


IT professionals of all skill levels are using PowerShell daily to perform a wide variety of tasks. Everything from automation of systems & database administration to help desk troubleshooting, PowerShell logging and auditing has a role to play. All this activity generates security concerns for an organization. You may find yourself asking:
- What are the commands being run during sessions?
- Are unapproved scripts being executed from insecure local or network sources?
- What modules are being used that could potentially harm?
In this article, you’ll learn about the options available for PowerShell logging and auditing. By the end of the article, you’ll be armed with enough knowledge to begin logging and auditing all the PowerShell actions occurring on the network. If this has you interested, keep reading!
Prerequisites
This article will be a hands-on tutorial. If you’d like to follow along, you’ll need a few things:
- A basic familiarity with Powershell
- Know how to access and edit registry entries
- Basic Group Policy knowledge
Non-Windows PowerShell logging is not covered in this article, but you can read about that topic here.
All examples are using PowerShell 5.1, Windows Server 2016, and Windows Server 2019.
Logging with Transcripts
There are lots of claims on the Internet about PowerShell being insecure. This couldn’t be farther from the truth. PowerShell provides mechanisms which allow SysOps and SecOps alike, to audit and log PowerShell activity.
One of the simplest PowerShell logging techniques is transcripts. Transcripts are a great way to save a current host session. This capability has been in PowerShell since 1.0 as part of the Microsoft.PowerShell.Host module.
With transcripts, you get all of the commands and output generated during a host session. Close the host session, and the transcript stops.
How to Turn on Transcripts with the Registry
While transcripts can be enabled by Group Policy, you can also enable them by editing the Windows Registry. For example, on Windows Server 2016, the registry key is located at HKLM:\SOFTWARE\WOW6432Node\Policies\Microsoft\Windows\PowerShell\Transcription and can contain values such as the ones shown below:

If you’d rather not open up regedit and manually edit the registry, below you will find a PowerShell function that will do all of the hard work for you. This function will set all of the appropriate registry values for you.
function Enable-PSTranscriptionLogging {
	param(
		[Parameter(Mandatory)]
		[string]$OutputDirectory
	)

     # Registry path
     $basePath = 'HKLM:\SOFTWARE\WOW6432Node\Policies\Microsoft\Windows\PowerShell\Transcription'

     # Create the key if it does not exist
     if(-not (Test-Path $basePath))
     {
         $null = New-Item $basePath -Force

         # Create the correct properties
         New-ItemProperty $basePath -Name "EnableInvocationHeader" -PropertyType Dword
         New-ItemProperty $basePath -Name "EnableTranscripting" -PropertyType Dword
         New-ItemProperty $basePath -Name "OutputDirectory" -PropertyType String
     }

     # These can be enabled (1) or disabled (0) by changing the value
     Set-ItemProperty $basePath -Name "EnableInvocationHeader" -Value "1"
     Set-ItemProperty $basePath -Name "EnableTranscripting" -Value "1"
     Set-ItemProperty $basePath -Name "OutputDirectory" -Value $OutputDirectory

}
Starting and Stopping Transcripts
The easiest way to get started with transcripts is to use just two cmdlets; Start-Transcript and Stop-Transcript. These two simple commands are the easiest way to begin and stop recording PowerShell console activity.
To start a transcript or log of commands used during a host session, type the following code into the terminal and press Enter:
# Works with Windows PowerShell 1.0 to 5.1 and PowerShell 7
Start-Transcript
Now enter a generic command to produce some verbose output in the session. Use the code below to get the current date-time:
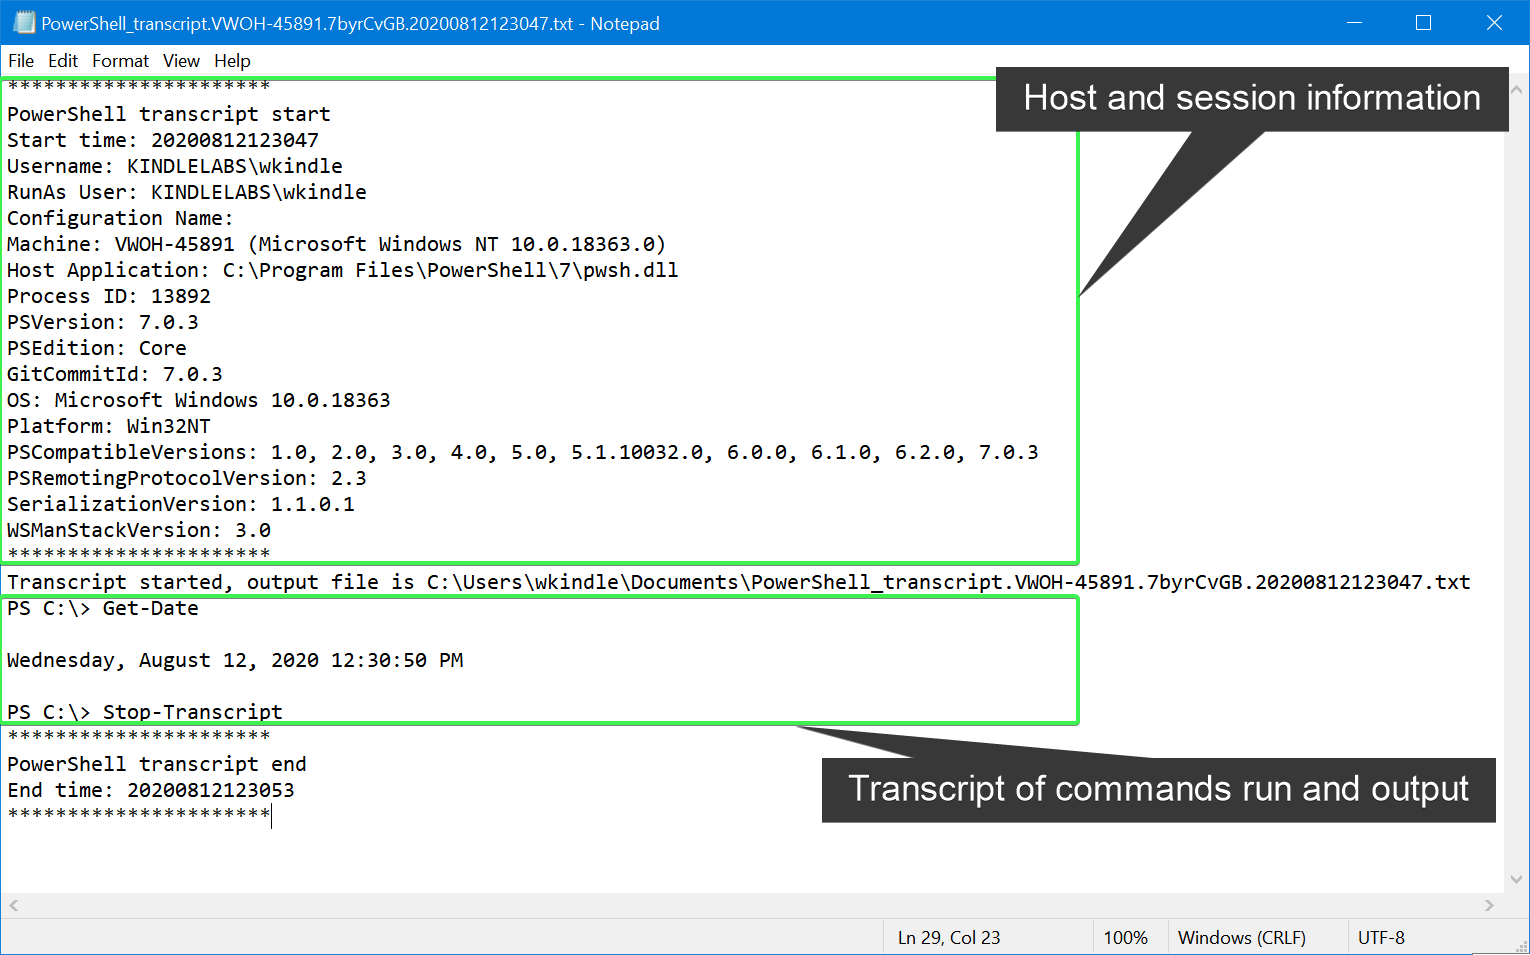
Get-DateYou should have similar output as shown in the screenshot below:

At this point, that command the output has been saved to the text file where you defined it in the registry. To end the transcript, close the host session or use the Stop-Transcript cmdlet.
Using the
Stop-Transcriptcmdlet shows intent. You can also “stop” a transcript by simply closing the PowerShell console.
The Get-Date cmdlet and the output were recorded in the background to a plain-text file, including the Stop-Transcript cmdlet.
By default, transcripts are saved in the %userprofile%\Documents folder and are named PowerShell_transcript.[hostname].[random_characters].[timestamp].txt . This naming convention becomes useful when transcripts are centrally stored as it prevents accidental overwrite and makes searching PowerShell logs easier.
Anatomy of a PowerShell Transcript
Every transcript has a certain “schema” or way it is structured. Take a look at the PowerShell transcript file which was saved in using default parameters. You can see all of the common attributes you can expect from the transcript.
Each transcript created using default parameters will include host session information, start time, username, PowerShell and OS version, and machine name. Following this useful information, you see the commands that were run, the output generated, and the final command Stop-Transcript, which ends the transcript and writes a final timestamp to the transcript file.
When using the Start-Transcript cmdlet, there is no hard limit to only using the default naming convention or path. A transcript can be saved using any name to any writable location.
Try it now. Use the -Path parameter, as shown in the example below. This code snippet will create a folder at C:\My_PowerShell_Transcripts and immediately begin recording a transcript in the Get-Date-Transcript.txt file.
$null = New-Item -Path C:\My_PowerShell_Transcripts -ItemType Directory -ErrorAction Ignore
Start-Transcript -Path 'C:\My_PowerShell_Transcripts\Get-Date-Transcript.txt'
After running some commands, stop the transcript again (Stop-Transcript) and then navigate to the directory specified in the example above. You should now see your transcript, as shown below:

Adding Parameters to Start-Transcript
Previously, you learned about using Start-Transcript with no parameters but this cmdlet also has some other handy parameters to customize the behavior such as:
NoClobber– prevents accidental overwritesAppend– allows PowerShell to write to an existing transcript fileIncludeInvocationHeader– adds the precise timestamp each command was run.UseMinimalHeader– a v6.2 parameter that removes host session detail information included by default.
You can Read the docs for a full list of optional parameters here.
Limitations of Transcripts
Transcripts are handy but you sometimes cannot see the end-to-end activity of what’s going on in a script. Let’s take a look at an example script called Get-Date.ps1.
The Get-Date.ps1:
- Returns the current date/time with the
Get-Datecmdlet - Prints network connectivity test results to the console with the
Test-NetConnectioncmdlet - Defines an array of numbers
- Loops over each number in the array initiating a command that doesn’t produce any output and opening a new PowerShell process.
# Run Get-Date as a script

# Produce date to host session
Get-Date

# Test network with some output to host session
Test-NetConnection localhost

#uh-oh
$numbers = 1..10

# What's this?
Foreach ($number in $numbers) {

    # Doing something that doesn't produce console output
    [System.Console]::Beep(6000,500)

    Start-Process pwsh.exe

    # host session runs this but it produces no output
    # and is not logged in the transcript!
}
Looking at the transcript just created, it’s not apparent that the Get-Date.ps1 script did extra stuff besides Get-Date and Test-NetConnection:
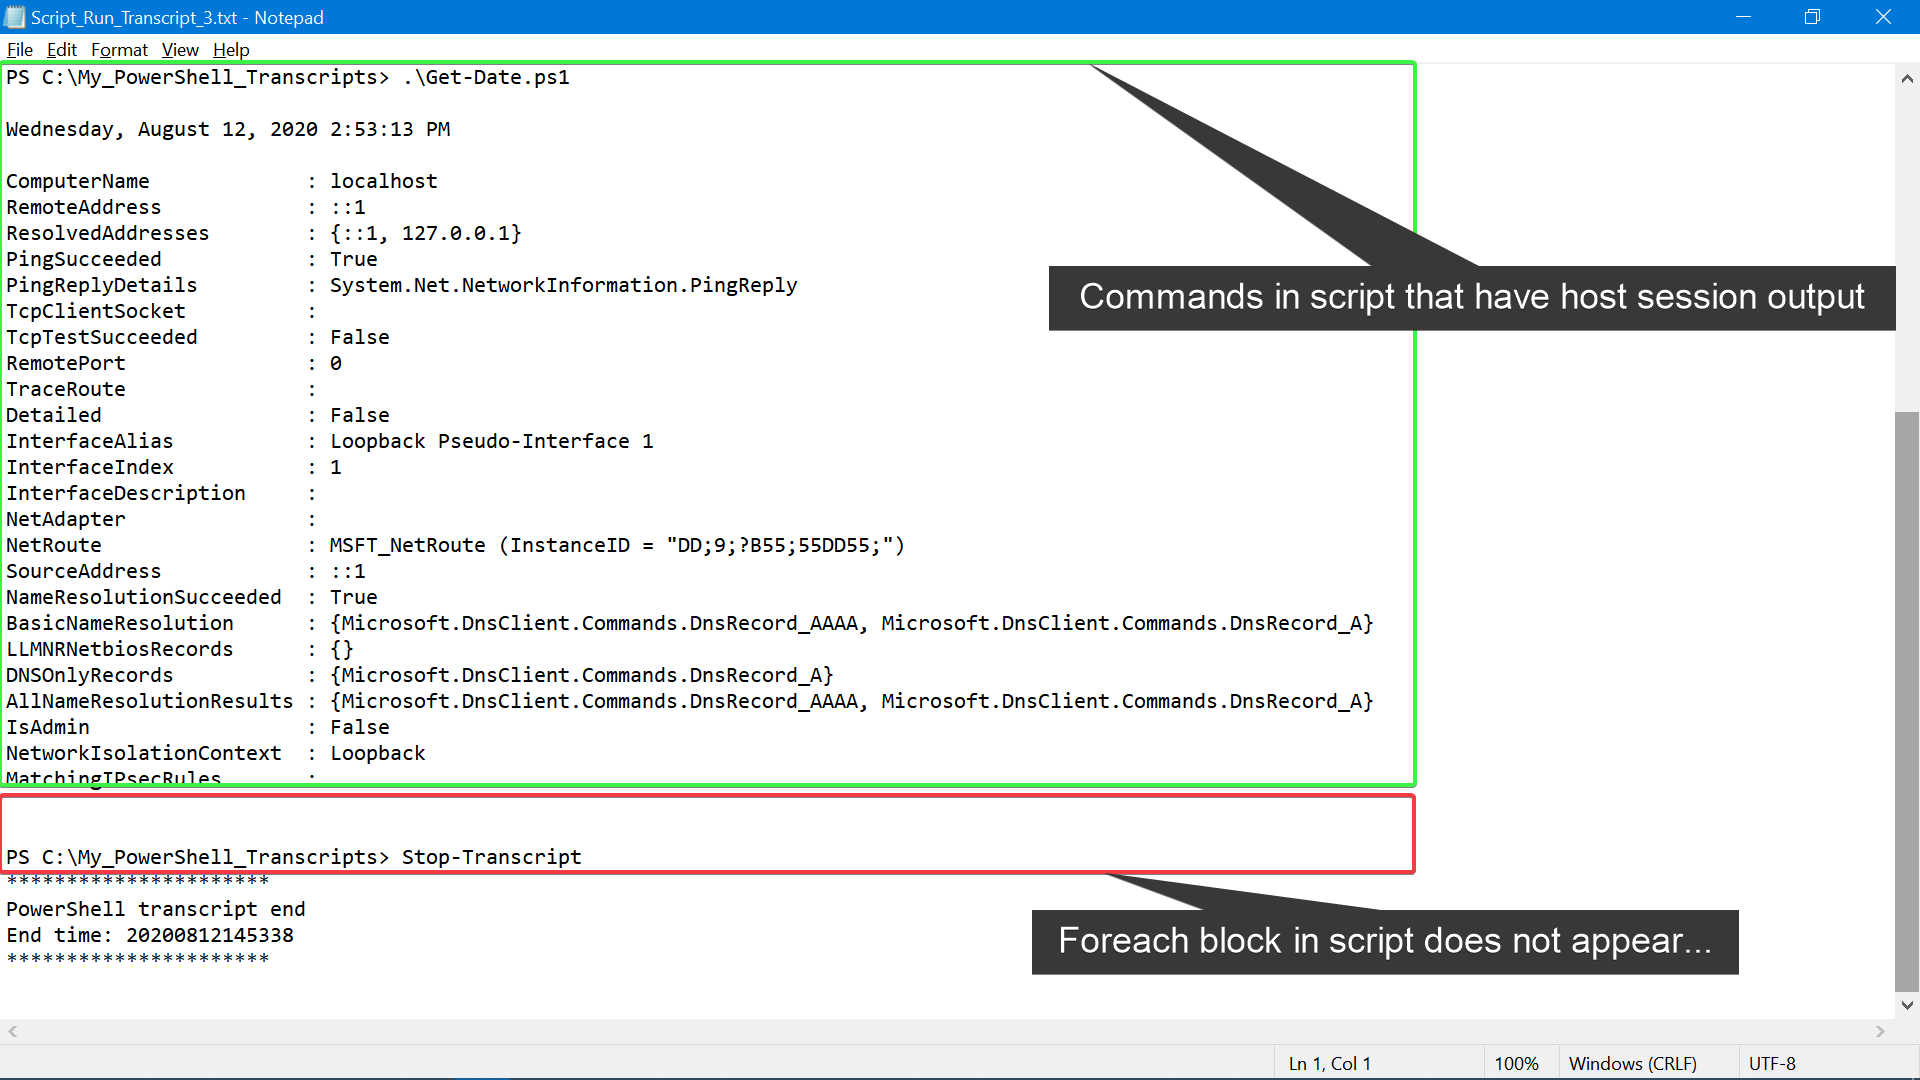
The downside to this PowerShell logging method is that it only works for the current user’s host session. If a script is executed produces no output to the host session, there’s no log of what actions the said script took. Transcripts, while providing some PowerShell logging capability, were never meant to encapsulate all PowerShell script activity.
PowerShell script block logging takes care of this issue and is the topic for the next section.
Script Block Logging
When enabled, script block logging will record everything that PowerShell does. Script block logging is implemented using Group Policy or by editing the Windows Registry directly. Windows 10 adds new functionality called Protected Event Logging, giving you the ability not to log sensitive information such as Personally Identifiable Information (PII) or other sensitive data such as credentials. Protected Event Logging is out of scope for this article, but you can read more about it here.
Editing the registry directly is a good solution for standalone systems or workgroup settings. If you can use Group Policy, configure Script Block Logging and Protected Event Logging there.
Enable Script Block Logging Using Windows Registry
To enable Script Block Logging using the Windows Registry, Copy the function below into your PowerShell session and press Enter:
function Enable-PSScriptBlockLogging
 {
 # Registry key $basePath = 'HKLM:\Software\Policies\Microsoft\Windows\PowerShell\ScriptBlockLogging'

# Create the key if it does not exist if(-not (Test-Path $basePath))

{

$null = New-Item $basePath -Force

# Create the correct properties      New-ItemProperty $basePath -Name "EnableScriptBlockLogging" -PropertyType Dword

}

# These can be enabled (1) or disabled (0) by changing the value Set-ItemProperty $basePath -Name "EnableScriptBlockLogging" -Value "1"
 }
Now run the function like you would a normal cmdlet, type the function name and press Enter:
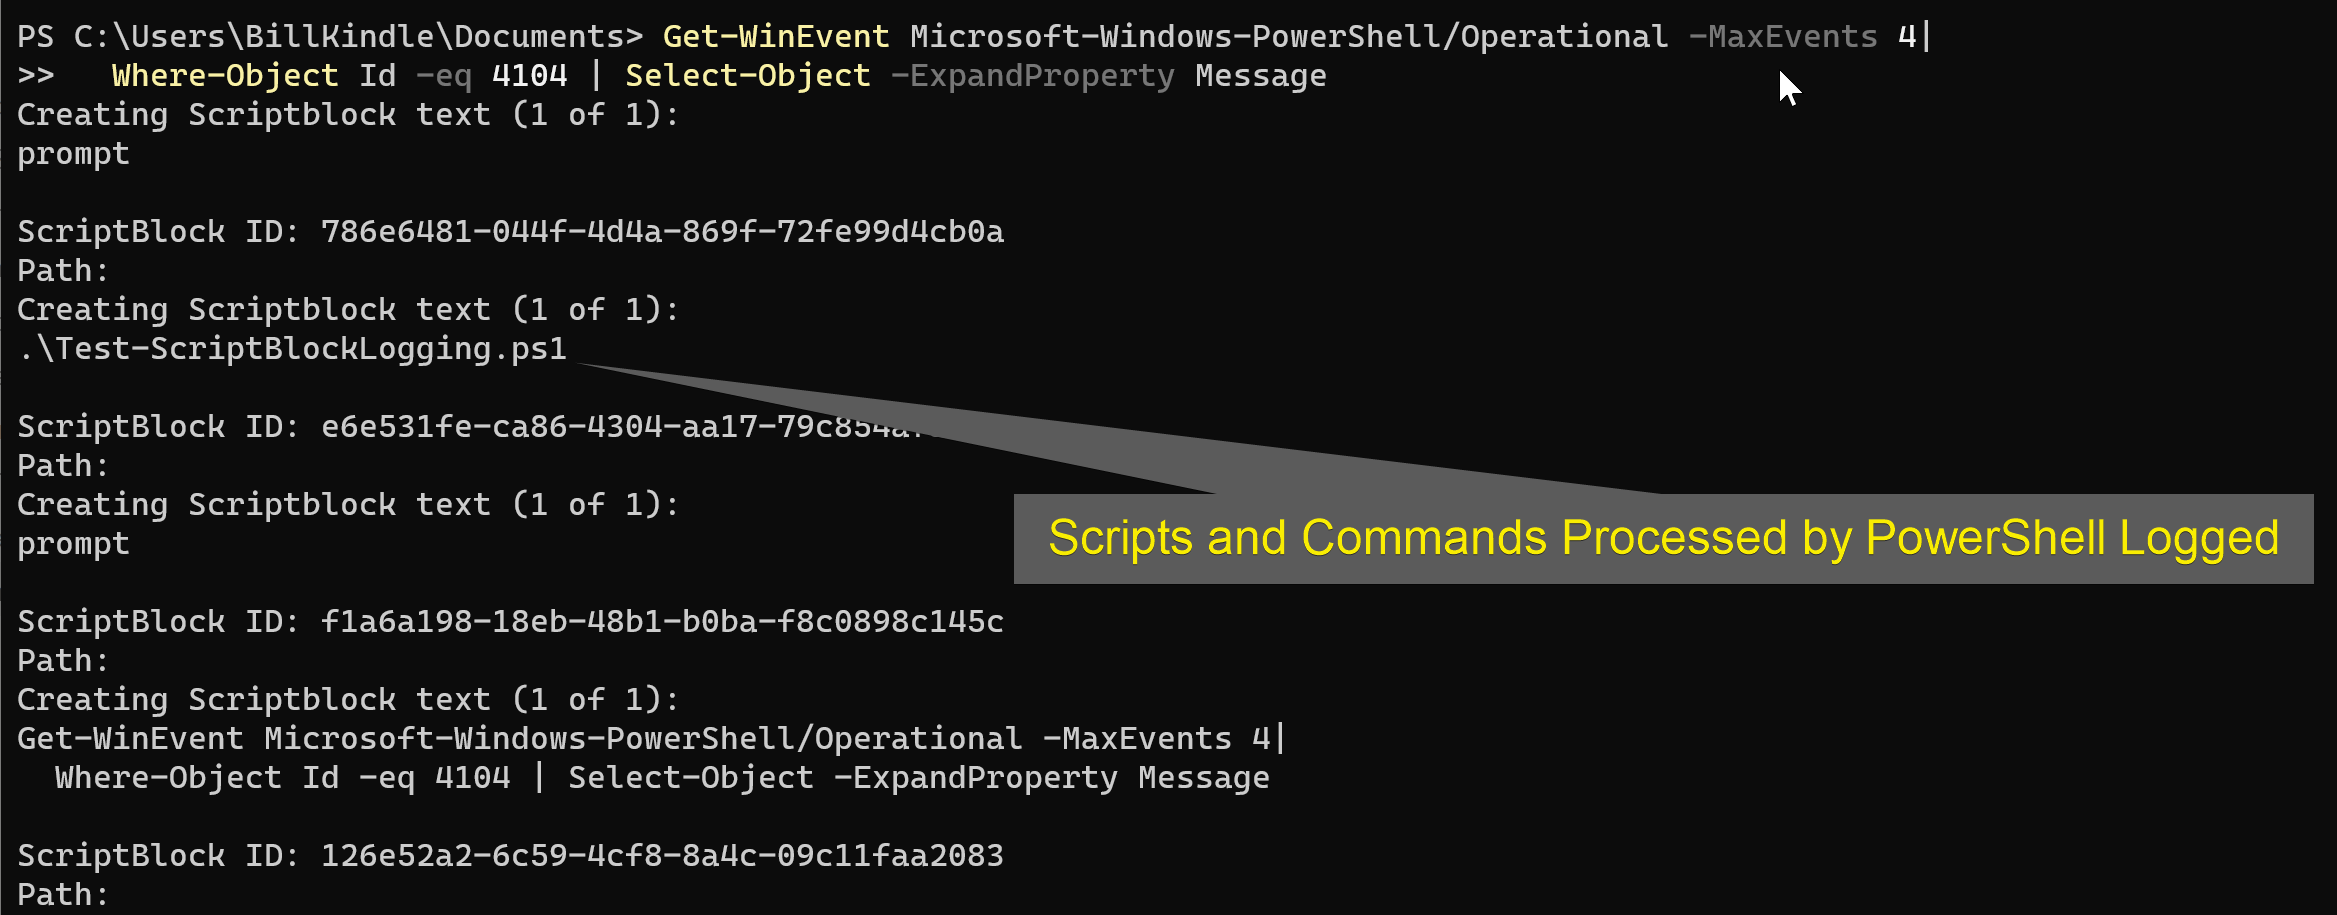
Enable-PSScriptBlockLoggingScript Block Logging is enabled. Now let’s test it out. Try running some cmdlets or a few of your scripts. Once you’ve done that, use the following code to inspect the Script Block Logging events:
# Viewing just the message which shows scripts, cmdlets run
Get-WinEvent Microsoft-Windows-PowerShell/Operational -MaxEvents 4 |
	Where-Object Id -eq 4104 | Select-Object -ExpandProperty Message
Below is an example of what your output could look like. You may see much more information depending on what commands or scripts you ran. In this screenshot, you see a script I ran, and the above command to view the log entries:
You can still view and audit this information using the traditional Windows Event Viewer and navigating to Applications and Services Logs > Microsoft > PowerShell > Operational. Here’s an example of how the log appears in Windows Event Viewer:
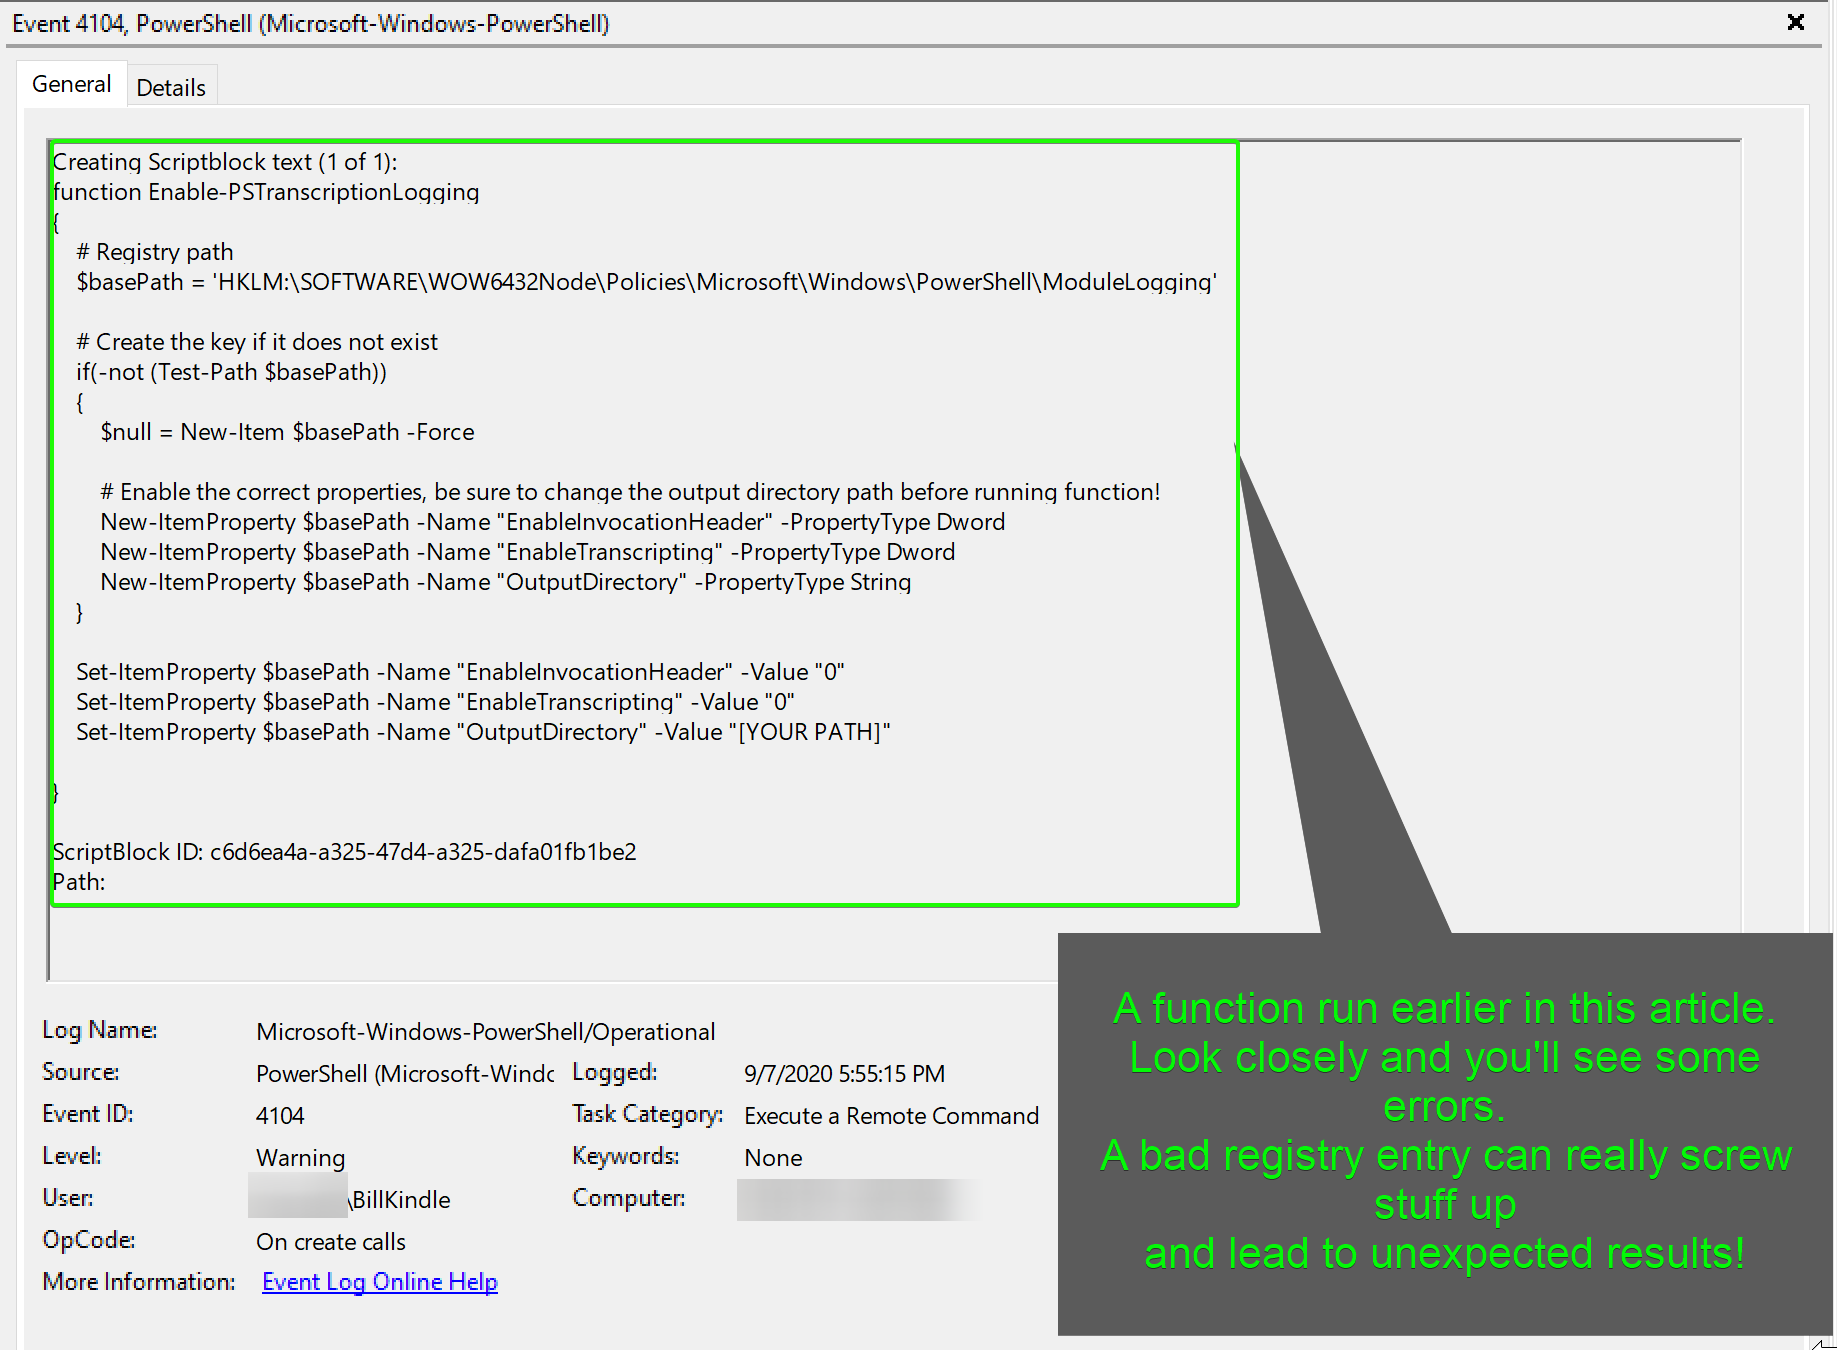
The above example is from a system change that created a bad set of registry entries, leading to unexpected results. Luckily ScriptBlock logging had been turned on ahead of time. The issue was traced to a naming issue in some code that was run.
It’s a good idea to have a centralized log collection point or SIEM in place if this information will be used for auditing purposes.
Now that you are getting visibility into what PowerShell is processing on your system, it’s time to audit and log what modules PowerShell is using during processing commands and scripts in the next section.
Module Logging
When you need to audit specific PowerShell modules being used on a host, Module Logging is the answer. You enable Module Logging in much the same way as you allow Script Block Logging.
Module logging will generate a lot more events than ScriptBlock logging does. You will want to consider the implications and develop a strategy for its use.
Enable Module Logging Using Windows Registry
Not every environment has a Group Policy available. So what do you do in these environments if you need to audit and log PowerShell module usage? You use the Windows Registry!
To enable Module Logging using the Windows Registry, use the following PowerShell function:
# This function checks for the correct registry path and creates it
# if it does not exist, then enables it.
function Enable-PSModuleLogging
{

    # Registry path
    $basePath = 'HKLM:\SOFTWARE\WOW6432Node\Policies\Microsoft\Windows\PowerShell\ModuleLogging'

    # Create the key if it does not exist
    if(-not (Test-Path $basePath))
    {

        $null = New-Item $basePath -Force
        # Create the correct properties
        New-ItemProperty $basePath -Name "EnableModuleLogging" -PropertyType Dword

    }

    # These can be enabled (1) or disabled (0) by changing the value
    Set-ItemProperty $basePath -Name "EnableModuleLogging" -Value "1"

}
Next, run the PowerShell function:
Enable-PSModuleLoggingWhen module logging is enabled, modules are not automatically monitored. You have to specify which modules to log. There are a couple of ways to do this. The adhoc way is to use the Pipeline Execution Details property and the Windows Registry or Group Policy for more permanent scenarios.
You can do this for specific modules or for all modules. It is not recommended to only monitor specific modules.
To log module usage in a single session with PowerShell, you have first to import the module you wish to audit. Then, using the member property LogPipelineExecutionDetails, setting the value to $True. By default, this property is $False for all modules.
For example, let’s say you want to log the module VMware.PowerCLI. You’d do so by entering the following code and press Enter:
# Assuming you have already imported a module
(Get-Module -Name VMware.PowerCLI).LogPipelineExecutionDetails = $true
After running the above command, each time you invoke the VMware.PowerCLI module in PowerShell, a log entry is created. However, this method is only valid for the current session. Once you close PowerShell, the logging stops until you start it again.
The pipeline execution details can be found in the Windows PowerShell event log as Event ID 800.
Here’s what the log looks like when viewed using the Windows Event Viewer:

To view these log entries with PowerShell, you would run the following code:
Get-EventLog 'Windows PowerShell' -EntryType Information -InstanceId 800If you are logging all PowerShell modules, you are going to see a lot of entries. You can filter them down to your liking. However, that is out of the scope of this article.
If you prefer to log all the modules, for all the users, all the time, then you need to edit the Windows Registry once more to add a new key value to the Module Logging key that you created earlier in this section.
To add a new registry key value for ModuleNames, use the PowerShell function below:
# This function creates another key value to enable logging
# for all modules
Function Enable-AllModuleLogging
{
    # Registry Path     $basePath = 'HKLM:\SOFTWARE\WOW6432Node\Policies\Microsoft\Windows\PowerShell\ModuleLogging\ModuleNames'

    # Create the key if it does not exist
    if(-not (Test-Path $basePath))
    {
	$null = New-Item $basePath -Force
    }
    # Set the key value to log all modules
    Set-ItemProperty $basePath -Name "*" -Value "*"
}
After you press Enter, you run the function just as you’ve done earlier in this section:
Enable-AllModuleLoggingPress Enter once more, and now all PowerShell modules will be logged each time used.
Enable Logging & Transcripts Using Group Policy
You don’t have to edit the Windows Registry if you choose not to. If you have an environment where you can use Group Policy, it may be easier to use the following policy objects to implement logging and auditing.
Start by opening the Group Policy Management console and create a new Group Policy Object (GPO). Then edit the policy as follows:
- Navigate to Computer Configuration > Administrative Templates > Windows Components > Windows PowerShell. You should see the same settings as shown in the below example:
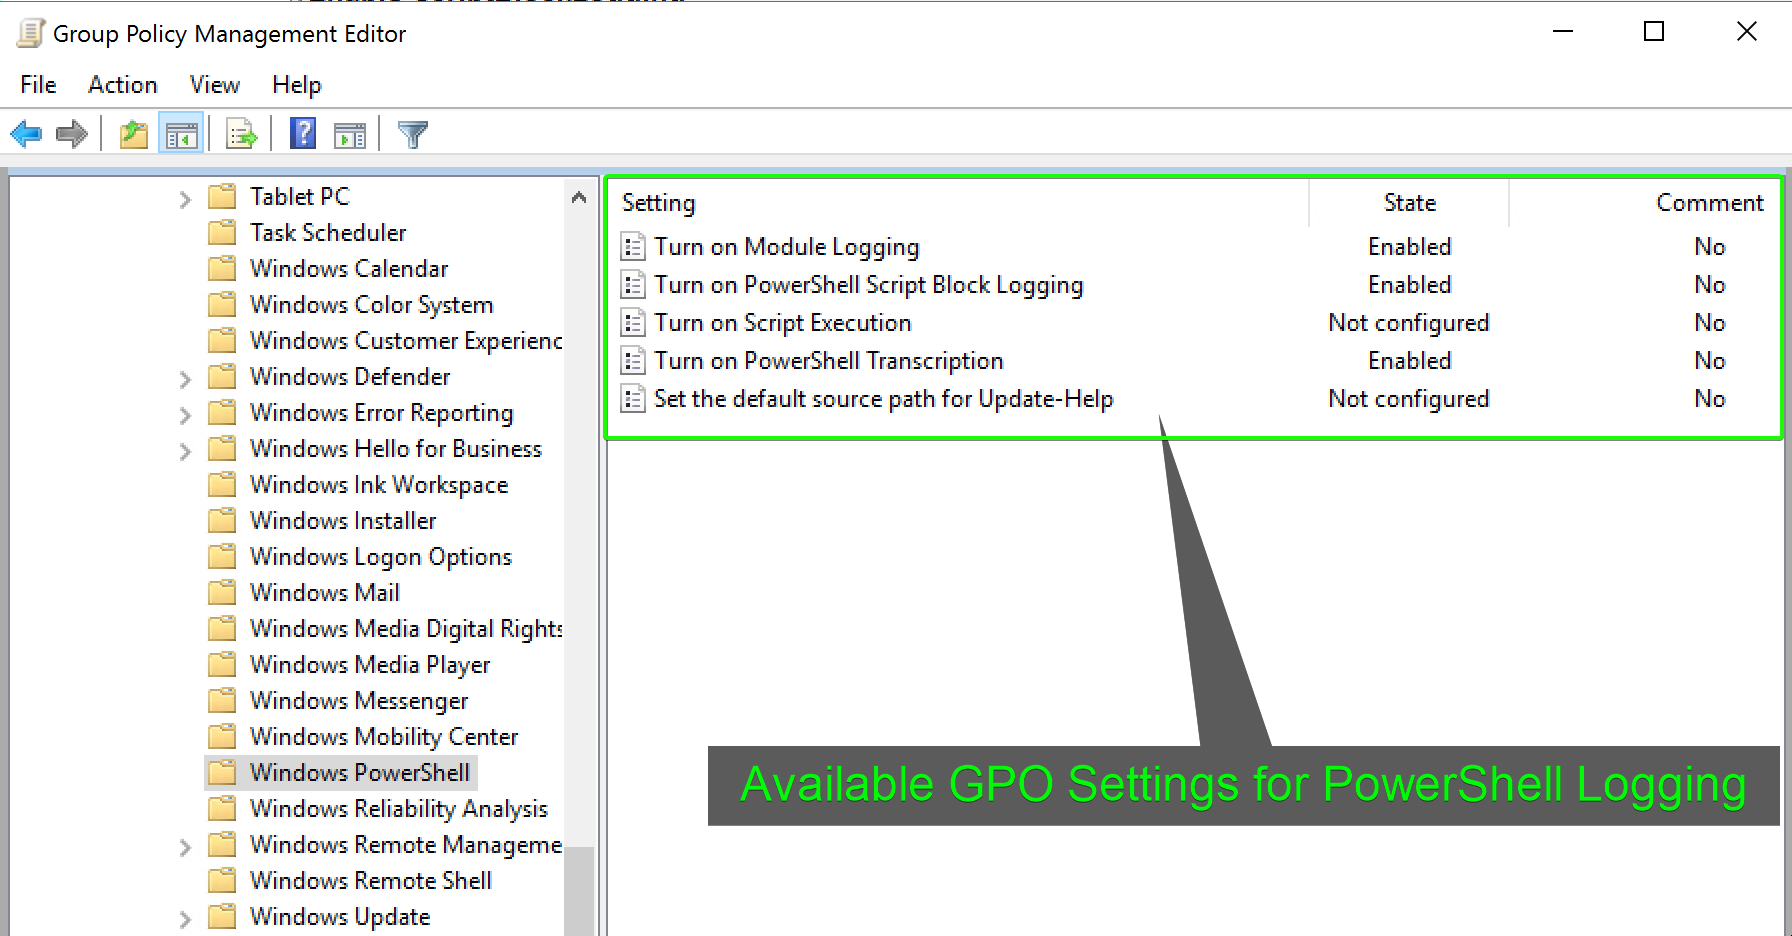
2. Enable your choice of the following settings by changing their state:
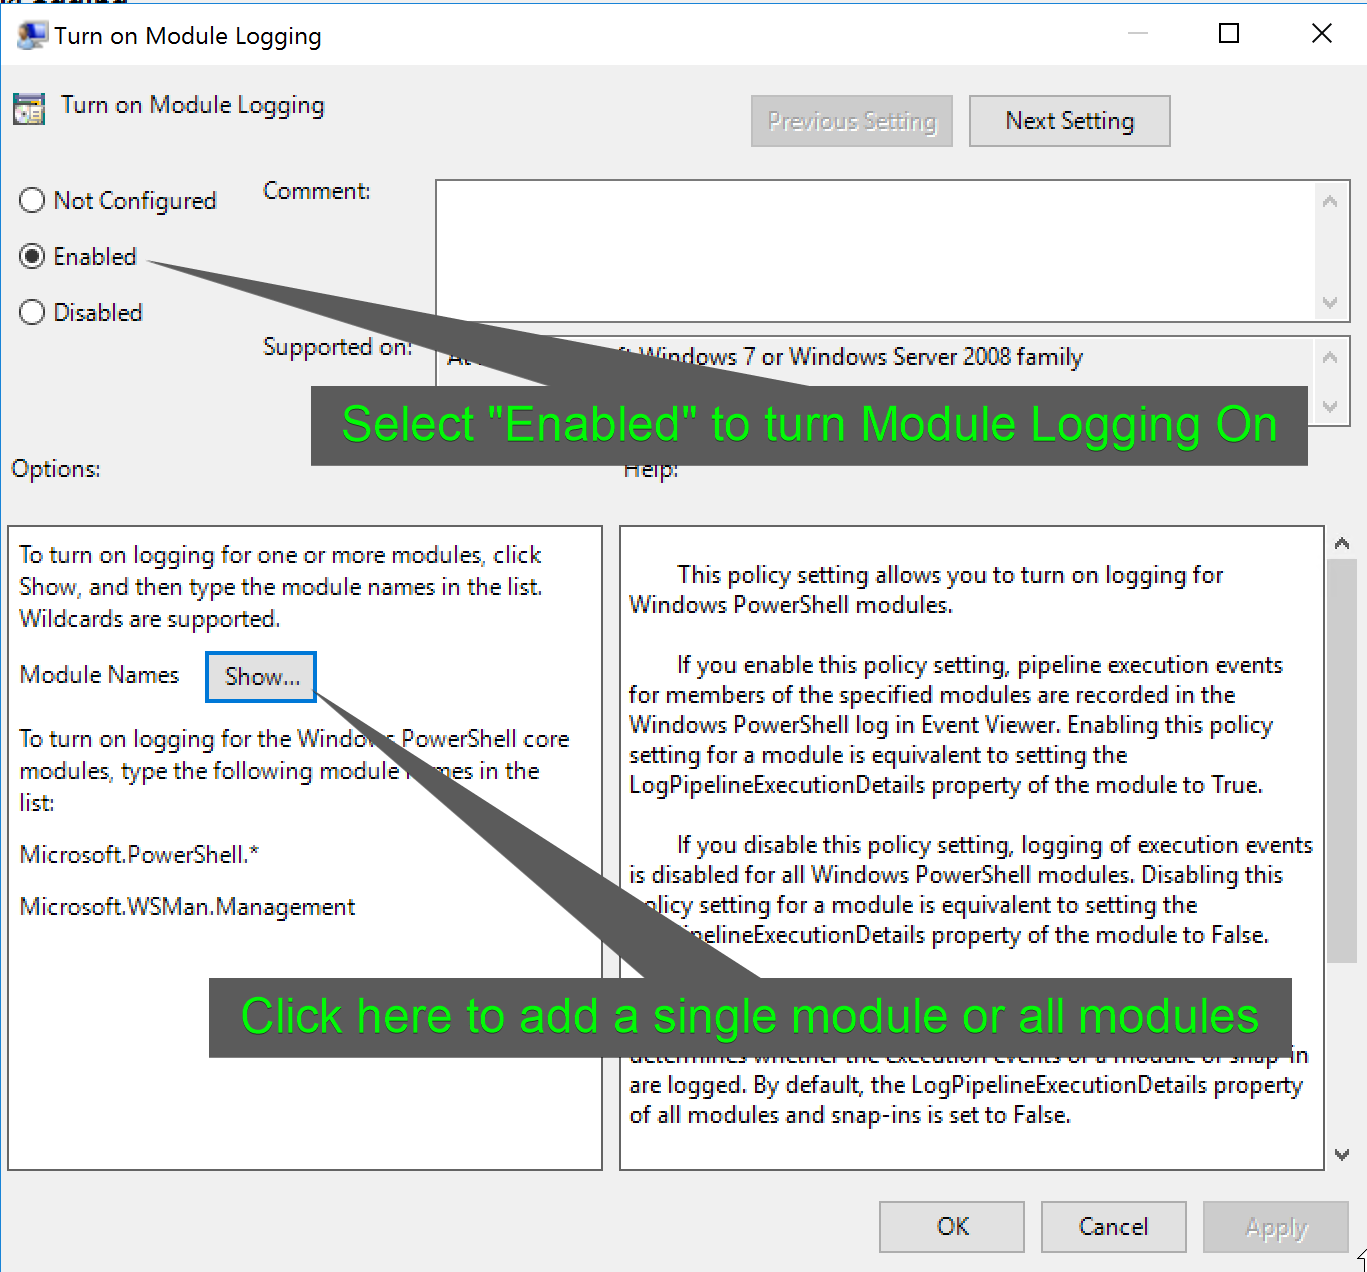
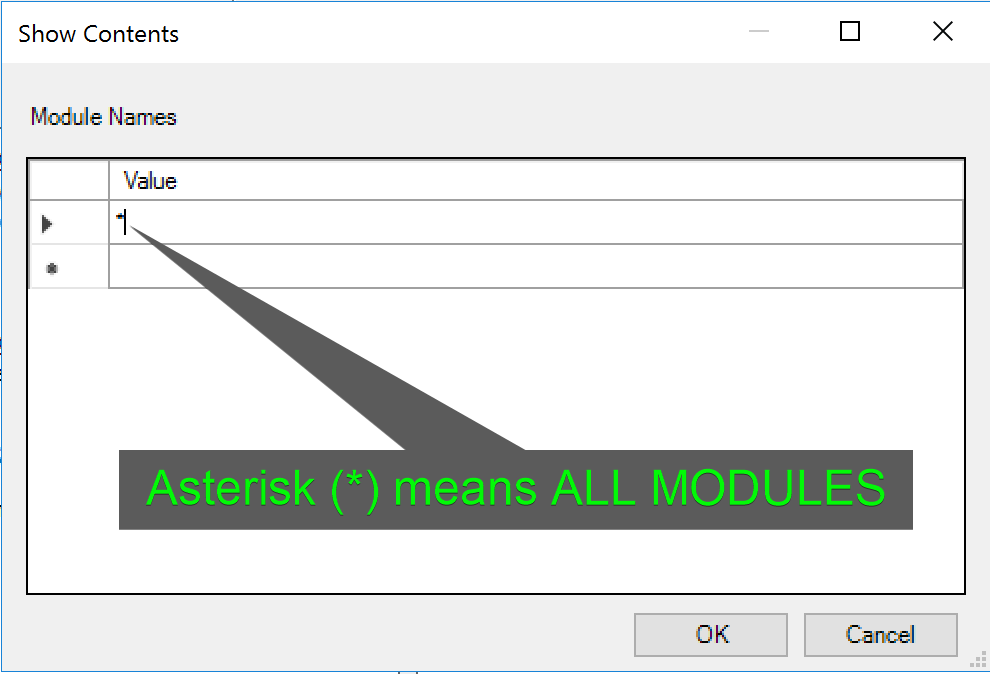
- Turn on Module Logging
Be sure to enable the logging of all modules by using an asterisk (*) for the value. Alternatively, you could list out specific modules by their name too.
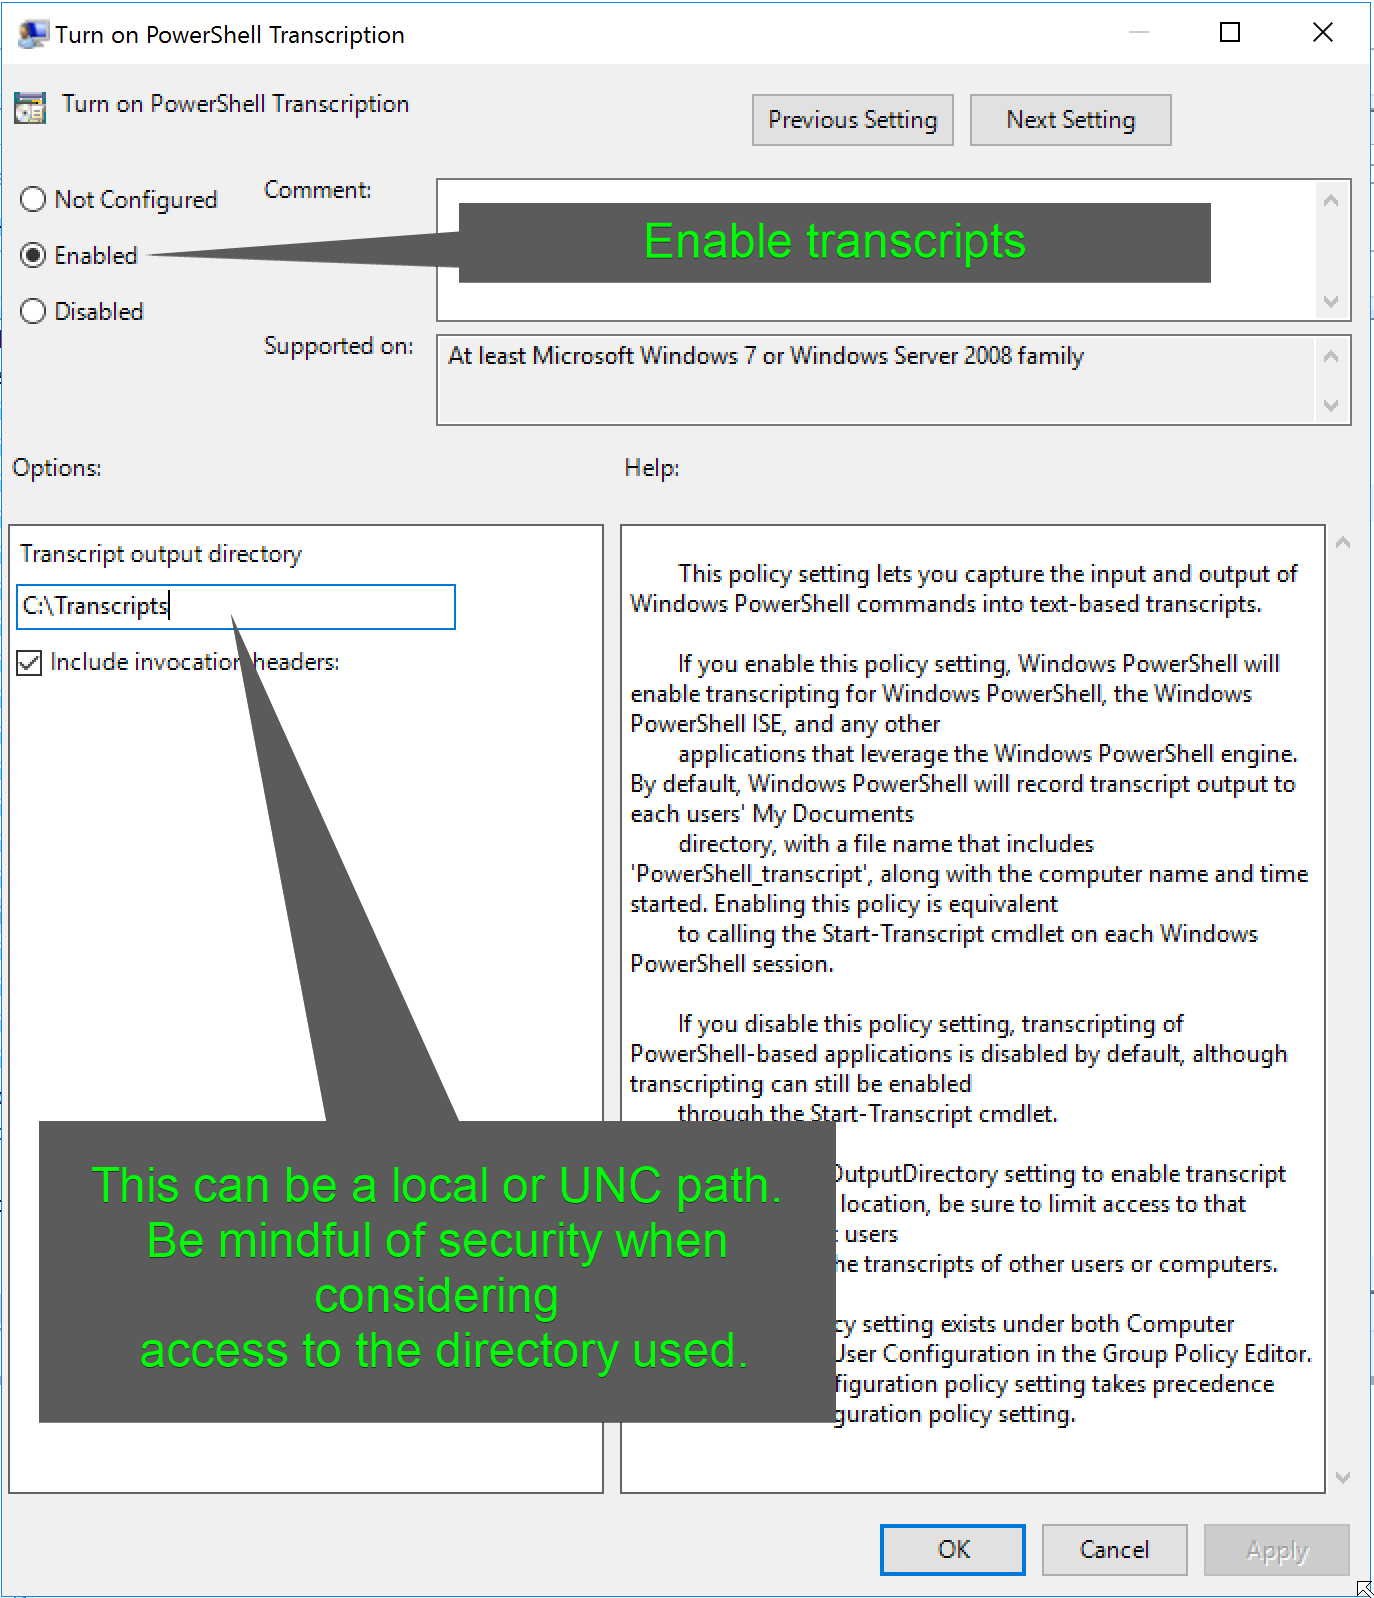
- Turn on Transcripts
3. Link the new GPO to the Organizational Unit (OU) that contains the computer accounts you want to monitor or audit.
Remember to reboot the computers this policy is applied too.
That’s all you have to do to begin auditing and logging your PowerShell environment using Group Policy.
Conclusion
With this new knowledge, you’ve just upped your security game with PowerShell administration. PowerShell logging and auditing capabilities make using PowerShell a very poor choice for bad actors trying to do bad things. The methods discussed in this article enable you to master the art of PowerShell Logging and Auditing, making you a better SecOps or SysOps professional. You’ve learned how to create transcripts, log script block execution, and module details using the Windows Registry, Group Policy and through PowerShell itself. You are encouraged to look through the additional resource links below to further your PowerShell logging and auditing knowledge. Now go forth, and fortify your PowerShell environments by logging and recording all the PowerShell things!
Additional Resources
about_Group_Policy_Settings-PowerShell
Group Policy to Registry Reference
Threat Research – Greater Visibility Through PowerShell Logging (FireEye)


