

This article has been updated for 2023!
Scripts can make decisions. How? By using a concept called conditional logic. The PowerShell if statement and the if/else constructs are the common ways to define conditions.
Not a reader? Watch this related video tutorial!When you write PowerShell scripts, you do so with a specific task or task in mind. But, an operation can have multiple possible actions based on one or more conditions. This situation is where the PowerShell If statement construct comes in.
In this article, you will learn the PowerShell If-Else construct and understand its syntax and how it works. You will also learn some ways you can use PowerShell If statement to add conditional logic handling in your scripts from the examples.
Understanding the PowerShell If Statement Syntax
The PowerShell if-else construct evaluates one or more conditional expressions. Below you’ll see the If statement syntax. This style is often called flow control.
if (<test1>)
    {<statement list 1>}
[elseif (<test2>)
    {<statement list 2>}]
[else
    {<statement list 3>}]
As you can see from the syntax above, each test is enclosed in a parenthesis (). Tests can make use of different operators, such as comparison operators and logical operators,
The statement lists contain the code intended to run if the result of the test evaluates to true.
Then, there are three possible statements in an If statement group. These are the IF, ELSEIF, and ELSE statements.
- The
ifstatement contains the first test to evaluate, followed by the first statement list enclosed inside the curly brackets{}.The PowerShell if statement is the only statement required to be present. - The
elseifstatement is where you add conditions. You can add multiple ElseIf statements when you have multiple conditions. PowerShell will evaluate each of these conditions sequentially. - The
elsestatement does not accept any condition. The statement list in this statement contains the code to run if all the prior conditions tested are false.
Understanding the PowerShell If Statement Logic Flow
To further understand how the PowerShell If-Else works, familiarize yourself with its logic flow. The diagram below illustrates the basic flow of the PowerShell If-Else.
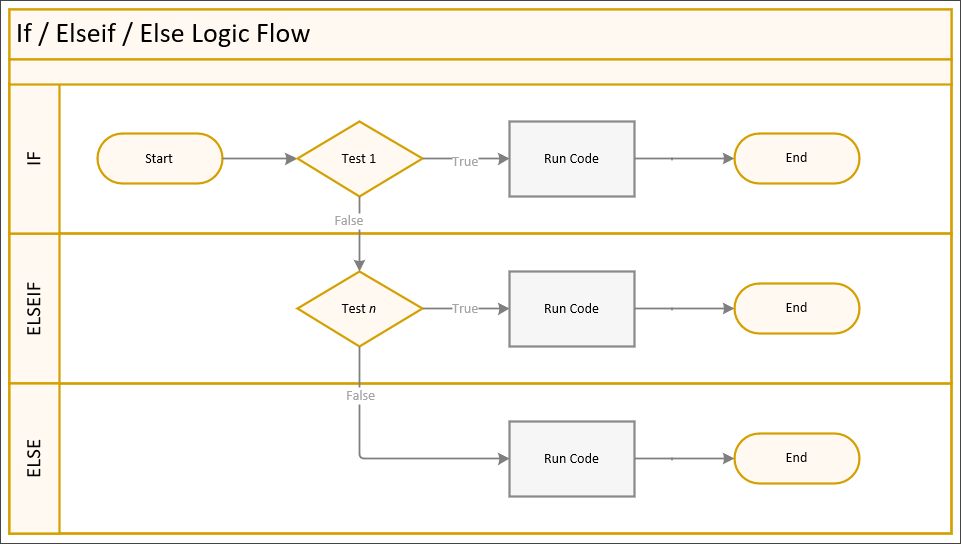
When the if statement runs, PowerShell runs through each condition evaluating if the code returns true or false. A summary of the behavior is below:
- PowerShell evaluates the condition in Test 1.
- If the result of Test 1 returns true, the code inside the If statement list will run, then PowerShell exits the If statement.
- If the result of Test 1 returns false, PowerShell continues to evaluate the condition (Test n) in the next ElseIf statement.
- If the result of Test n returns false, PowerShell continues to evaluate the condition (Test n) in the next ElseIf statement, if another ElseIf statement exists -OR-
- If Test n’s result returns false, the code in the Else statement runs, and PowerShell will exit the If statement -OR-
- If Test n’s result returns true, the code in the ElseIf statement runs, and PowerShell will exit the If statement.
Using the PowerShell If-Else Statement
The next sections are several examples of how the PowerShell If statement is used when writing scripts. The techniques you will learn can guide you in using the If statement should you encounter a real-life situation that requires its use.
Single If-Else Condition
Starting with the most basic is the single PowerShell If statement. You should use a single if statement when there’s only one condition to test.
The example below tests whether the value of the $num variable is greater than 10. If the result is true, the result saying "$num is greater than 10" will be displayed on the screen. If the result is false, PowerShell does nothing because there is only one condition to test.
$num = 11
if ($num -gt 10) {
    "$num is greater than 10"
}
If you check for just a specific value, such as
if ($Value) { }then PowerShell will test if the$Valueis not$Null,0,$False, an empty string, or an empty array.
Pasting the code above into PowerShell will give you the result shown below.

Now, you can add the Else statement if you want to add a default “fallback” action rather than just letting PowerShell do nothing when the test result is false.
In the example below, the code in the Else statement will run if the value of the $num variable is NOT greater than 10.
$num = 9
if ($num -gt 10)
{
    "$num is greater than 10"
}
else
{
    "$num is NOT greater than 10"
}
Running the modified code in PowerShell gives you the output shown below.

Starting with PowerShell 7.0, a new syntax for the If statement has been introduced using a ternary operator. Single If statements can make good use of this new syntax.
Using the same example above, this is how the code would look with the ternary operator.
$num = 11
$num -gt 10 ? "$num is greater than 10" : "$num is NOT greater than 10"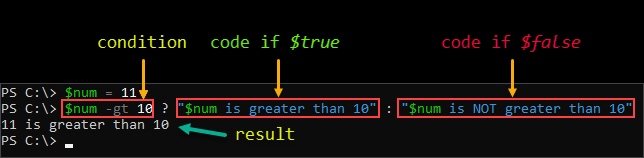
Testing for $Null in a PowerShell If Statement
You may think that testing for a $Null condition is straightforward. But, the side that you place the $Null value on is important as it may not result in the same in every condition. It is best practice to always put the $Null condition on the left like so.
$Null -NE $ValueIf you put the $Null test on the right-hand side, and the left-side value is a list, such as an array, then $Null will act as a filter. As you can see from the example below, if $Null is placed on the left-hand side, you will have consistent boolean results.
$List = @(1,2,2,3,4)
$List -NE $Null
$List -EQ $Null
$Null -NE $Null
$Null -EQ $Null
Multiple If-Else Conditions with ElseIf
When evaluating multiple conditions, you need to add one or more ElseIf statements. Each ElseIf statement contains the test expression and its code to run.
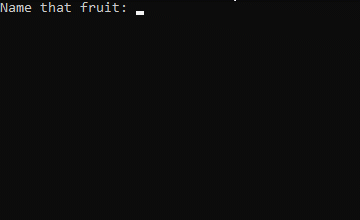
The script below, when executed, will keep on prompting for a fruit name until the CTRL+C keystroke is issued, or the user inputs the letter “X“.
Then, the If statement will go through each condition in sequence until it finds a match. If the input did not match any of the conditions, the code inside the Else statement would be executed.
While ($fruit -ne "X") {
    $fruit = Read-Host "Name that fruit"

    if ($fruit -eq 'Apple') {
        'I have an Apple'
    }
    elseif ($fruit -eq 'Banana') {
        'I have a Banana'
    }
    elseif ($fruit -eq 'Orange') {
        'I have an Orange'
    }
    else {
        'Sorry, that fruit is not in the list'
    }
}
Below is a demonstration of how the script above behaves when running in PowerShell.
Reporting Free Disk Space Status
Free disk space reporting is one task that is common for system admins. The usual way of reporting the space information of fixed disks on a Windows machine revolves around the code below.
Get-CimInstance -ClassName CIM_LogicalDisk | Where-Object {$_.DriveType -eq 3}The information the code above will return would look like the one shown in this next screenshot.

As you can see, the output above shows the drive letter, free space values, and other properties. While the output above is fine, it is not intuitive. How the information is presented does not indicate whether the disk space is in a critical or warning state or normal.
Using a PowerShell If Statement to Improve Code
A more intuitive output can be achieved using the PowerShell If-Else statement by adding conditions to check if the free space is over or below certain thresholds. And these thresholds will define the status of the free disk space.
The example script below performs the following:
- Using the variable’s value of
$Critical, define the threshold to which the percent of free space will be tagged as critical. - Using the value of the variable
$Warning, define the threshold to which the percent of free space will be tagged as warning. - Get all fixed disk information from the local machine
- Loop through all the disk information to determine free space and tag its status.
- If the free space percentage is higher than the value of the
$Warningvariable, the disk space status is tagged as normal. - If the free space percentage is higher than the value of the
$Criticalvariable, the disk space status is tagged as warning. - If the free space percentage is less than or equal to the value of the
$Criticalvariable, the disk space status is tagged as critical.
- If the free space percentage is higher than the value of the
- Compose the object properties
'Drive Letter','Drive Name','Total Space (GB)','Free Space (GB)','Free Space (%)', and'Status'. - Return the final report.
Copy the code below and save the script with the filename Get-DiskSpace.ps1. Do not forget to change the values of the $Critical and $Warning variables to test with different thresholds.
# Define thresholds in percentage
$Critical = 20
$Warning = 70

# Get all Fixed Disk information
$diskObj = Get-CimInstance -ClassName CIM_LogicalDisk | Where-Object { $_.DriveType -eq 3 }

# Initialize an empty array that will hold the final results
$finalReport = @()

# Iterate each disk information
$diskObj.foreach(
    {
        # Calculate the free space percentage
        $percentFree = [int](($_.FreeSpace / $_.Size) * 100)

        # Determine the "Status"
        if ($percentFree -gt $Warning) {
            $Status = 'Normal'
        }
        elseif ($percentFree -gt $Critical) {
            $Status = 'Warning'
        }
        elseif ($percentFree -le $Critical) {
            $Status = 'Critical'
        }

        # Compose the properties of the object to add to the report
        $tempObj = [ordered]@{
            'Drive Letter'     = $_.DeviceID
            'Drive Name'       = $_.VolumeName
            'Total Space (GB)' = [int]($_.Size / 1gb)
            'Free Space (GB)'  = [int]($_.FreeSpace / 1gb)
            'Free Space (%)'   = "{0}{1}" -f [int]$percentFree, '%'
            'Status'           = $Status
        }

        # Add the object to the final report
        $finalReport += New-Object psobject -property $tempObj
    }
)

return $finalReport
You may also assign the result of the if/else condition to a variable, i.e.
$Status = if ($percentFree -gt $Warning) { 'Normal' }to potentially make a shorter condition.
Once the script is saved, test it by calling its name in PowerShell. Below is a sample demonstration of how this script works.
As you can see from the output, the status for each disk is determined by the free disk space percentage, which was the result of using multiple conditions with PowerShell If-Else.
Multiple and Nested If-Else
Let’s say you have an if-else statement with a condition defined in the else block. When the if-else statement runs, the else block is invoked if the code inside of the if block returns false.
Inside of the else block, you need to perform another conditional test. As a result, you need another If-Else statement. This scenario is called a nested If-Else. The nested If-Else statement is commonly used if the inner If-Else depends on the result of the operation in the outer If-Else.
Using multiple and nested If-Else statements can be quite confusing. The key point is to remember the scaffold placement and ensure you indent your code. Indenting your code will help you easily recognize and separate your If-Else statements.
Example of Multiple/Nested If-Else Statements
The example script below shows how multiple and nested If-Else can be dependent on the result of each other. The logic of the code below is as follows.
- If the
$SendEmailis$false, the script will do nothing and exit. - If the
$SendEmailis$true, then the$Fromand$Tovariables must not be empty or null. Otherwise, the$abortFlagwill be set to 1. - If the
$SendEmailis$trueand the$CCEnabledis$true, then the$CCvariable must not be empty or null. Otherwise, the$abortFlagwill be set to 1. - If the
$SendEmailis$trueand the$BCCEnabledis$true, then the$BCCvariable must not be empty or null. Otherwise, the$abortFlagwill be set to 1. - If the
$abortFlagvalue is 1, the script will exit at this point and will not continue. - If the
$abortFlagvalue is 0, the script continues until the end.
Copy the code below and save it as Send-MyMail.ps1. Do not change any values yet.
$SendEmail = $true

$From = ""
$To = ""

$CCEnabled = $true
$CC = ""

$BCCEnabled = $true
$BCC = ""

$abortFlag = 0

if ($SendEmail) {
    if (!$From) {
        Write-Host "[From] is missing" -ForegroundColor Red
        $abortFlag = 1
    }

    if (!$To) {
        Write-Host "[To] is missing" -ForegroundColor Red
        $abortFlag = 1
    }

    if ($CCEnabled) {
        if (!$CC) {
            Write-Host "[CC] is missing" -ForegroundColor Red
            $abortFlag = 1
        }
    }

    if ($BCCEnabled) {
        if (!$BCC) {
            Write-Host "[BCC] is missing" -ForegroundColor Red
            $abortFlag = 1
        }
    }

    if ($abortFlag -eq 1) {
        Write-Host "The abort flag has been tripped. Exit script." -ForegroundColor Red
        break
    }
    else {
        Write-Host "Your email will be sent from this address $From" -ForegroundColor Green
        Write-Host "And will be sent to the following people:" -ForegroundColor Green
        Write-Host "To: $To" -ForegroundColor Green

        if ($CCEnabled -and $CC) {
            Write-Host "CC: $CC" -ForegroundColor Green
        }

        if ($BCCEnabled -and $BCC) {
            Write-Host "BCC: $BCC" -ForegroundColor Green
        }
    }
}
Once you’ve saved the file, run it in PowerShell, as shown below. The demonstration below shows the result of the script when the variable values go unchanged.

Next, edit the script and update all the variables properly, like this snippet below.
$SendEmail = $true

$From = "[email protected]"
$To = "[email protected]"

$CCEnabled = $true
$CC = "[email protected]"

$BCCEnabled = $true
$BCC = "[email protected]"

---SNIP---
After editing the variables, save the script, and run it again. It should show you the same result, as seen below.

Now, modify the variables and try combinations to test how the nested If-Else will be affected. Modifying and testing on your own would help you understand the logic further.
Summary
In this article, you learned about the conditional logic construct – the PowerShell If Statement construct. The If-Else statement allows scripters to formulate conditional logic and direct their scripts’ actions based on testing results.
With the examples in this article, you should have learned ways and techniques to use the If-Else statement when creating a decision-driven code. If-Else can be simple using a single condition and gets more complex while you dig deeper into the nested If-Else statements.
What do you think of the If-Else statement? Is this something you think you would be using more and more after reading this article? What other purposes can you consider where you can apply the knowledge you’ve acquired here?


