When you use PowerShell scripts to manage systems or process bulk tasks, you’ll undoubtedly encounter the need to use a loop construct as part of your scripts. There are many types of loops available in PowerShell, and one of them is the for loop. The PowerShell for loop can make running the same set of commands on multiple items quickly and produce consistent results.
Not a reader? Watch this related video tutorial!In this article, you will learn what the for loop in PowerShell is, understand its syntax and what makes up a for loop statement. You will also learn from the examples some of the different ways that you can use for loop.
Understanding the PowerShell for Loop Statement and Placeholders
The PowerShell for loop is commonly used when the number of times (iteration count) a command or process needs to run, is already known. An example would be when you want to process only a subset of values in an array (e.g., only process 10 of out X number of items).
Using a for loop gives more control over limits and conditions on when the code should exit. This is compared with the foreach loop or the ForEach-Object cmdlet, where iteration stops after the last item in the collection was processed.
Below is the syntax of the for loop statement for your reference.
for (<Initial iterator value>; <Condition>; <Code to repeat>)
{
    <Statement list>
}
As you can see in the syntax above, the PowerShell for loop statement can be broken down into four placeholders that you must know. These are the Initial, Condition, Repeat, and Statement list placeholders.
- The Initial placeholder is where you specify a starting value. This value is only read by the statement once. Typically, scripters assign this variable with a value of zero.
- The Condition placeholder specifies the limit or condition to determine whether the loop should continue running or end. The expression used in this placeholder evaluates to true.
- The Repeat placeholder accepts multiple commands. The commands provided in this placeholder are executed after each loop repeats and before the Condition is re-evaluated. Scripters typically use this to provide an expression to either increment or decrement the value in the Initial placeholder.
- Finally, the Statement list placeholder is where the main code that you intend to run will be placed. The code inside this placeholder is repeated in a loop until the Condition returns a value of
$False.
Understanding the PowerShell For Loop Execution Flow
To further understand how the PowerShell for loop works, you need to familiarize yourself with its execution flow. A for loop is initially a four-step process, then turns into a three-step process after the initial run. To further explain, continue reading the algorithm below.
STEP 1
At the beginning of the for loop statement, the Initial value is read and stored into the memory.
Example: $num = 0
STEP 2
The for loop statement evaluates the boolean result of the expression inside the Condition placeholder. If the result is $false, the for loop is terminated. If the result is $true, then the for loop continues to the next step.
Example: $num -lt 10
STEP 3
PowerShell runs the code inside the Statement list placeholder. There could be one or more commands, script blocks, or functions.
Example: "I count $num "
STEP 4
In this step, the expression in the Repeat placeholder is run, which will update the current value of the Initial placeholder. Then, the flow will go back to Step 2.
Example: $num++
Using the PowerShell For Loop (Examples)
The next sections will be some examples of how to use for loop in a variety of ways. These examples may or may not have practical or real-life use as-is. But techniques you will learn can guide you in using for loop should you encounter a real need to do so.
Now that you have the idea of how the for loop works, it’s time you see how it all comes together using basic code.
Getting a Sequence of Numbers
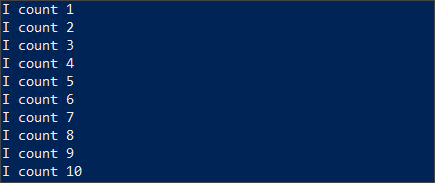
The code below displays the string "I count $num" repeatedly on the console starting from 1 until the value of $num reaches 10.
for ($num = 1 ; $num -le 10 ; $num++){ "I count $num"}When you copy the code above and paste it into your PowerShell session to run it, this screenshot below shows you the result.

Concatenating Strings
The for loop statement is not limited to only mathematical expressions like addition, subtraction, or multiplication. It can also be used to concatenate string values.
The example below will keep repeating the letter “x” with each line containing one more character than the previous one until the number of characters in the line reaches 30.
As you can see, the value of $x was initiated with '' which contains zero characters. The limit based on the condition is up to when the number of characters contains in the value of $x reaches 30. After each iteration, one more letter “x” is appended to the value of $x.
for ($x='' ;$x.length -le 30;$x=$x+'x'){
    Write-Host $x
    Start-Sleep -Milliseconds 20
}
The output below shows the expected result when the code above is run in PowerShell.

Concatenating Strings with Multiple Initial and Repeat Expressions
The Initial and Repeat placeholders in the for loop statement can accept multiple expressions.
Using the code in the previous example above, the code can be modified to add a new expression in the Repeat placeholder to pick a random color. The random color will then be used as the foreground color of the string to be displayed in the console.
As you can see in the first line, an array containing names of colors is defined. The for loop operation will randomly pick a color name from this array.
Notice that the Initial and Repeat placeholders now has two expressions. Each expression is enclosed in a parenthesis and separated with a comma.
$colors = @("Green","Cyan","Red","Magenta","Yellow","White")
for (($x=''),($fgcolor = $colors | Get-Random) ;$x.length -le 30;($x=$x+'x'),($fgcolor = $colors | Get-Random)){
    Write-Host $x -ForegroundColor $fgcolor
    Start-Sleep -Milliseconds 20
}
Once the modified code is run in PowerShell, the expected result is shown below.

Displaying Progress
Perhaps the most common use of for loop is for showing progress indicators. This is mostly employed when running tasks for bulk items that may take time to complete. Like, creating a report for all mailbox sizes in your Exchange organization, or updating attributes of multiple users in Active Directory.
The sample code below shows you the basic way of showing the progress from 1 to 100%. As you’ll see, the initial value of the $counter is 1, and the condition indicates that this loop will run until the $counter value reaches 100.
for ($counter = 1; $counter -le 100; $counter++ )
{
		# ADD YOUR CODE HERE
    Write-Progress -Activity "Update Progress" -Status "$counter% Complete:" -PercentComplete $counter;
}
When you run the above code in PowerShell, you should see a similar output, as shown below.

Displaying a Countdown Timer
This next code shows how to use the for loop to display a countdown timer. This countdown timer only shows the remaining seconds, starting from 10.
If you want to change the starting number, you only need to change the value of the $seconds variable in the Initial placeholder.
for ($seconds=10; $seconds -gt -1; $seconds--) {
    Write-Host -NoNewLine ("`rseconds remaining: " + ("{0:d4}" -f $seconds))
    Start-Sleep -Seconds 1
}
Running the above code in PowerShell will result in the sample output below.

Displaying a Countdown Timer (Nested For Loop)
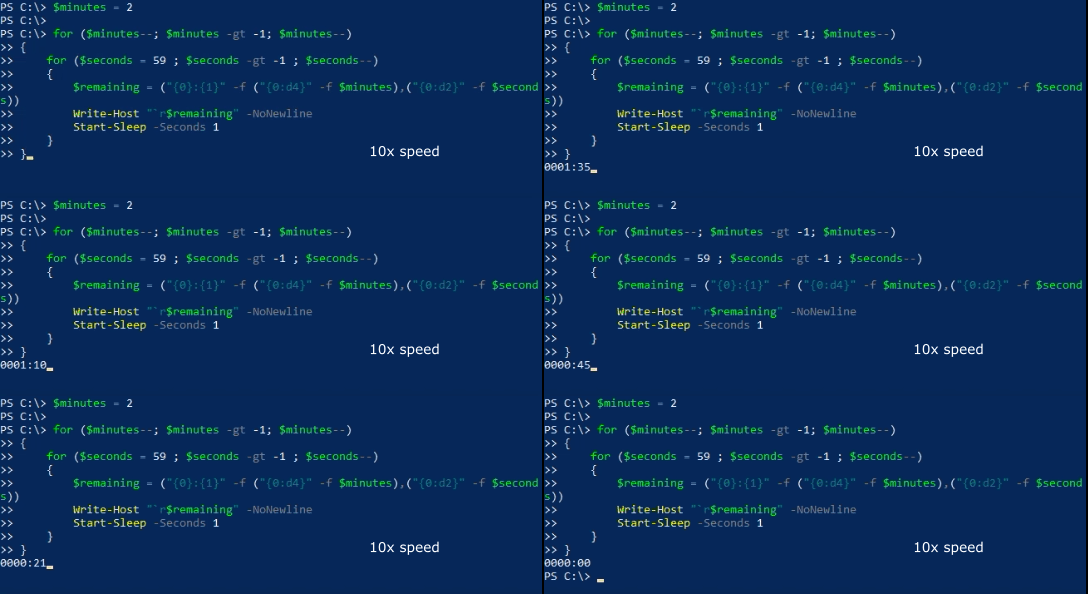
What if you want to display the countdown timer using the minutes:seconds format? The nested for loop can be used to accomplish that. A nested for loop is simply defined as a for loop inside another for loop and so on.
The sample code below contains two for loop statements.
The first for loop handles the countdown of the minute part of the timer. As you can see, there is a $minutes variable before the for loop where you need to indicate the number of minutes that the for loop will countdown from.
The second for loop handles the countdown of the seconds part of the timer. After each iteration, the loop pauses for 1 second before resuming. It will continue to do so until the $seconds value reaches 0.
# Set the number of minutes to countdown from
$minutes = 1

for ($minutes--; $minutes -gt -1; $minutes--)
{
    for ($seconds = 59 ; $seconds -gt -1 ; $seconds--)
    {
        $remaining = ("{0}:{1}" -f ("{0:d4}" -f $minutes),("{0:d2}" -f $seconds))
        Write-Host "`r$remaining" -NoNewline
        Start-Sleep -Seconds 1
    }
}
When the code above is run, below is how the countdown timer would look like.

Determining a Prime Number
PowerShell for loop is also a good choice for mathematical operations. In this example, for loop is used to determine if a given number is a prime number.
A prime number is a number that is only divisible by 1 and N, where N is the number itself. For example, if the value of N is 7, then N divided by 1 is 7 divided by 1.
The script below, when executed, will perform the following:
- Prompt the user to input a number.
- Perform division using the input number as the dividend, and the divisors are the numbers from 2 to the input number minus 1. This means that if the input value is 7, the divisors are 2,3,4,5 and 6, respectively.
- If the quotient is a whole number, this means that the input number is not a prime number and then, the for loop will be terminated.
- If the quotient is not a whole number, this means that the input number is a prime number.
Copy and save this script as isPrime.ps1
$num = Read-Host "Input a number"

$isPrime = $true
for ($y = 2 ; $y -lt $num ; $y++ )
{
    if (($num / $y) -is [int]) {
        Write-Host "$num is not a prime number"
        $isPrime = $false
        break
    }
}

if ($isPrime -eq $true) {
    Write-Host "$num is a prime number"
}
Once you have saved the isPrime.ps1 script, run it in PowerShell to test. To demonstrate, see the sample output below.

Summary
The PowerShell for loop brings no surprises when compared to how the for loop functions used in other languages – and that makes it easier to adapt if you’re not new to the concept.
In this article, you’ve learned the basics of the PowerShell for loop statement. You’ve learned about its syntax, logic, flow, and even learned from several examples about how to use it for different purposes.
Remember that even if there are other types of loops in PowerShell, it is unfair to say that one is better than the other. It all depends on the purpose of the code and the preference of the one writing the code.
Using the knowledge you acquired from this article, you should be able to find ways to apply for loop more to automate your usual tedious tasks.


