


Curl is a versatile tool that allows you to make HTTP calls across a wide range of situations. It’s been around mostly in the Linux world for many years but more recently in Windows 10. But the scripting language PowerShell can accomplish similar tasks that curl can. Is PowerShell a good alternative to curl? What are the differences? Let’s find out!
In this article, let’s compare PowerShell and curl side-by-side to discover which one works best in various contexts. We’ll also compare each in various use cases for you to make the best decision based on your personal situation.
Myth Busting: PowerShell Cmdlets <> Curl
Before we get too deep into this article, let’s bust a popular myth that PowerShell’s Invoke-WebRequest or Invoke-RestMethod cmdlets are “replacements” for curl. This simply isn’t true. By looking at the help content for these commands, it’s clear each has different capabilities and use cases.
Take a look at what the curl documentation says:
curl is a tool to transfer data from or to a server, using one of the supported protocols (DICT, FILE, FTP, FTPS, GOPHER, HTTP, HTTPS, IMAP, IMAPS, LDAP, LDAPS, POP3, POP3S, RTMP, RTSP, SCP, SFTP, SMB, SMBS, SMTP, SMTPS, TELNET and TFTP).
The command is designed to work without user interaction. Curl offers a busload of useful tricks like proxy support, user authentication, FTP upload, HTTP post, SSL connections, cookies, file transfer resume, Metalink, and more.
Now compare that to the Invoke-WebRequest and Invoke-RestMethod cmdlet help documentation.
“The Invoke-WebRequest cmdlet sends HTTP, HTTPS, FTP, and FILE requests to a web page or web service. It parses the response and returns collections of forms, links, images, and other significant HTML elements.”
“The Invoke-RestMethod cmdlet sends HTTP and HTTPS requests to Representational State Transfer (REST) web services that return richly structured data. PowerShell formats the response based on the data type. For an RSS or ATOM feed, PowerShell returns the Item or Entry XML nodes. For JavaScript Object Notation (JSON) or XML, PowerShell converts, or deserializes, the content into objects.”
Breaking down how each tool is described, curl aims to be the premiere solution for transferring data from or to a server over many protocols.
Contrast that with the Invoke-WebRequest and Invoke-RestMethod PowerShell cmdlets that focus on more common communications with servers. These PowerShell cmdlets also provide a rich experience for working with returned data through PowerShell’s use of objects.
Long Parameters in Bash vs. PowerShell
Since curl isn’t a scripting language like PowerShell is, it relies on the command shell it’s executed from. Most of the time that command shell is Bash.
Both the PowerShell cmdlets and curl both may require different parameters that may extend far past a terminal’s width. To make the syntax easier to read, each shell scripting language has its own way of handling this.
Take the below code for example. This example demonstrates sending an HTTP POST verb to a URL using a small bit of data. This code could be placed on one line but it would soon begin to wrap the screen or require scrolling. To remediate this, in Bash, you can use backslashes to continue the command onto a new line.
curl --header "Content-Type: application/json" \
      --request POST \
      --data '{"title":"test post","user":2}' \
        https://jsonplaceholder.typicode.com/posts
Contrast the line-wrapping method with PowerShell using either cmdlet. By using splatting, you can structure the same request performing the same task.
$param = @{
    Uri         = "<https://jsonplaceholder.typicode.com/posts>"
    Method      = "Post"
    Body        = '{"title":"test post","user":2}'
    ContentType = "application/json"
}
Invoke-RestMethod @param
You can also mix and match the splatted and named parameters as shown below.
$main = @{
    Uri         = "<https://jsonplaceholder.typicode.com/posts>"
    ContentType = "application/json"
}
$param = @{
    Method      = "Post"
}

Invoke-RestMethod @main @param -Body '{"title":"test post","user":2}'
Working with REST APIs
REST APIs are a common feature tied to many products. Since querying REST APIs is a common use of both curl and the PowerShell cmdlets, let’s first compare and contrast the various ways these two tools handle them.
Note that the tasks you’ll be learning will work just as well with standard HTTP URIs. Both curl and the PowerShell cmdlets will work with any HTTP endpoint.
Getting Data From a REST API
First up, the easiest task to demonstrate is getting a response from a REST API. Both curl and the PowerShell cmdlets can do this with a single URI parameter as shown below. You can see below that each immediately returns the JSON response’s body.
> curl <https://jsonplaceholder.typicode.com/todos/1>
PS> Invoke-WebRequest '<https://jsonplaceholder.typicode.com/todos/1>'
PS> Invoke-RestMethod '<https://jsonplaceholder.typicode.com/todos/1>'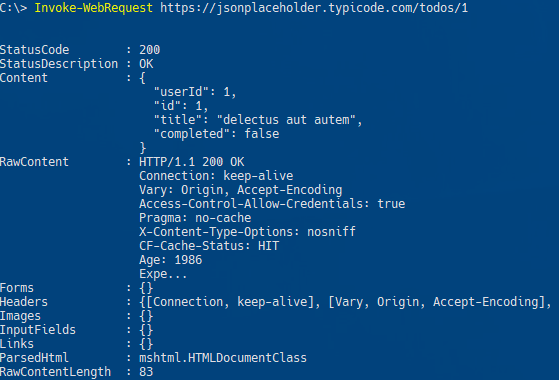
The Invoke-RestMethod cmdlet, unlike Invoke-WebRequest, automatically converts response data from JSON to PowerShell objects. But you can do the same with Invoke-WebRequest by using the ConvertFrom-Json cmdlet as shown below.
(Invoke-WebRequest '<https://jsonplaceholder.typicode.com/todos/1>').Content |
    ConvertFrom-Json
Submitting Data to a REST API
Curl and PowerShell cmdlets can also submit data to a URI using the POST verb. When submitting data via POST, you’ll usually include a body as well which both tools are capable of.
You can see below using the --request parameter for curl and the Method parameter with Invoke-RestMethod, you can specify the verb. For the body, you’ll use the --data parameter in curl and the Body parameter with Invoke-RestMethod.
curl <https://jsonplaceholder.typicode.com/posts> --request POST --data "title=test post&user=2"

Invoke-RestMethod <https://jsonplaceholder.typicode.com/posts> -Method Post -Body @{title="test post";user=2}
By default, curl and Invoke-RestMethod will send POST requests using a content type of application/x-www-form-urlencoded.
If the API only allows a specific content type or you’ll need to manually specify a one via a parameter. Below you can see that curl uses the more generic header parameter while the Invoke-RestMethod cmdlet allows you to specify the content type separately using the ContentType parameter.
## Curl
--header "Content-Type: application/json"

## Invoke-RestMethod
-ContentType application/json
You can also use curl’s shortcut
-Hparameter instead of--header.
Using Custom Headers
In the above example, you saw how you could pass the content-type header to a URI using both curl and PowerShell. You can also add more at the same time if you’d wish.
To add more headers in curl, you’ll simply add another --header or -H providing the key and value of the header you’d like to send as shown below.
curl -H "Content-Type: application/json" \
      -H "Accept: application/json" \
      --request POST \
      -d '{"title":"test post","user":2}' \
         https://jsonplaceholder.typicode.com/posts
You can do the same in PowerShell also as shown below. By passing a hashtable with headers’ key/value pairs to the Headers parameter, you can send as many headers as you’d like.
$param = @{
    Uri     = "<https://jsonplaceholder.typicode.com/posts>"
    Body    = @{ title = "Test" }
    Method  = "Post"
}
Invoke-RestMethod @param -Headers @{ Accept = "application/json" }
Parsing the HTTP Response
Now that you have seen how to get simple data, let’s extract some useful information from it.
One big advantage of using PowerShell vs. curl is the native ability to parse the response. Since curl is a utility and not a scripting language, you’ll typically need to use another utility to parse the response. To level the playing field, you’ll see many people parsing curl’s response using Python or Perl or using a tool called jq. Jq is a utility that allows you to parse JSON data.
To demonstrate parsing, using the previous example, perhaps you’d like to extract only the title from the response. The example below uses curl to explicitly specify to use the GET verb using the --request parameter (curl defaults all requests to GET). The example is also using the silent -s parameter to avoid some on-screen statistics.
curl https://jsonplaceholder.typicode.com/todos/1 --request GET -s | jq .title
Since you learned that the main difference between the Invoke-WebRequest cmdlet and the Invoke-RestMethod cmdlet is Invoke-RestMethod‘s native ability to parse the response, let’s skip Invoke-WebRequest in this example.
Below you will see, as with curl, explicitly specifying the GET method changes nothing. Also notice that the command and parameter is enclosed in parentheses. This allows you to then reference the object property Title using dot notation.
(Invoke-RestMethod https://jsonplaceholder.typicode.com/todos/1 -Method Get).Title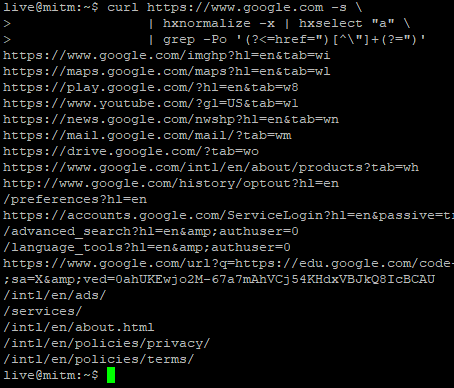
Scraping a Webpage
When you pull data from a webpage, you will probably want to do additional processing on the output. In Bash, that may mean using an HTML parser like hxselect provided by the package html-xml-utils. In contrast, PowerShell’s Invoke-WebRequest cmdlet can parse much of what you want automatically.
To demonstrate, let’s extract all HTML <a> references from www.google.com.
In Bash, you’ll need the html-xml-utils package installed. To query a webpage and parse it with hxselect, you have to normalize the web response to xhtml (-x) format. You’ll also need to use a text processing tool, like Grep to filter and select the output.
The example command below is using Grep’s Regex matching (-P) and only-matched (-o) to split out the results onto their own lines:
curl https://www.google.com -s \
     | hxnormalize -x | hxselect "a" \
     | grep -Po '(?<=href=")[^\"]+(?=")'
In PowerShell, you’ll only need to specify that you want the href property from the links in these <a> tags.
(Invoke-WebRequest www.google.com).links.href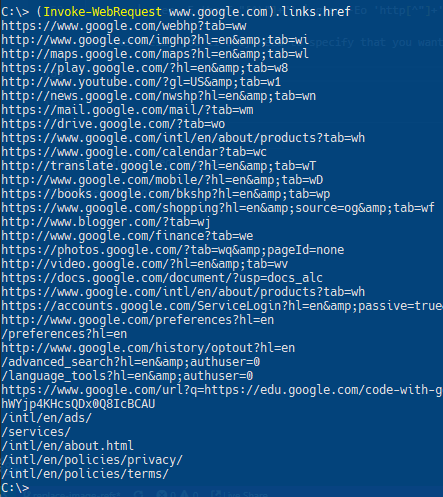
Submitting a Form
Forms are used for many things, such as login, search, uploads, etc. While PowerShell can easily select forms from a webpage and provide a hashtable to fill out, using Curl + Bash requires more work.
In PowerShell, you must first gather a form, fill it out, then submit it. The example below is calling $Form.fields to view all of the available fields of the form. $Result is then populated with the response and you can inspect the google results through $Result.links.
$Form = (Invoke-WebRequest www.google.com).forms[0]
$Form.fields['q'] = "Best PowerShell cmdlets"
$Result = Invoke-WebRequest -Uri "www.google.com$($Form.Action)" -Body $Form.Fields
Using Curl, you have to work to find the fields and then specify them yourself. The output of the first command shows me that there is a q form field I can use for search queries. I then specify data to be filled for that field when submitting the request:
curl https://www.google.com -s \
      | hxnormalize -x | hxselect "form" | hxselect "input" \
      | grep -Po ""
 curl -F q="Curl is amazing at some things" https://www.google.com
Using a Web Session / Cookies
When you need to save cookies between commands, such as a website login to access private pages, you’ll also want your cookies saved between sessions.
Curl asks you to use a “cookie jar” to hold these cookies which you can then use as your input “cookies” once logged in. You’ll have to do some work to find the actual form submission data that you need.
Using curl, you can specify a username and password to authenticate and a place for the curl “cookie jar”. Then, using the cookie obtained from that call, specify the “cookie jar” in the subsequent call as shown below.
curl --user <username>:<password> --cookie-jar ./filename <https://someSite.com>
curn --cookie ./filename <https://someSite.com/important>
PowerShell also allows you to store and use cookies/sessions as well using the Invoke-WebRequest cmdlet’s SessionVariable parameter.
The SessionVariable will store the cookie returned. Once complete, you can then use the WebSession parameter to pass that cookie to subsequent requests. Below you can see an example of filling out a form and using the same cookie returned when the form was queried earlier.
$result = Invoke-WebRequest -Uri https://someSite.com  -SessionVariable ss
$LoginForm = $result.Forms[0]
$LoginForm.Fields["user"] = "username"
$LoginForm.Fields["password"] = "password"
$result = Invoke-WebRequest -Uri $LoginForm.Action -WebSession $ss -Method Post
Summary
PowerShell’s web cmdlets Invoke-WebRequest and Invoke-RestMethod are useful web querying and parsing cmdlets. They hold some similarity to curl, but, as you’ve seen, both tools are different in their approach.
Since the cmdlets are part of the PowerShell scripting language, they are built with PowerShell in mind. The PowerShell approach differs from the curl utility in that regard because curl has to rely on other languages and tools to perform the same tasks.
Related Links
For a handy PowerShell module that will convert many curl commands to PowerShell format, please check out Curl2PS.


