


Deploying PostgreSQL with container technology can be challenging, especially in complicated environments, like Kubernetes. But no worries, this tutorial got you covered, so you can securely deploy PostgreSQL to Kubernetes.
In this tutorial, you will learn how to install and deploy PostgreS to Kubernetes environment in two different ways, using Helm charts and using manual YAML configurations.
Prerequisites
This tutorial will be a hands-on demonstration. To follow along, be sure you have the following:
- A Kubernetes cluster or local Kubernetes environment, such as Minikube.
- Helm installed on your local machine.
- kubectl tool installed on your local machine.
- A Linux client machine.
Deploying PostgreSQL with Helm Chart
Helm is the package manager for Kubernetes that allows you to deploy applications to Kubernetes in no time. Helm simplifies the application deployment complexity on Kubernetes and comes with quick update features, sharing of charts, and rollbacks feature.
Learn how to deploy PostgreSQL to Kubernetes using the Helm repository as your template in the following sections.
Adding a Helm Chart Repository
Many available Helm repositories you can use to deploy PostgreSQL to Kubernetes. But this tutorial uses the Helm repository provided by Bitnami.
For the complete list of available Helm repositories, visit Artifacthub.io.
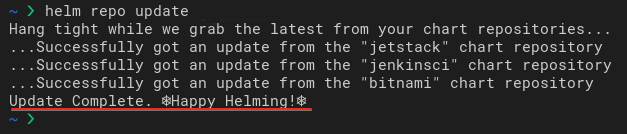
Open your terminal, and run the helm commands below to add the Bitnami helm repository to your system and refresh the index chart of the Helm repository.
# Add Helm repository by Bitnami
helm repo add bitnami <https://charts.bitnami.com/bitnami>

# Update Helm index charts
helm repo update
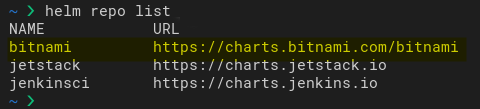
Now run the helm command below to verify the list of available Helm repositories on your system.
helm repo lists
You should get the Bitnami Helm repository available on your system, as shown below.
Creating a PersistentVolume (PV) and a PersistentVolumeClaim (PVC)
You’ve now added the Bitnami Helm repository to your system. But before deploying your PostgreSQL, you’ll need a place for storing PostgreSQL data permanently.
You’ll create the PersistentVolume (PV) and PersistentVolumeClaim (PVC) on Kubernetes:
- PV – is a Kubernetes resource for storing data of your applications.
There are multiple types of PV supported by Kubernetes. These PV types include local directory and third-party cloud storage providers, such as Amazon EBS and AzureDisk.
- PVC – is the way your application uses a given PV. PVC is used to mount a PV to your application’s pod.
To create persistent storage:
1. Create a new YAML configuration (local-pv.yaml) file with your preferred editor and populate the following configuration.
The configuration below creates a new PV named postgresql-data on Kubernetes with the PV’s type as local. Be sure to change the storage capacity with your need and the path with your local directory.
apiVersion: v1
kind: PersistentVolume # Create a PV
metadata:
  name: postgresql-data # Sets PV's name
  labels:
    type: local # Sets PV's type to local
spec:
  storageClassName: manual
  capacity:
    storage: 10Gi # Sets PV Volume
  accessModes:
    - ReadWriteOnce
  hostPath:
    path: "/data/volume" # Sets the volume's path
2. Next, run the kubectl apply command below to apply the configuration in the local-pv.yaml file to Kubernetes.
kubectl apply -f local-pv.yaml3. Create another YAML configuration file (pv-claim.yaml) and populate the following configuration.
The below configuration creates a PVC named postgresql-data-claim with the size of 10GB.
apiVersion: v1
kind: PersistentVolumeClaim # Create PVC
metadata:
  name: postgresql-data-claim # Sets name of PV
spec:
  storageClassName: manual
  accessModes:
    - ReadWriteOnce # Sets read and write access
  resources:
    requests:
      storage: 10Gi # Sets volume size
4. Now, run the kubectl command below to apply the pv-claim.yaml configuration.
kubectl apply -f pv-claim.yaml5. Lastly, run each command below to verify the PV and PVC on your Kubernetes.
# Checking PersistentVolume
kubectl get pv

# Checking PersistentVolumeClaim
kubectl get pvc
If your configurations are correct, you’ll see an output similar to below. The PV (postgresql-data) is bounded to the PVC (postgresql-data-claim) and vice-versa.

Creating a Custom Configuration
You’ve now created the PV and PVC on your Kubernetes for permanently storing data. But how about your PostgreSQL secrets?
Typically, you wouldn’t want sensitive information lying around, so you’ll create a custom configuration. A custom configuration lets you store PostgreSQL secrets and add the postgresql-data-claim PVC to the PostgreSQL deployment for storing data permanently.
1. Create a new configuration file (values.yaml) using your preferred editor and populate the following configuration.
The below configuration deploys the PostgreSQL to Kubernetes, creating a new database called app_db and a new user named app1 with a password (StrongPassword).
# define default database user, name, and password for PostgreSQL deployment
auth:
  enablePostgresUser: true
  postgresPassword: "StrongPassword"
  username: "app1"
  password: "AppPassword"
  database: "app_db"

# The postgres helm chart deployment will be using PVC postgresql-data-claim
primary:
  persistence:
    enabled: true
    existingClaim: "postgresql-data-claim"
Deploying PostgreSQL to Kubernetes
You’ve completed setting up your resources, but they’re not doing much unless you deploy your PostgreSQL data to Kubernetes. You’ll start the PostgreSQL deployment to Kubernetes using the Bitnami Helm chart.
Run the helm install command below to deploy PostgreSQL to Kubernetes with the name postgresql-dev using the Bitnami Helm chart (bitnami/postgresql).
helm install postgresql-dev -f values.yaml bitnami/postgresql
After deployment, you’ll get an output like the screenshot below. As you can see, postgresql-dev is deployed to the Kubernetes with the default PostgreSQL version 14.1.0.
Notice that you also get messages on how to connect to the PostgreSQL pod.

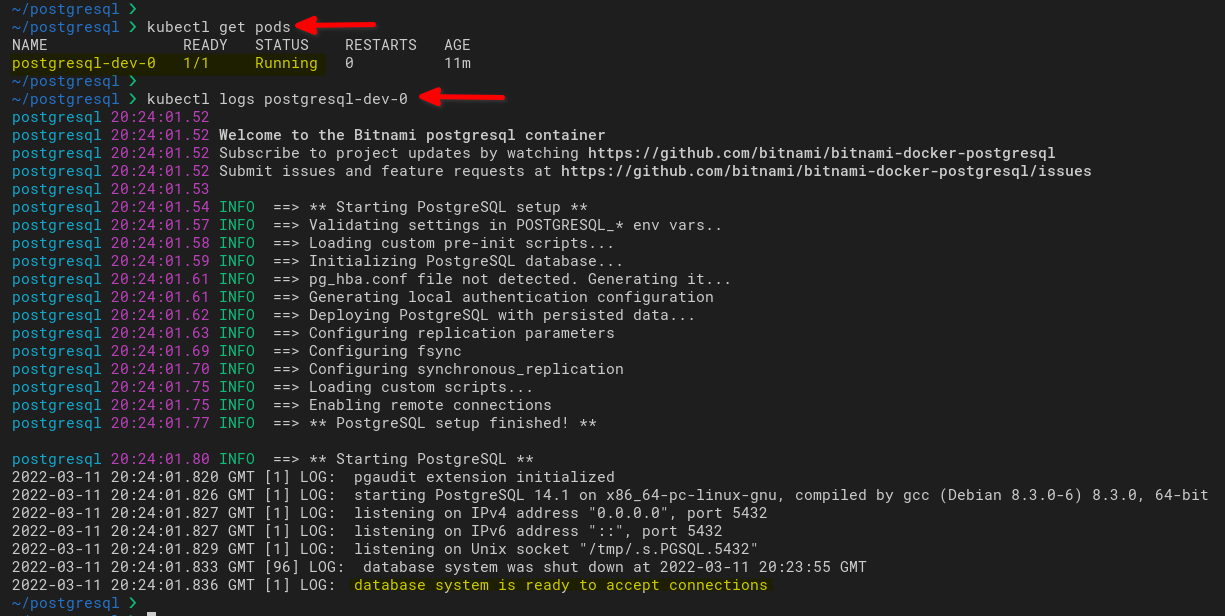
Now, run the kubectl commands below to check the PostgreSQL pod and pod’s logs. Be sure to change postgresql-dev-0 with your pod.
# Checking pods
kubectl get pods

# Checking logs of pods
kubectl logs postgresql-dev-0
As you can see below, the pod (postgresql-dev-0) STATUS is running. And at the bottom of pod logs, you’ll see the message database system is ready to accept connections. This message indicates the PostgreSQL deployment is complete.
Connecting to PostgreSQL
At this point, you’ve completed the PostgreSQL deployment on Kubernetes. But how do you connect to the PostgreSQL database for managing the database itself?
You’ll connect to the PostgreSQL database on Kubernetes using a temporary pod. The temporary pod will automatically be deleted when the pod exits.
1. Run the below export command to create the POSTGRES_PASSWORD environment variable, which contains the password for the PostgreSQL database (app_db).
This command doesn’t have an output, but you’ll verify the PostgreSQL connection in the following steps.
export POSTGRES_PASSWORD=$(kubectl get secret --namespace default postgresql-dev -o jsonpath="{.data.password}" | base64 --decode)2. Next, run the kubectl run command below to connect to the PostgreSQL database (app_db).
This command creates a new temporary pod called postgresql-dev-client that connects to the PostgreSQL database (app_db) with the user app1.
kubectl run postgresql-dev-client --rm --tty -i --restart='Never' --namespace default --image docker.io/bitnami/postgresql:14.1.0-debian-10-r80 --env="PGPASSWORD=$POSTGRES_PASSWORD" \
--command -- psql --host postgresql-dev -U app1 -d app_db -p 5432
3. Lastly, run the following PostgreSQL query to verify your connection to the PostgreSQL database.
# Checking PostgreSQL connection
\conninfo

# Logout from PostgreSQL shell
exit
Below, you can see that you’re connected to the PostgreSQL database (app_db) inside Kubernetes using the database user app1.
Notice that when you log out from the PostgreSQL shell, the pod postgresql-dev-client is deleted.

Deploying PostgreSQL to Kubernetes Manually
You’ve seen how to deploy PostgreSQL using a Helm chart as your template, so why choose manual deployment? The advantage of deploying PostgreSQL to Kubernetes manually is that it gives you a more in-depth understanding of application deployment on the Kubernetes environment.
You’ll create some Kubernetes resources required to manually deploy the PostgreSQL to Kubernetes.
Creating a ConfigMap to Store Database Details
Deploying PostgreSQL to Kubernetes manually requires some Kubernetes resources. One of those resources is a ConfigMap, an API object you’ll use to store key-value pairs.
You’ll create a Kubernetes ConfigMap to store database details such as user, database name, and password for the PostgreSQL deployment.
For the production environment, deploying secrets such as password authentication using the Kubernetes secret is highly recommended for security.
1. Create a new YAML configuration file (postgres-configmap.yaml) and populate the following configuration. The configuration below creates a ConfigMap named postgres-secret for the postgres application and a database called appdb.
You can set the database details with your preferred ones. But for this tutorial, the user is set as appuser and the password as strongpassword.
# Create ConfigMap postgres-secret for the postgres app
# Define default database name, user, and password
apiVersion: v1
kind: ConfigMap
metadata:
  name: postgres-secret
  labels:
    app: postgres
data:
  POSTGRES_DB: appdb
  POSTGRES_USER: appuser
  POSTGRES_PASSWORD: strongpasswordapp
2. Now run the kubectl command below to apply the configuration in the postgres-configmap.yaml file.
kubectl apply -f postgres-configmap.yaml
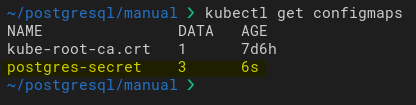
3. Lastly, run the below command to get the list of ConfigMaps on your Kubernetes.
kubectl get configmapYou’ll see the postgres-secret ConfigMap on the list, as shown below.
Creating PersistentVolume (PV) and PersistentVolumeClaim (PVC)
Like deploying PostgreSQL with Helm chart, you’ll also create a PV and PVC for manual deployment to store PostgreSQL data on your Kubernetes host permanently.
1. Create a new YAML configuration file (postgres-volume.yaml) and populate the following configuration.
The configuration below creates a new PV called postgres-volume with a type as local on the Kubernetes host.
apiVersion: v1
kind: PersistentVolume # Create PV
metadata:
  name: postgres-volume # Sets PV name
  labels:
    type: local # Sets PV's type
    app: postgres
spec:
  storageClassName: manual
  capacity:
    storage: 10Gi # Sets PV's size
  accessModes:
    - ReadWriteMany
  hostPath:
    path: "/data/postgresql" # Sets PV's host path
2. Next, run the kubectl command below to apply the postgres-volume.yaml file’s configuration.
kubectl apply -f postgres-volume.yaml
3. Create another configuration file (postgres-pvc.yaml) and populate the following configuration.
This configuration creates the PVC called postgres-volume-claim for your PostgreSQL deployment.
apiVersion: v1
kind: PersistentVolumeClaim # Create PVC
metadata:
  name: postgres-volume-claim # Sets PVC's name
  labels:
    app: postgres # Defines app to create PVC for
spec:
  storageClassName: manual
  accessModes:
    - ReadWriteMany
  resources:
    requests:
      storage: 10Gi # Sets PVC's size
4. Now run the following command to apply the postgres-pvc.yaml file’s configuration.
kubectl apply -f postgres-pvc.yaml
5. Lastly, run each command below to verify all available PV and PVC on your Kubernetes.
# Get list of PersistentVolume
kubectl get pv

# Get list of PersistentVolumeClaim
kubectl get pvc
You should see the postgres-volume PV and the postgres-volume-pvc PVC with the status Bound to each other like the screenshot below.

Creating PostgreSQL Deployment
You’ve created a PersistentVolume and PersistentVolumeClaim for the PostgreSQL deployment. Now it’s time to create a PostgreSQL deployment and declare Pods configuration for the PostgreSQL in Kubernetes.
1. Create a new YAML file for the PostgreSQL deployment called postgres-deployment.yaml using your preferred editor and populate the following configuration.
apiVersion: apps/v1
kind: Deployment # Create a deployment
metadata:
  name: postgres # Set the name of the deployment
spec:
  replicas: 3 # Set 3 deployment replicas
  selector:
    matchLabels:
      app: postgres
  template:
    metadata:
      labels:
        app: postgres
    spec:
      containers:
        - name: postgres
          image: postgres:12.10 # Docker image
          imagePullPolicy: "IfNotPresent"
          ports:
            - containerPort: 5432 # Exposing the container port 5432 for PostgreSQL client connections.
          envFrom:
            - configMapRef:
                name: postgres-secret # Using the ConfigMap postgres-secret
          volumeMounts:
            - mountPath: /var/lib/postgresql/data
              name: postgresdata
      volumes:
        - name: postgresdata
          persistentVolumeClaim:
            claimName: postgres-volume-claim
2. Next, run the kubectl command below to apply the postgres-deployment.yaml configuration to create the PostgreSQL deployment.
This command will download Docker images postgres:12.10 for your deployment and create three pods replicas.
kubectl apply -f postgres-deployment.yaml
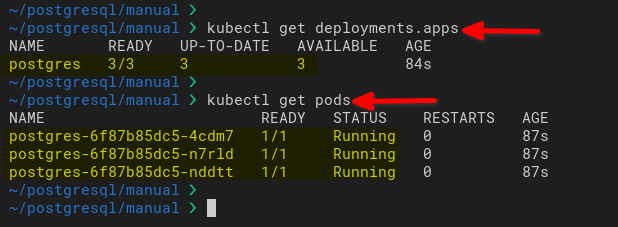
3. Run the kubectl command below to verify the list of running pods and deployments on your Kubernetes.
# checking Kubernetes deployment
kubectl get deployments

# checking pods
kubectl get pods
Below is the screenshot of pods in creating status. The STATUS of all pods is still on the ContainerCreating process.
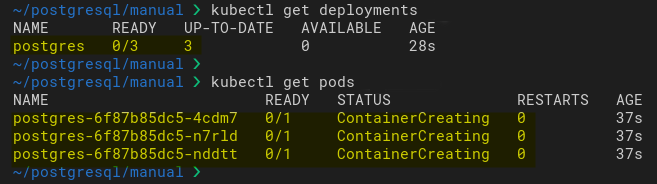
After the deployment process completes, you’ll see the STATUS of all pods is Running.
Creating a Service for PostgreSQL
At this point, you’ve completed the deployment of PostgreSQL on Kubernetes. But how do you let clients connect to the PostgreSQL pod? You’ll expose PostgreSQL outside of the Kubernetes environment by creating and running a Kubernetes service.
1. Create a new YAML configuration file (postgres-service.yaml) and populate the following configuration.
This configuration creates the Kubernetes service with the type as NodePort for the postgres application running on the default port 5432.
apiVersion: v1
kind: Service # Create service
metadata:
  name: postgres # Sets the service name
  labels:
    app: postgres # Defines app to create service for
spec:
  type: NodePort # Sets the service type
  ports:
    - port: 5432 # Sets the port to run the postgres application
  selector:
    app: postgres
2. Next, run the kubectl command below to apply the postgres-service.yaml configuration to create a new Kubernetes service.
kubectl apply -f postgres-service.yaml
3. Lastly, run the kubectl get command below to verify the Kubernetes service.
kubectl get svcBelow, you can see that the postgres service with the type NodePort exposes the port 31398 on the Kubernetes host for the PostgreSQL client connections.
You may have a different port than 31398 because the NodePort is a randomly selected port for your service. The NodePort service will randomly select the port for your service between 30000-32767.
Notice the NodePort 31398 on the Kubernetes host is mapped to PostgreSQL pods on port 5432.

Connecting to PostgreSQL via kubectl Command
You’ve created the Kubernetes service resource for the PostgreSQL deployment, and now you’re ready to connect to the PostgreSQL pod. How? You’ll connect to the PostgreSQL shell using the kubectl exec command or the PostgreSQL client on your host.
You can jump to the “Connecting to PostgreSQL via PostgreSQL Client” section if you prefer to use the PostgreSQL client instead.
1. Run the kubectl exec command below to connect to the PostgreSQL pod. Be sure to change the pod name, database name, and the user.
kubectl exec -it postgres-xxxx -- psql -h localhost -U appuser --password -p 5432 appdb2. Input the password for your database, and you’ll get the PostgreSQL shell like the screenshot below.

3. Lastly, run the query below to get information about your connection to the PostgreSQL shell and type exit to log out.
\conninfo
Connecting to PostgreSQL via PostgreSQL Client
If you prefer to connect to the PostgreSQL shell using the PostgreSQL client, run the psql command instead. Be sure the PostgreSQL client packages are installed on your local machine.
1. Run the psql command below to connect to the PostgreSQL pod through the NodePort (31389). Change the IP address 192.168.39.196 with your Kubernetes host IP address and port 31398 with the port of your NodePort resources.
psql -h 192.168.39.196 -U appuser --password -p 31398 appdb2. Input the password for your database to connect to the PostgreSQL shell.

3. Finally, run the query below to get information about your connection.
\conninfoThe output below confirms you’ve connected successfully to your PostgreSQL database.

Conclusion
In this tutorial, you’ve learned how to deploy a PostgreSQL database to Kubernetes using the Helm chart. You’ve also deployed a PostgreSQL database manually using YAML configuration files. And at this point, you’ve acquired a basic understanding of how to deploy applications to Kubernetes securely.
Now how would you build on this newfound knowledge? Perhaps apply the PostgreSQL High Availability on your Kubernetes?


