


Managing Office 365 resources using the Microsoft 365 admin center is convenient, especially if you are on standard management, like creating users, assigning licenses, etc. But if you need to build a custom solution using automation, the Office 365 API is the way to go.
But, the Office 365 API is now legacy, and Microsoft recommends the Microsoft Graph API instead. Microsoft Graph API includes the same functionalities (and more!) that you would previously find in the Office 365 API.
Microsoft 365 Backup For Dummies eBook addresses the data security challenges by outlining the out-of-the-box security features in Microsoft 365. Get eBook
Learn how to use the Microsoft Graph Office 365 API by example in this tutorial. Specifically, you will simulate a real-life use case of provisioning a new user, assigning licenses, and group memberships.
Prerequisites
This tutorial will be a hands-on demonstration. If you’d like to follow along, be sure you have the following:
- A working Office 365 tenant – Sign up for an Office 365 trial tenant if you don’t have one for testing.
- A Global administrator role to manage every aspect of your tenant and all resources.
- Windows PowerShell 5.1 or the latest PowerShell 7 release – This tutorial uses a Windows 10 computer with PowerShell 7.2.5.
Installing Microsoft Graph PowerShell SDK
As a RESTful API, you can use Microsoft Graph API in many ways, such as in an HTTP web application, JavaScript, etc. But in this tutorial, you’ll use the Microsoft Graph PowerShell SDK. This SDK is a PowerShell module you can install using the Install-Module command.
Open PowerShell as administrator on your computer and run either of the below commands to install Microsoft Graph PowerShell SDK (Microsoft.Graph) for AllUsers or CurrentUser.
# Install for all users (requires local admin access)
Install-Module Microsoft.Graph -Scope AllUsers

# Install for the current user
Install-Module Microsoft.Graph -Scope CurrentUser
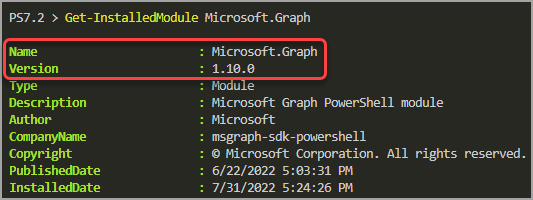
Once installed, run the below command to confirm you have successfully installed the module.
Get-InstalledModule
The latest version as of this writing is 1.10.0, as shown below.
Planning Microsoft Graph Office 365 API Permissions
Working with Microsoft Graph API allows you to pick specific permissions to authorize. Does your task need read-only access to the Azure Active Directory or full access to users’ calendars? You can limit your authorization flow to allow only those permissions.
You can plan the permissions around your requirements with granular control. For example, in this tutorial, your tasks will include the following with their corresponding minimum permissions.
| Tasks | Delegated Permissions | Application Permissions |
| Create user | User.ReadWrite.All | User.ReadWrite.All |
| Read and assign licenses | User.ReadWrite.All, Organization.Read.All | User.ReadWrite.All, Organization.Read.All |
| Add group membership | GroupMember.ReadWrite.All | GroupMember.ReadWrite.All |
| Add user to Teams | TeamMember.ReadWrite.All | TeamMember.ReadWrite.All |
Notice that there are Delegated Permissions and Application Permissions? What’s the difference? In a delegated scenario, the permissions are limited to the signed-in user’s assigned roles. In contrast, application permissions are what you explicitly assign to it.
In this tutorial, you’ll focus on the delegated authentication flow only. The users doing the administrative task must log in (authenticate) with their user accounts while only getting specific permissions (authorization).
Refer to the Microsoft Graph permissions reference to see the complete list of Microsoft Graph API permissions.
Connecting to Microsoft Graph Office 365 API
After planning the permissions you need for your specific tasks, the next step is to authenticate and authorize with Microsoft Graph Office 365 API.
As mentioned previously, you can authenticate with user delegation or application credentials. But in this tutorial, you’ll be using the delegated user flow.
Follow the below steps to connect to Microsoft Graph PowerShell:
1. Open a PowerShell window on your computer, and run the code below to declare the API permissions in a variable called $scopes.
# Which permissions do you need?
$scopes = 'User.ReadWrite.All','GroupMember.ReadWrite.All','TeamMember.ReadWrite.All','Organization.Read.All'
2. Next, run the following command to connect to the Microsoft Graph PowerShell. This command invokes the Connect-MgGraph cmdlet and specifies the permission scopes you previously declared.
# Connect to Microsoft Graph PowerShell
Connect-MgGraph -Scopes $scopes
After running the command, your default browser automatically opens and asks you to log in to your Microsoft 365 account.
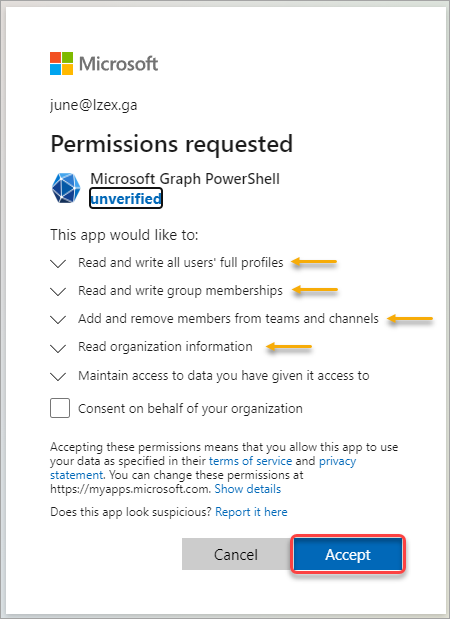
3. Once logged in, you’ll see the prompt, similar to the screenshot below, asking you to confirm the permissions requested on your behalf. As you can see, the permissions coincide with the scopes you specified.
After reviewing the permissions, click Accept to continue.
After successfully signing in, you’ll see the Welcome To Microsoft Graph! message in PowerShell.

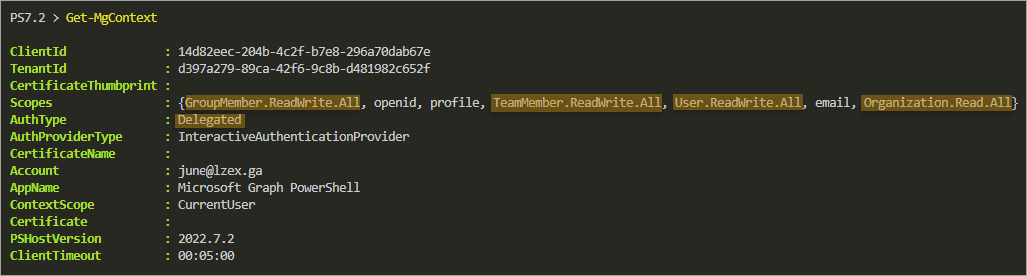
4. Finally, run the below Get-MgContext to confirm your authentication context.
Get-MgContextAs you can see below, the Scopes property contains the specific API permissions you requested, and your AuthType is Delegated.
Creating a New User
You’ve signed in and can now start creating a new user. In this example, you’ll create a new user in Azure AD with the following details:
| Display Name | Patrick Star |
| User principal name | [email protected] |
| Firstname | Patrick |
| Lastname | Star |
| Alias | PStar |
| Password | Scribe@Datebook1@Paramedic |
| Force password reset on next sign-in | True |
| Account enabled | True |
| Usage location | US |
To create a new user, follow these steps:
1. Compose the new user’s properties on the same PowerShell window, as shown below. Replace the necessary information to match your environment, especially the domain part and location.
## Define the user details.
## NOTE: These are the minimum properties.
$userSplat = @{
    AccountEnabled    = $true
    GivenName         = 'Patrick'
    Surname           = 'Star'
    DisplayName       = 'Patrick Star'
    UserPrincipalName = '[email protected]'
    MailNickname      = 'PStar'
    UsageLocation     = 'US'
    passwordProfile   = @{
        password                      = 'Scribe@Datebook1@Paramedic'
        forceChangePasswordNextSignIn = $true
    }
}
2. Next, run the New-MgUser cmdlet with the user properties you defined to create a new user in step one. This command will save the result into the $user variable, which you’ll use later.
## Create the user
$user = New-MgUser @userSplat
3. Lastly, run the below Get-MgUser cmdlet to confirm that the new user exists in Office 365.
## Confirm the new user exists in Azure AD.
Get-MgUser -UserId $user.Id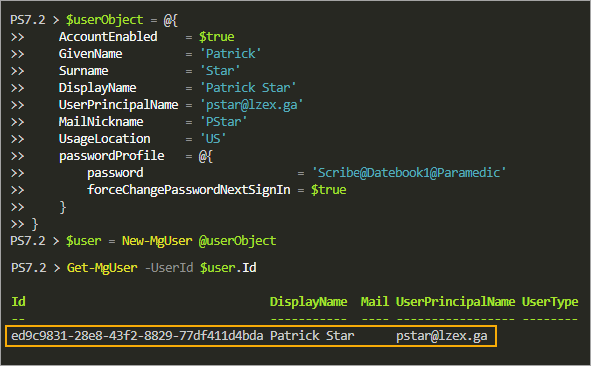
Assigning Licenses to a User
You’ve created a new user, but it doesn’t have any license yet. Some organizations have a default set of licenses they assign to new accounts, depending on what their subscription has.
To assign a license to a user:
1. Run the Get-MgSubscribedSku command below to find the available licenses and their respective identifiers.
Get-MgSubscribedSku -All | Select-Object SkuId,SkuPartNumber,CapabilityStatus
In this example, the tenant only has two subscribed products.
| SKU ID | SKU Part Number | License Display Name |
| c42b9cae-ea4f-4ab7-9717-81576235ccac | DEVELOPERPACK_E5 | Microsoft 365 E5 Developer (without Windows and Audio Conferencing) |
| f30db892-07e9-47e9-837c-80727f46fd3d | FLOW_FREE | Microsoft Power Automate Free |
Refer to Product names and service plan identifiers for licensing for the complete list of product names and their identifiers.
2. Next, run the following command, which doesn’t provide output but defines the licenses in an array of hashtables (one hashtable for each license SKU ID).
Defining the licenses as below suits suppose the user requires the DEVELOPERPACK_E5 and FLOW_FREE licenses.
# What are the licenses to assign
$addLicenses = @(
    @{SkuId = 'c42b9cae-ea4f-4ab7-9717-81576235ccac'} # DEVELOPERPACK_E5
    @{SkuId = 'f30db892-07e9-47e9-837c-80727f46fd3d'} # FLOW_FREE
)
3. After defining the licenses, run the Set-MgUserLicense cmdlet while specifying the -AddLicenses parameter with the $addLicenses variable value. The -RemoveLicenses parameter is mandatory, but you’ll provide it with an empty array since you’re not removing any licenses from the user.
# Assign licenses to the user
Set-MgUserLicense -UserId $user.Id -AddLicenses $addLicenses -RemoveLicenses @()
4. Lastly, run the Get-MgUserLicenseDetail command to confirm that the license assignment worked. This command lists the specified user’s license details.
Get-MgUserLicenseDetail -UserId $user.Id The result below confirms that the user now has the licenses you assigned.

Adding Group Membership
New user provisioning processes often include adding standard group memberships. Groups are helpful in assigning permissions and restrictions, such as in SharePoint and OneDrive, among others.
There are four group types that Azure Active Directory supports. These groups are:
- Microsoft 365 groups
- Security groups
- Mail-enabled security groups
- Distribution groups
Out of these four, you can only manage the Microsoft 365 groups and Security groups using Microsoft Graph API. The other groups are read-only.
Suppose that in this organization, all new users must become members of the following groups.
| Group Name | Group Type | Group Description |
| InTune – Allow Print | Security Group | Members can use printers in the corporate network |
| Enforce Conditional Access | Security Group | Members will have Azure AD Conditional Access Rules applied |
To add the user as a member of these groups:
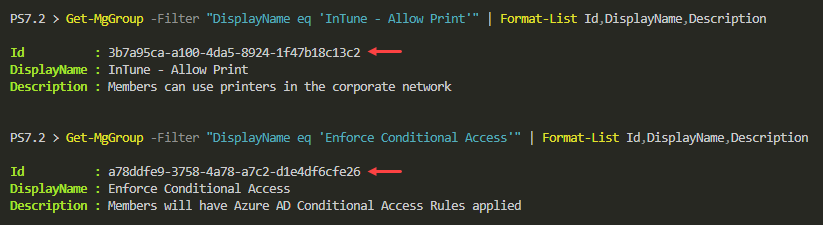
1. First, get the Id of each group by running the Get-MgGroup commands below. The -Filter clause looks for the group whose display name matches the group name you’re searching for.
# 'InTune - Allow Print' group
Get-MgGroup -Filter "DisplayName eq 'InTune - Allow Print'" | Format-List Id,DisplayName,Description
# 'Enforce Conditional Access' group
Get-MgGroup -Filter "DisplayName eq 'Enforce Conditional Access'" | Format-List Id,DisplayName,Description
Copy the Id value of each group from the results. In this example, the values are as follows:
- InTune – Allow Print – 3b7a95ca-a100-4da5-8924-1f47b18c13c2
- Enforce Conditional Access – a78ddfe9-3758-4a78-a7c2-d1e4df6cfe26
2. After you retrieve the Group IDs, run the below commands to add the user as a member of each group. The -GroupId parameter accepts the group’s ID, and the -DirectoryObjectId accepts the user’s ID or principal name.
# Add user as a member of the 'InTune - Allow Print' security group
New-MgGroupMember -GroupId '3b7a95ca-a100-4da5-8924-1f47b18c13c2' -DirectoryObjectId $user.id
# Add user as a member of the 'Enforce Conditional Access' security group
New-MgGroupMember -GroupId 'a78ddfe9-3758-4a78-a7c2-d1e4df6cfe26' -DirectoryObjectId $user.id
If the group member addition is successful, you will not see any result or output on the console.

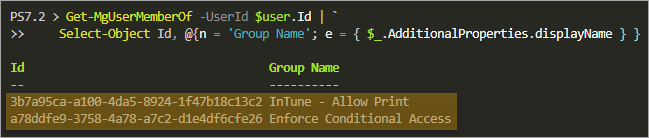
3. Finally, run the Get-MgUserMemberOf command below to confirm that the user is now a member of the groups. Note that the code uses line continuation for brevity.
Get-MgUserMemberOf -UserId $user.Id | `
    Select-Object Id, @{n = 'Group Name'; e = { $_.AdditionalProperties.displayName } }
The result below lists the user’s group memberships.
Adding Team Membership
Adding a user to a Team is a little bit trickier. But don’t worry. Follow the step-by-step instructions below, and you should do fine.
Suppose your new user must become a member of the Finance Team. If so, you must find the Finance Team’s ID.
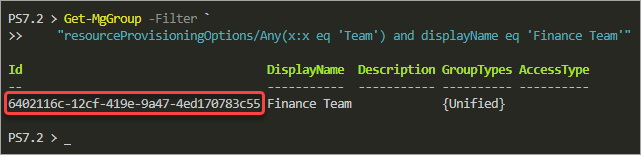
1. Run the following Get-MgGroup command to find the Finance Team’s ID.
Note: To search for a different team name, replace the name Finance Team in the filter clause.
Get-MgGroup -Filter `
    "resourceProvisioningOptions/Any(x:x eq 'Team') and displayName eq 'Finance Team'"
Copy the Team Id value for later use.
2. Next, compose the body parameter in the following format. In this example, you don’t need to change anything in the below code. Just copy/paste the code into PowerShell and press Enter.
Note: To make the user an owner of the team, insert the word “owner” into the Roles array (e.g., Roles = @(“owner”)). If not, the user will become a regular member of the team.
$bodyParams = @{
    "@odata.type"     = "#microsoft.graph.aadUserConversationMember"
    Roles             = @()
    "[email protected]" = "https://graph.microsoft.com/v1.0/users('" + $user.id + "')"
}
3. Finally, run the below code to add the user as a Team member. Replace the -TeamId parameter value with your appropriate Team Id.
New-MgTeamMember -TeamId '6402116c-12cf-419e-9a47-4ed170783c55' -BodyParameter $bodyParams | Format-List DisplayName,Roles,AdditionalProperties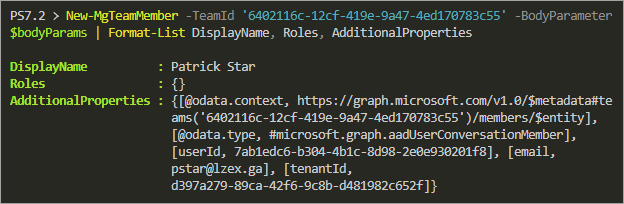
Microsoft 365 Backup For Dummies eBook addresses the data security challenges by outlining the out-of-the-box security features in Microsoft 365. Get eBook
Conclusion
Managing Office 365 with the Microsoft Graph Office 365 API can be a steep learning curve. But the long-term benefits outweigh the effort to learn it. You can build customized solutions or scripts that could validate your skills as a toolmaker.
The sample use-case you learned in this tutorial only covered the basics. Microsoft Graph API has more functionalities than this tutorial can teach. For example, you can improve user creation by adding a step to upload a user’s photo or enabling multifactor authentication (MFA) right off the bat.
There are so many possibilities, and it would only do you good to start exploring what the Microsoft Graph Office 365 API can do for you now!


