

NGINX is one of the most flexible high-performance web servers out there. If you’re still serving up unencrypted HTTP traffic, you’re doing your users a disservice. Set up a cheap (or free) certificate and start using NGINX to redirect HTTP to HTTPS!
In this tutorial, you’re going to learn how to create a self-signed certificate and automatically redirect all HTTP traffic to HTTPS, so your traffic always remains encrypted.
Prerequisites
To follow along with this tutorial, be sure you have the following:
- A Linux server – This tutorial uses Ubuntu 20.04 LTS, but you can perform the same steps with any other Linux distribution.
- NGINX
- A user account with sudo privileges.
Installing OpenSSL
Before you begin activating NGINX to Redirect HTTP to HTTPS traffic you must first have an SSL certificate installed on your web server. The certificate will be used to encrypt all traffic send and received over HTTPS. To create a self-signed certificate, though, you’re going to need OpenSSL, so let’s first install it.
On your NGINX web server:
1. Change to the /usr/local/src directory. This directory will be where you’ll install OpenSSL. cd /usr/local/src
cd /usr/local/src2. Download the OpenSSL tarball using wget.
sudo wget https://www.openssl.org/source/openssl-1.1.1g.tar.gz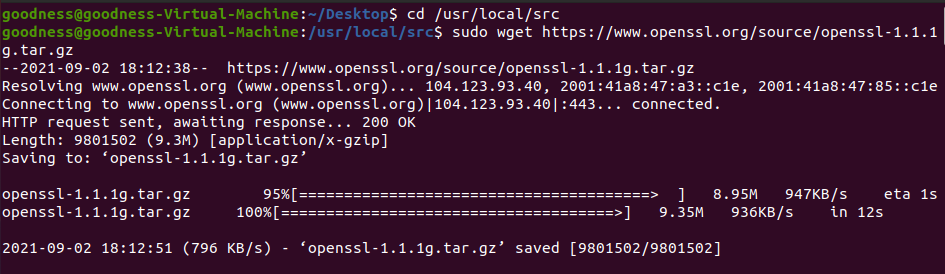
3. Extract the files from OpenSSL tarball.
sudo tar -xf OpenSSL-1.1.1g.tar.gz4. Configure OpenSSL to link the shared libraries that the executable file needs when it is executed.
sudo ./config -Wl,--enable-new-dtags,-rpath,'$(LIBRPATH)'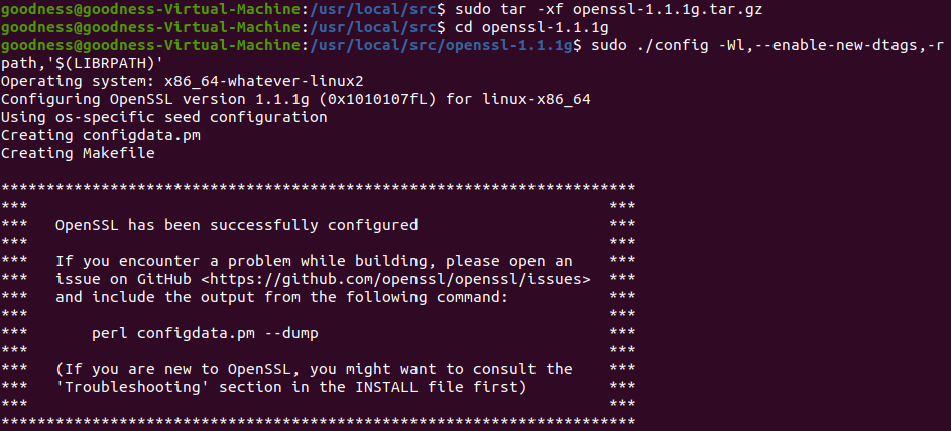
5. Compile and install OpenSSL by running the following commands.
sudo make
sudo make install
Generating a Self-Signed Certificate
Now that you have OpenSSL installed, you must have a certificate that HTTP will use. For this tutorial, you’ll be creating a self-signed certificate.
Self-signed certificates are not signed by trusted certificate authorities and shouldn’t be used in production; they should be used just for testing purposes. If you need an SSL certificate for production, you can get it from a Certificate Authority such as Let’s Encrypt.
1. Create a directory called local_ssl with a configuration file called open_ssl.conf inside. This file will be used as a certificate request to generate a self-signed certificate.
mkdir local_ssl
cd local_ssl
touch open_ssl.conf
2. Edit the open_ssl.conf configuration file created in step six and copy/paste the following content into it. This file contains the certificate issuer’s details and other details such as your domain name, in this case, your details since it is a self-signed certificate and you are acting as the Certificate Authority (CA).
[req]
distinguished_name = req_distinguished_name
x509_extensions = v3_req
prompt = no
[req_distinguished_name]
C = //Country code, any country code, 2 letters e.g US
ST = //State, any state
L = //City, any city
O = //Organisation name, can be anything you want
OU = //Department, can be anything you want
CN = //Certificate Issuer, can be anything you want
[v3_req]
keyUsage = keyEncipherment, dataEncipherment
extendedKeyUsage = serverAuth
subjectAltName = @alt_names
[alt_names]
DNS.1 = //Domain name 1
DNS.2 = //Domanin name 2
3. Now generate the SSL certificate with the OpenSSL command. The following command will generate a certificate and a key that will be used to sign the certificate.
- req – Tells OpenSSL to generate a certificate request.
- nodes – Tells OpenSSL to skip the option that lets you protect the private key with a passphrase.
- days – Specifies the certificate validity period in days.
- newkey rsa: 2048 – Generates a new private key using the RSA algorithm with a key length of 2048 bits.
- keyout – Specifies where you want the private key that will be created to be stored.
- out – Specifies where you want the certificate that will be created to be stored.
- config – Specifies the path to the configuration file.
openssl req -x509 -nodes -days 1024 -newkey rsa:2048 -keyout localhost.key -out localhost.crt -config open_ssl.conf -extensions 'v3_req'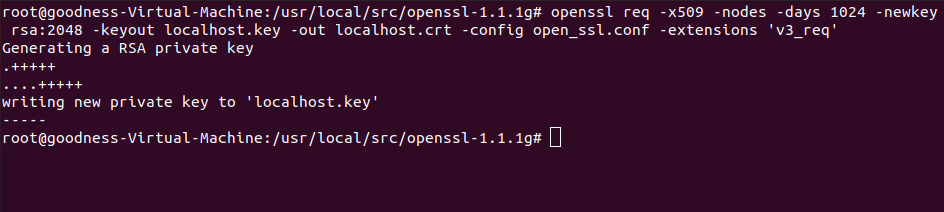
Configuring NGINX to Use a Certificate
You now have a certificate, let’s now configure NGINX to use it.
1. Copy the certificate and key to the /etc/ssl/certs and /etc/ssl/private directories, as shown below. You must do this so that Ubuntu can find them when necessary.
sudo cp localhost.crt /etc/ssl/certs/localhost.crt
sudo cp localhost.key /etc/ssl/private/localhost.key
2. Edit the NGINX configuration file at /etc/nginx/sites-enabled/default and copy/paste the following code in the server block of your NGINX configuration file. The lines below ensure NGINX listens on port 443, binds the certificate previously created to NGINX, and enables TLS v1.2, and 1.3.
listen 443 ssl;
listen [::]:443 ssl;
ssl_certificate /etc/ssl/certs/localhost.crt;
ssl_certificate_key /etc/ssl/private/localhost.key;
ssl_protocols TLSv1.2 TLSv1.3;
3. Next, restart NGINX to force the webserver to read the new configuration file modified in step 10.
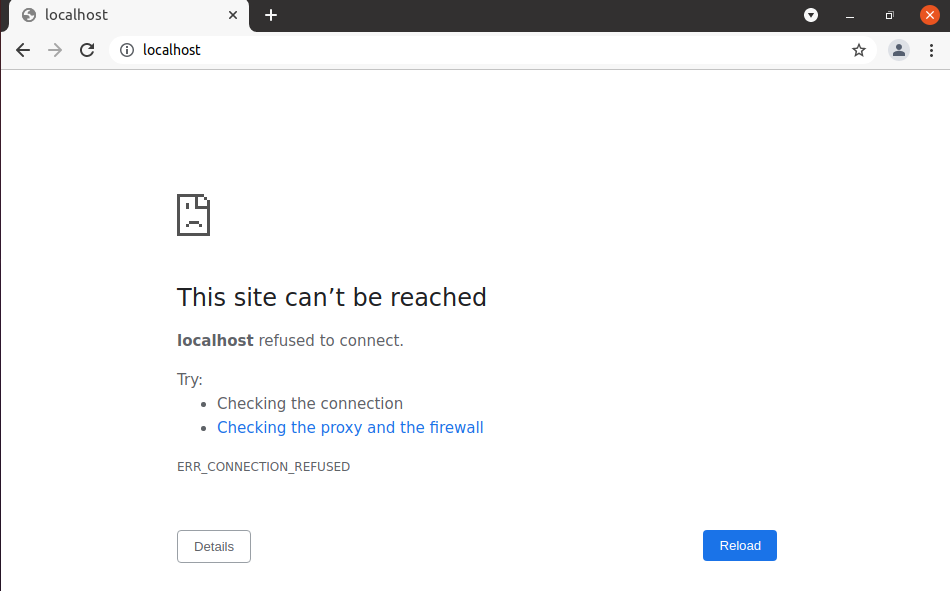
systemctl restart Nginx4. Open a web browser on the Linux host and navigate to http://localhost. The connection to the webserver should fail, as you see below.
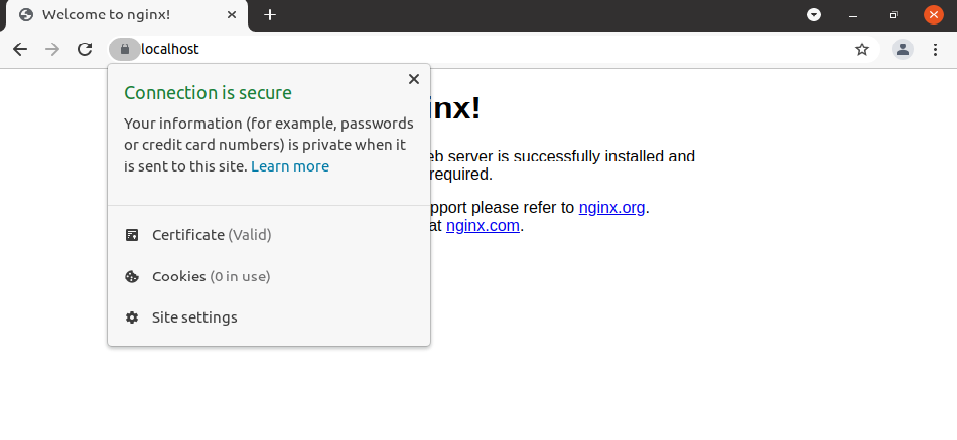
5. Now, navigate to https://localhost, and you will see the default NGINX page come up.

Trusting the Self-Signed Certificate
Even though the site renders using HTTPS, the browser still says it is not secured. The browser still displays a Not secure label because the browser doesn’t have the self-signed certificate’s public key to trust it.
For the browser to trust the self-signed certificate, the browser must have access to the certificate’s public key. To do that, you will need the certutil utility which comes with the libnss3-tools package.
1. First, install the libnss3-tools package by running the following commands:
sudo apt-get update
sudo apt-get install libnss3-tools
2. After the installation is complete, navigate to the folder where the certificate file is (in this case, /etc/ssl/certs) and run the following command to add the certificate.
certutil -d sql:$HOME/.pki/nssdb -A -t "CT,c,c" -n "localhost" -i localhost.crt3. Finally, close and reopen the browser. You should now see that the browser trusts the certificate.
Using NGINX to redirect HTTP to HTTPS
You should now have a certificate created and bound to NGINX with NGINX serving up traffic on HTTPS. It’s now time to redirect all HTTP traffic to HTTPS automatically.
In the NGINX configuration file, you can configure HTTP to HTTPS redirection in a couple of different ways. You can set redirection up on a site-by-site basis or all sites at once. Let’s go through each method.
After making changes to the NGINX configuration file, always ensure you restart NGINX (
systemctl restart Nginx).
If you have more than one site on your web server, you can selectively pick which one you’d like to redirect HTTP to HTTPS traffic on. To do that, configure the NGINX configuration file as shown below.
The snippet below configures NGINX to listen on port 80 (HTTP) and immediately send a redirect request (HTTP/301) to the user using the same $request_uri that they requested but using HTTPS.
server {
    listen 80;
    listen [::]:80;
    server_name <Your server name goes here>;
    return 301 https://<Your server name goes here>$request_uri;
}
If you navigate to http://localhost, you’ll now see that you’re automatically redirected to that same page only encrypted with HTTPS.
If you’d like to redirect all HTTP traffic destined for your webserver to HTTPS, replace the server_name attribute from the server name to simply _. The _ value is like a wildcard for all incoming hostnames.
You’ll also see the redirection statement (return 301) has changed to https://$host$request_uri indicating that you want to redirect whichever hostname is typed in as the $host variable returns the domain name of a request.
server {
    listen 80;
    listen [::]:80;
    server_name _;
    return 301 https://$host$request_uri;
}
Conclusion
You should now have to use NGINX to redirect HTTP to HTTPS solution set up and working. Navigate to your web server on HTTP and notice how it automatically redirects you!
What areas do you see that would benefit the most from this approach?