


How do you currently handle local Windows administrator passwords? Every Windows system has one and they have the keys to the kingdom of each PC. Since local admin passwords are not part of Active Directory (AD), you must manage each account on every computer separately. It’s a pain.
Much of the time, organizations don’t think too much of it and just set a standard administrator password on each Windows machine. This practice, although convenient, opens organizations up to a much bigger problem when that one, master password is put into the wrong hands. Having a separate local administrator password on each computer doesn’t necessarily prevent a malicious individual from accessing one PC but it prevents the lateral exploitation of other PCs considerably.
Microsoft Local Administrator Password Solution (LAPS) can help.
In this article, you’re going to learn how to secure your AD-joined computers by setting up LAPS.
What is Microsoft LAPS?
LAPS is a vital part of keeping a Windows environment secure. LAPS is a tool that works in a clever way; it automatically randomizes the local administrator password on all domain computers with LAPS activated and changes each password regularly.
LAPS ensures that you have randomized local administrator passwords across your domain and prevents lateral movement from hackers and malware. Now, you might think that a long local administrator password on the client might protect you from this but it that’s not true.
Hackers can use a Pass-The-Hash method to rapidly spread through your domain and might even come across a domain admin credential by using the same method. LAPs prevents this activity by forcing malicious individuals to discover a password for each, individual machine.
LAPS in Practice
LAPS has three main parts:
Locked-Down AD Attributes
LAPS stores each local administrator password for every controlled computer in AD called ms-Mcs-AdmPwd. LAPS also needs to know when the passwords expire to change it so it also stores another AD attribute called ms-Mcs-AdmPwdExpirationTime. These AD attributes are only read/writeable by specified AD principals like a group or a user and also writable by the computer account that’s using the password.
GPO Settings
To provision LAPS on a computer and to change the password LAPS also has a set of GPO settings. When the GPO is linked to a set of computers, the LAPS settings are distributed to each computer. When the computer applies GPO settings, LAPS uses a special DLL file to interpret them.
When LAPS see that the current date is past the expiration date of the password it will:
- Randomize a new password and set it as the local administrator password.
- Write the new local administrator password to the Ms-Mcs-AdmPwd attribute in AD.
- Writes a new expiration date to ms-Mcs-AdmPwdExpirationTime.
By using this clever yet simple method the domain computers stays even more secure.
Setting up LAPS
Enough information, let’s get down to actually seeing what LAPS can do! Setting up LAPS is not complicated but does require a few steps you’re going to learn in this tutorial. They are:
- Installing the LAPS Management Tools on your admin machine.
- Extending the AD schema to add the two custom AD attributes LAPS uses.
- Setting appropriate privileges for various components in AD.
- Building the LAPS GPO that will get applied to Windows computers.
- Deploying the LAPS GPO Extension to applicable Windows computers.
Once you’re with the above steps, you will have a fully-functional LAPS environment set up and ready to go!
Prerequisites
In this article, you’ll be setting up LAPS for real. If you’d like to follow along, please be sure you meet a few prerequisites first.
- An AD Domain (2003 and upwards)
- A computer running Windows (10 or Server 2012+ is recommended) has RSAT for Active Directory installed.
- Have access to an account that is both a member of the AD Domain Admins and Schema Admins groups.
All examples in this article will be using an AD domain called contoso.com.
Best practice for the schema admin group is to only be a member of it when you need the permissions.
Installing Microsoft LAPS Management Tools
To get started, you must first install the LAPS Management Tools on your admin computer. These management tools will install both the LAPS GPO extension (if selected) and the management tools to configure LAPS.
- Start by downloading the LAPS.x64.msi file and launch it as an admin and click Next.
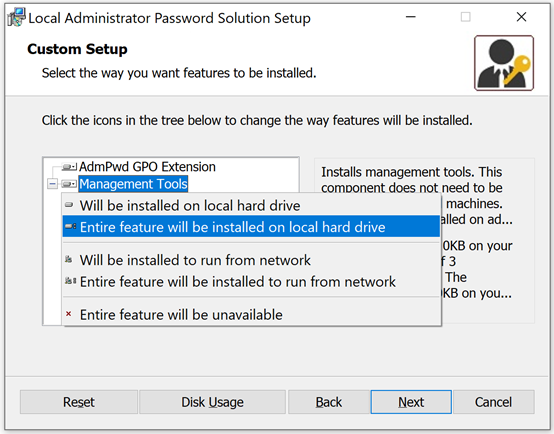
2. Press Next until you come to the custom setup then click Management Tools and Entire feature will be installed on local hard drive to install both of these components. If you would not like the current machine to be managed by LAPS then select AdmPwd GPO Extension.
3. Click Next until the install finishes and exit the installer.
You have now installed LAPS GPO extensions (if selected) and it’s management tools and we can now start extending the AD schema and adding our GPOs.
Extending the AD Schema
As mentioned earlier, LAPS uses two AD attributes called ms-Mcs-AdmPwd and ms-Mcs-AdmPwdExpirationTime. These two attributes are not default and must be added to the AD schema.
- Start out by adding a member of the Domain Admins groups to the Schema Admins group if the account is not already a member. We’ll call this your “admin account”.
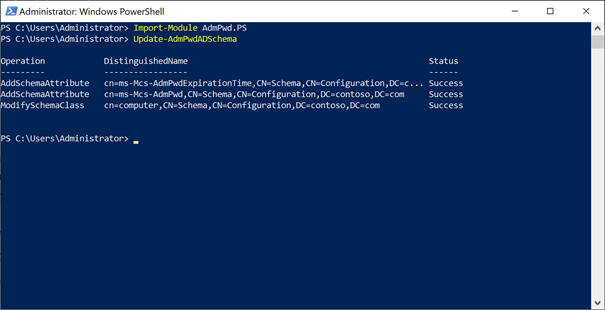
- Start PowerShell as your admin account and import the AdmPwd PowerShell module by executing
Import-module AdmPwd.PS. - Once the module is imported, run the command
Update-AdmPwdADSchemato update the AD schema adding the two AD attributes. You can see the output in the following screenshot.
You now extended our AD schema to support LAPS and are ready to set permissions in Active Directory.
Configuring Active Directory Permissions
Each computer needs the ability to update their local administrator password and expiration time AD attribute. To do that, each computer must have self-write permission to the ms-Mcs-AdmPwd and ms-Mcs-AdmPwdExpirationTime AD attributes. Luckily most of this work is easily done with the AdmPwd PowerShell module.
Allowing Machines to Save Their Password
First, ensure each computer can save their password to the ms-Mcs-AdmPwd AD attribute and update when that password expires in the ms-Mcs-AdmPwdExpirationTime AD attribute. The AdPwd PowerShell module has a command you can set these permissions called Set-AdmPwdComputerSelfPermission by organizational unit (OU) which applies to all child OUs.
In PowerShell, run Set-AdmPwdComputerSelfPermission -OrgUnit ‘OU=Workstations,DC=contoso,DC=com’ remembering to update your specific OU and domain name.
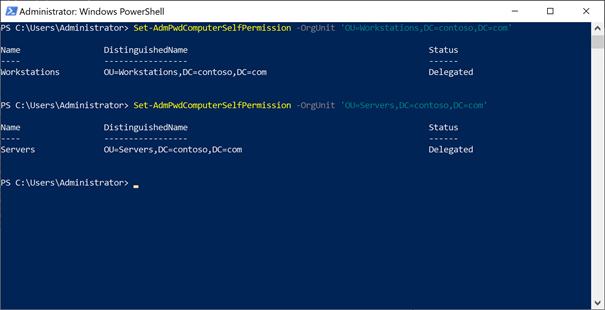
If you’d like LAPS to control more OUs, repeat the above command for each OU in AD.
Locking Down AD Attributes by Finding Extended Rights
To ensure that only the users and groups that you want to have permissions to read and reset the local admin password of each computer, you need to audit who has access. Specifically, you need to know that only the accounts that needs to have “Extended rights” have it.
To find accounts with extended rights, run Find-AdmPwdExtendedRights -OrgUnit 'OU=Workstations,DC=contoso,DC=com' | Select -ExpandProperty ExtendedRightHolders ensuring to replace your OU and domain name.
You can now see in the following screenshot that CONTOSO\joe-the-admin and CONTOSO\MDT-service have extended rights to the Workstations OU.
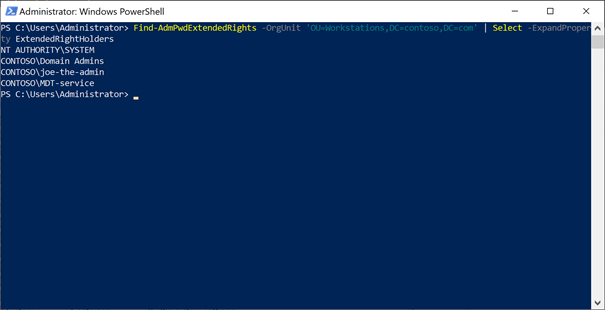
The MDT-service permission does indeed need the extended right, but joe-the-admin does not. You now need to remove the permission for joe-the-admin.
You’ll need to repeat this process for all OUs that you set the self-write permission on in an earlier step.
Removing Extended Rights
Once you’ve identified each account to remove extended rights from, it’s now time to actually do it.
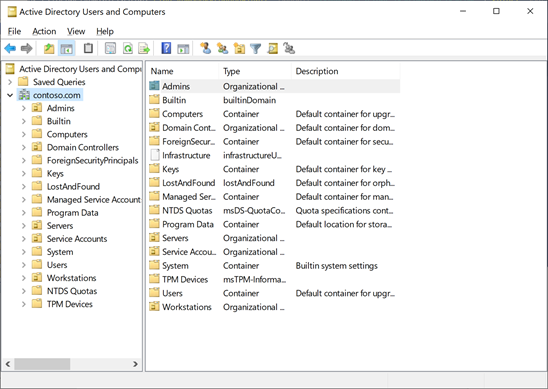
- Open Active Directory Users And Computers and click on View in the upper menu and ensure Advanced Features is enabled. When you enable advanced features, you’ll see all of the typically hidden OUs as shown in the following screenshot.
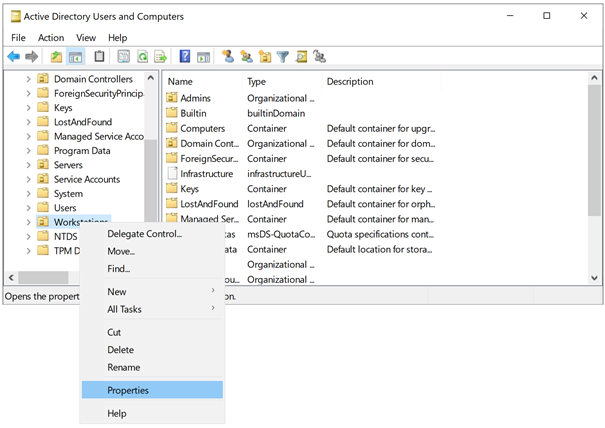
2. Right click on the OU that you want to remove the extended right on and click Properties.
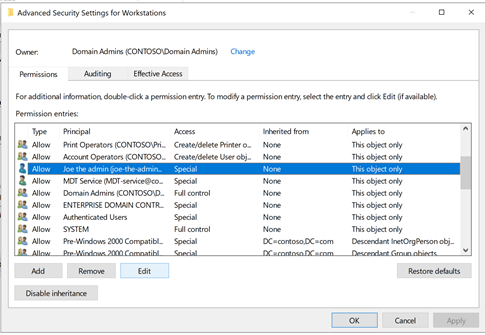
3. Click on the Security tab and then click the Advanced button.
4. Find the account or group that you want to remove the extended rights for and remove it by selecting it and clicking on Remove.
5. Repeat these steps as needed for all principals with extended rights.
Giving Permission to Read and Reset the Local Administrator Password
Now that you’ve made sure that only appropriate accounts have extended rights, you now need to to create two AD groups for reading and resetting the local admin password called LAPS Workstations Password Read and LAPS Workstations Password Reset.
Note that the group names specified here are not mandatory. You are free to use any group name you please.
With a PowerShell console still open with your admin account, enter the following commands to give both AD groups permission to read the local administrator password for computers in the Workstations OU.
PS> Set-AdmPwdReadPasswordPermission -OrgUnit 'OU=Workstations,DC=contoso,DC=com' -AllowedPrincipals "LAPS Workstations Password Read"

PS> Set-AdmPwdResetPasswordPermission -OrgUnit 'OU=Workstations,DC=contoso,DC=com' -AllowedPrincipals "LAPS Workstations Password Reset"
You’ve now enabled the AD groups above to read and reset local administrator passwords for computers in the Workstations OU. You now need to add the administrators or groups required to read or reset the passwords.
Creating a Central Store for Group Policy templates
For LAPS to enable itself once installed on the computers, first create a group policy by importing the group policy templates to the PolicyDefinition store. The PolicyDefinition store is a folder located on all domain controllers.
Never enable a LAPS GPO that targets the domain controllers. It’s not supported and may cause unexpected problems.
- Pick out a domain controller in AD; any domain controller will work.
- Ensure a \\contoso.com\SYSVOL\Policies\PolicyDefinitions exists. If not, create it now.
- Copy the contents of C:\Windows\PolicyDefinitions on your admin computer (the one you installed LAPS on) to \\contoso.com\SYSVOL\Policies\PolicyDefinitions folder on the domain controller.
Creating the GPO
Now let’s copy the LAPS GPO templates to the Central Store (PolicyDefinitions folder).
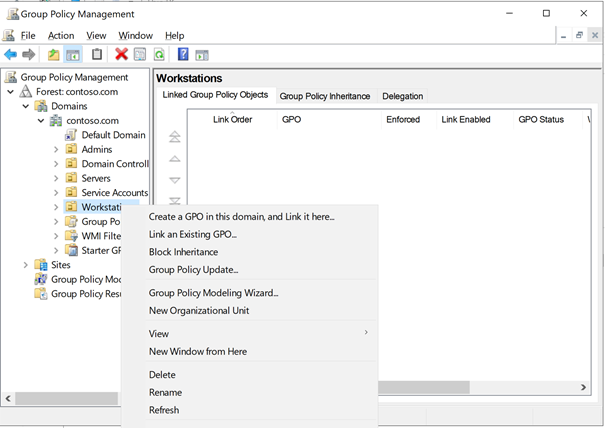
- Open Group Policy Management under your admin account,right-click the OU you want to enable LAPS in and click Link an Existing GPO…
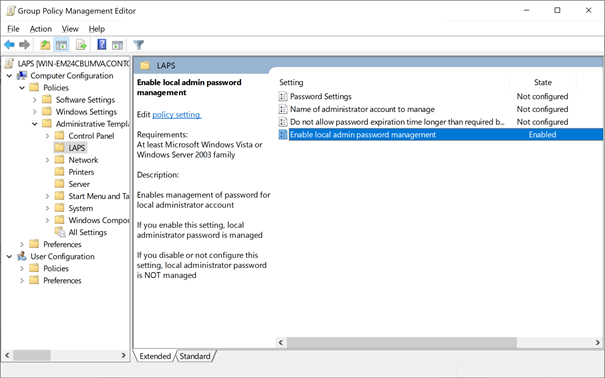
2. Navigate to Computer Configuration —> Administrative Templates —> LAPS and set Enable local admin password management to Enabled. If you have different requirements for Password complexity, edit the Password Settings accordingly.
You’re almost done! Now link this GPO to all OUs that you want to use LAPS in.
Deploying LAPS GPO extension
Once the GPO is applied to all applicable OUs with computers in them, you now need to deploy the LAPS GPO extension. You’ve got a couple of different ways to install this extension by either installing the MSI (as shown earlier) or by registering the LAPS DLL file.
If you choose to install the MSI, on every computer inside of a LAPS-controlled OU, run the following command to enable LAPS.
> msiexec /q /i \\server\share\LAPS.x64.msiIf you choose to enable LAPS by registering the DLL, you can do so with the following command.
> regsvr32.dll \\server\share\AdmPwd.dllYou can use any remote execution tool you have to run these commands on the computers.
Deploying the LAPS MSI with a GPO
Using a GPO is the easiest method to ensure that the LAPS GPO extension is installed on all computers.
- Copy LAPS.x64.msi to a network share accessible by all Domain Computers.
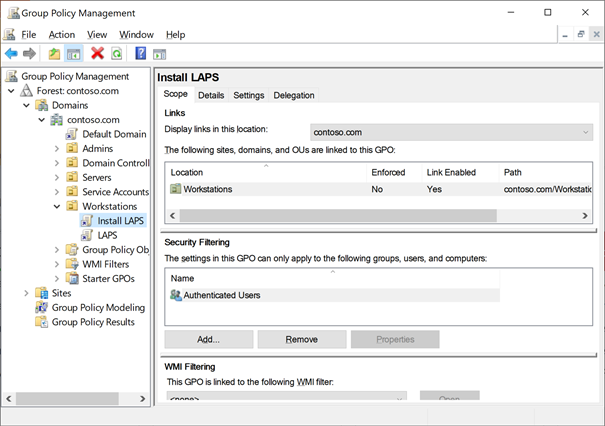
- Open Group Policy Management on your admin computer and create a GPO called Install LAPS or something similar.
3. Right-click on the Install LAPS GPO, click Edit and navigate to Computer Configuration —> Policies —> Software Settings —> Software Installation.
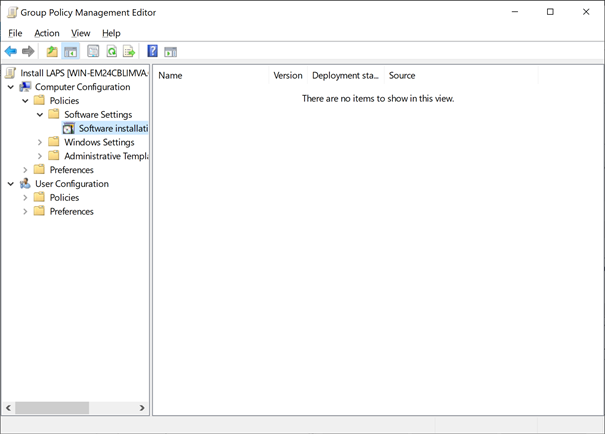
4. Right-click on Software Installation and navigate to New—> Package…

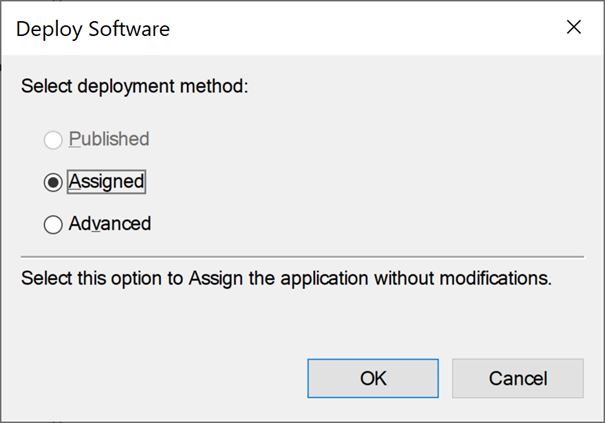
5. Navigate to the share that you copied LAPS.x64.msi, select it, click OK and select Assigned.
6. Now link the GPO to the same OUs as you configured LAPS for. You’re now ready to test LAPS!
Testing LAPS
To ensure that LAPS is working as designed on the controlled computers, let’s now force one of the computers to apply the aforementioned GPO and see what happens.
- Restart a computer that’s located under one of the OUs you just configured. Once up again, the computer should begin installing LAPS.
- Once LAPS installs on the computer, reboot the machine once again and open up a PowerShell console as administrator on your admin computer as an account that’s a member of the LAPS Workstation Password Read and LAPS Workstation Password Reset AD groups .
- Run the
Get-AdmPwdPassword <computername>command using the computer name you had just rebooted and installed LAPS on. If all went well, you will see something similar to the output in the following screenshot.
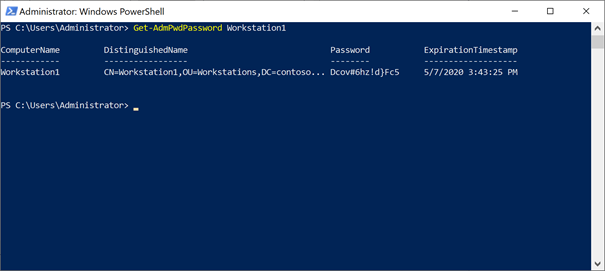
4. Now try to log into the LAPS-controlled computer with the displayed password above. If it worked, you should be in.
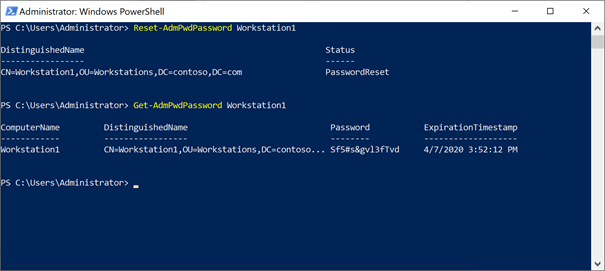
5. Now try to reset the password by running Reset-AdmPwdPassword <ComputerName> and rebooting the computer. See how it changed passwords in the following screenshot?
You now have LAPS working in your environment. And while the administration is quite easy there’s a few things that you should know about…
Tips and tricks for Using LAPS for Real
While the setup covered above is enough for most smaller environments it might be too insecure or not offer the audit level needed for larger organizations. Here are a few tips for making it work in the real world.
1. Turn on Auditing
Auditing when someone reads or resets a password is important, especially considering that you can hook up alarms to it if someone reads the password of all computers. Luckily the AdmPwd module provides us with a cmdlet to enable just that.
PS> Set-AdmPwdAuditing -AuditedPrincipals Everyone -OrgUnit "OU=Workstations,DC=contoso,DC=com"2. Ensure No User Can Directly Read the ms-mcs-AdmPwd AD Attribute
One way is to ensure a user can’t read ms-mcs-AdmPwd AD attribute is to create a self-service method get the local admin password of a computer. While out of scope for this article, check out tools like JEA or WebJEA if you don’t have an existing self-service portal suitable for this.
3. Reset the Ms-Mcs-AdmPwdTime Attribute During Disk Imaging
You must remember to reset the Ms-Mcs-AdmPwdTime attribute when reimaging a LAPS-controlled computer otherwise it will not trigger the password change and will keep the local admin password given by the image. It will, however, trigger after the Ms-Mcs-AdmPwdTime expires.
You can use the following PowerShell command to reset the ExpirationTime without the AdmPwd module:
# With RSAT
Get-ADComputer Workstation1 | Set-ADObject -Replace @{"ms-mcs-AdmPwdExpirationTime"=(Get-Date)}

# Without RSAT
$Computer = New-Object DirectoryServices.DirectoryEntry "LDAP://CN=Workstation1,OU=Workstations,DC=contoso,DC=com"
$Computer.'ms-Mcs-AdmPwdExpirationTime'.Clear()
$Computer.CommitChanges()
4. Remember the ms-Mcs-AdmPwd Attribute Stays in the AD Recycle Bin
When you delete an object in AD and have the AD Recycle Bin enabled, AD usually removes important attributes; luckily ms-Mcs-AdmPwd is protected from that!
5. LAPS is Not for Temporary Access
While tempting, LAPS is not meant to give temporary access to suppliers, users and other types of accounts. Instead of using LAPS, use an AD group that’s a local admin of that specific computer and use TimeToLive on group memberships.
Conclusion
You’ve now learned how to deploy LAPS, setting its permissions and some tips and tricks for making it more secure. With an environment where LAPS is deployed all the local administrator password changes regularly and automatically. This greatly reduces the risks of having a domain-joined computer taken over by hackers or malware and hopefully it saves you from a lot of headaches.
If you have any questions, please feel free to tweet me at @AlexAsplund or leave a comment below.


