


A Linux killswitch is a must for any serious Linux VPN user. It guards your data against leaking to the internet by preventing anyone from accessing your data even if disconnected from the VPN. It also ensures that all information remains confidential regardless of what happens in between.
For a cyber-criminal, a kill switch is a nightmare. It’s a significant obstacle standing between them and their target. If the connection to your VPN drops for even a second because your computer or phone freezes, dies, or you accidentally cut the cord – as long as you have a kill switch enabled – none of that data can be accessed by anyone.
A VPN killswitch prevents traffic leaks, but it does not remove exposed personal records from broker databases. If that is part of your privacy checklist, compare MyDataRemoval privacy monitoring and data broker removal workflows before choosing a paid data removal service.
Prerequisites
To follow along, you will need:
- The configuration file to connect to your VPN provider. This article uses NordVPN as the VPN provider.
- A Ubuntu device with the OpenVPN client. The examples will use Ubuntu 20.04 and OpenVPN 2.5.3.
Installing the Uncomplicated Firewall (UFW)
In this tutorial, the Linux killswitch hinges on the configuration of the firewall. First, start by installing the Uncomplicated Firewall (UFW) on your device and setting the firewall up to act as the kill switch.
Before diving in, make sure your Linux distro is up to date, or your UFW firewall might not work as expected. For example, the UFW might not load the settings at startup or an added/removed rule won’t load.
1. Run sudo apt install ufw -y to install the firewall.
The UFW firewall is installed by default on most Ubuntu distributions, so you may already have UFW installed.
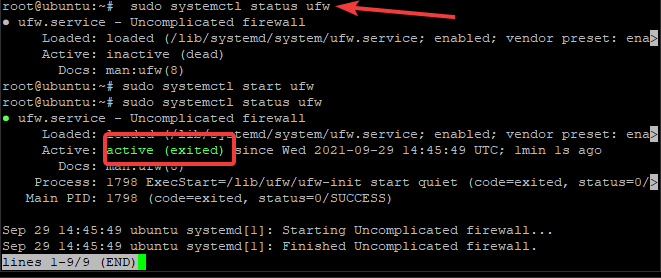
2. Start the UFW service with sudo systemctl start ufw.
3. Check if the UFW installation was successful. Run the sudo systemctl status ufw command, and if successful, the output will show active (exited) in green as seen below.
4. Start UFW with sudo ufw enable. Press Y and then Enter when asked if you want to Proceed with operation (y|n)?

Allowing Remote Access Protocols
Now that the firewall is installed, you need to configure UFW to allow any protocols you wish to use with the VPN.
Start by making sure you are not locked out of your client: you may need to log in via SSH if something goes wrong with your OpenVPN connection. If the connection goes down and you can’t log in via SSH, you will need to access the device physically to hop back on.
1. Allow SSH connections with the sudo ufw allow ssh command. The UFW firewall reads the ports and protocol in the /etc/services file and opens the ports accordingly. You can check the command output below.

It’s highly recommended to add an extra layer of security by requiring your users to authenticate with an SSH key when connecting via OpenVPN. This procedure will protect against brute force attacks and unauthorized connections.
2. Next, you’ll need to add rules to allow the VNC protocol by allowing traffic on the corresponding ports.
As for the VNC protocol, it is optional. VNC allows remote access, similar to SSH. VNC provides a graphical console, while SSH only allows a text console. Allow VNC traffic with sudo ufw allow 5901:5910/tcp command.
These commands will give an output like the one below.

3. Once your rules are added, make sure they are applied successfully. The sudo ufw show added command will list all the added rules, as you can see below.

Configuring the VPN Kill Switch
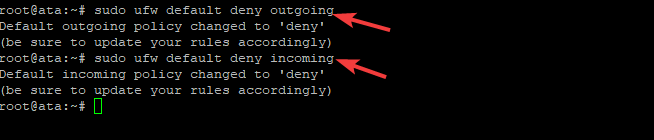
In this section, you will learn how to set up the actual kill switch using the UFW firewall. To start run the following two commands.
sudo ufw default deny outgoingsudo ufw default deny incoming
The ufw default deny command blocks all outgoing/incoming traffic to/from your machine, aside from the explicitly allowed SSH connection and remote protocols you set up in the previous sections. You can see the result of the commands in the screenshot below.
Next, add an exception to the UFW ruleset so your machine can connect to the VPN server: you will need your VPN server configuration file. In this tutorial, the OpenVPN files is named, ata.ovpn and downloaded from the NordVPN site.
Your OpenVPN configuration file name may be different. This tutorial uses the naming convention of “ata” but feel free to name yours as you deem appropriate!
Next, look inside the ata.opvn OpenVPN configuration file with the command, sudo head /etc/ata.ovpn. The resulting output includes information such as the port, protocol, and IP address of the VPN server you connect to, with NordVPN shown as the example below.
To craft the correct UFW command, take note of the port, protocol, and public IP address info output from the configuration file.
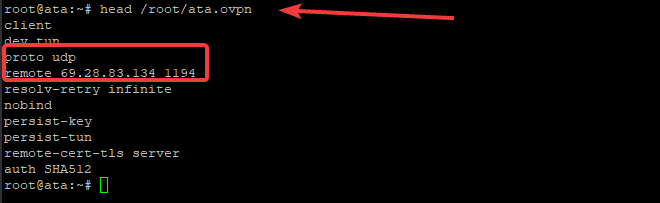
Next, create the ufw allow out command as follows: sudo ufw allow out to 69.28.83.134 port 1194 proto udp. As you can see the IP address and port used are from the configuration line starting with remote and the protocol from the line starting with proto.
This example uses NordVPN as the VPN provider. For NordVPN the 1194 UDP port must be open. If, for example, you use Express VPN, the 1195 UDP port must be open, not the 1194 port. Every VPN provider may have unique UDP ports.
Creating a Firewall Exception for OpenVPN
Of course, for proper usability, you must allow OpenVPN through the firewall. Up to this point, you have blocked all incoming and outgoing traffic with the exception of a few ports.
To begin with, you must find the network interface name that the OpenVPN client uses. Run the ifconfig command to list all configured network interface names, as shown below.
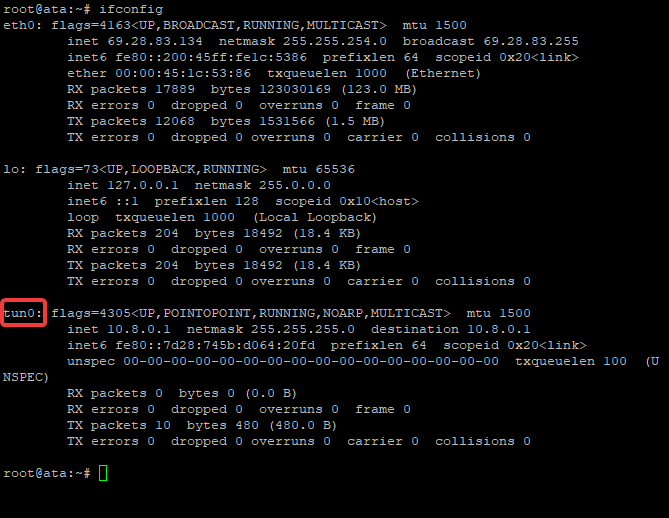
Notice the network interface with the name tun0 in the resulting list. The tun0 interface is the VPN interface that all incoming and outgoing traffic routes through and the interface to allow. It’s a virtual interface added at boot time, which simply means it is not a physical connection. This interface is the default in OpenVPN.
Add a firewall exception for the VPN tunnel interface you found with ifconfig to force all traffic through it. Otherwise, there won’t be any internet access, and your kill switch will fail. Run the command below to add an exception for OpenVPN traffic on the tun0 interface.
sudo ufw allow out on tun0 from any to any
Some applications, such as accessing a voice chat application while playing games, require incoming connections through the VPN. To allow incoming connections, run the following command:
sudo ufw allow in on tun0 from any to any
Configuring the OpenVPN Client
In this final section, you will configure the OpenVPN client to run as a service utilizing the configuration that you previously created.
Start by renaming your plain-text ata.opvn file **(your filename may differ) to ata.conf. To run the OpenVPN client as a background system service, the filename must be named with the *.conf file extension. Additionally, you will also move the file to the /etc/openvpn directory.
Move the config file with sudo mv /root/ata.ovpn /etc/openvpn/ata.conf.

Now, change the directory to /etc/openvpn and verify that the file is there.
cd /etc/openvpn
ls
With the configuration file in the /etc/openvpn directory, start the OpenVPN client service with the systemctl command. To start the service, run: sudo systemctl start [email protected].
The “ata” portion of the OpenVPN client name is from the name of the configuration file used. Yours may differ according to the name of the file.

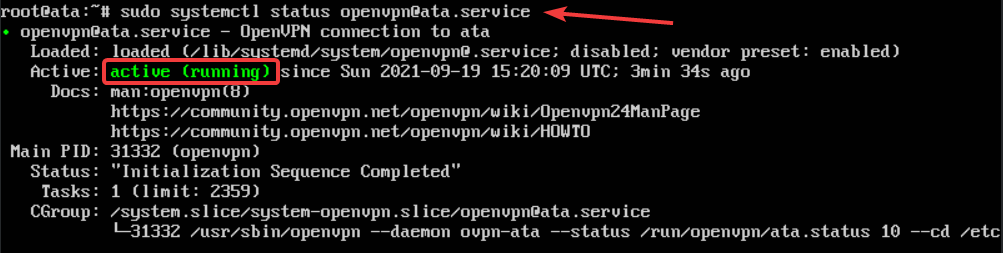
To verify that the OpenVPN service is running, use the systemctl status command as follows.
sudo systemctl status [email protected]As shown below, the active (running) green status of the OpenVPN service is displayed.
Finally, you need to configure your device to connect to your VPN service automatically. Automatically connecting to the VPN ensures that OpenVPN will always be running, even if you restart your machine.
Run the sudo systemctl enable [email protected] command, and from now on, once the OpenVPN service starts, it will automatically connect your device to the VPN.

Conclusion
This article has shown you all the steps needed to set up a Linux killswitch for your VPN connection. A kill switch disconnects the network connection from your computer if the connection drops unexpectedly, preventing data leaks and keeping you safe online.


