


If you’re a system administrator and wondering how to add a Linux desktop and server to your current Linux Active Directory (AD), then you’ve come to the right place. Adding new clients to AD simplifies user management between multiple client machines, especially when you’re managing hundreds of computers in your environment.
In this tutorial, you’ll learn how to add Linux systems (Ubuntu 20.04, Linux Mint, and Ubuntu Server) to a Linux Samba Active Directory. Doing so allows Samba Active Directory users to log in to a Linux client machine with its own home directory, default shell, and sudo root privileges (if needed).
Ready? Jump right in!
Are there compromised passwords in your Active Directory? Download Specops Password Auditor and scan for free.
Prerequisites
This tutorial will be a hands-on demonstration. If you’d like to follow along, be sure you have the following requirements:
- Linux Desktop Machine – This tutorial uses the Ubuntu 20.04 Desktop, but you can use other distributions such as Linux Mint and Ubuntu Server.
- A non-root user with
sudoprivileges. - A fully functional Samba Active Directory (AD).
Setting up a Permanent DNS Resolver
Before you can add Linux clients to the Samba Active Directory, you must ensure the Samba Active Directory domain name is reachable from the client machine. How? By setting the Samba AD IP address as the default DNS resolver for each client machine in the /etc/resolv.conf configuration file.
1. Open your terminal, and run the systemctl command below to disable and stop the systemd-resolved service. Doing so ensures the Linux client uses the static and permanent DNS resolver.
The administrator defines this permanent DNS resolve and is not replaced by any third service like systemd-resolved.
# disable and stop systemd-resolved service
sudo systemctl disable --now systemd-resolved
2. Next, run the unlink command below to remove the symlink file (/etc/resolv.conf). You’ll replace this file in the next step. # remove symlink file /etc/resolv.conf sudo unlink /etc/resolv.conf
# remove symlink file /etc/resolv.conf
sudo unlink /etc/resolv.conf
3. Now, create a new file named /etc/resolv.conf using your preferred editor and populate the file with the following configuration.
The configuration below sets the main and fallback DNS resolvers.
# Samba AD as main DNS resolver
nameserver 172.16.1.10

# fall-back DNS resolver using Cloudflare
nameserver 1.1.1.1

# hostname lookup for domain example.lan
search example.lan
4. Run the chattr commands below to make the file /etc/resolv.conf immutable to ensure client machines always use Samba AD as the default DNS resolver. These commands also prevent overwrites from other services such as NetworkManager.
# making the file `/etc/resolv.conf` immutable
sudo chattr +i /etc/resolv.conf
# remove immutable attribute
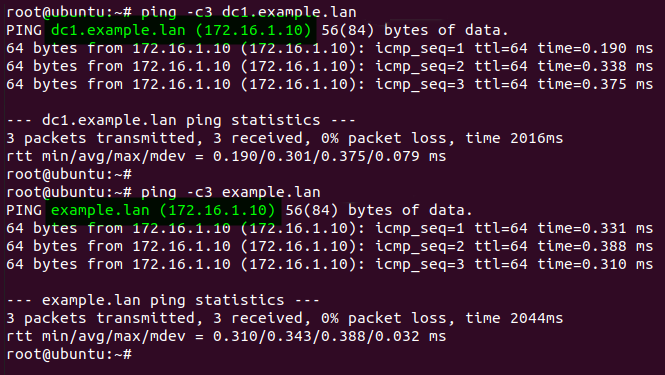
sudo chattr -i /etc/resolv.conf5. Finally, run the ping commands below to verify the connection to Samba AD domain names dc1.example.lan and example.lan.
# ping to AD server dc1.example.an and example.lan
ping -c3 dc1.example.lan
ping -c3 example.lan
If your connection is successful, you’ll receive a reply message from the AD server, and the domain dc1.example.lan and example.lan will be resolved to the Samba AD IP address.
Setting up Chrony as NTP Client
After you’ve configured the DNS resolver, you’ll now set up Chrony to synchronize time between the client machine to the Samba AD server. If there is a time difference (five minutes max) between the client machine and the AD server, the client cannot access all resources on the AD server.
1. Run the below command to install chrony to your Linux clients.
# install chrony
sudo apt install chrony -y
2. Now, edit the default Chrony configuration (/etc/chrony/chrony.conf) in your preferred editor and add the following configuration.
The bindcmdaddress value must be the client IP address. The Chrony service will be running on this IP address. While the server option is where you add your Samba AD domain name as the NTP server.
# run Chrony as NTP client on the IP address
bindcmdaddress 172.16.1.85
# time synchronize to the Samba AD dc1.example.lan
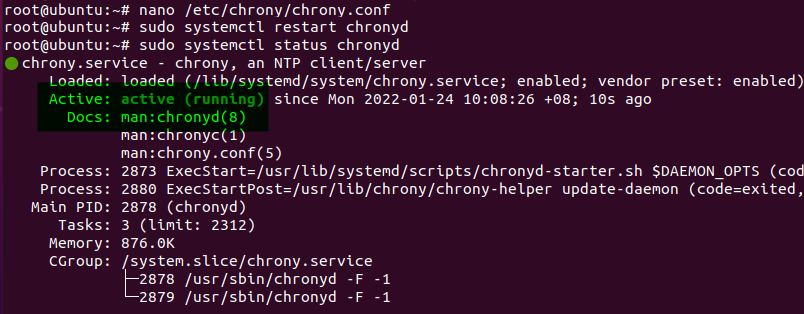
server dc1.example.lan iburst3. Next, run the systemctl commands below to restart the chronyd service and verify that the service status is active (running). # restart chronyd service sudo systemctl restart chronyd # verify status chronyd service sudo systemctl status chronyd
# restart chronyd service
sudo systemctl restart chronyd

# verify status chronyd service
sudo systemctl status chronyd
As you can see below, the chronyd service is active (running) and enabled. The Chrony NTP client will now start automatically at system startup.
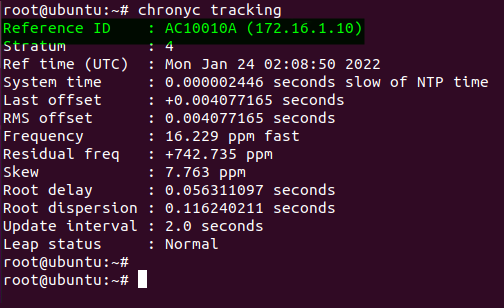
4. Finally, run the below command to verify that the Chrony service on the client machine is connected to the Samba AD NTP server. chronyc tracking
chronyc trackingAs you can see below, the Chrony service on the Linux client is connected to the Samba AD NTP server with the IP address 172.16.1.10.
Joining Linux Clients to Samba Active Directory
You’ve now configured Chrony on the Linux client. But how do you add this client machine to the Samba Active Directory? Start by installing and configuring the realmd and sssd services to add Linux clients to the Samba AD server.
1. Run the apt command below to refresh your package index. This command ensures you’re installing the latest version of packages from the repository.
sudo apt updateNext, run the below command to install the realmd and sssd services with all additional packages needed. The realmd service is used with underlying Linux services, such as sssd, to join the Samba Active Directory.
sudo apt install -y realmd sssd sssd-tools samba-common krb5-user packagekit samba-common-bin samba-libs adcliInput the default realm (in uppercase) for the Samba Active Directory, as shown below. You’ll use this default realm for the Kerberos authentication.
In this example, the default realm domain for Samba AD is EXAMPLE.LAN.
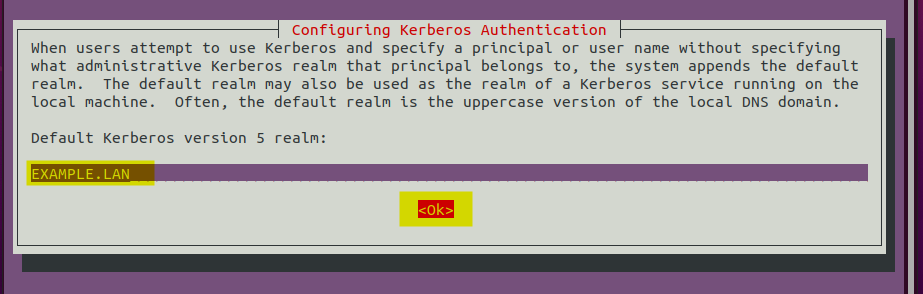
EXAMPLE.LAN for Kerberos authentication3. Create a new file /etc/realmd.conf using your preferred editor and add the following configuration. The below configuration performs the following:
- Handles behaviors of the Samba AD domain and users
- Specifies client connection to the AD server
- Determines whether to use automatic installation of additional services or not.
- Specific configuration for the
example.lanAD domain.
[users]
# define Samba AD users behavior
# define default home directory and shell for Samba AD users
default-home = /home/%U
default-shell = /bin/bash
[active-directory]
# define realmd connection to the Samba AD
# you can use `sssd` or `winbind` for realmd to join Samba AD
# os-name can used as an identifier for client
default-client = sssd
os-name = Linux Ubuntu and Mint Desktop
[service]
# disable automati install for additional realmd service
automatic-install = no
[example.lan]
# define behavior of Samba AD `example.lan`
# disable fully-qualified-names so you can use a username to identify Samba users
# automatic-id-mapping to yes will automatically generate UID and GID numbers
# user-principal to yes will automatically create UserPrincipalName for the client machine
# manage-system to yes to enabled realmd to manage client machine
fully-qualified-names = no
automatic-id-mapping = yes
user-principal = yes
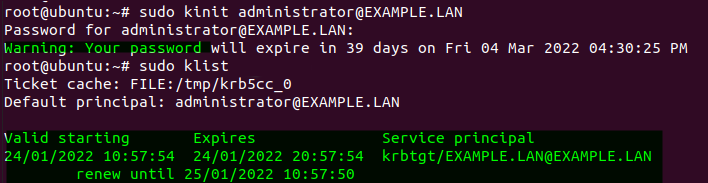
manage-system = yesRun the kinit command below to authenticate domain connection (EXAMPLE.LAN) to the Kerberos service using the default user (administrator).
Input the password for the administrator Samba AD user when prompted, as shown below.
Adding new clients to the Samba AD requires the use of the
administratoruser.
# authenticate to Kerberos server on EXAMPLE.LAN using administrator
sudo kinit [email protected]

# verify authentication and print detailed Kerberos tickets for administrator user
sudo klist
5. Now, run the realm join command below to add Linux clients to the Samba AD (example.lan). Replace UbuntuMintDesktop with a unique user principal name (UPN). Each client/machine must have a different UPN.
# joining/adding Linux Ubuntu/Mint to Samba AD example.lan
# --verbose to get full logs from the process
# --user-principal will automatically set the UserPrincipalName for this machine
# --unattended will run the realm command without prompting for a password prompt,
# because you've already authenticated through the Kerberos ticket
sudo realm join --verbose example.lan --user-principal=UbuntuMintDesktop/[email protected] --unattended
You’ll get the Successfully enrolled machine in realm message when the process completes. At this point, you’ve successfully added your Linux client to the Samba Active Directory.

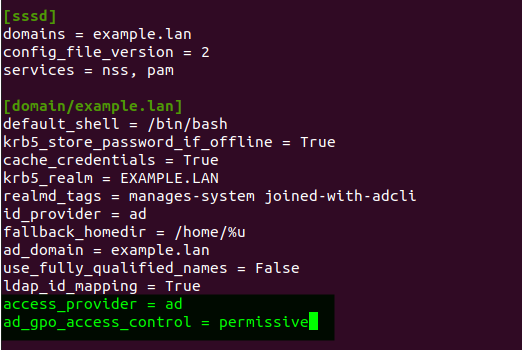
6. Next, open the /etc/sssd/sssd.conf configuration file in your preferred editor.
Add the following line, which changes the default group policy object (GPO) access control to permissive, and set the value of the access_provider to ad. The ad value indicates default authentication for the sssd service is an Active Directory.
During this writing, both Ubuntu 20.04 Desktop and Server will not allow AD users to log in when the
ad_gpo_access_controlis set toenforcing(the default value). So you change thead_gpo_access_controlvalue topermissive.But on Linux Mint, you can still log in using AD users, even when the
ad_gpo_access_controlis on theenforcingmode.
# change default GPO access control to permissive
ad_gpo_access_control = permissive
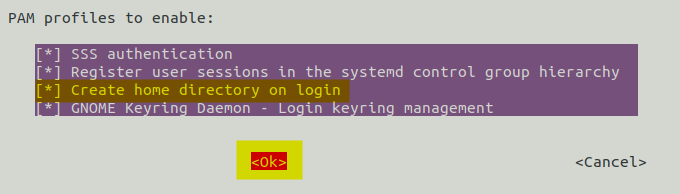
7. Run the pam-auth-update command below to modify the PAM configuration. This command enables the PAM module (pam_mkhomedir.so). Enabling the PAM module automatically creates a home directory for Samba AD users (only when the home directory is unavailable).
# modify PAM configuration
pam-auth-update
Select the Create a home directory on the login option at the terminal screen and select Ok to confirm.
Press the SPACE key to enable an option, and press the TAB key to move the cursor menu.
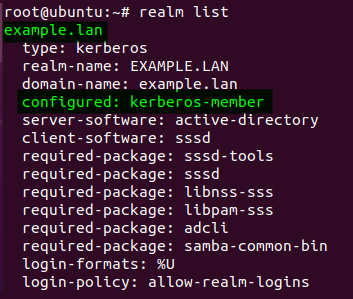
8. Run the realm list command below to verify your connection to the Samba Active Directory.
# Checking connected AD
realm list
If your connection is successful, you’ll receive a detailed AD connection, as shown below.
Below, you can see the Ubuntu/Mint desktop machine is connected to the Samba Active Directory (example.lan) as the (kerberos-member).
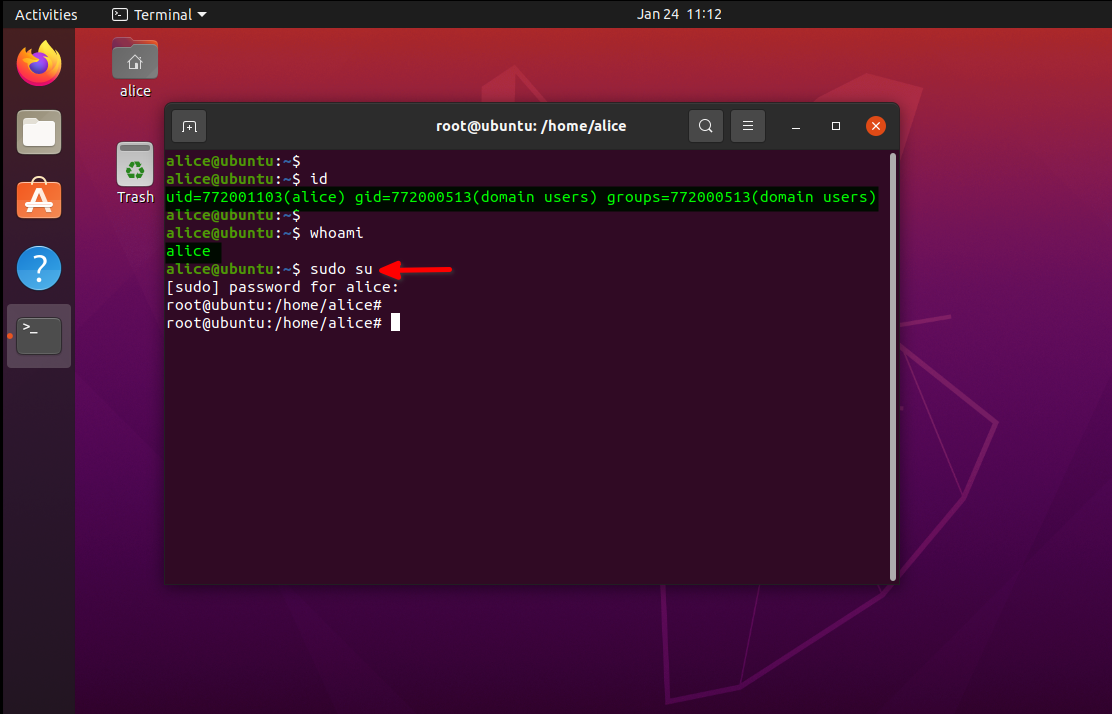
9. Now, run the id command below to check the Samba AD user.
# checking Samba AD user `alice`
id alice
If your installation is successful, you’ll receive random uid and gid for the Samba user alice. In this example, you can see the user alice is created and available on the Samba AD.

10. Additionally, run the following commands to set your default text editor and open (visudo) the /etc/sudoers file in your default editor. You can always change your preferred text editor, but the default editor is nano for this demo.
# Sets default editor to nano
export EDITOR=nano
# Opens the /etc/sudoers file in the default editor
visudo
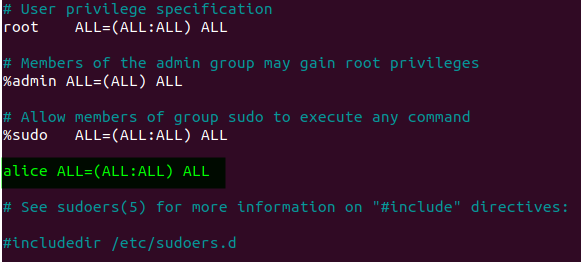
Add your Samba AD user to the sudoers file using the following format, save the changes and close the editor. Doing so lets you enable sudo privileges for the Samba user (if you need the user to run sudo).
# add Samba user `alice` to sudoers
alice ALL=(ALL:ALL) ALL
11. Finally, run the following command on the Ubuntu desktop to reboot the system to apply the new configurations.
But for Linux Mint and an Ubuntu server, you’ll still need to add some additional configuration, which is covered in the following section.
sudo reboot
Setting up LightDM for Samba Active Directory
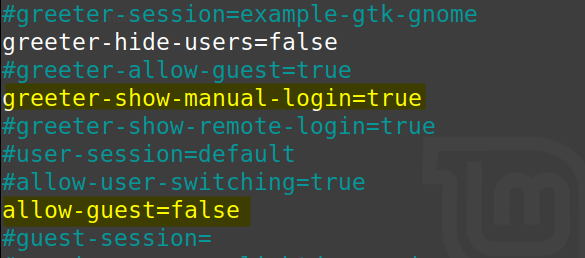
The default LightDM configuration for the manual login process using username and password is disabled on the Linux Mint desktop. You’ll change the LightDM configuration to enable the manual login process so that the Samba AD users can log in to the Mint Desktop machine.
Open the LightDM (/etc/lightdm/lightdm.conf) configuration file in your preferred editor and populate the following configuration under the [Seat:*] section.
The greeter-show-manual-login=true option below enables the manual login process on the LightDM, while the allow-guest=false option disables login for guest user.
# enable manual login
greeter-show-manual-login=true

# disable guest login
allow-guest=false
Now, run the below command to restart your Linux Mint desktop to apply new configurations.
sudo reboot
Setting up Kerberos Authentication for SSH Service
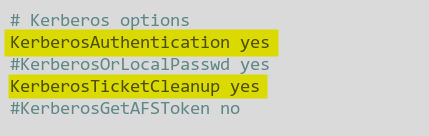
You must enable the Kerberos authentication on the SSH service in the server environment. Doing so lets the AD user log in to the server. How? By editing the SSH configuration file.
Open the SSH (/etc/ssh/sshd_config) configuration file in your preferred editor.
Uncomment the following options and set their values to yes:
KerberosAuthentication– Enables Kerberos authentication.KerberosTicketCleanup– Automatically destroys Kerberos tickets on logout
Now, run the command below to restart your server and apply new configurations.
sudo reboot
Logging in to Linux Machines using Samba AD Users
Now you’ve completed and added Linux clients to Samba AD. But how can you verify the Samba AD users can log in to those Linux clients? You can specify user and password on the Display Manager login screen on Linux Desktop clients. While for the Ubuntu server, you can connect through the secure SSH protocol.
Logging in to Ubuntu, Mint, and Ubuntu server looks different from one another. But no worries, you’ll see how to log in on each OS using Samba AD users in this demo.
Logging in to Linux Ubuntu Desktop
With Linux Ubuntu Desktop, logging in using Samba AD users is the same as how you typically log in on a user account.
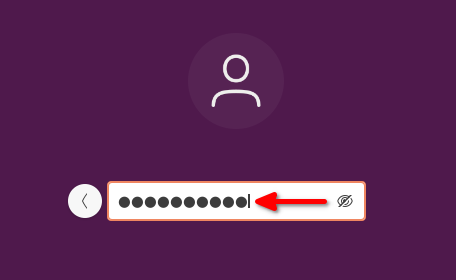
1. Boot up your Ubuntu desktop client, click the Not listed? option on the Ubuntu GDM login screen to log in with a different user.

2. Next, input your Samba AD user in the [email protected] format. This example uses the Samba AD user alice(example.lan), as shown below.
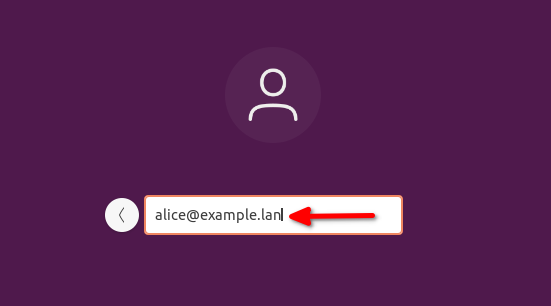
alice3. Input the password of your Samba AD user (alice) and press ENTER to log in.
After logging in, you’ll see the default Ubuntu Desktop as the screenshot below, where the Samba AD user alice is successfully logged in.
You can see below that the PAM module (pam_mkhomedir.so.) automatically created the user’s home directory. While the sudo root privileges are configured through the file sudoers.
Logging in to Linux Mint Desktop
For the Linux Mint desktop, logging in looks a bit different than how you log in on an Ubuntu desktop,
Click the Login button, input your user and password, as shown below, then press ENTER to log in.
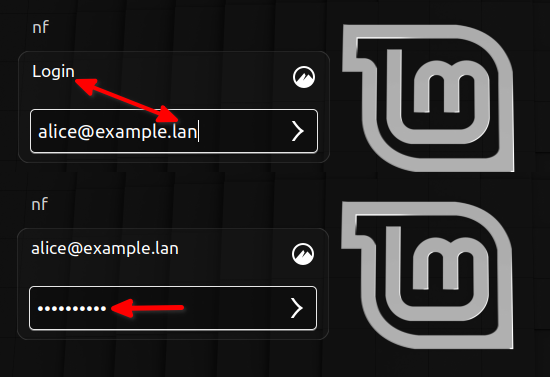
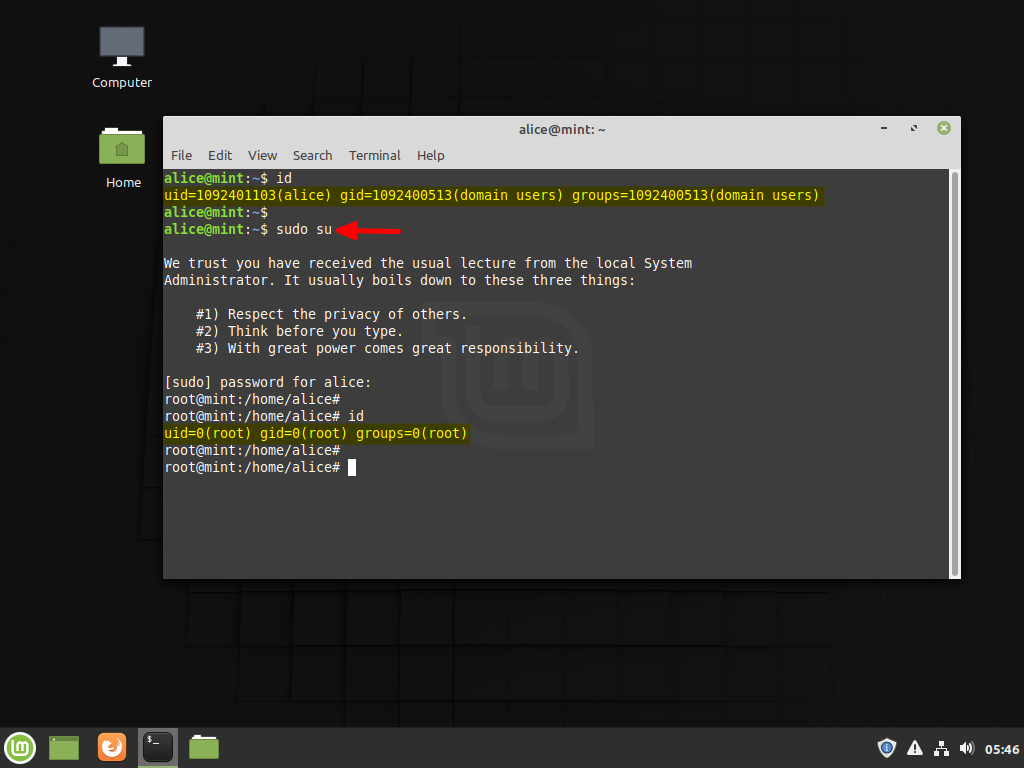
aliceNow you’ll see the Linux Mint Desktop for your Samba AD user like the one below.
Logging in to Ubuntu Server
Unlike the first two OS, you’ll log in to an Ubuntu server via the command-line environment using the ssh command.
Run the ssh command below from another machine to connect to the server using the Samba AD user following the user@server_ip format, as shown below.
# connect to SSH using AD user
ssh [email protected]
Type yes to add the server fingerprint identity and input the password for your Samba AD user to the Ubuntu server.
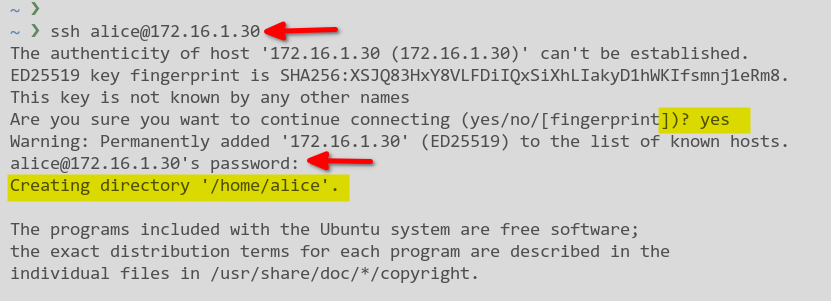
As you see below, the user’s home directory is automatically created, and the default shell for Samba AD users is Bash.

Enforce compliance requirements, block over 3 billion compromised passwords, and help users create stronger passwords in Active Directory with dynamic end-user feedback. Contact us today about Specops Password Policy!
Conclusion
Throughout this tutorial, you’ve learned how to add Linux clients (Desktop and Server) to the Samba Active Directory (AD) using the SSSD and Realm service. Also, you’ve learned to enable Kerberos Authentication on the SSH service for a Linux server.
Now, how would you leverage the functionality of Samba Active Directory? Perhaps try adding another server as Domain Controller (DC) to join the current Samba AD? This setup provides replication, redundancy, and load-balancing supports on your AD. As a result, you can add another group of clients to the Samba AD.


