

Generating SSL certificates can be a daunting task, one filled with frustration and sorrow. But it doesn’t have to be that way! If you have Windows 10 and OpenSSL along with a little help from this tutorial, you will be well on your way.
Not a reader? Watch this related video tutorial!
Not seeing the video? Make sure your ad blocker is disabled.
In this article, you’re going to learn how to install OpenSSL on Windows 10. Once installed, you’ll then generate SSL certificates, troubleshoot and debug certificates, and convert between formats.
Let’s begin mastering OpenSSL on Windows 10 with PowerShell!
Related: Managing Certs with Windows Certificate Manager and PowerShell
Prerequisites
In this article, you are going to learn using a hands-on approach. While OpenSSL historically is a Linux OS utility, you can use it with Windows OS as well.
- A Windows system with Local Administrator rights – The tutorial will be using Windows 10
- Windows PowerShell 5.1 (comes with Windows) or PowerShell 7
- Chocolatey – A package manager for Windows installed.
- PowerShell ISE, Visual Studio Code or any text editor of your choice
All screenshots in this guide were taken from Windows 10 build 1909 and PowerShell 7.
Installing OpenSSL on Windows 10 with PowerShell and Chocolatey
Assuming you have installed Chocolatey using the installation instructions, your first task is to install OpenSSL on Windows 10. To do this, open up your PowerShell console and run choco install OpenSSL.Lightas shown below.

That’s it! You’ve now installed OpenSSL with PowerShell.
Set up a Working Directory
This tutorial will be creating a few certificates to learn from. To ensure all of the work you do here is confined to a single folder you can clean up later, go ahead and create one.
This tutorial will store all certificates and related files in the C:\certs folder. You can create a folder with PowerShell by running the below command.
New-Item -ItemType Directory -Path C:\certsNow it’s time to configure OpenSSL.
Configuring OpenSSL
By default, OpenSSL on Windows 10 does not come with a configuration file. This is intentional because there are a lot of configuration options that you can customize. For the purposes of this guide, you are going to use a sample configuration that you can customize later to best suit your security requirements.
Open up PowerShell and run the below command. This command downloads a sample configuration file from MIT and saves it as openssl.cnf in the current working directory.
Invoke-WebRequest 'http://web.mit.edu/crypto/openssl.cnf' -OutFile .\openssl.cnfYou can now open up the openssl.cnf file and you should see something that looks like below.
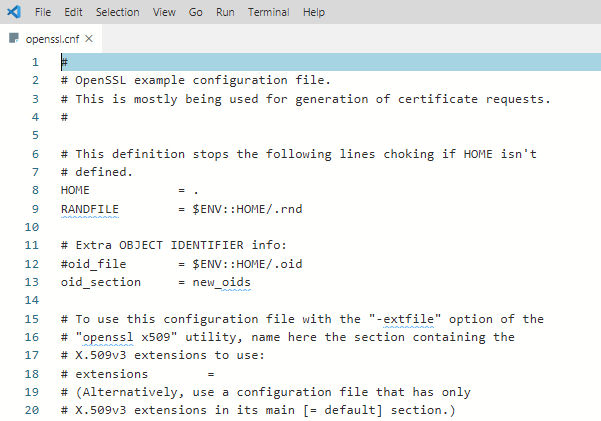
The downloaded configuration will work as-is for now. Do not use the defaults in a production environment!
Update PowerShell Profile Environment Variables
To make things go smoothly, you should modify your PowerShell profile on Windows 10. Setting up some environment variables allows you to easily switch between different versions of OpenSSL that you may have installed.
I suggest adding two environment variables to your PowerShell profile called path and OPENSSL_CONF. You will update the PATH environment variable to ensure you can run the openssl binary in any location while on the command line.
Below you’ll see a way to create a PowerShell profile if you don’t already have one. This command appends the OpenSSL binary path to your PATH and assign the configuration file path to OPENSSL_CONF.
# Add environment variables to PowerShell profile
# Test for a profile, if not found create one!
if (-not (Test-Path $profile) ) {
    New-Item -Path $profile -ItemType File -Force
}

# Edit profile to add these lines
'$env:path = "$env:path;C:\Program Files\OpenSSL\bin"' | Out-File $profile -Append
'$env:OPENSSL_CONF = "C:\certs\openssl.cnf"' | Out-File $profile -Append
To use the environment variables, reload your profile typing . $profile or just close and reopen PowerShell.
Now you can easily invoke the openssl binary wherever you are in PowerShell as shown below.
Using OpenSSL on Windows 10 to Generate a CSR & Private Key
Before you can create an SSL certificate, you must generate a certifiate-signing request (CSR). A CSR is an encoded file that provides you with a way to share your public key with a certificate authority (CA). This file contains identifying information, a signature algorithm, and a digital signature. Let’s create your first CSR and private key.
Related: Understanding X509 Certificates: A Clear and Concise Guide (For Mortals)
To create a CSR, run the below command. OpenSSL will then prompt you to enter some identifying information as you can see in the following demonstration.
openssl req -new -out MyFirst.csr
Once complete, you will have a valid CSR and private key which can be used to issue an SSL certificate to you.
The configuration file defaults can be edited further to streamline this process should you not want to enter data every time you generate a CSR.
You can read more about the available CSR options and view sample configurations in the man pages. OpenSSL also has an active GitHub repository with examples too.
Generating RSA Key Pairs
You can also create RSA key pairs (public/private) with OpenSSL. To do so, first, create a private key using the genrsa sub-command as shown below.
When you run the command below, OpenSSL on Windows 10 will generate a RSA private key with a key length of 2048 bits. This key is generated almost immediately on modern hardware. The resulting key is output in the working directory
# generate a private key using maximum key size of 2048
# key sizes can be 512, 758, 1024, 1536 or 2048.
openssl genrsa -out rsa.private 2048
Next, generate a public key using the private key that you just created using the rsa sub-command. The syntax below will create a public key called rsa.public in the working directory from the rsa.private private key.
# generate a public key using the private key
openssl rsa -in rsa.private -out rsa.public -pubout -outform PEM
Generating a Self-Signed Certificate
On occasion you may need to generate a self-signed certificate. Self-signed certificates are fine to use for lab use but not a secure practice to use in a production environment.
Let’s create a self-signed certificate before moving onto the next task. To do so, enter the command below to create an X509 SSL certificate. This certificate will use SHA256 cryptography that will be valid for 365 days using an RSA key length of 2048 bits. The certificate will be saved to the working directory.
openssl req -x509 -sha256 -nodes -days 365 -newkey rsa:2048 -keyout privateKey.key -out certificate.crtYou are now ready to import the certificate into a browser or server.
Validating CSRs, Certificates, and Keys with OpenSSL
Checking the information in a CSR, private key, certificate, or PKCS#12 can save you time troubleshooting SSL errors. Sometimes a wrong key may have been used to create a certificate, for example. You may have the wrong identifying information in the certificate.
Let’s start by checking a CSR using the req command and some parameters:
openssl req -text -noout -verify -in .\MyFirst.csr
Details such as country name, organizational name, and the email address you entered when creating the CSR at the beginning of this guide, should match precisely.
You can also check a certificate using the x509 sub-command with a couple of parameters:
openssl x509 -in .\certificate.crt -text -noout | more
Converting Certificates with OpenSSL
There are occasions where an application does not use a particular certificate format. You can run into this issue with an application called HAproxy, for example that requires a PEM certificate when you may have a DER-formatted certificate (.crt .cer .der).
To demonstrate converting a certificate, let’s convert the self-signed certificate created earlier in a DER format (certificate.crt) to PEM. Use the code in the following code snippet to do so.
This command below uses the x509 sub-command with the parameter of -inform which should match the format of the -in file followed by the -out format.
openssl x509 -inform der -in .\certificate.crt -out .\certificate.pemYou can also reverse the order if you’d like to the DER format from PEM too as shown below.
openssl x509 -outform der -in .\certificate.pem -out .\certificate.derAnd last but not least, you can convert PKCS#12 to PEM and PEM to PKCS#12. This is a file type that contain private keys and certificates. To convert to PEM format, use the pkcs12 sub-command.
openssl pkcs12 -in .\SomeKeyStore.pfx -out .\SomeKeyStore.pem -nodesYou can convert a PEM certificate and private key to PKCS#12 format as well using -export with a few additional options. Below you are exporting a PKCS#12 formatted certificate using your private key by using SomeCertificate.crt as the input source. Using the -certfile option value MyCACert.crt allows you to validate SomeCertificate.crt.
openssl pkcs12 -export -out SomeCertificate.pfx -inkey SomePrivateKey.key -in SomeCertificate.crt -certfile MyCACert.crtTroubleshooting & Debugging
Now that you can create & convert CSR’s, certificates, and key pairs, it’s time to learn how to troubleshoot and debug them. OpenSSL comes with commands that make it a breeze to troubleshoot problems.
OpenSSL also allows you to check certificates for file integrity and test for possible data corruption. Using an MD5 checksum, you can use the following code examples to test certificates, keys and CSR’s:
# Certificates
openssl x509 -noout -modulus -in .\certificate.crt | openssl md5

# Public / Private Keys
openssl rsa -noout -modulus -in .\privateKey.key | openssl md5

# Certificate Server Request
openssl req -noout -modulus -in .\MyFirst.csr | openssl md5

# Check an external SSL connection
openssl s_client -connect www.google.com:443
Once you have the original hash, you can then compare that original hash with a current hash to verify the certificate hasn’t been modified or corrupted.
Here’s a sample of what that code looks like when run in PowerShell:

Summary
In this article, you have learned how to install and configure OpenSSL on Windows 10, create a CSR, key pair, and SSL certificate. You have also learned how to convert between different certificate formats and do some basic troubleshooting using built-in sub-commands.


