


If you’re an IT professional planning to enhance your macOS environment with powerful packages, the command line interface might seem daunting. But worry not! A game-changing solution awaits – Homebrew. This guide will take you through a step-by-step process to install Homebrew and mastering Homebrew on macOS.
Empower your management prowess and dive into the world of seamless package installation. Let’s get started!
Prerequisites to Install Homebrew on MacOS
Before we embark on this journey, ensure you have:
- A macOS computer. For this tutorial, we’ll be using a Mac M1.
- XCode Command Line Tools
Other tools like PuTTY or Telnet also rely on Xcode Command Line Tools for correct functioning.
Setting Up Xcode Command Line Tools
Usually, Xcode Command Line Tools come bundled with Xcode installation. However, if you’re new to Xcode or have uninstalled it, manual installation might be necessary.
Follow these steps to proceed:
1. Open your terminal and execute the following xcode-select command to confirm if Xcode Command Line Tools are installed:
xcode-select -pIf the tools are already installed, you’ll see their path specified, typically in the /Library/Developer/CommandLineTools directory.
2. To verify the success of the previous step, run the echo $? command:
echo $?If the exit status is 0, Xcode Command Line Tools are installed. If you encounter an exit status of 1, you’ll need to install them.
3. To install the tools, use the following command:
xcode-select --installYou can also acquire the Xcode Command Line Tools from the App Store, but the terminal method is recommended due to its efficiency and lightweight nature.
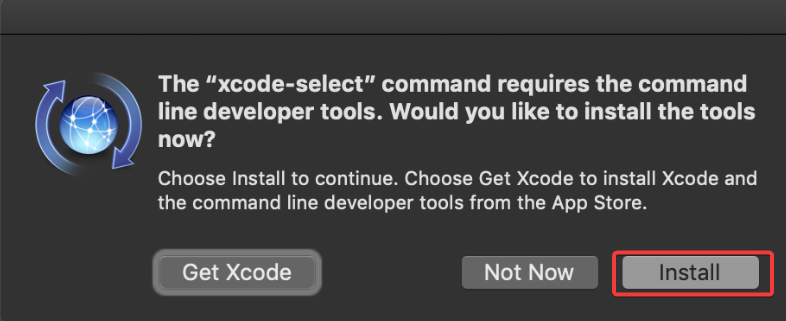
4. Upon prompt, click “Install” to commence installation:
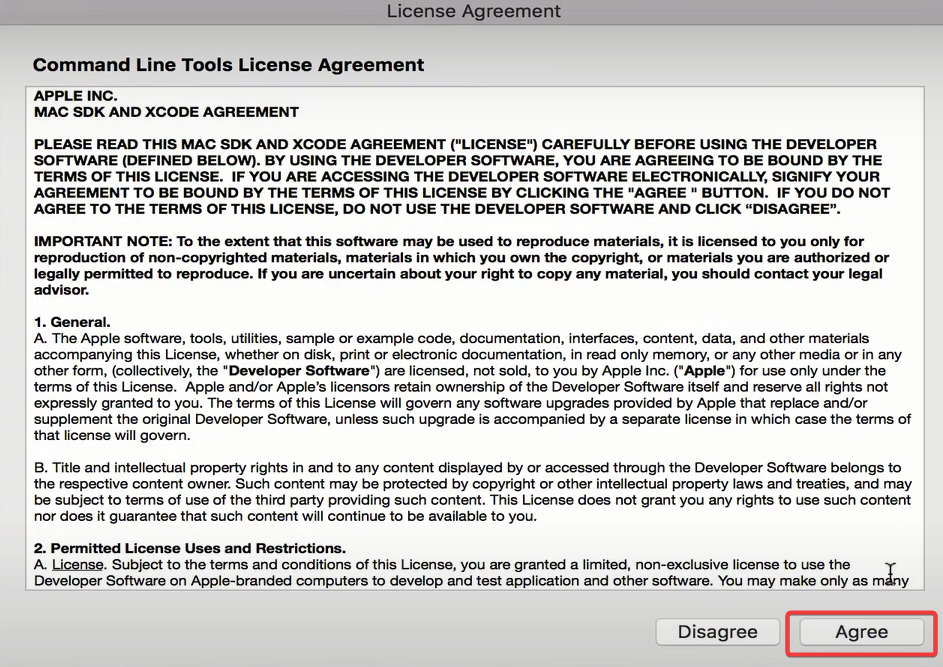
5. Accept the software license agreement by clicking “Agree” and kickstart the installation, which might take a few minutes:
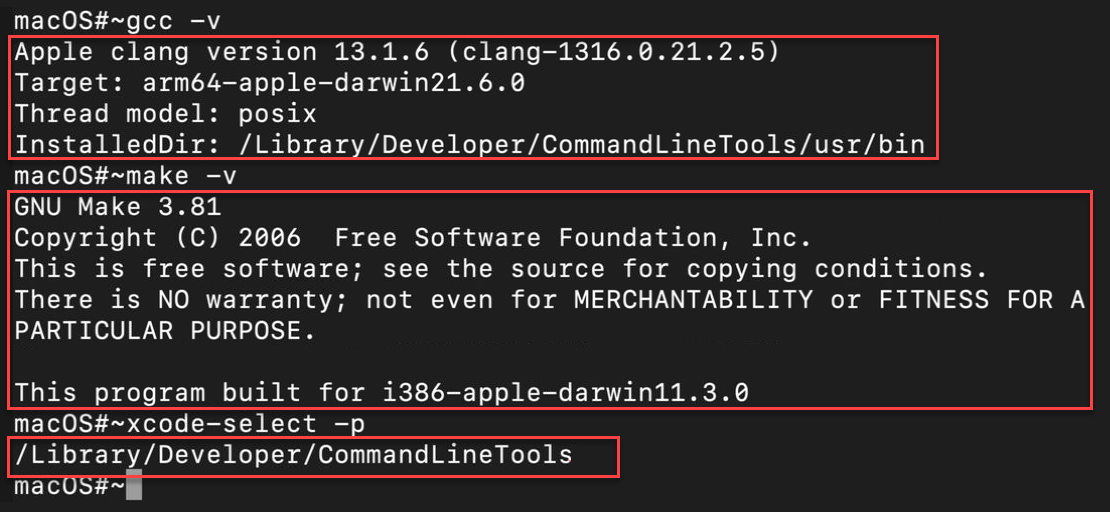
6. Verify the installation by running the following commands:
gcc -v
make -v
xcode-select -p
Unlocking Homebrew’s Potential on macOS
Now that Xcode Command Line Tools are at your disposal let’s move forward and explore the world of Homebrew. It’s time to unleash its power and seamlessly manage packages on your macOS.
1. Install Homebrew on macOS by executing the command below:
This command downloads the Homebrew installation script (install.sh) from the Homebrew GitHub repository and executes it:
- The
-coption instructs the terminal to run the subsequent command.
- The
-fsSLflag directs the curl command to fetch the URL without errors, follow redirects, and display a progress bar during download.
/bin/bash -c "$(curl -fsSL https://raw.githubusercontent.com/Homebrew/install/master/install.sh)"2. The installation script begins by checking the prerequisites, like the operating system, user permissions, and the Xcode Command Line Tools. If everything is in order, installation commences:
3. Upon successful installation, a message stating “Installation successful!” is displayed. This indicates that Homebrew is now a part of your macOS environment:

4. You can also verify the installation by checking the Homebrew version:
brew --versionWith Homebrew successfully installed, you’re now equipped to manage various packages on your macOS system effortlessly. Stay tuned for the next part of this series, where we’ll explore package management commands and how to install, update, and uninstall packages using Homebrew.


