


When working with Outlook, there will inevitably come a time when you’ll need to import a PST. But, what is a PST? According to Microsoft, “An Outlook Data File (.pst) contains your messages and other Outlook items and is saved on your computer.”
If you’re an email user using Microsoft Outlook, some scenarios where importing PST is needed may include:
- Re-hydrating your mailbox from PST after a computer replacement or OS reinstall.
- You are importing a backup of a resigned employee’s emails into your Outlook profile.
- Moving from one mail system to another. (e.g., Outlook.com to Gmail).
On the other hand, if your’re an email admin, you may need to import a PST into user’s Outlook when:
- Restoring emails from a PST export.
- Providing access to a terminated employee’s emails to another user.
- Migrating email data from on-prem to the cloud. (e.g., Exchange Server to Exchange Online, Office 365)
Regardless of the reason for importing the PST file, there are several ways to do it. And, in this article, you will learn the different possible ways to import Outlook data file PST. Then, you can decide which method of PST import is best for you.
Requirements
This article is a How-To, which means there are some requirements if you decide to follow along with the examples.
- A computer with Windows 10.
- An email account. The email account may be from any provider as long as the mailbox can be configured in Outlook. However, it is recommended for you to set up a dummy email account for testing.
- Outlook 2019. An older version of Outlook, like Outlook 2010, Outlook 2013, and Outlook 2016 can be used as well.
- A part of this article deals with an example using an Exchange Mailbox, so access to an Exchange Server will be needed if you need to follow along with the example.
Attaching PST Files using Outlook
Attaching PST files to Outlook allows you to just be able to access the contents of a PST as a separate Outlook data file in your Outlook profile. This means that the contents of the PST are not imported into your own mailbox.
You can attach one or more PST files to Outlook and have access to them all at the same time. PST file locations may be local or remote (UNC).
The procedure below assumes that you already have a mailbox profile configured in Outlook, and you will be attaching a PST file located in C:\PST\backup.pst.
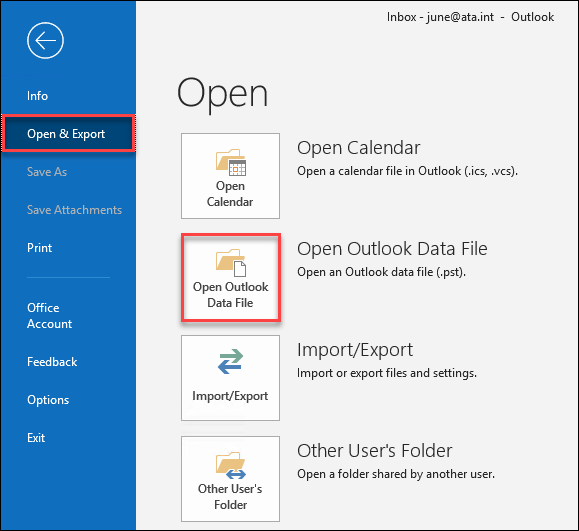
While in Outlook, click on File —> Open & Export —> Open Outlook Data File.
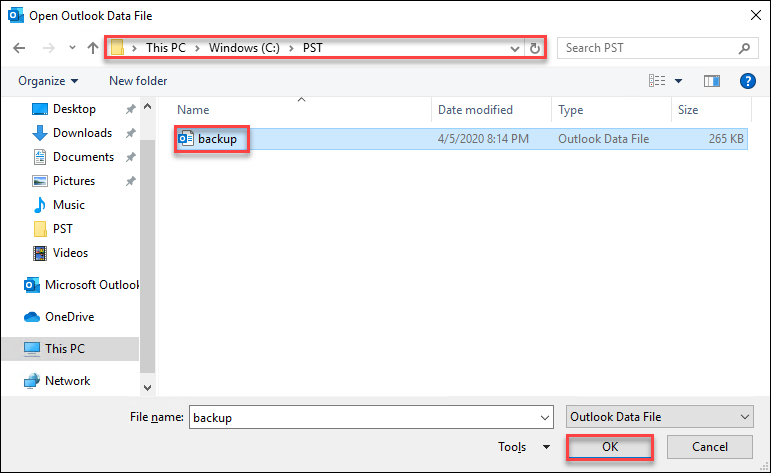
Once the Open Outlook Data File window shows up, browse to the location of the PST file that you want to attach to Outlook. In this example, the PST file is in C:\PST\backup.pst. Then, once you’ve located the PST file, click OK.
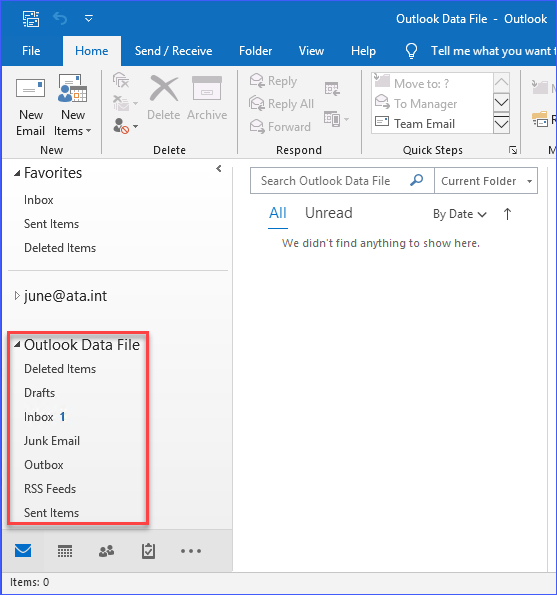
After clicking the OK button, you will see that a new folder with the name Outlook Data File will appear in your Outlook’s folder pane.
Now that the PST is attached to Outlook, you can decide whether to copy the contents into your own mailbox or just leave them in the separate PST file.
Attaching PST Files using PowerShell and the Outlook .NET API
Using the Microsoft.Office.Interop.Outlook Namespace, attaching one or more PST files to Outlook can be automated. This method is especially useful for admins who need to attach PST files to the Outlook profile of multiple users, perhaps during user logon or at a scheduled interval.
The script below will enumerate all PST files found in the directory C:\PST, then attach each PST file to the default profile configured in Outlook.
$PSTPath = "C:\PST"
Add-type -assembly "Microsoft.Office.Interop.Outlook"
$outlook = new-object -comobject outlook.application
$namespace = $outlook.GetNameSpace("MAPI")

Get-ChildItem $PSTPath -Filter *.pst |
ForEach-Object {
    $namespace.AddStore($_.FullName)
}
When you run the script above by pasting it into your PowerShell session, you should see a similar output, as shown in the demonstration below.
Importing PST Files using the Outlook Import Wizard
Outlook has a built-in feature called the Import and Export Wizard. Running the import wizard is, by far, the most convenient way for users to import PST into Outlook. It imports all or selected data from a PST file into the mailbox configured in Outlook.
Suppose you already have an Outlook email profile configured, and your email admin provided you the PST file containing the emails you asked them to recover. Now, you need to import the recovered emails into your mailbox. This is where the Import and Export Wizard will be useful.
In this next example, the PST to be imported is in C:\Temp\recovered.pst.
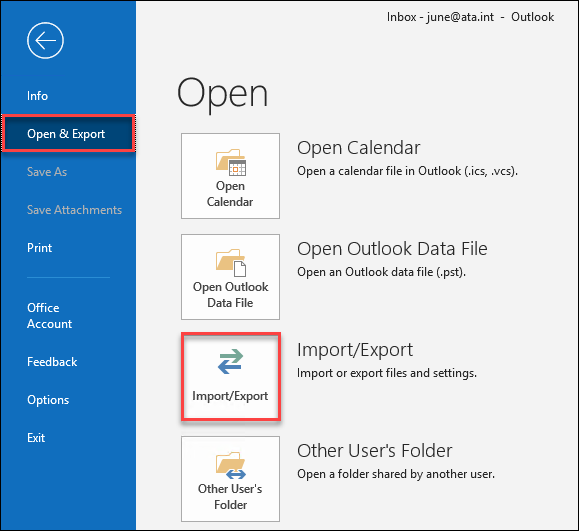
While in Outlook, click on File —> Open & Export —> Import/Export.
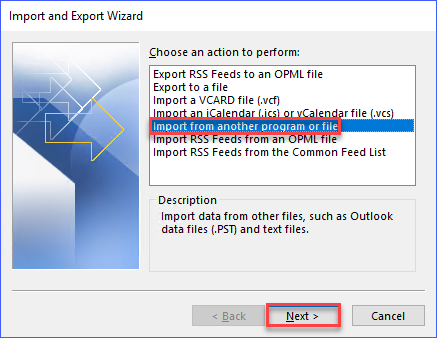
When the Import and Export Wizard window shows up, select the option to Import from another program or file. Then, click Next.
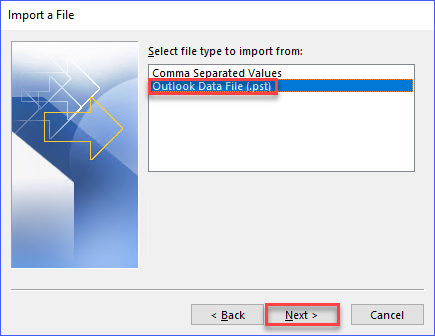
Then, in the Import a File window, select Outlook Data File (.pst). Then, click Next.
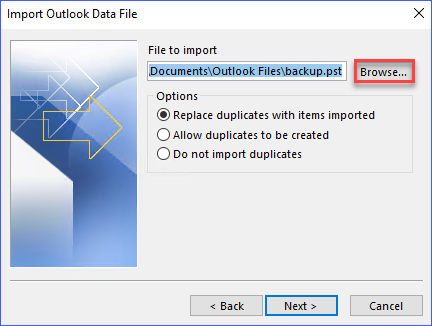
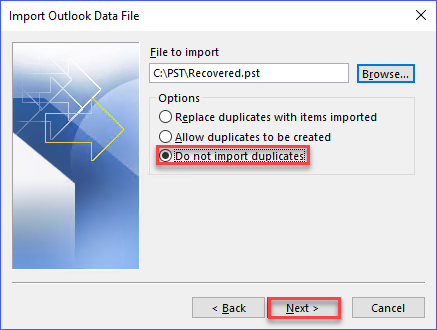
When the Import Outlook Data File window shows up, click on Browse.
Locate the PST file to import the emails from. In this example, the file is in C:\PST\Recovered.pst and click Open.

Once you’re back to the Import Outlook Data File window, the File to import box shows the file pst and click Do not import duplicates to prevent duplicates from being imported. Then, click Next.
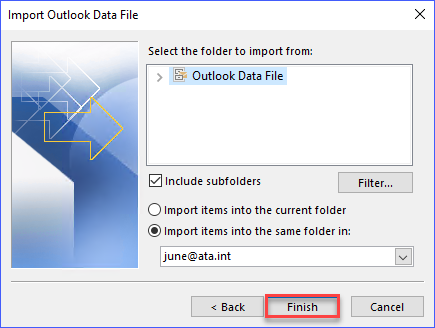
In the next window, you can choose to import from the top folder, including subfolders, or you can expand the top folder and select which subfolder to import items from. In this example, the top folder is selected and will include all subfolders.
Once you’re satisfied with your selection, click Finish.
After clicking Finish, Outlook will proceed to import items. The time Outlook takes to complete the import will depend on the number and size of items being imported. The import duration may take several minutes to hours.
Importing PST Files Using the New-MailboxImportRequest PowerShell Cmdlet
Using the New-MailboxImportRequest PowerShell cmdlet is not exactly just importing PST files into Outlook. The New-MailboxImportRequest cmdlet is specifically for importing PST files into a mailbox hosted in Exchange Server. The result, however, is that the imported items will show up in Outlook.
Only admins who have the Mailbox Import Export role in Exchange can perform this operation. If the admin’s account is not assigned the Mailbox Import Export role, the cmdlet will not be available.
It is important to note that the New-MailboxImportRequest accepts the path of the PST using the FilePath parameter. However, the FilePath parameter only accepts UNC paths and does not accept local paths. So, even if the PST files are located locally, you must use their UNC file path instead.
This next example will import the PST file C:\PST\Recovered.pst located in the server usexc001 into the mailbox of [email protected]. The Name parameter is where you can assign a name to the import task you are creating. This can be any name that you want. In this example, the name of the import task is the same as the name of the mailbox.
New-MailboxImportRequest -Mailbox '[email protected]' -FilePath '\usexc001\c$\pst\recovered.pst' -Name '[email protected]'The code above must be run inside the Exchange Management Shell, and once the code is run, the screenshot below shows the expected output.

As you can see from the output above, the initial status of the import request will be set to queued. You can monitor the status using the Get-MailboxImportRequest and Get-MailboxImportRequestStatistics cmdlets.
The code below gets the PST import status with the name [email protected].
Get-MailboxImportRequest -Name '[email protected]' | Get-MailboxImportRequestStatisticsAfter running the command above, you should see the current status of the import request. See the screenshot below as an example.

As you can see, the above screenshot shows that the import request has been completed. And the next time you opened the mailbox in Outlook, the imported items from the PST file should become available.
There are more parameters or options that can be used with the New-MailboxImportRequest to control the result of the PST import request. And, if you’re interested to learn more, you can visit this link.
Conclusion
In this article, you learned the different ways to attach or import PST file to Outlook. You’ve learned how the PST files can be attached to Outlook manually using the features built-in to Outlook itself.
You’ve also seen how PST files can be attached to Outlook using PowerShell utilizing the Outlook .NET API. The Outlook .NET API can also be used with other different programming languages like Visual Basic. This programmability provides flexibility for admins to how PST import can be automated.
Additionally, you’ve also learned how email admins can import PST files into Exchange Server mailboxes using the New-MailboxImportRequestExchange PowerShell cmdlet.
Perhaps now, with the knowledge that I hope you gained in this article, you can create a more complex script to import multiple PST files to multiple user mailboxes automatically.


