

Have you ever had to do the same task multiple times? Like, creating multiple Active Directory users one user at a time using the GUI? Or how about logging in to a server to delete old logs from some selected folders? If your answer is yes, then know you’re not alone. It’s time to master PowerShell’s Import-Csv and the foreach loop.
There’s nothing wrong with manual tasks; it’s necessary sometimes. But when it comes to reading and processing CSV files, the PowerShell cmdlet Import-Csv and ForEach loop used can help.
The PowerShellImport-Csv cmdlet is an excellent way of reading data from a tabulated source such as a CSV file. You can use the ForEach loop to then iterate over each row in the CSV data.
In this article, you’ll learn how to use this powerhouse combination to automate bulk, mundane, and repetitive tasks.
If you’re new to the
Import-Csvcmdlet andForEachloop, or if you want a refresher of what you already know, you may visit these links to learn more.Managing CSV Files in PowerShell with Import-Csv (foreach loop)
If the CSV loop becomes a recurring analysis or reporting workflow, compare PopAi AI Sheets for spreadsheet editing, report generation, and document data extraction before choosing a paid AI spreadsheet tool.
Prerequisites
There are several examples and demos in this article. To follow along, there are a few things you’ll need first.
- A script editor such as Visual Studio Code, Atom, or Notepad++. Use whichever one you’re comfortable with.
- Windows PowerShell 5.1 or PowerShell Core 6+
- Access to Exchange Online (optional if you will follow the Exchange Online related example hands-on).
Putting Import-Csv and the ForEach Loop in Action
In the next sections are several examples of how to use the Import-Csv cmdlet and ForEach loop that you may encounter in real-world scenarios. While these import CSV foreach PowerShell examples are specific to each purpose, it is crucial to understand that the concept and technique employed are the same.
Reading and Displaying Records from CSV
Perhaps the most basic use of Import-Csv and ForEach loop is reading records from a file and displaying them in the console. A CSV file’s anatomy is similar to that of a database. It has column headers, and each row is considered as a record.
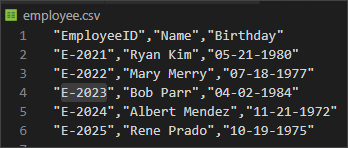
For example, below is the content of the file called employee.csv, which consists of three columns – EmployeeID, Name, and Birthday, and four records.
The code below imports the contents of the employee.csv file and then pipes the imported data to the ForEach-Object cmdlet. Then, ForEach-Object will go through each record in the imported CSV to display the concatenated values in the console. Copy the code below and save it as list-employee.ps1.
Note: The type of ForEach loop used in this example below is the ForEach-Object cmdlet. Refer to the “The ForEach-Object cmdlet” section in this article.
Import-Csv .\employee.csv | ForEach-Object {
    Write-Host "$($_.Name), whose Employee ID is $($_.EmployeeID), was born on $($_.Birthday)."
}
Once the script is saved, run it by calling its filename in PowerShell. When the script is run, you should see an output similar to the screenshot below.

Searching and Displaying Records from CSV
In the previous example, you learned how to read and display all records from a CSV. In this example, the same CSV file employee.csv will be used, but this time, you’ll create a PowerShell function to search for an EmployeeID from the CSV.
The code snippet below is a PowerShell function called Find-Employee that has only one parameter. The parameter name is EmployeeIDand it accepts an employee ID value to be searched from the CSV.
Before this function can be used, it has to be imported into your PowerShell session first. There are two ways to import the Find-Employee function into the memory:
- Copying and pasting the below code into PowerShell.
- Saving the script as
Find-Employee.ps1and import it using the dot-sourcing technique.
Note: The type of ForEach loop used in this example below is the ForEach Statement. Refer to the “The foreach Statement” section in this article.
Function Find-Employee {
    param (
        # Parameter accepts the employee id to be searched.
        [Parameter(Mandatory)]
        $EmployeeID
    )

    # Import the contents of the employee.csv file and store it in the $employee_list variable.
    $employee_list = Import-Csv .\employee.csv

    # Loop through all the records in the CSV
    foreach ($employee in $employee_list) {

        # Check if the current record's employee ID is equal to the value of the EmployeeID parameter.
        if ($employee.EmployeeID -eq $EmployeeID) {

            # If the EmployeeID is found, display the record on the console.
            Write-Host "$($employee.Name), whose Employee ID is $($employee.EmployeeID), was born on $($employee.Birthday)."
        }
    }
}
Once the function code is imported into the PowerShell session, call it by typing the function name as below.
Find-EmployeeWhen the function is run without using the EmployeeID parameter, it will prompt for the value of the EmployeeID to search. See the example output below.

Or, the function can be run with the EmployeeID parameter value specified at runtime, as shown below.
Find-Employee -EmployeeID 'E-2023'Getting Disk Space Usage from Multiple Servers
One common routine task among system admins is monitoring disk space usage of multiple servers. Instead of logging to each server to check the disk space usage, you can create a CSV list containing server names, drive letters and thresholds. Then, using PowerShell, import the CSV file and loop through each line to run a query.
To create a script that gets the disk space usage from remote servers, first create the CSV list with the following headers:
- servername – this is the name server to query.
- disk – this is the letter of the drive whose space usage will be retrieved.
- threshold – this defines the threshold in GB. If the free space of the disk is lower than this value, the report will show a warning status.
The sample below shows that there are four records listed. Your CSV file will be different depending on the number of servers or disks to read.
servername,disk,threshold
au-dc01,c,120
au-mail01,c,100
au-mail01,d,6
au-file01,c,120
Once the CSV is finalized, save the file as servers.csv. This will serve as the input list that will be imported by the PowerShell script.
To provide an example of getting disk space usage, copy the code below into your script editor and save it as diskReport.ps1. The script must be saved in the same location as the CSV path.
$server_list = Import-Csv -Path .\servers.csv

foreach ($server in $server_list) {
    Get-WmiObject -Class Win32_logicaldisk -ComputerName ($server.servername) | `
        Where-Object { $_.DeviceID -match ($server.disk) } | `
        Select-Object `
    @{n = 'Server Name'; e = { $_.SystemName } }, `
    @{n = 'Disk Letter'; e = { $_.DeviceID } }, `
    @{n = 'Size (GB)'; e = { $_.Size / 1gb -as [int] } }, `
    @{n = 'Free (GB)'; e = { $_.FreeSpace / 1gb -as [int] } }, `
    @{n = 'Threshold (GB)'; e = { $server.Threshold } }, `
    @{n = 'Status'; e = {
            if (($_.FreeSpace / 1gb) -lt ($server.Threshold)) {
                return 'Warning'
            }
            else {
                return 'Normal'
            }
        }
    }
}
The script above performs the following actions once it’s executed.
- Imports the csv file named servers.csv and store it in the
$server_listvariable. - Loop through the list of servers stored in the
$server_listvariable. - In each iteration of the foreach loops, the current line is represented by the variable
$server. - Get the disk information from the servers using the
Get-WmiObjectcmdlet. - Select only relevant properties to display.
– Server Name – This is the name of the system that is being queried.
– Disk Letter – The letter assigned to the drive.
– Size (GB) – The size of the disk in GB
– Free (GB) – The free space size in GB
– Threshold (GB) – The defined threshold in GB
– Status – If the Free (GB) value is lower than the Threshold (GB) value, the status returned is ‘Warning‘. Otherwise, the status will be ‘Normal‘
Having saved the script file diskReport.ps1, it is now ready to run by calling its name in PowerShell.
./diskReport.ps1Once executed, the screenshot below shows the output of the script.

The output can be exported to CSV, too. Exporting to CSV is useful when the report needs to be shared because the exported CSV file can be emailed or uploaded to a file share or to a SharePoint site. Be sure to check out Export-Csv: The PowerShell Way to Treat CSV Files as First Class Citizens if you’d like more information on exporting to CSV.
Creating Multiple Active Directory Users
At this point, you would already have a solid idea about using Import-Csv and ForEach. This next example takes your learning a bit further by adding the New-ADUser and Get-ADUser cmdlets into the mix.
Let’s assume that you received a CSV file new_employees.csv containing the list of new employees from the HR department. Each row in the CSV file represents one user to be on-boarded and has the following columns: FirstName, LastName, Department, State, EmployeeID, and Office.
The username must be derived from the employee’s first name’s first letter concatenated with the last name (e.g., bparr for the user Bob Parr).

Once the CSV file is saved, the script below uses Import-Csv to read the CSV file new_employees.csv. Then, iterate through each row, passing the values to the appropriate parameters of New-ADUser.
Import-Csv .\new_employees.csv | ForEach-Object {
    New-ADUser `
        -Name $($_.FirstName + " " + $_.LastName) `
        -GivenName $_.FirstName `
        -Surname $_.LastName `
        -Department $_.Department `
        -State $_.State `
        -EmployeeID $_.EmployeeID `
        -DisplayName $($_.FirstName + " " + $_.LastName) `
        -Office $_.Office `
        -UserPrincipalName $_.UserPrincipalName `
        -SamAccountName $_.SamAccountName `
        -AccountPassword $(ConvertTo-SecureString $_.Password -AsPlainText -Force) `
        -Enabled $True
}
After executing the script, the new users should already exist in Active Directory. But, it is good practice to confirm that the user accounts are really created.
Using the same CSV file new_employees.csv as a reference, the script below will run import CSV and foreach to get the ADUser objects matching the ones in the list.
Import-Csv .\new_employees.csv | ForEach-Object {
	Get-AdUser $_.SamAccountName
}
Adding a Proxy Email Address to Office 365 Mailbox
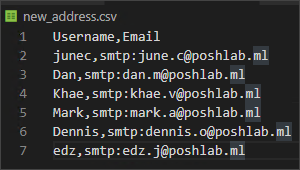
In Office 365 mailbox management, requests for adding proxy addresses for multiple users is not unheard of. Commonly, in this kind of request, the admin receives a list of users and the email address to be added, similar to the below CSV example.
Note: Before you can run any Exchange Online cmdlets in PowerShell, you must be logged in to the Exchange Online Management shell first.
Using the Import-Csv and ForEach loop in a PowerShell script, the list can be processed in one go. The script below shows how it can be done.
The script below imports the contents of the new_address.csv file and stores it to the $user_list variable. Then, using the foreach() method, PowerShell loops through the entire list of users and use the username and email values in each record to add a new email address to each mailbox.
$user_list = Import-Csv .\new_address.csv

$user_list.foreach(
    {
        Set-Mailbox -Identity $_.username -EmailAddresses @{add="$($_.email)"}
    }
)
Once the script is run, there will be no output displayed in the console. No screen output means that the new email address was added successfully. But, how can you make sure that the email addresses were added?
Using the same CSV file new_address.csv as a reference, whether or not the new addresses were added can be verified using Import-Csv and ForEach.
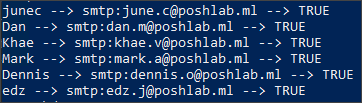
The script below imports the contents of the new_address.csv file and stores it to the $user_list variable. Then, using the foreach() method, PowerShell loops through the entire list of users to check if the new email address exists in the list of the mailbox proxy addresses. If found, the status will return True; otherwise, the result will be False.
$user_list = Import-Csv .\new_address.csv

$user_list.foreach(
    {
        $emailObj = (Get-Mailbox -Identity $_.username).EmailAddresses
        if ($emailObj -contains $_.email) {
            Write-Host "$($_.username) --> $($_.email) --> TRUE"
        }
        else {
            Write-Host "$($_.username) --> $($_.email) --> FALSE"
        }
    }
)
When the validation script runs, the output should look like the one shown in the screenshot below. You’ll notice in the output below that the status is all TRUE, which would mean that the new email addresses were added to each mailbox successfully.
Sending Daily Weather Forecast to a Mailing List
In this example, it is assumed that you have a CSV file containing a list of the subscribers’ email addresses and their area or location. These subscribers are expecting a daily email containing the weather forecast for the day specific to their location. Look at the sample CSV below with filename subscribers.csv.
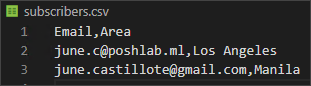
The CSV below contains only two subscribers. One in Los Angeles and one in Manila.
The goal is to create a script that will perform the following actions:
- Import the email and area information from the subscribers.csv file
- For each subscriber:
– Download the weather forecast image based on the subscriber’s area from https://wttr.in/
– Send the weather forecast image as an email to the subscriber’s email address.
The script below performs the actions listed above. You only need to modify the first three variables – $senderAddress, $smtpServer, and $smtpPort. Then, copy this code and save it as Send-WeatherInfo.ps1. Refer to the comments above each section of the script to learn more about what the code does.
# START SMTP settings here
$senderAddress = '<SENDER EMAIL ADDRESS HERE'
$smtpServer = '<SMTP RELAY SERVER HERE>'
$smtpPort = 25
# START SMTP settings here
# Import the subscribers' email list
$subscriber_list = Import-Csv .\subscribers.csv
# Get weather forecast and send email
$subscriber_list.foreach(
{
# Build URL for weather info based on area
$uri = ('<https://wttr.in/>' + $_.Area + '_u1F.png')
# Get the Weather Forecast image of the area. Save the image as <AREA>.png
$imageFile = (((Resolve-Path .\).Path) + "$($_.Area).png")
Start-BitsTransfer $uri -Destination $imageFile
# Create attachment object
$attachment = New-Object System.Net.Mail.Attachment -ArgumentList $imageFile
$attachment.ContentDisposition.Inline = $true
$attachment.ContentDisposition.DispositionType = "Inline"
$attachment.ContentType.MediaType = "image/png"
$attachment.ContentId = "weatherImage"
# Compose message
$emailMessage = New-Object System.Net.Mail.MailMessage
$emailMessage.From = $senderAddress
$emailMessage.To.Add($_.Email)
$emailMessage.Subject = ('Weather Forecast - ' + $_.Area)
$emailMessage.IsBodyHtml = $true
$emailMessage.Body = '<img src="cid:weatherImage">'
$emailMessage.Attachments.Add($attachment)
# Send Message
Write-Output "Sending Weather Info to $($_.Email)"
$smtp = New-Object Net.Mail.SmtpClient($smtpServer, $smtpPort)
$smtp.Send($emailMessage)
# Dispose of objects
$attachment.Dispose()
$emailMessage.Dispose()
}
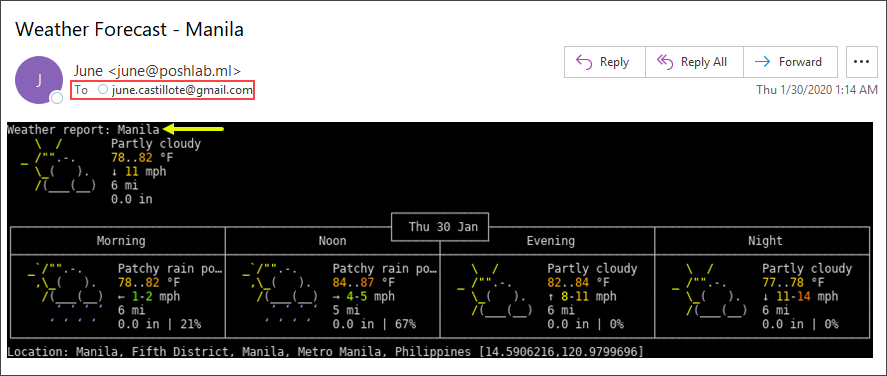
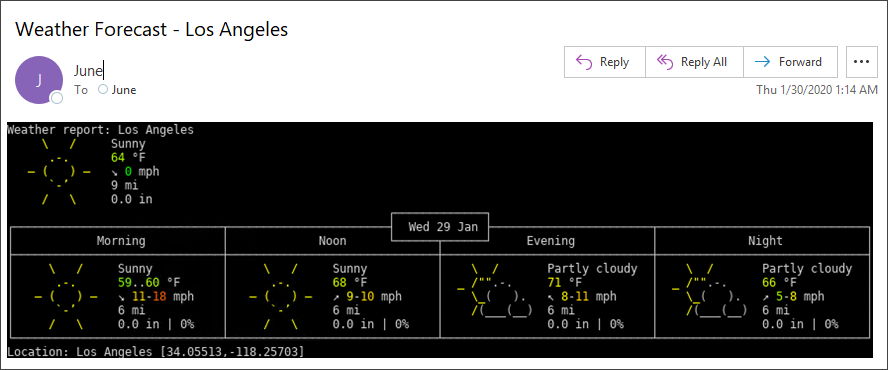
)Once the script is run, an email will be sent to each subscriber similar to the example email screenshot below.
Summary
There’s no limit to the tasks where the Import-Csv and the ForEach loop can be applied. As long as the task involves a list with delimited columns, you’re sure to dig into this powerful combo.
In this article, you’ve learned how a CSV file is similar to a database. You’ve also learned how to use Import-Csv for importing data and how to reference the values during the ForEach loop iteration.
I hope that with the many examples provided in this article, you now understand more of the Import-Csv and ForEach. And, that you would be able to use the knowledge you gained in this article in your administration and automation tasks.


