


Managing networks and monitoring traffic data flow between systems sounds intimidating. Well, not unless you know how to use Netcat.
Netcat is a command-line tool that you can use for various purposes, such as port scanning, file transfers, and creating a minimal webserver to test connection activities. And in this tutorial, you’ll learn to take advantage of Netcat as you go over some of the most common use cases for Netcat.
Ready? Read on and kick your networking skills up a notch!
Prerequisites
This tutorial will be a hands-on demonstration. If you’d like to follow along, be sure you have the following.
- Two Linux machines: One (ubuntu1) acts as the receiving host, and another (ubuntu2) serves as the sending host – This tutorial uses Ubuntu 20.04 for both machines.
Scanning for Open Ports
Ports are the doorways that allow network traffic to enter and exit a machine. When a port is closed, no service is listening on that port, and no traffic can pass through. But if the port is open, your network is subject to attacks.
If you’d like to check if a specific port is open on a machine patch for any security vulnerabilities, Netcat is up to the task. As a pentester, you need to know which ports are open to conducting your attack. Whatever the reason might be, scanning for open ports is a common need.
The basic syntax for port scanning using Netcat is as follows where:
host– is the IP address or hostname of the machine you want to scan.startport– is the starting port number.endport– is the ending port number.
netcat options host startport-endport
he netcat command has an alias of nc, which comes in handy to shorten commands. But this tutorial uses netcat for proper documentation.
SSH to your sending host (ubuntu2) and run the following command to scan for open ports between ports 1-100.
Throughout this tutorial, replace 149.28.86.131 with your sending host’s IP address.
In most cases, the 1-100 port range is sufficient. Most of the services use default port numbers that generally fall in this range, such as 22 for SSH, 80 for HTTP, etc.
The list below explains each of the flags that control the port scan’s behavior:
-z(zero I/O modes) – Netcat will not read from or write to the network connection. This option makes the scanning process faster.-n– Tells Netcat to disable DNS lookup to avoid delays.-v– Makes Netcat show all port scanning processes in detail.
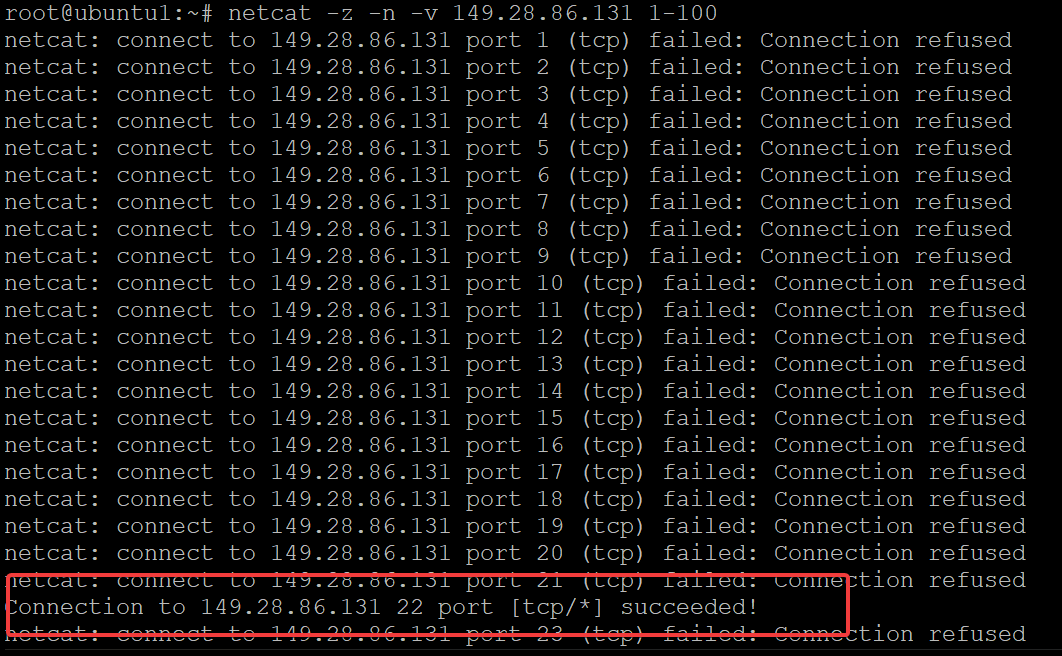
netcat -z -n -v 149.28.86.131 1-100
You can see below that the connection to port 22 (SSH) succeeded, but all the other ports failed.
Since the netcat command lists all scanned ports, you get lots of information and some you don’t need. In that case, run the below command, piping the grep command. This command filters out only the open ports with the “succeeded!” message at the end, as shown below.
netcat -z -n -v 149.28.86.131 1-100 2>&1 | grep succeeded
Below, you can see that port 22 is open for SSH connection as expected.

Sending Files Securely Between Hosts
Aside from port scanning, Netcat makes it possible to securely transfer files between two machines. Netcat uses the TCP protocol for file transfer, which is more reliable than UDP.
The basic syntax for sending a file using Netcat is as follows:
netcat options host port filename
To send files from your host to another machine:
1. Run the below command to start listening on port 4444 on the receiving host (ubuntu1).
This command doesn’t have an output, but the options below affect how the command sets the listening port:
-l– tellsnetcatto listen for an incoming connection on the specified TCP port. The port can be any number you want, but make sure other services are not using your preferred port.
> - tells netcat to redirect all incoming data to a file on the specified path (ata_file).
netcat -l 4444 > ata_fileOnly the root user can bind to ports lower than 1000, so you must select a port larger than 1000 as a non-root user. If you try to use a port number lower than 1000 as a non-root user, you’ll get the following error.

2. On the sending host (ubuntu2), run the following echo command, which doesn’t have an output but creates a file called ata_file with Hello from ATA as the content.
echo "Hello from ATA" > ata_file3. Now, run the netcat command below to send ata_file to the receiving host (ubuntu1). Make sure that you use the same port number on the receiving host (4444) as the sending host.
This command doesn’t have an output, but the < option tells netcat to take the input from the specified file.
netcat 149.28.86.131 4444 < ata_file4. Lastly, switch to the receiving host (ubuntu1) and run the cat command below to check the content of the ata_file.
cat ata_fileYou can see the Hello from ATA message below indicating the transfer worked.

Sending Directories to Another Host
So far, you’ve successfully sent a single file from one host to another. But what if you like to send an entire directory with all its subdirectories and files instead? Netcat can send directories too!
Suppose you have a backup directory called apache_backup on the sending host (ubuntu2). You’ll have to compress the directory first, then send and extract the directory to the receiver host (ubuntu1).
1. On the receiving host (ubuntu1), run the following command to create a new directory called apache_backup and move (cd) into that directory.
mkdir apache_backup && cd apache_backup
2. Next, run the below command to start listening on port 4444 and extract compressed files the sending host (ubuntu2) sends to the receiving host (ubuntu1).
This command doesn’t have an output, but the tar xf – flags take the input from the Netcat (standard input) and extract all the files into the current directory.
netcat -l 4444 | tar xf -3. On the sending host (ubuntu2), run the following commands to create a directory (apache_backup), some text files, and send them to the receiving host (ubuntu1).
These commands don’t have an output, but you’ll verify if the transfer worked in the following step.
# Creates an apache_backup directory and some text files inside
mkdir apache_backup && cd apache_backup && touch ata{1..5}.txt
# Compresses the working directory and sends it to the receiving host
tar cf - . | netcat 149.28.86.131 4444
4. Finally, switch to the receiving host (ubuntu1), press Ctrl+C to stop listening to port 4444, and run the ls command to list the files inside the apache_backup directory.
lsAs you can see below, the apache_backup directory’s files are successfully transferred to the apache_backup directory on the receiving host.

Sending Entire Disk or Partition to Another Host
Sending your entire disk or partition to another host may seem ambitious, but this task is achievable apart from sending files and directories. This feat comes in handy, especially if you need to backup your entire disk before taking drastic measures, such as moving or deleting tons of files.
1. Run the command on the receiving host (ubuntu1) to start listening on port 4444. This command doesn’t have an output but unzips all the incoming data (bzip2 -d |dd) to /dev/sdb.
/dev/sdb is your second hard disk on the machine. But in this case, /dev/sdb is an empty hard disk attached to this machine for this tutorial.
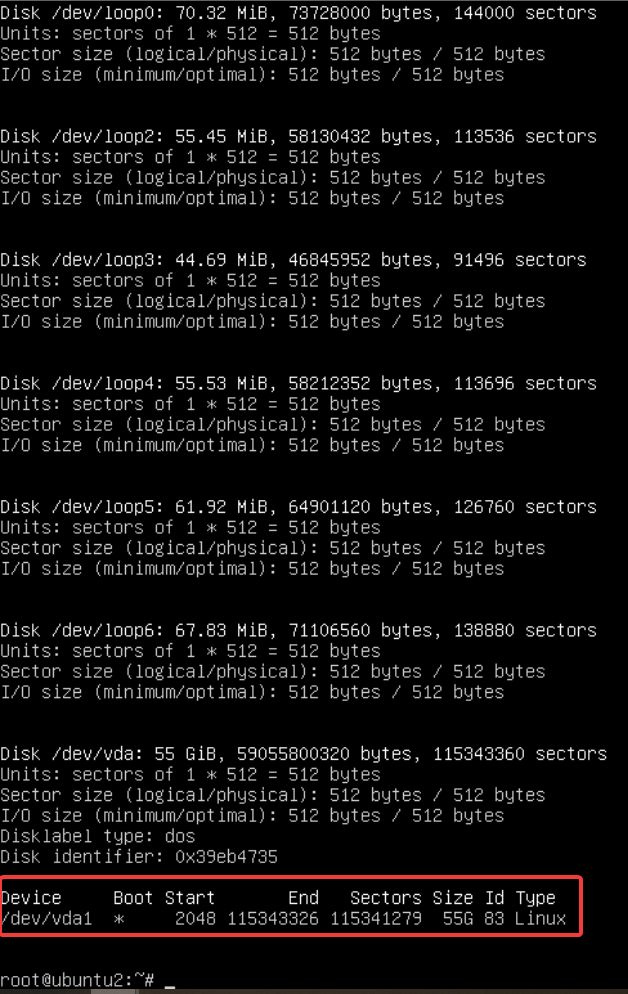
netcat -l 4444 | bzip2 -d | dd of=/dev/sdb2. On the sending host (ubuntu2), run the below fdisk command to find all the disks and partitions on your machine.
fdisk -lAs you can see below, /dev/vda1/ is the root partition for the sending host in this tutorial. Your output may be different depending on your machine’s configuration.
3. Run the following command on the sending host (ubuntu2), which doesn’t have an output, but sends the /dev/vda1 partition to the receiving host (ubuntu1) via port 4444.
Compressing and sending the partition to the receiving host takes a while, depending on the size of the partition.
bzip2 -c /dev/vda1 | netcat 149.28.86.131 44444. Once the process completes, switch to the receiving host (ubuntu1), and you will see the output below.
The no space left on device error is expected since /dev/vda1 is probably larger than /dev/sdb. But you get the idea! You can use Netcat to send your entire hard disk or partition to another machine.

5. Finally, run the commands on the receiving host (ubuntu1) to mount the /dev/vda1 partition and list all the files in the partition.
# Mounts /dev/vda1 partition
mount /dev/vda1 /media
# Lists all the files in the partition
ls media
As you can see below, all files and directories from /dev/vda1 are successfully transferred to /dev/sdb.

Creating a Minimal Webserver
Configuring a full-fledged web server like Apache or NGINX just to diagnose a web server issue can be a pain. Instead, create a minimal webserver with Netcat to quickly identify web server issues.
To create a minimal webserver:
1. Switch to your received host and run the below commands to create a root directory (nc-webserver-docroot) for the webserver and a shell script (httpresponse.sh) that generates the HTTP response.
mkdir -pv /root/nc-webserver-docroot/
2. Next, create an index.html file in the /root/nc-webserver-docroot/ directory with your preferred editor and populate the file with the code below. This HTML file holds the contents that the Netcat web server will serve.
<!doctype html>

<html lang="en">

<head>
	<title>NETCAT Testing network connectivity </title>
</head>

<body>
	<h1>NETCAT Test</h1>
	<p>Connection Successful! Your networking skills are awesome!</p>
</body>

</html>
3. Create a shell script file called httpresponse.sh in the /root/nc-webserver-docroot/ directory and populate the code below.
This shell script returns the contents of the /root/nc-webserver-docroot/index.html file as an HTTP response to any client that sends a request to your Netcat web server.
#!/bin/bash
printf 'HTTP/1.1 200 OK\n\n%s' "$(cat /root/nc-webserver-docroot/index.html)"
4. Now, run the chmod command below, which doesn’t have an output but makes the httpresponse.sh file executable (+x).
chmod +x /root/nc-webserver-docroot/httpresponse.sh5. Run the below ncat command to start the Netcat web server on port 7777.
Be sure to replace port 7777 with the port number of your choice, which is not be used by any other service on your system.
The following options affect the behavior of stating the Netcat web server:
-l– tells Ncat to listen for an incoming connection.
-v– enables verbose mode to show all incoming HTTP requests in your terminal.
-c - specifies the path to the httpresponse.sh script that generates the HTTP responses.
- -keep-open – keeps the Ncat listener open even after the first connection is closed. This option is useful if you test your web server with multiple clients.
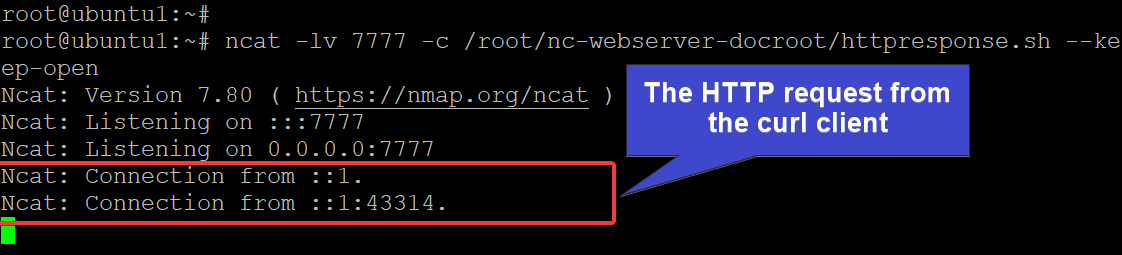
ncat -lv 7777 -c /root/nc-webserver-docroot/httpresponse.sh --keep-openYou’ll see the following output once the Netcat web server runs and listens on port 7777 on all available network interfaces.

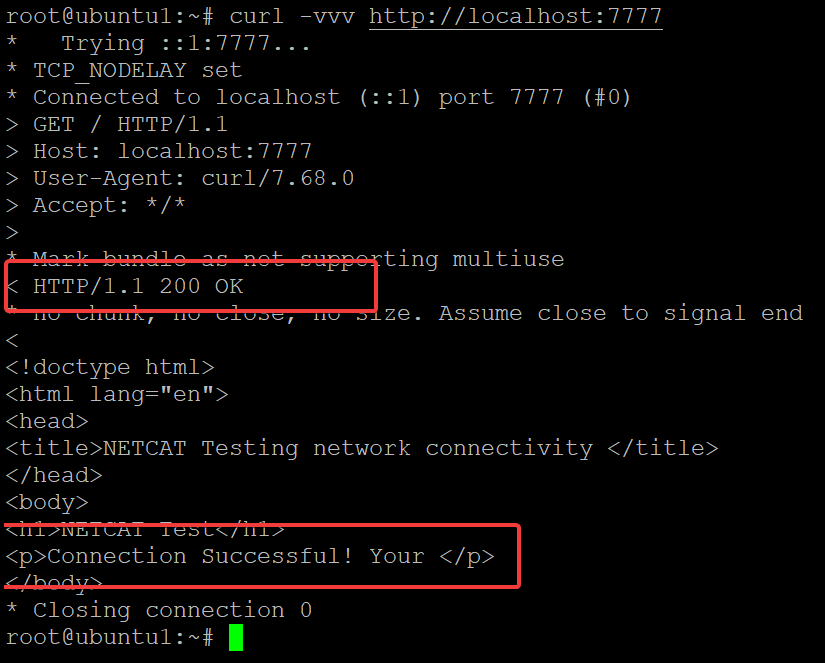
6. Now, open another terminal and run the following command to test your Netcat web server (http://localhost:7777).
curl -vvv http://localhost:7777The output below shows the Netcat web server is working as expected and can return the contents of the /root/nc-webserver-docroot/index.html file as an HTTP response.
7. Lastly, switch back to the terminal where the Netcat web server is running. You’ll see that the Netcat web server has received and processed the HTTP request from the curl client.
Congratulations! You’ve successfully created a minimal Netcat web server to test your networking connectivity!
Conclusion
In this tutorial, you’ve learned to use Netcat to level up your networking and debugging skills. You’ve scanned for open ports, transferred files, and created a minimal web server. And at this point, you can now solve many real-world networking problems with this powerful networking utility!
With this newfound knowledge, why not level up your networking skills even more and become a power user in Cybersecurity?


