


Wishing to take advantage of Ansible for automation and improved efficiency, but cannot find the right module for the tasks you want to undertake? Give the Ansible Command module a try. The Command module enables you to execute arbitrary commands across multiple nodes quickly.
In this tutorial, you will learn how to execute directives with the Ansible command module by running ad-hoc commands and building a playbook effectively.
Enough with the introduction, and start executing!
Prerequisites
This tutorial houses hands-on demos. If you’d like to follow along, be sure you have the following:
- Ansible v2.12.1 or later.
- Linux host (Ansible control node) – This tutorial uses Fedora 35 with hostname as my-fed.
- Linux remote host – This tutorial uses Fedora 35 with hostname as medsvr.
- A user account with access to the remote system – This tutorial uses a username set as meduser.
Creating a Custom Inventory File
With the prerequisites out of the way, kick start this tutorial by creating a list of machines in an inventory file by running an ad-hoc command. Ansible uses an inventory file to know which machines Ansible can interact with. In addition to the global inventory file, Ansible allows you to maintain your inventory.
Ad-hoc commands, in Ansible parlance, are commands that are run individually and directly on the command-line using the Ansible binary. They are quick to use but hardly reusable since they are not written in files that can be shared or version controlled.
Log in to your control node, open the terminal and run the below command. This command outputs the remote node (medsvr) to a file called inventory. The inventory file will come in handy when dealing with remote machines while following this tutorial.
echo medsvr > inventoryThe control node can be omitted from the inventory file because it can be referred to as localhost.
Listing Files and Directories using Ansible Command Module
Now that you have the inventory file in place, you can run commands to execute directives. Perhaps you need to list files and directories in the working directory. If so, you can run the ls command with the Ansible command module.
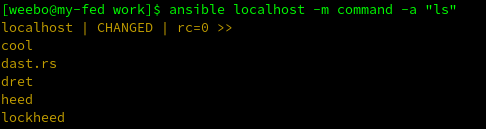
Execute the ansible command below with the command module to list (ls) the contents of the current working directory on the control node (localhost).
The -m switch tells Ansible to use the command module, while the -a switch specifies the exact command or directive to execute.
ansible localhost -m command -a "ls"Upon successful completion, you’ll see a list of files and directories, prepended with Ansible’s status summary, like in the output below.
Checking a Remote System’s Current Memory
Perhaps you want to display the memory statistics of a remote system. One way of doing so is by running the free command.
Run the command below to combine the Ansible command module and free command to display the memory usage of the remote machine in gibibytes (-g).
For remote access, the user (-u) named meduser performs the checks on the remote node (medsvr) listed in the custom inventory file (-i inventory). The -k switch tells Ansible to prompt you to enter the SSH password for that user.
ansible medsvr -m command -a "free -g" -u meduser -k -i inventoryAs a rule of thumb, use a specialized module where it exists to enjoy advantages such as idempotence. Use Shell when you require complex shell features, but use the Ansible Command module when directives can be executed outside a shell environment.
Below, you can see the remote node’s memory statistics in a table format.

Starting the Httpd Service Based on File Existence
Suppose you want to start the Apache httpd service on your webservers only if a file you just uploaded to some of your webservers exists. But, it’s only ideal to leave the system untouched if the file does not exist.
Run the Ansible command module below to start (systemctl start) the httpd service on the remote node (medsvr) only if the /var/www/html/index.html file exists. The removes keyword is defined to explicitly specify the file whose presence allows the directive to be executed.
The -K and -b switches are used together to request elevation with a password prompt for meduser while running the task.
ansible medsvr -m command -a "systemctl start httpd removes=/var/www/html/index.html" -i inventory -u meduser -kbKIf the file is present, the output should look like the one below.

But if the /var/www/html/index.html file does not exist, you’ll get an output like the one below instead.

Installing a Non-Existent Package
Like in the previous example, you can also execute any directive, except this time, only if a file does not exist. For example, you can install Flameshot on the remote machine if its binary is not found.
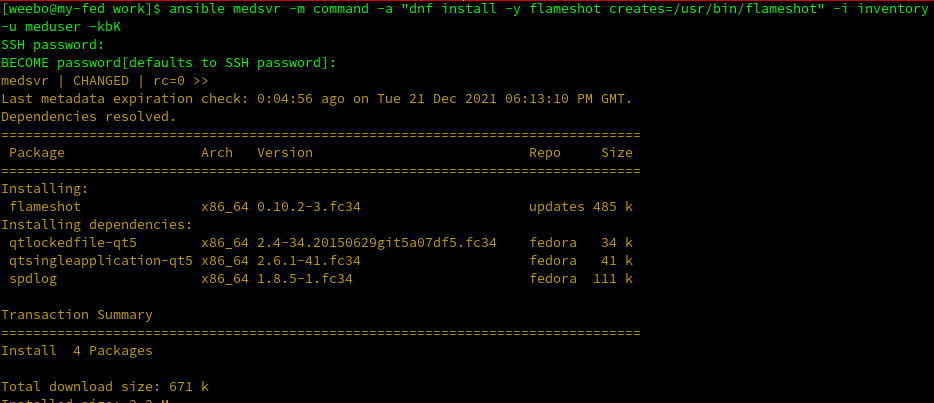
Run the Ansible command module below to install Flameshot (dnf install -y flameshot) on the remote node (medsvr). The creates keyword tells Ansible to execute the command only if the /usr/bin/flameshot file does not exist.
ansible medsvr -m command -a "dnf install -y flameshot creates=/usr/bin/flameshot" -i inventory -u meduser -kbKIf the /usr/bin/flameshot file does not exist, you’ll see results equivalent to the following where Ansible installs Flameshot.
Changing Working Directory and Creating a File
Ansible command module allows you to ensure that a command is executed only after the working directory is changed. This feature is handy for situations where you’re running scripts, compiling from source, or creating files that require a pre-defined environment.
Execute the command below to first change (chdir) to the /opt/ directory on the control node, and create the hello.txt file.
ansible localhost -m command -a "touch hello.txt chdir=/opt/" -bK
Run the ls command to display the/opt/ directory contents.
ls /optAs you can see below, the hello.txt file you created exists in the /opt/ directory.

Executing Directives Within a Playbook
Ad-hoc commands work great, but they are not all Ansible is good for. Playbooks can be used to document and reuse a series of tasks.
All the previous examples performed on the remote machine will be converted into a series of tasks in a single playbook. But, the individual tasks are isolated for analysis to make it easier to follow along. You will then run the playbook in its entirety at the end of this section.
1. Create a YAML file with your favorite text editor and populate the code below. For this demo, the file is called command-training.yml, but you can name it differently as you prefer.
In the code below, using the command module (ansible.builtin.command), the task runs the free command to display memory usage in gibibytes.
---
  - name: Running commands on remote server using Command Module
    hosts: localhost
		# Value is set to "no" to speed up execution by skipping the data gathering step
		# that every playbook goes through when it is run.
    gather_facts: no
    tasks:
      - name: Check Memory on remote machine
        ansible.builtin.command: "free -g"
2. Add the code below under tasks in the command-training.yml file. The code below will only start the httpd service if an index.html file has been uploaded to a web server.
The most direct way to write this task is to write the command with every option as the only argument to the module, as shown below. But this style hurts readability and hurts your ability to share or debug effectively in the long run.
- name: Start Httpd only if file exists
  ansible.builtin.command: "systemctl start httpd removes=/var/www/html/index.html"
  become: yes
Another way of defining the directive is to split the command into a list of its constituent parts using the args keyword, as shown below. The main command then occupies one line designated by cmd while the options take subsequent lines, appropriately designated.
The choice of tags for each line is not arbitrary. The Ansible team has chosen them to reflect the usual arguments to the module.
- name: Start httpd only if file exists
  ansible.builtin.command:
  args:
      cmd: systemctl start httpd
      removes: /var/www/html/index.html
  become: yes
3. Now add the code below under tasks in the command-training.yml file as you did in step two.
Instead of going direct or using a list of named arguments, the code below uses the argv parameter. The argv parameter enables you to break the main command into a list to aid reading and debugging.
The
argvparameter is specific to the command module, whileargsis a task-level keyword like become. Whereasargsis indented to the level of the module name,argvhas to be indented much deeper to show it is a child of the command module.
The code below installs flameshot using argv only if the flameshot binary (/usr/bin/flameshot) is absent from the system.
- name: Install a package only if a file does not exist
  ansible.builtin.command:
     argv:
        - dnf
        - install
        - -y
        - flameshot
     creates:
        - /usr/bin/flameshot
  become: yes
An advantage of using
argvis that it quotes every entry, so you can safely use items that would otherwise require quotes while omitting the quotes. But mind you that you have to ensure every item, once reconstructed on the command line, is quotable.
By following up each step, you have seen at least three ways of writing tasks using the command module. Depending on your aim, you can use any of the above styles. Just make sure you take care where indentation levels are concerned.
And as promised, below is the playbook (command-training.yml) in full:
---
- name: Running commands on remote server using Command Module
# Set remote machine as target host
hosts: medsvr
gather_facts: no
tasks:
- name: Check Memory on remote machine
ansible.builtin.command: "free -g"
- name: Start Httpd only if file exists
ansible.builtin.command:
args:
cmd: systemctl start httpd
removes: /var/www/html/index.html
become: yes
- name: Install a package only if file does not exist
ansible.builtin.command:
argv:
- dnf
- install
- -y
- flameshot
creates: /usr/bin/flameshot
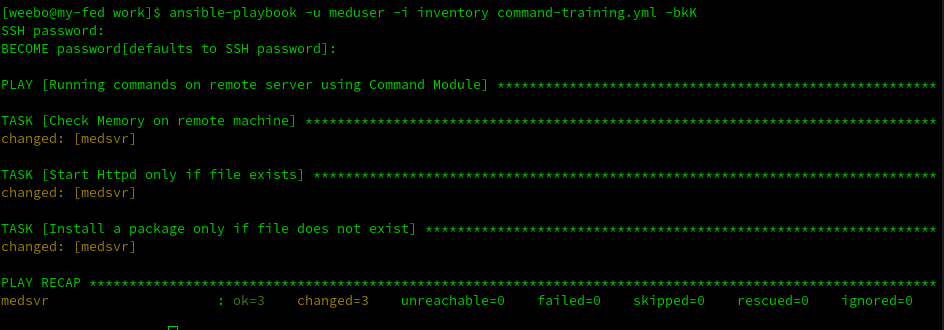
become: yes4. Finally, run the ansible-playbook command below to execute the playbook (command-training.yml). Supply the custom inventory(inventory) file and the right combination of switches to ensure Ansible executes the playbook with appropriate privileges (-bkK).
ansible-playbook -u meduser -i inventory command-training.yml -bkKOnce the command completes, you’ll get an output similar to the one below.
Executing Multiple Directives using with_items Plugin
Perhaps you have multiple directives to run in one go. If so, Ansible offers a way to execute multiple directives in a single task using the with_items plugin. The trick is to employ the with_items looping construct.
Create a file named small.yml and populate with the code below.
The code below creates a directory (/test/work) and backs up the sshd configuration file to that directory. Ansible executes each entry in the list in turn before moving to the next task.
- name: Command module using with_items

  ansible.builtin.command: "{{ item }}"
  with_items:
    - mkdir -p /test/work
    - cp /etc/ssh/sshd_config /test/work/sshd_config.bk
  become: yes
Now run the command below to execute the playbook (small.yml)
ansible-playbook -u meduser -i inventory small.yml -bkK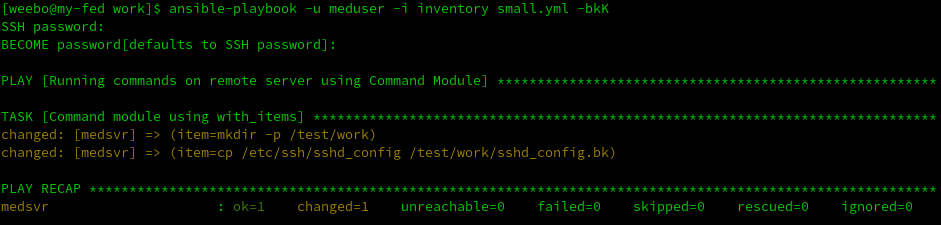
Conclusion
Throughout this tutorial, you’ve learned how to combine various facets of the Ansible command module to perform a host of tasks. Your creativity can only determine the exact limit to the utility of this tool.
At this point, you are in a good position to start taking advantage of Ansible’s power. So why not indulge in managing users with the Ansible User module?


