


If you’re looking for a partition editor that works for most disk partition types and volumes, the GNOME Partition Editor (GParted) got you covered. GParted Linux provides a clean and intuitive GUI – no more messy and confusing commands, and it takes the guesswork out of managing partitions.
This tutorial will teach you how to manage storage partitions in the GParted Linux tool. In the end, you’ll have created, resized, moved, and deleted disk partitions all within GParted.
What are you waiting for? Let’s find out if you’re up to partitioning disks or end up with a dead drive!
Prerequisites
This tutorial will be a hands-on demonstration. If you’d like to follow along, be sure you have the following:
- A computer where you’ll install or run GParted Linux. This tutorial will be using an Ubuntu 20.04 computer.
- A storage device, such as a hard disk drive (HDD), solid-state drive (SSD), or flash drive. The examples in this tutorial will be using a 20GB HDD.
Storage partitioning poses a high risk of data loss. Make sure that your storage is fit for testing and does not contain any critical files.
Choosing Your GParted Linux Flavor
GParted Linux comes in two flavors. Which one you choose depends on your usage scenario. But don’t worry, the selection criteria are not complicated.
GParted Live – A bootable media (often called a Live CD) containing a small, standalone GNU Linux distribution that you can install on a USB, CD/DVD, or a PXE server. If you don’t have a Linux computer or want to manage partitions outside your PC’s operating system, GParted Live is your best bet.
This tutorial does not cover how to create bootable mediums. Should you choose to go this route, visit their official GParted installation instructions page to learn how.
GParted Linux Package – If you’re already on a Linux PC and don’t want to deal with installing and booting to another OS, this package will serve you best. GParted is available to Linux as an installable package using your respective distro’s package manager.
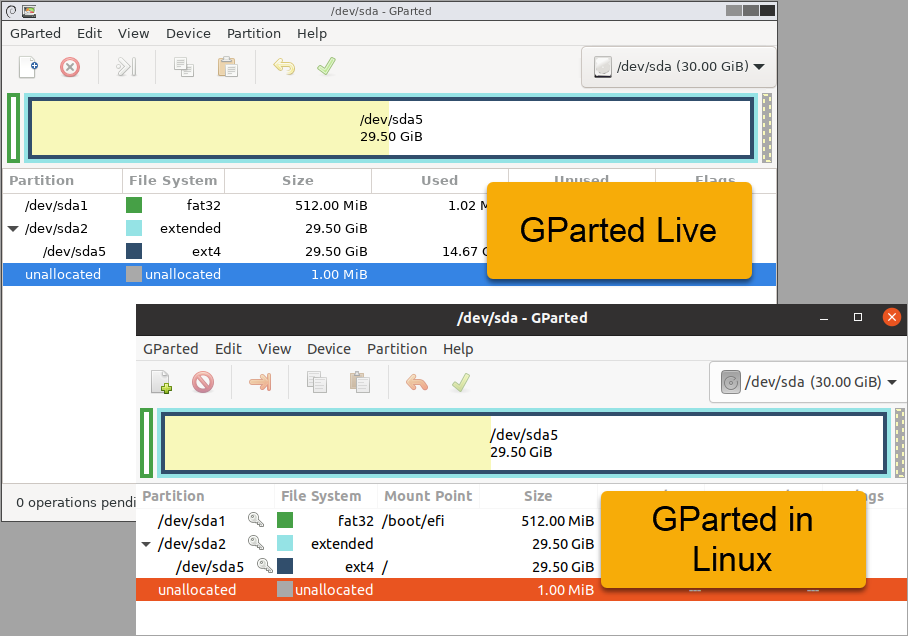
The examples in this tutorial will be using the GParted Linux Package. But whichever GParted flavor you choose, the usage instructions are essentially the same. As you can see on the comparison image below, the functional interface is the same, apart from the aesthetics.
Installing the GParted Linux Package
Most Linux distros, including Ubuntu, don’t include the GParted Linux tool out of the box. But don’t sweat; installing is quick and convenient. With two command lines, you’ll have GParted running.
To install GParted, follow these steps.
1. On your computer, open a terminal window.
2. Next, run the command below to make sure that your computer’s package repository cache is up-to-date.
sudo apt update3. Now, install the GParted Linux tool by running the below command. The -y option suppresses the confirmation prompt and automatically answers yes.
sudo apt install gparted -y4. After installing, confirm that the GParted Linux installation is successful and which version you have.
apt list installed gpartedAs you can see below, the command returned the installed GParted version.
According to the GParted website, distribution packages might not contain the most recent versions of GParted.

Finally, launch the GParted application. The image below shows opening the GParted tool on Ubuntu from the applications overview.
GParted requires sudo or root privileges and will prompt you to enter your password.
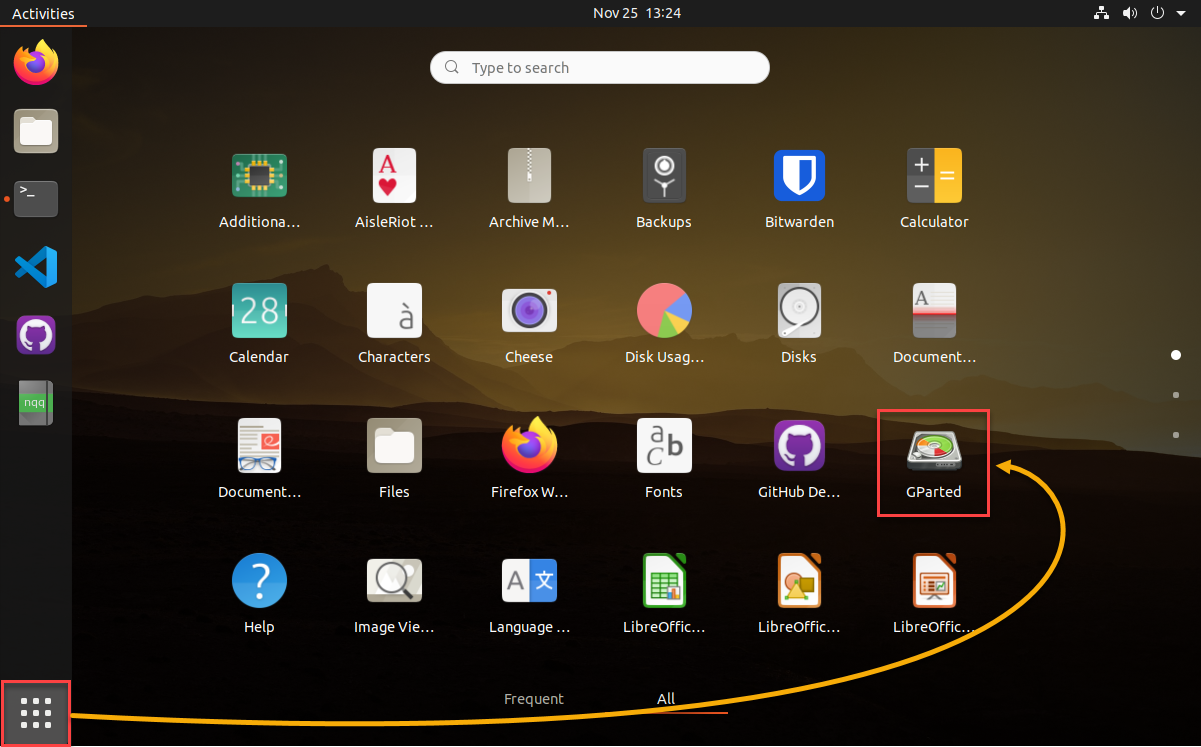
Opening the GParted Linux application
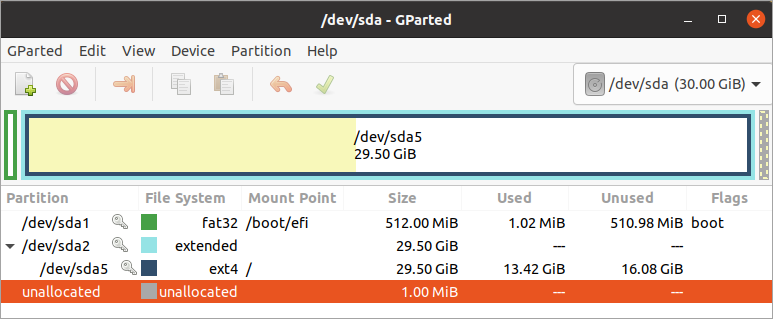
GParted selects the first disk on your computer by default on launch. The first disk typically contains your computer’s operating system. As you can see below, this Ubuntu computer has four partitions with different file systems (fat32, ext4) and mount points.
Managing Storage with GParted Linux
Now the fun begins! You’ve installed GParted Linux and are ready to take for a spin. To start fresh, the instructions from this point will be using an empty 20GB hard drive on an Ubuntu PC, but the general process should work with other storage devices.
Initializing a Disk
Before creating partitions, a partition table must already exist on the disk. Brand new disks typically do not have a partition table, and you’ll need to initialize the disk to assign a partition type. To initialize a disk and create a partition table, proceed as follows.
The same procedure applies to used disks too. But recreating a partition table on a used disk will cause data loss.
1. On the GParted Linux window, select the disk to initialize. To do so, click the drop-down menu on the toolbar and click the storage device from the list.
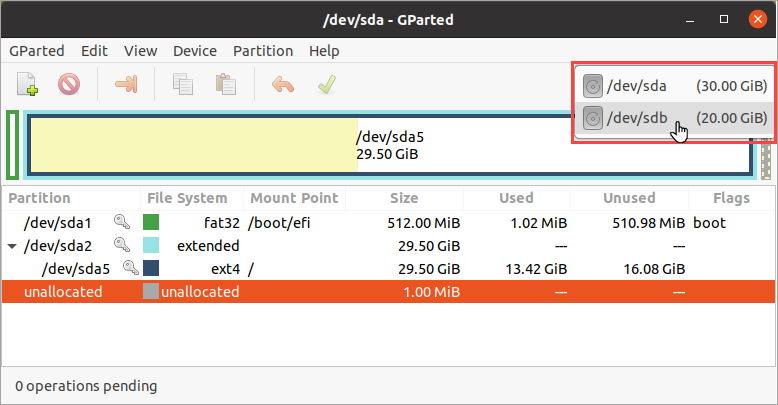
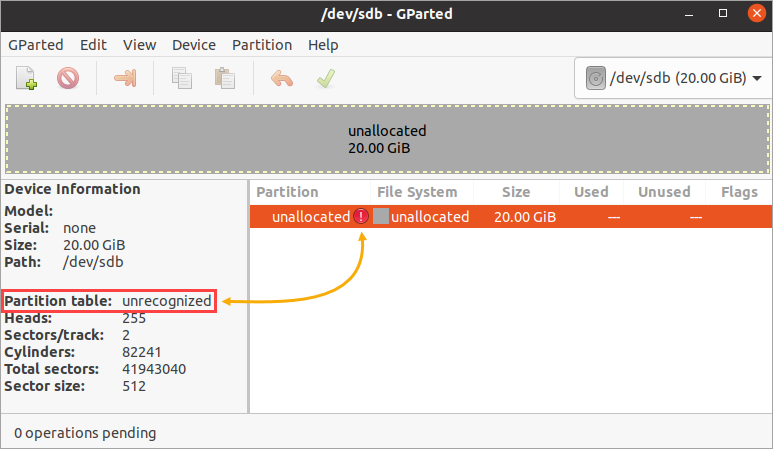
After selecting the disk, the graph area is now showing the disk information. In this example, the disk has 20GB of unallocated space.
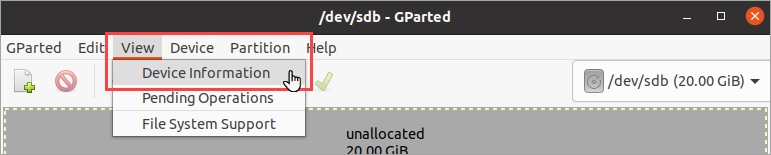
2. Next, click View —> Device Information to show the device information pane on the left-hand side of the window.
After selecting the disk, the graph area is now showing the disk information. In this example, the disk has 20GB of unallocated space. If the disk doesn’t have a partition table, you should see a similar output like the screenshot below. The Partition table value is unrecognized.
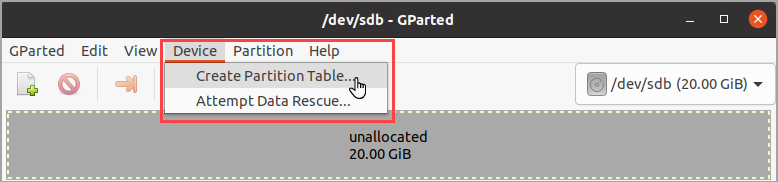
3. Now, to create a new partition table, click Device —> Create Partition Table.
4. Next, the Create partition table window pops up, warning that this operation will erase all data on the entire disk.
On the Select new partition table type field, click the drop-down and select either msdos or GPT. The example below sets the default partition table, which is msdos. Finally, click Apply.
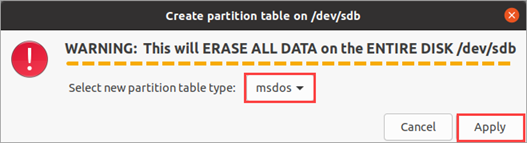
While many partition table types are available, MBR (msdos) and GPT are common.
As you can see below, the Partition table value now shows msdos, and the error icon is gone. You have successfully initialized the disk.

Creating New Partitions
You’ve completed the initial task and are a few steps away from making the disk usable by creating new partitions. A disk can have one or multiple partitions if necessary, depending on your requirements.
Perhaps you want to split a disk into two partitions with different file systems. Like, one partition for use in Linux (ext4) and another one for Windows (NTFS)? Yes, you can have a mix of different file systems if you so wish. And to do so, proceed with the following steps.
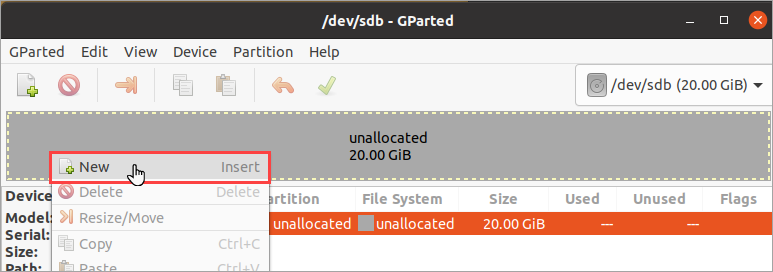
1. Right-click on the unallocated space and click New.
2. On the Create new Partition window that pops up, notice the following details.
| Free space preceding (MiB) | Specifies the amount of free space to leave in front (to the left) of the new partition. The minimum size is 1 MiB. In most cases, you do not need to adjust this value when creating the first partition. |
| New size (MiB) | This value specifies the new partition size. The default value is the entire available unallocated space. If you only intend to create one partition, you don’t need to adjust this value. |
| Free space following (MiB) | This value is the space you leave at the end of the new partition (to the right). Adjusting the New size value automatically the value of this field. |
| Align to | Determines whether to align the partition precisely to the mebibytes (MiB) or the disk’s cylinder. Keep this value as MiB. The Cylinder alignment is only an option for older operating systems before the year 2000. |
| Create as | Specify the type of partition you’re creating, such as Primary or Extended. In most cases, you’d want to choose the primary partition type. The only significant difference is primary partitions can be bootable. |
| Partition name | This field allows you to name the partition but only applies if the partition table type is GPT. |
| File system | Assign the file system type for the partition. While multiple file systems are available, you can only select those compatible with the disk’s partition table. |
| Label | An optional field that allows you to add a label to the partition. |
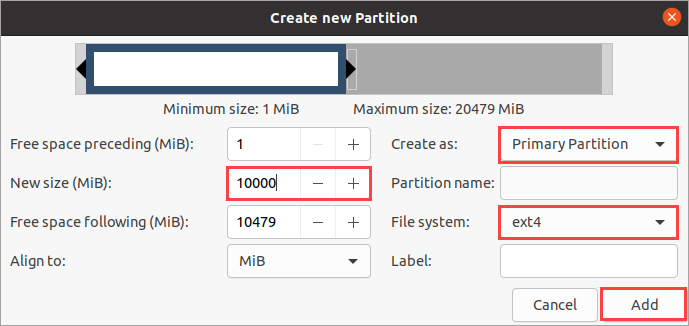
Since you’re creating two partitions in this case, adjust the New size (MiB) value to approximately half of the current unallocated space.
Set the Create as value to Primary Partition and the File system to ext4. After setting the values, click Add.
You can click-hold-drag the arrows on both ends of the partition graph to adjust the partition size.
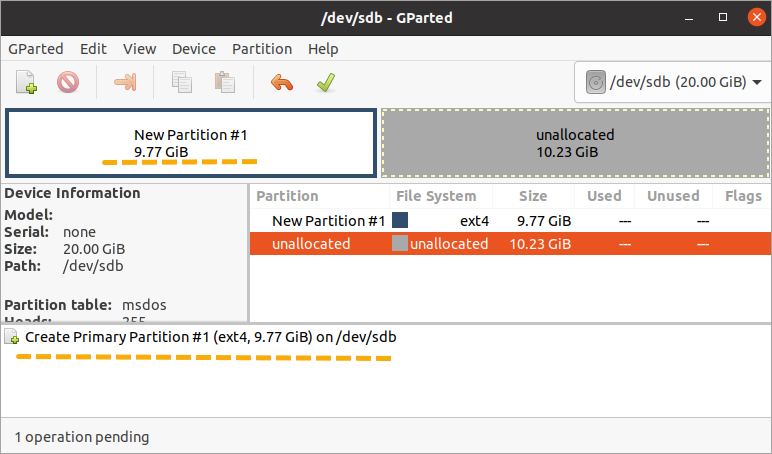
GParted automatically shows you the Pending Operations pane at the bottom of the window. As you can see below, you now have one pending operation to Create Primary Partition # 1. At this point, do not apply the changes yet.
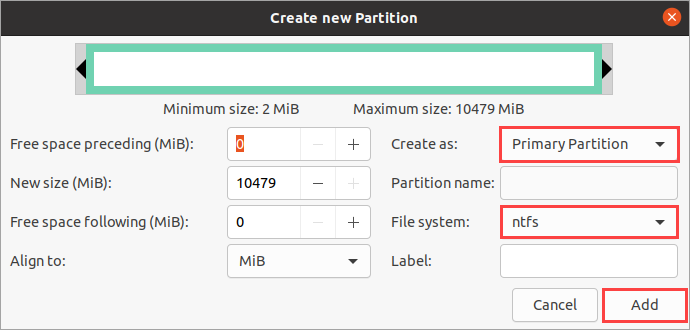
3. Now, right-click the remaining unallocated space and click New.
4. This time, leave the new partition size value as-is, and the partition type should still be Primary Partition. Only change the file system to ntfs. Click Add to queue up this new partition creation.
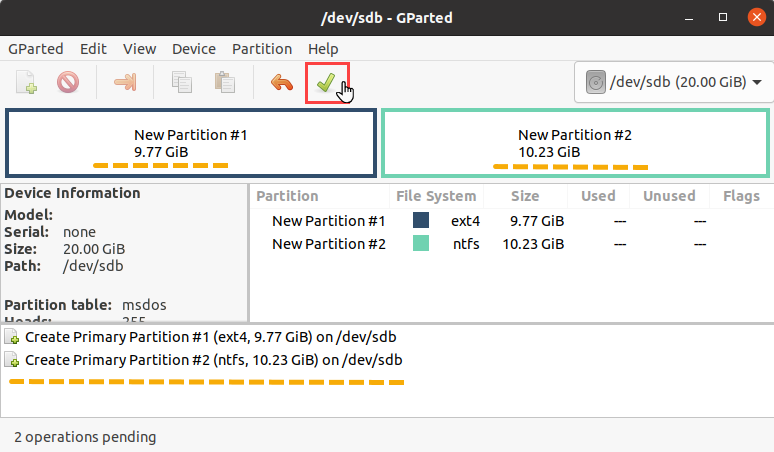
5. Now you have two pending operations to create two new partitions. To apply the pending changes, click the green check button on the toolbar.
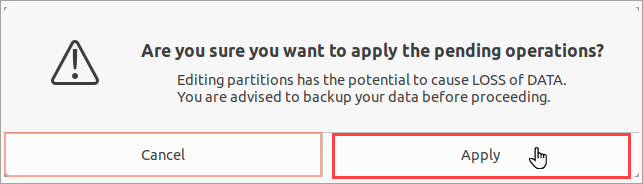
6. At the following confirmation prompt, click Apply to proceed and wait for the process completion.
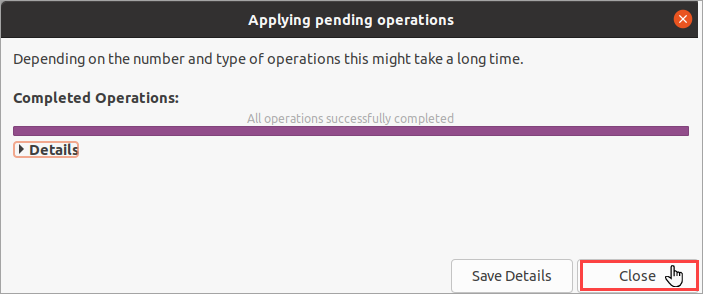
7. Finally, after completing the operation, click Close.
Formatting Partitions
After creating the partitions, what if you realized that you should have selected a different file system? Do you need to recreate the partition? No, you don’t. You can reformat a partition, whether with the same file system or with a new file system altogether.
Formatting a partition only takes a few steps. But to remind you, you’ll lose all data on the partition (if any) during the reformatting.
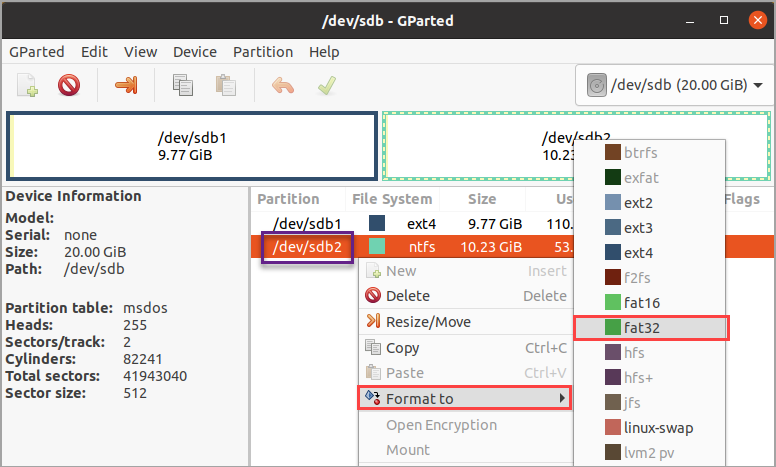
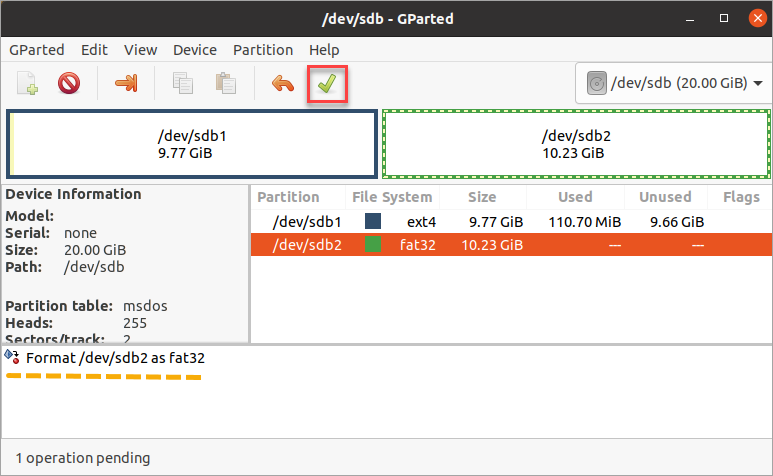
1. To start, right-click the partition you want to format, click Format to —> fat32.
2. The format operation now appears on the list of pending operations. To apply the changes now, click the green check button on the toolbar and confirm to proceed with the operation.
3. Finally, click Close.

Deleting and Resizing Partitions
You may, later on, change your mind and decide that you don’t need a second partition. Instead, you want to have one partition that occupies the entire disk size. Deleting and resizing partitions in the GParted Linux application is a breeze.
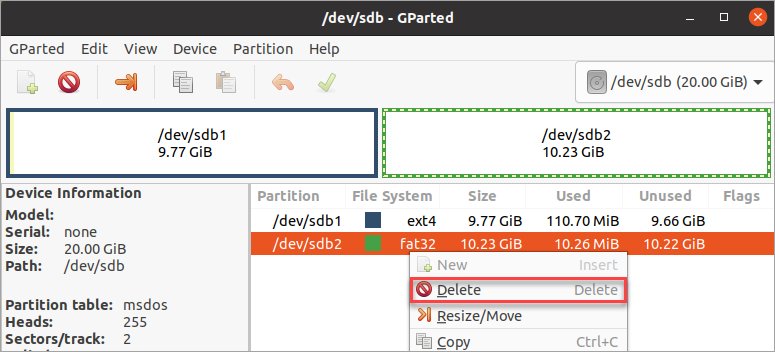
1. On the GParted window, right-click the partition you want to delete and click Delete.
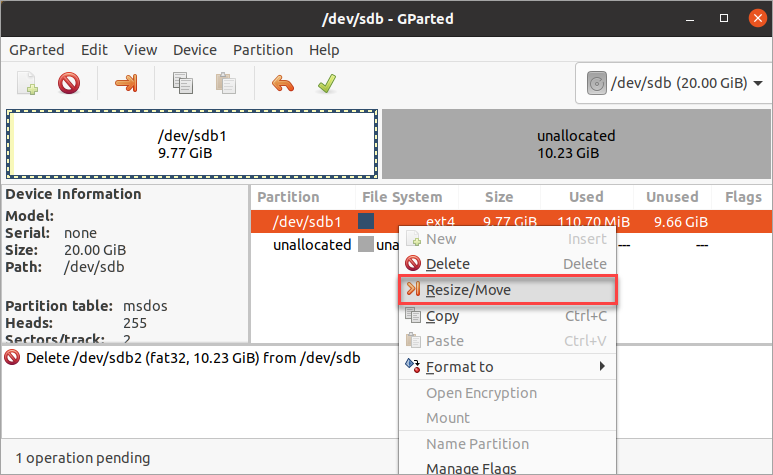
2. Next, right-click the partition to resize and click Resize/Move. In this example, you’re resizing the first partition.
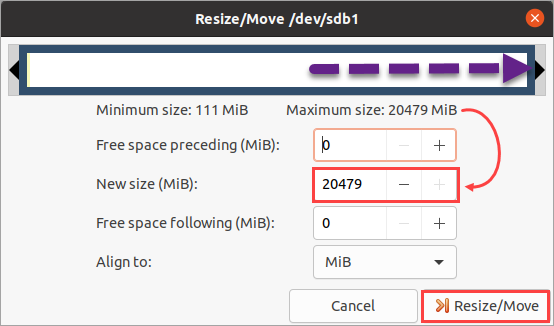
3. Now, drag the right arrow on the graph to the right or until the New size value is the same as the Maximum size. After resizing, click Resize/Move.
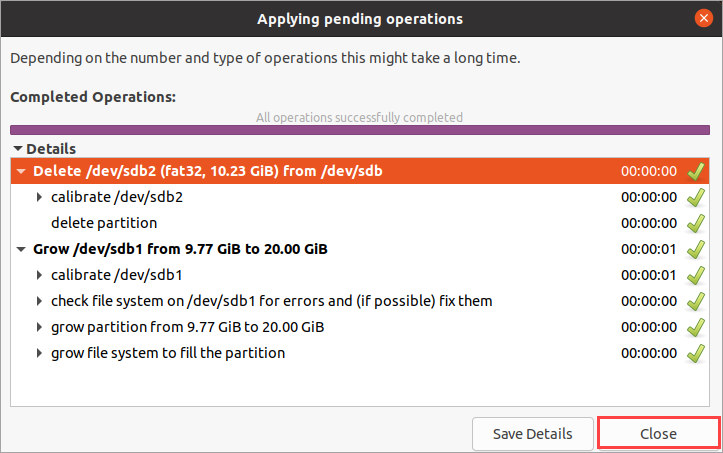
4. There are now two pending operations in your queue — delete the second partition and resize the first partition. To apply the changes, click the green check button on the toolbar and answer any confirmation prompts to proceed.

5. After the partition deletion and resize operations have been completed, click Close.
You now have deleted and resized your disks partitions.
Conclusion
This tutorial aimed to teach you how to get started with tasks like creating, resizing, deleting, and formatting disk partitions. But there are other operations that the GParted Linux app can do, such as moving or copying partitions. Perhaps you can experiment a little more.
Do you think GParted is user-friendly? Is there another, better partition editor tool you would recommend?


