


Repeated username and password prompts are annoying and time-wasting. If you use password authentication with your Gitlab account, each action requires you to send over your credentials, whether as part of the command or through an interactive prompt.
Not a reader? Watch this related video tutorial!
Not seeing the video? Make sure your ad blocker is disabled.
Especially when automating the CI/CD pipelines in GitLab, password authentication can be inefficient and a possible security risk. Why not end your suffering and switch to Secure Shell (SSH) authentication using Gitlab SSH keys? Read on and learn how!
By the end of this tutorial, you will have generated an SSH key pair, used the key to authenticate and publish a new Gitlab project.
Prerequisites
This tutorial is a hands-on demonstration. To follow along, be sure to prepare the following requirements.
- Your GitLab account. If you don’t have one yet, sign up for a free account first.
- A computer to use as your Gitlab SSH client. This tutorial will be using an Ubuntu 20.04 LTS computer but should work with Windows and macOS too.
- Update or Install Git. The latest version as of this writing is 2.25.1.
Visual Studio Code (VS Code). The example in this tutorial will be using VS Code 1.62.3.
Generating a Gitlab SSH Key Pair
SSH keys or a key pair is consists of private and public keys. In a nutshell, the private key is what the client (your computer) presents to the server (Gitlab) for authentication, and the public key is what the server uses to decode your private key. And if both keys match, the authentication passes.
GitLab supports two types of SSH key pairs, the RSA and ED25519 SSH keys. But in this example, you’ll generate the ED25519 key pair as it is considered more secure than RSA keys. Follow the steps below to generate an SSH key pair.
1. On your desktop, open a terminal session and run the command below. This command opens your home directory in VS Code.
code ~2. On the VS Code, click Terminal —> New Terminal.

3. On the VS Code terminal, run the ssh-keygen -t below to generate the ED25519 SSH key type. The comment tag -C is optional but recommended to make your keys more identifiable.
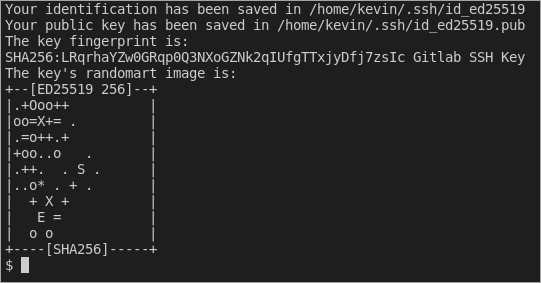
ssh-keygen -t ed25519 -C "Gitlab SSH Key"4. At the next prompt asking where to save the key, press Enter to accept the default filename. The filename should be similar to /home/<username>/.ssh/id_ed25519, where <username> is your username.

5. Next, leave the passphrase empty, and press Enter twice. As a result, you’ll be creating a passwordless SSH key pair.

You should see a similar result to the screenshot below showing the private key (id_ed25519) and public key (id_ed25519.pub) locations.
The private and public keys have the same base filename. But the public key has a .pub extension, while the private key does not have an extension.
Adding the Gitlab SSH Key to Your Profile
Remember that the private key stays on your computer, while the public key should be on the Gitlab server. So after generating the SSH Keys, your next step is to upload the public key to your Gitlab account. To do so, proceed as follows.
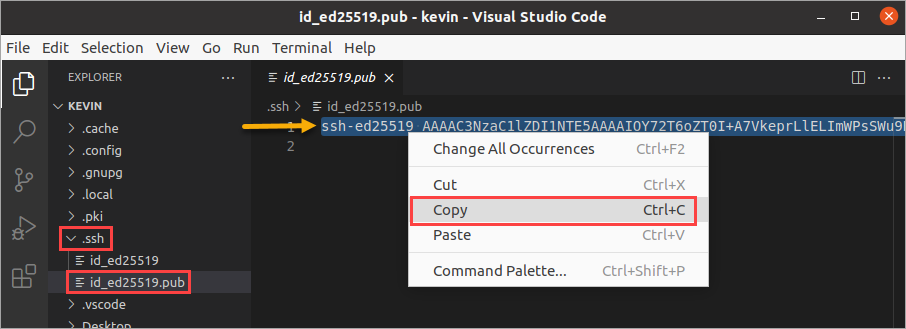
1. Open your public key file in VSCode. On the Explorer pane, expand the .ssh folder and click id_es25519.pub. Next, select the public key and copy it to the clipboard.
2. Now, open a web browser, navigate to https://gitlab.com, and log in to your Gitlab account.
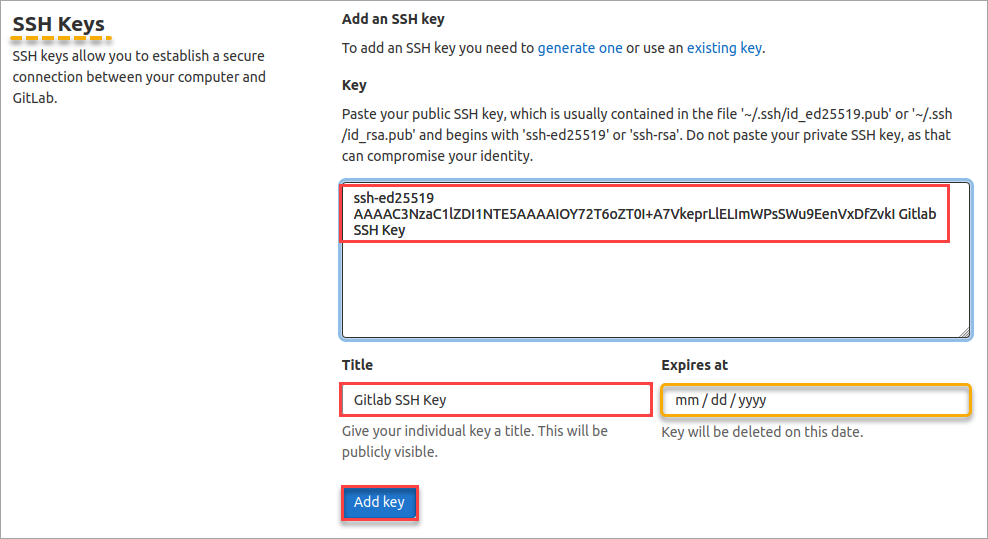
3. After login, navigate to the SSH Keys profile settings at https://gitlab.com/-/profile/keys.
- Paste the public key that you copied earlier into the Key field.
- The Title field automatically populates with the comment portion of your public key. Leave the title value as-is or enter your preferred value.
- Optionally, specify an expiration date on the Expires at field.
- Lastly, click Add key.
Using Your Gitlab SSH Key
So far, you’ve generated the SSH key and uploaded it to your Gitlab account. What’s left is to test whether your SSH key works by using it to connect and authenticate to Gitlab.
Signing In
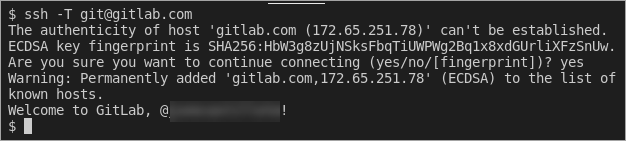
On the VS Code terminal, connect to your Gitlab account by running the command below.
ssh -T [email protected]Assuming you’re connecting for the first time, the command prompts you to verify the host’s authenticity and confirm the connection. Type yes at the prompt and press Enter to confirm.
Notice that you did not have to enter a username and password to log in? Instead, the ssh command automatically uses your SSH keys for authentication. After a successful login, you should see a welcome message saying, “Welcome to Gitlab @username!“.
Publishing a New Project
You’ve confirmed that your Gitlab SSH key works and lets you authenticate successfully. But does it also work when you interact with Gitlab through Git? Why not test by publishing a new Gitlab repository?
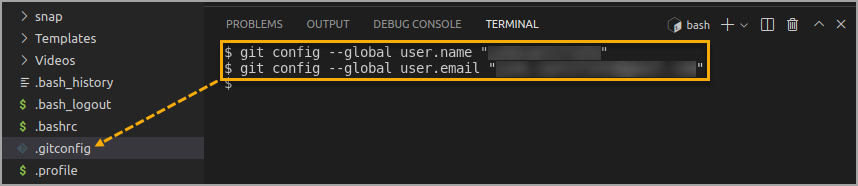
1. First, initialize the Git configuration and set it up with your Gitlab account’s username and email address. On the VS Code terminal, run the git config commands below to specify your Gitlab username and email address, respectively.
git config --global user.name "your_username"
git config --global user.email "[email protected]"
The command you ran should update or create the ~/.gitconfig file with the information you provided.
2. Next, create a folder under your home directory for your new repository. Name the new folder as my-first-project.
The folder name will also become your Gitlab repository project name.
# Create a new folder
mkdir ~/my-first-project
# Change the working directory to the new folder
cd ~/my-first-project
3. Initialize the repository by running the command below. Make sure to change the <username> with your Gitlab username.
git initYou should see a similar confirmation message to the screenshot below.

4. Next, specify the remote Git repository address for your project. This repository address determines whether you’ll authenticate with SSH keys or with username and password.
Find the syntax below, where <username> is your Gitlab username and <project-name> is the Gitlab repository name. Notice that the repository address begins with [email protected], which indicates that you’ll be authenticating with the SSH key instead of a username and password.
git remote add origin [email protected]:<username>/<project-name>.gitSuppose the Gitlab username is kevin, and the repository name is my-first-project. Now run the command in the terminal as follows.
git remote add origin [email protected]:kevin/my-first-project.git5. Run the command below to create an empty file in your repository called README.md.
touch README.md6. Open the README.md file for editing and paste the following content into the file. Save the file after editing. My first project to demonstrate Gitlab SSH keys.
My first project to demonstrate Gitlab SSH keys.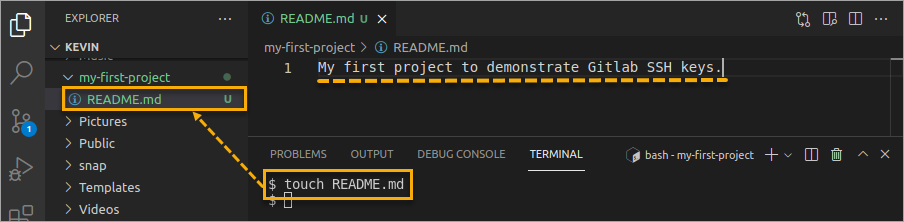
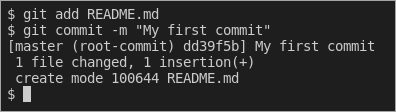
7. Now, tell Git to add the new README.md file to the repository and commit the changes.
git add README.md
git commit -m "My first commit"
You should see a similar output as shown below.
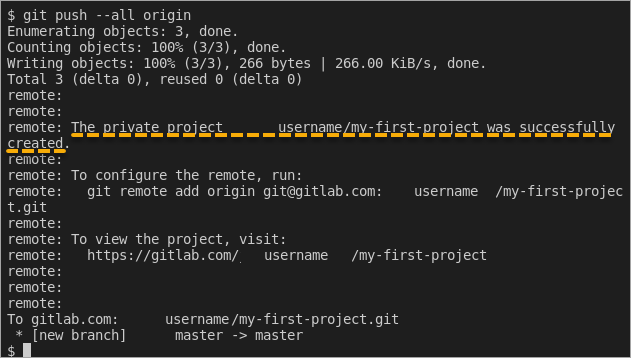
8. Finally, time to publish your new repository. Run the command below to push the repository from your computer to your Gitlab account.
git push --all originAs you can see below, the project creation was successful, and there were no credential prompts! Git used your SSH keys to authenticate with Gitlab.
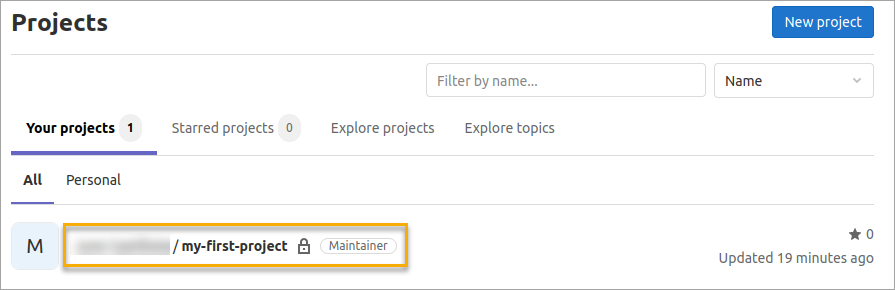
9. Finally, confirm that your new Gitlab project exists online. Using your browser, navigate to https://gitlab.com/dashboard/projects to view a list of your existing projects. You should then see the my-first-project name on the list.
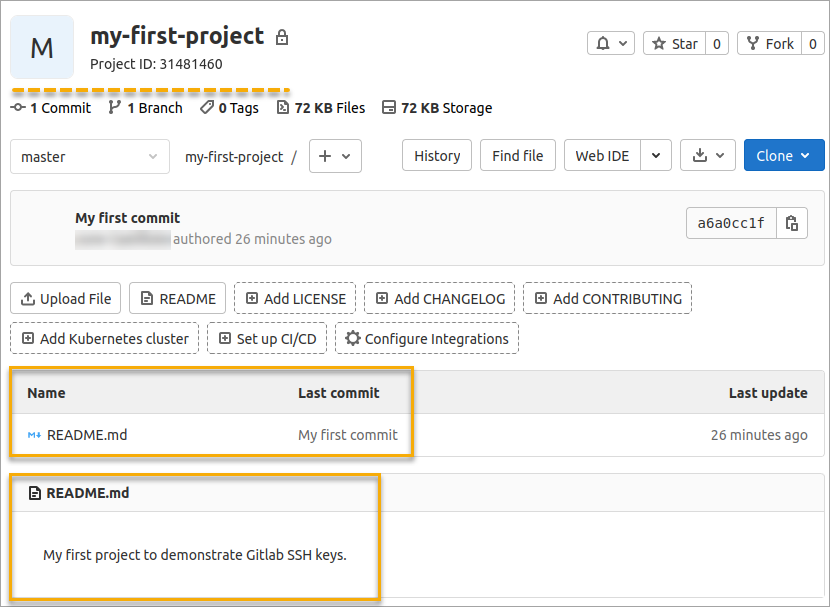
10. Furthermore, click on the project name, and you should see the README.md file and contents on display.
Conclusion
Congratulations on having made this far in this tutorial! Throughout this step-by-step tutorial, you’ve learned how to generate and use SSH keys to make secure version control deployments to your GitLab repository.
With this knowledge, you can now perform tasks on your Gitlab repositories without worrying about inadvertently exposing your username and password.
Have you used Gitlab SSH key authentication before? How was the experience? Do you recommend others to use SSH keys, too, or is there any reason they should stay away from it? Let us know.


