


Has your team invested a lot of effort in manually packaging code? If so, it’s about time you use GitHub Actions Artifacts, so your team can automate this procedure. At the same time, you reduce release variability and save time to work on other crucial tasks.
GitHub Actions Artifacts lets you effectively transfer data from one active job to another, eliminating the repetitious and time-consuming tasks involved in deployment. In this tutorial, you’ll learn how to use and manage artifacts for deploying a React application to Netlify.
Read on and start creating consistent deployments!
Prerequisites
This tutorial will be a hands-on demonstration. If you’d like to follow along, be sure you have a simple React application and a GitHub repository. This tutorial uses a React Counter App repository.
Building a CI/CD Workflow
When a job in a GitHub Actions workflow ends, so does the data they process and generate. Data called artifacts can be retained on the repository page after jobs have been completed and can be uploaded using the upload-artifact action.
But before using GitHub Actions artifacts for your deploy releases, you need to first build a CI/CD workflow for your application:
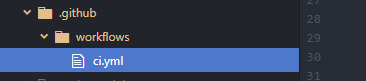
1. Create a .github folder in the root directory of your application and create a sub-folder called workflows.
2. Next, create the workflow file (a .yml file) in the workflows folder. You can name the file as you like. But for this tutorial, the file is named ci.yml.
Your file workflow resource structure should look like the one below.
3. Add the following code into the ci.yml file and save the changes. The code below creates a workflow called CI with a build job for the application.
name: CI
on:
push:
branches: [ "main" ]
pull_request:
branches: [ "main" ]
# The workflow will be triggered on a push or pull event on the main branch
jobs:
build:
name: Build
runs-on: ubuntu-latest
# Operating System to run on
strategy:
matrix:
node-version: [12.x, 14.x, 16.x]
steps:
- uses: actions/checkout@v3
# Get code from the repository
- name: Use Node.js ${{ matrix.node-version }}
uses: actions/setup-node@v3
with:
node-version: ${{ matrix.node-version }}
- name: Install dependencies
run: npm ci
- name: Build app
run: npm run build
- name: Run tests
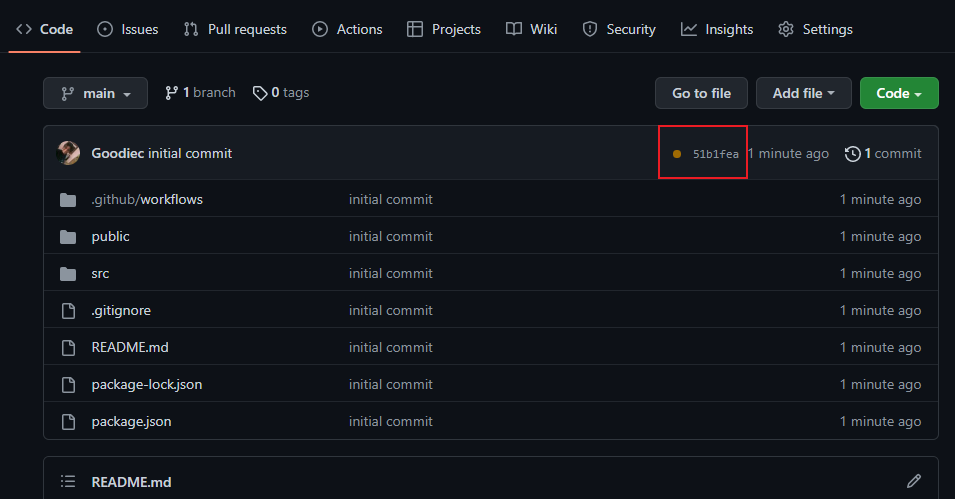
run: npm run test4. Now, add and commit the changes, and push them to your remote GitHub repository.
If the push were successful, you’d see the commit with an amber-colored circle, as shown below, indicating that the workflow is running.
5. Click on the Actions tab to view the workflow.
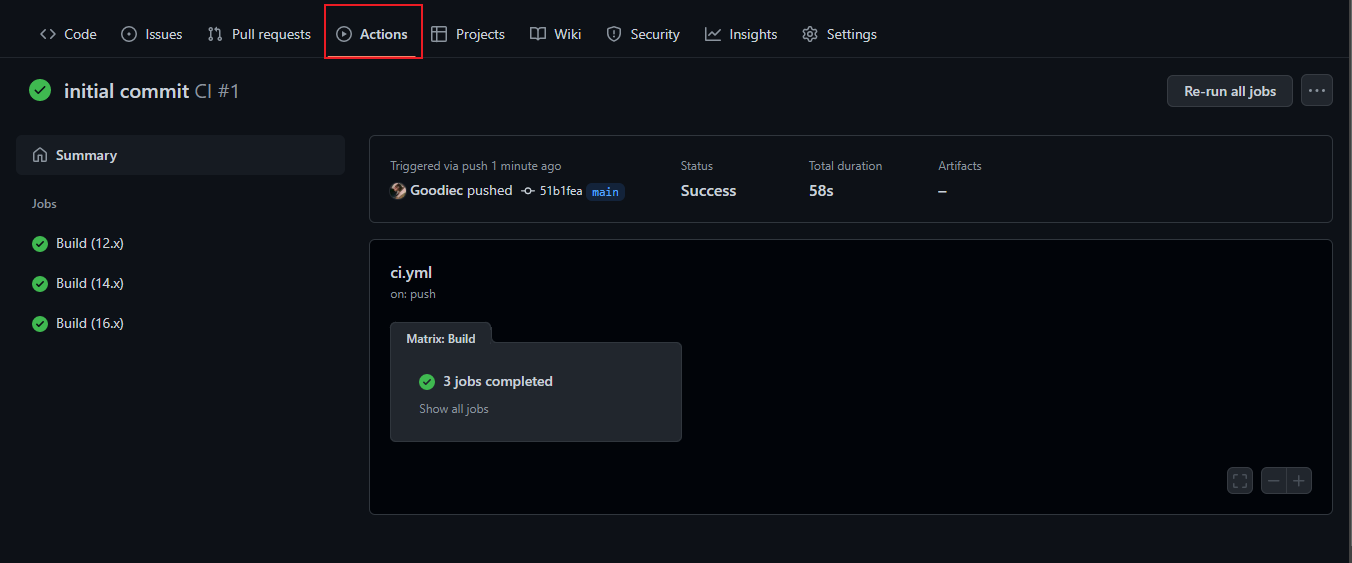
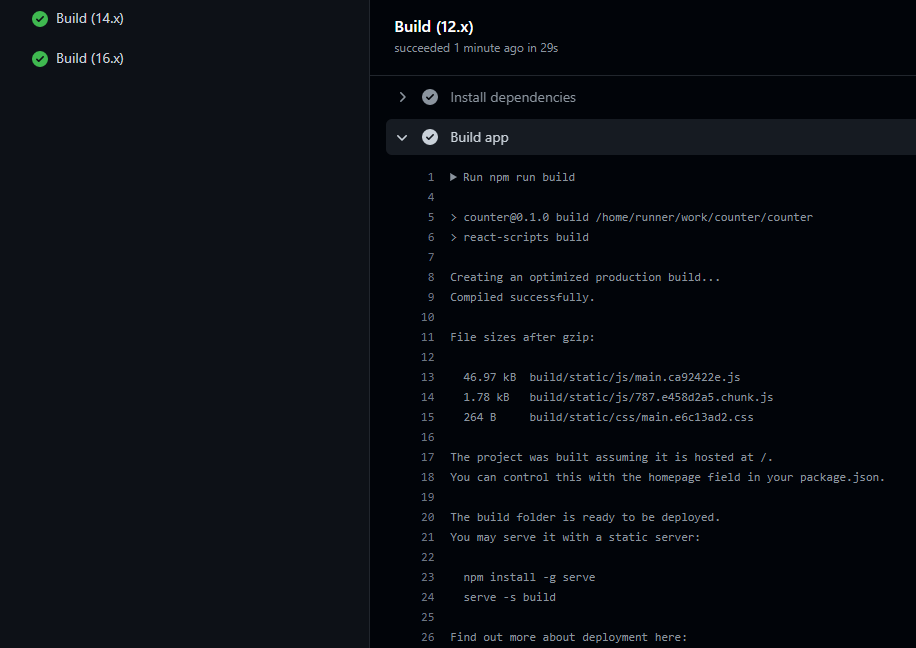
6. Click on any build jobs on the left-hand side and expand the Build app job. You’ll see the build job’s data (static files) generated. These are the files you need for deployment.
These generated files are lost when the server running the job is disposed of (or when the job ends). Since you’ll need these files for deployment, you’ll implement a step to take these files and upload them as an artifact in the following section.
7. Finally, add the following code after your run tests under the steps block in your build job.
The code below uploads an artifact named production from the build directory using the actions/upload-artifact@v3 action.
The generated files are lost when the server running the job is disposed of or when the job ends. Since you’ll need these files for deployment, the code below implements a step to take them and upload them as an artifact.
# Upload Artifact
- name: Upload production-ready build files
  uses: actions/upload-artifact@v3
  with:
    name: production
    path: ./build
Configuring a Custom Artifact Retention Period
Artifacts are stored for 90 days by default before being erased. But depending on the type of repository, you can alter this retention period.
Below are the values you can set for customizing an artifact retention period:
- Private Repository – Any value between
1and400days. - Public Repository – Any value between
1and90days only.
To set a custom artifact retention period, update your workflow YAML file by including retention-days: 2 in your # Upload Artifact step.
# Upload Artifact
- name: Upload production-ready build files
  uses: actions/upload-artifact@v3
  with:
    name: production
    path: ./build
    # Customize Artifact Retention Period
		retention-days: 2
Alternatively, configure the artifact retention period with the following through GitHub:
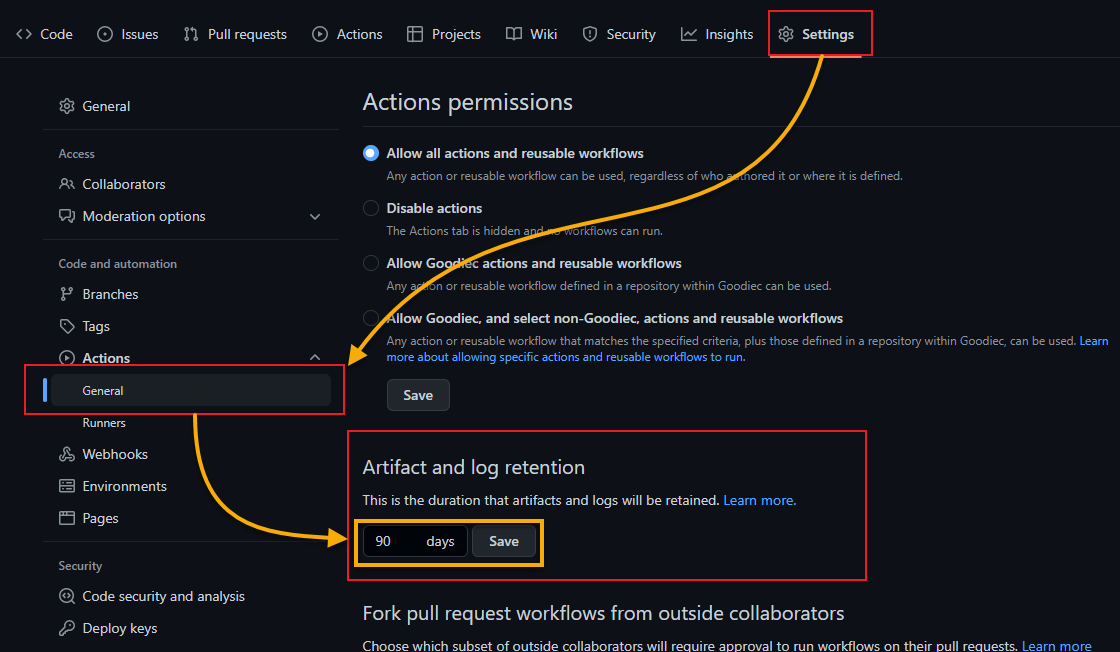
- Navigate the Settings tab in the repository.
- Click on Action (left panel) to expand the dropdown, and select General.
- Input the number of days you want to keep the artifact under the Artifact and log retention section shown below, and click Save.
Importing a Project from Git Repository to Netlify
The build artifact can now be accessed in another job in the workflow by being downloaded because you have a step to upload the artifact, reducing the workflow completion time. You’ll add a deploy task to your workflow, and one of the steps in that job downloads the uploaded item.
But before updating your workflow, you’ll set up Netlify for the app deployment:
1. Open your favorite web browser, navigate to Netlify and log in with your GitHub.
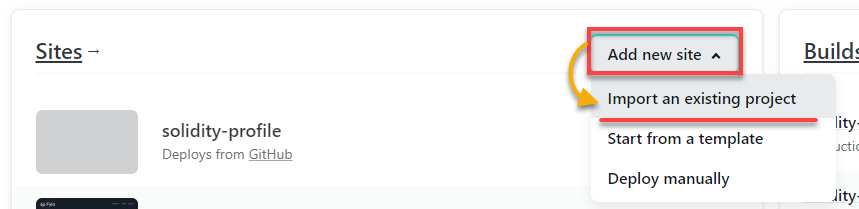
2. Once logged in, click on Add new site in the Sites section, and select Import an existing project to initiate importing your project.
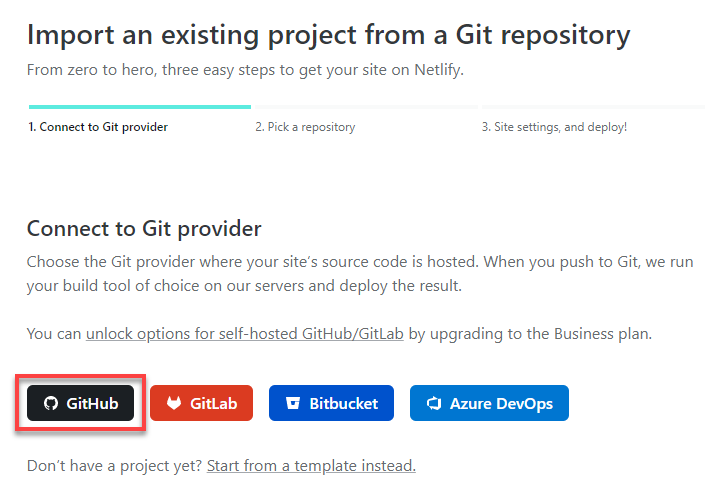
3. Click on GitHub since you’ll use the repository you created for this tutorial on GitHub. A pop-up window appears where you’ll authorize Netlify access to your GitHub identity.
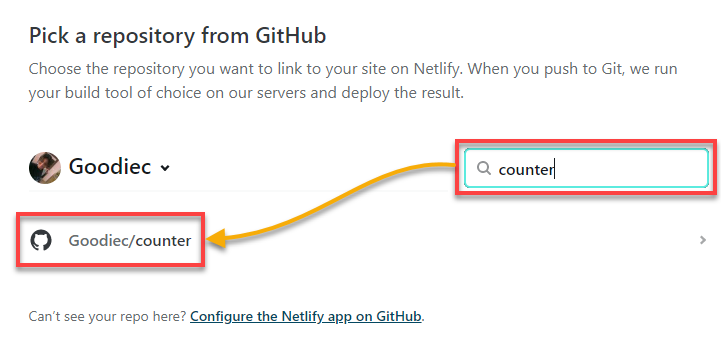
4. Once authorized, search, and select the repository you want to import the project from.
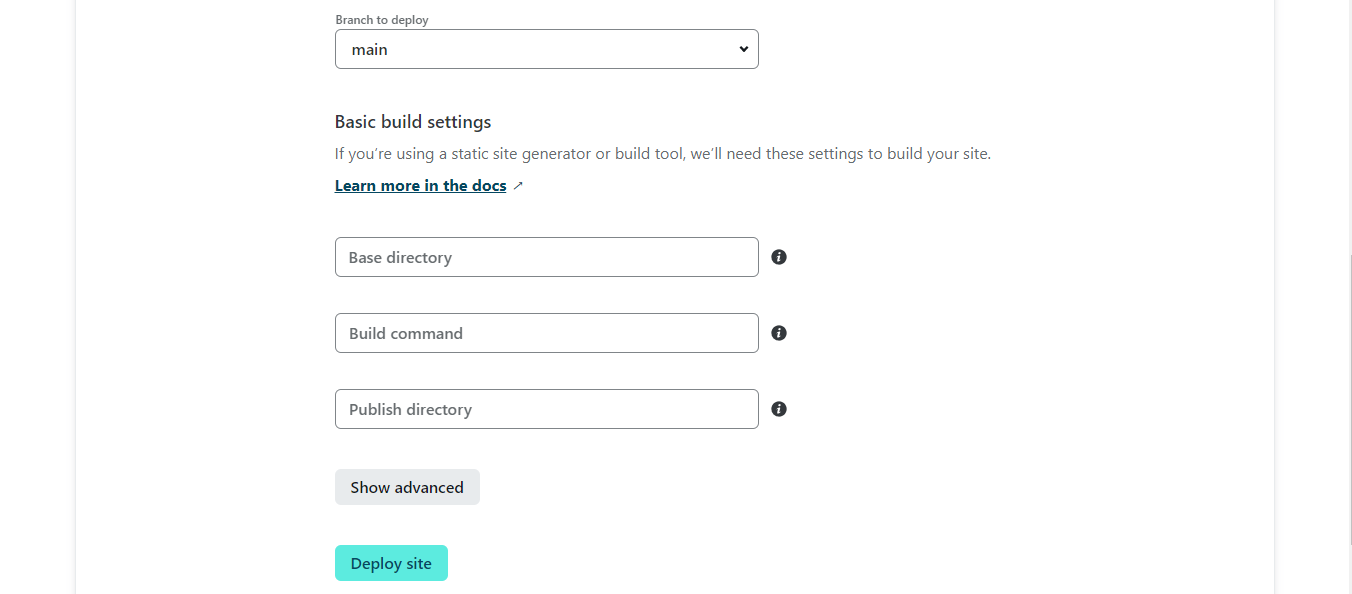
5. On the new page, configure the basic build settings for the site, such as the branch you want to deploy from and the build command. But since you’ll be deploying using GitHub actions, leave the build command, and publish directory fields blank.
Click on Deploy site after configuring the build settings, and you will see that the site is being deployed. Once deployed, a live link will be generated for the site.
If you left the build command field blank, going to the link will display a 404 page as the app didn’t build.
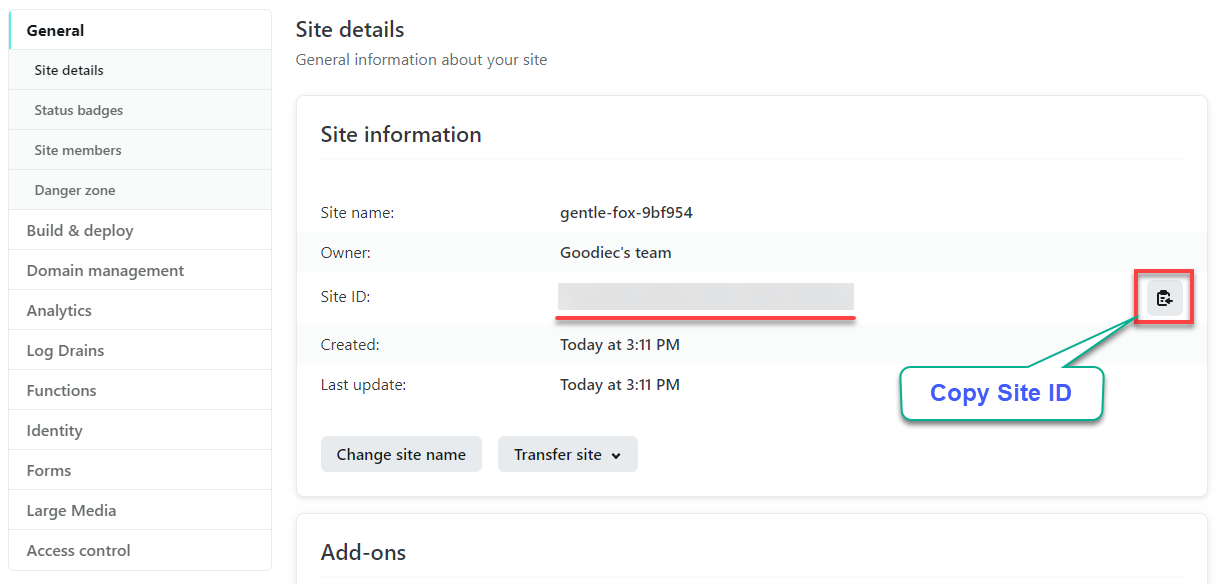
6. Next, click on Site settings to overview the site information (step six).

7. Lastly, on the Site details page, note down the Site ID below under the Site information section for later use.
Creating a Personal Access Token
Now that you have your site ID, you need to get an access token. The personal access token will grant access to your Netlify account so that GitHub Actions perform the deployment on Netlify.
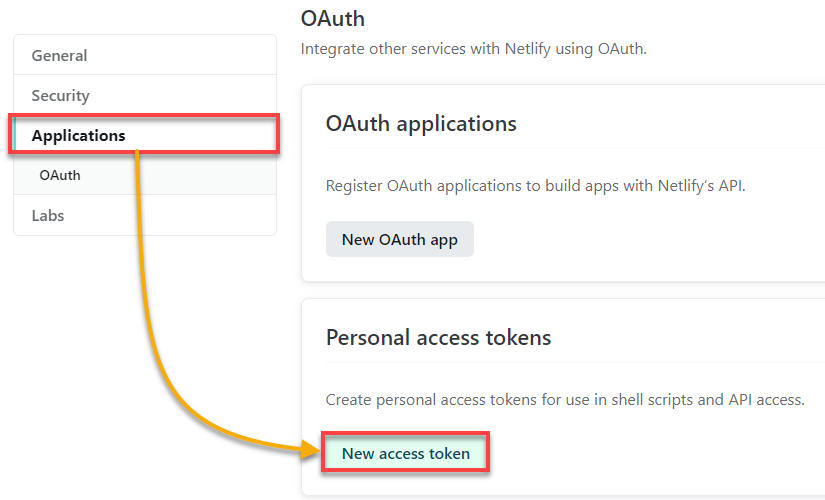
1. Click on your profile icon (top-right), and choose User settings to access your profile settings.

2. On the new page, click on Applications (left panel) → New access token (under Personal access tokens section) to initiate creating a new access token.
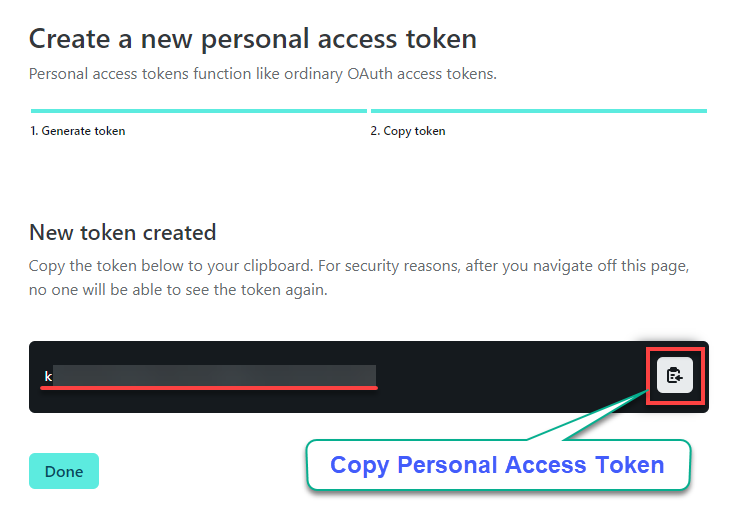
3. On the new page, input a descriptive name for the token and click on Generate token.
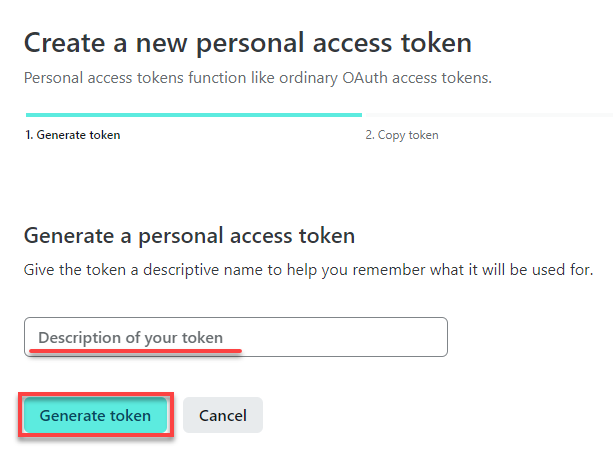
4. Now, copy the token to a safe place.
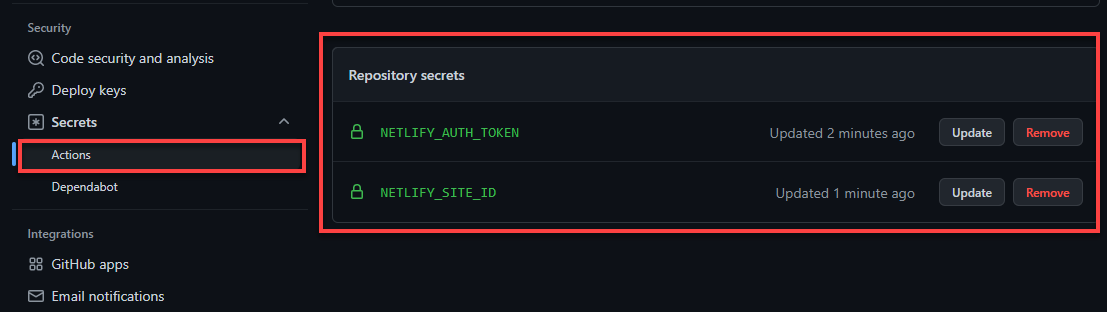
Securing Site ID and Access Token by Creating Secrets
Now that you have the site ID and access token from Netlify, you can add them to your repository to be used in the actions workflow. But first, you’ll have to secure your site ID and access token by creating secrets.
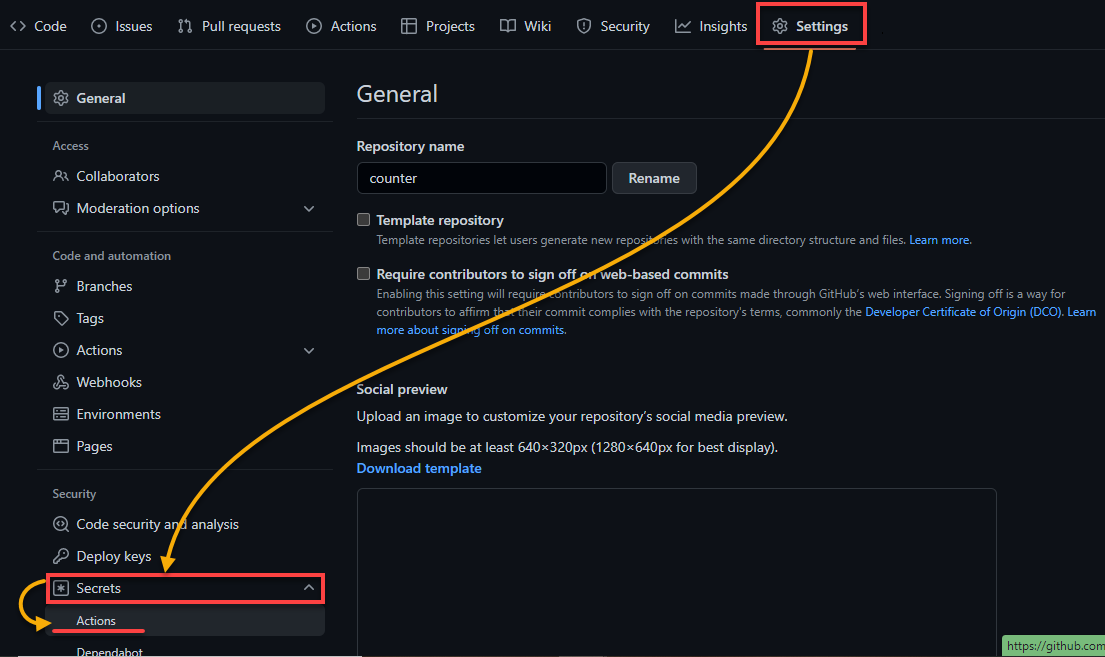
1. Navigate to your GitHub repository on your browser.
2. Next, click on the Settings tab → Secrets (left panel) → Actions (under Secrets) to access the list of actions available on your repository.
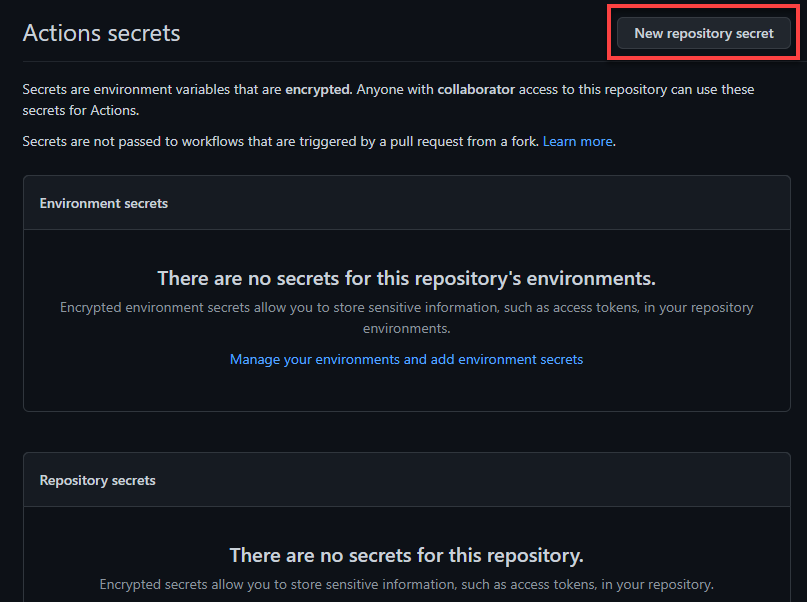
3. Click the New repository secret on the Actions secrets page to initiate adding a secret.
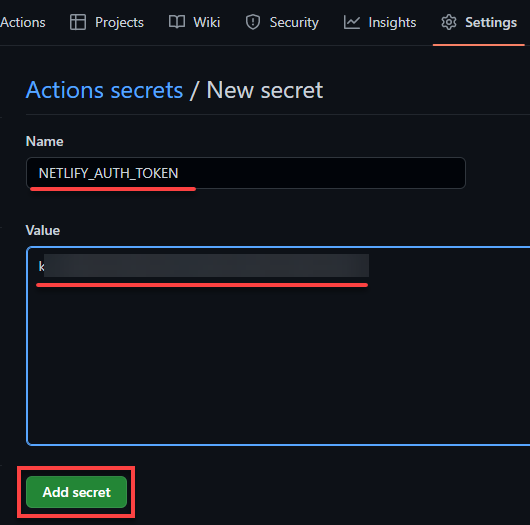
4. Now, provide a descriptive Name for the new secret. But this tutorial uses NETLIFY_AUTH_TOKEN as the secret name.
Add your access token as the Value and click on Add secret to create the new secret.
5. Lastly, repeat step four, but this time, add a secret for your site ID.
Once added, you’ll see the secrets in the Repository secrets section, as shown below.
Downloading and Deploying Artifact to Netlify
Now that your Netlify site and secrets are set up, you’ll include a step in your workflow to deploy to Netlify using your secrets.
1. Update your workflow by adding the code below containing the deploy job.
The following code contains steps to download the uploaded artifact and another step to deploy it to Netlify.
You can find the complete code for the ci.yml file in ATA’s GitHub repository.
deploy:
  name: Deploy #Job name
  needs: build # The build job has to run successfully for the deploy job to run
  runs-on: ubuntu-latest

  steps:
  - name: Download artifact
    uses: actions/download-artifact@v3
# Downloads the uploaded files
    with:
      name: production
      path: ./build

  - name: Deploy to Netlify
    uses: netlify/actions/cli@master
# Step to deploy to Netlify
    env:
      NETLIFY_AUTH_TOKEN: ${{ secrets.NETLIFY_AUTH_TOKEN }}
      NETLIFY_SITE_ID: ${{ secrets.NETLIFY_SITE_ID }}
# Secrets for authentication
    with:
      args: deploy --dir=build --prod
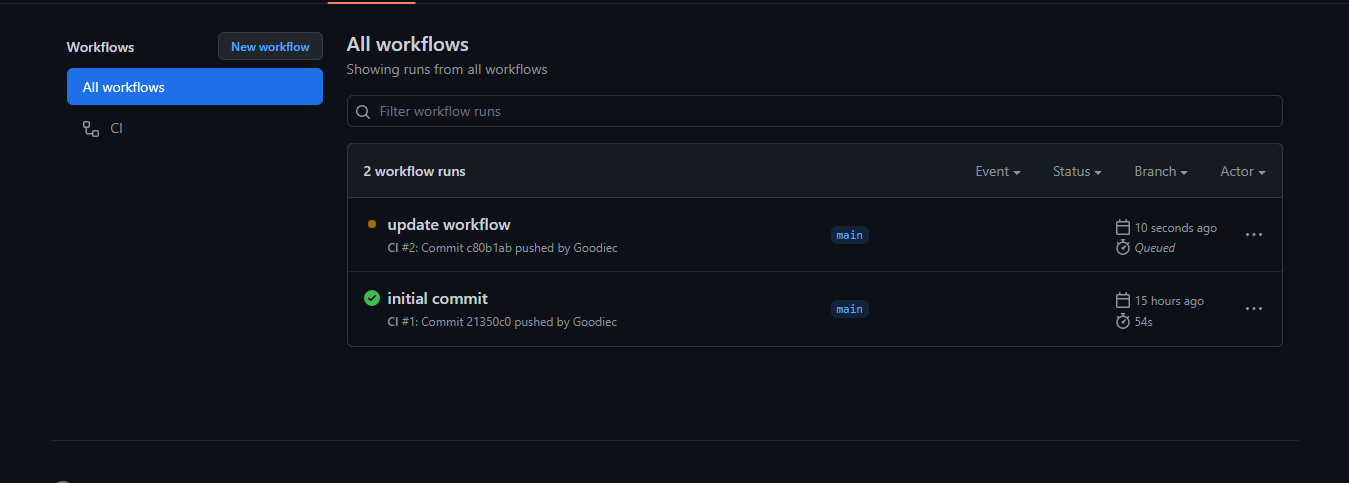
2. Next, add and push the changes to the remote repository.
You should see the latest commit being run on the workflows page on the repository, as shown below.
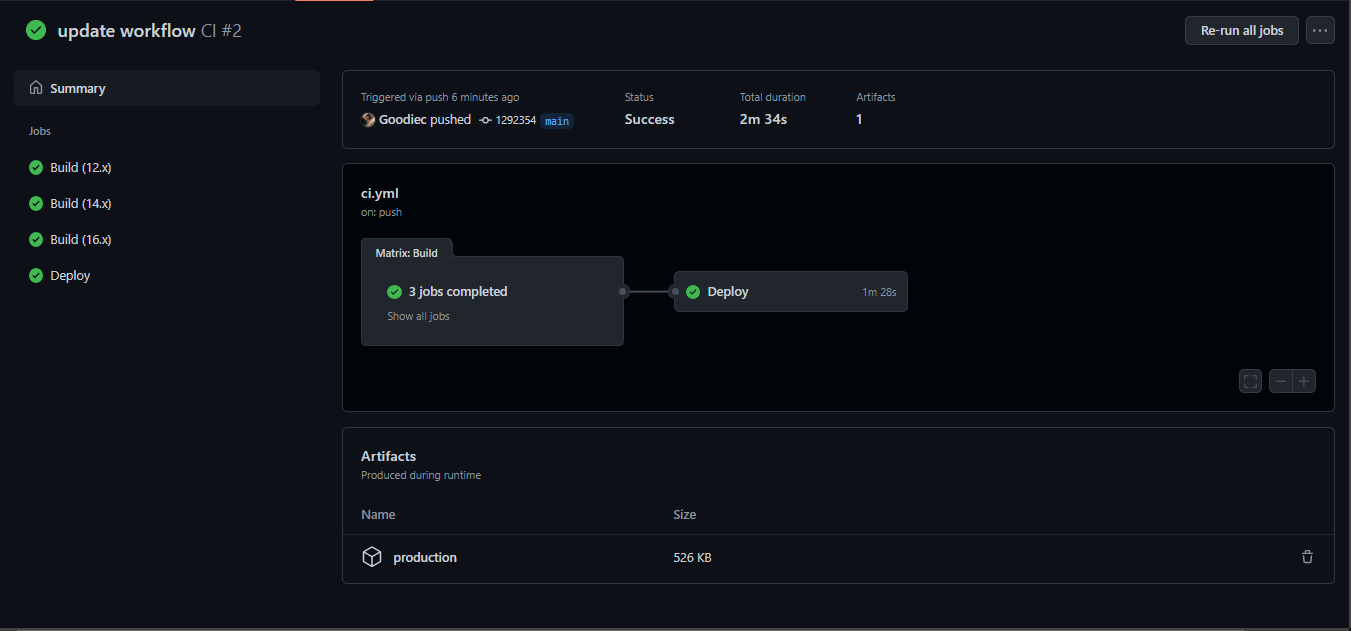
Once committed, click on the latest run to view more details.
If the jobs run successfully, you’ll see a green check beside the jobs and the production artifact at the bottom of the page.
3. Now, click on the Deploy job (left panel), and expand the Deploy to Netlify task. You’ll see the output of the step, which contains the website URL.
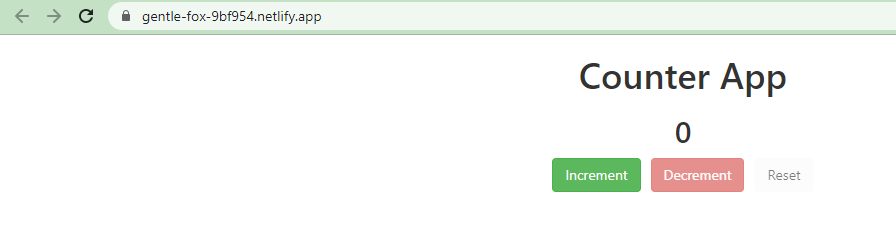
Click on the Website URL to verify the site works and is accessible.
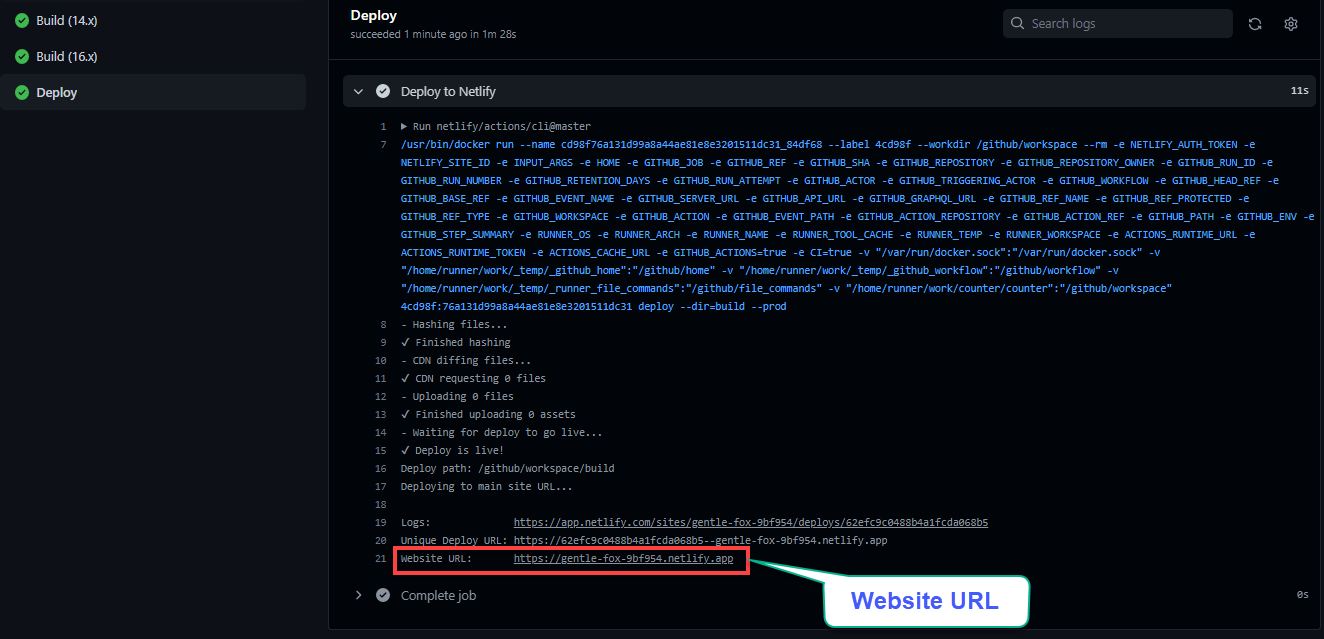
The URL automatically opens in a new tab on your web browser, as shown below. This output indicates that your site is working correctly.
Deleting Unused Artifacts to Save Space
After each release, you use more disk space when you upload and download new releases. How do you save space? Deleting unused artifacts is the most viable solution. You must limit the number of release artifacts residing on each server to prevent the accumulation of thousands of releases and a full disk.
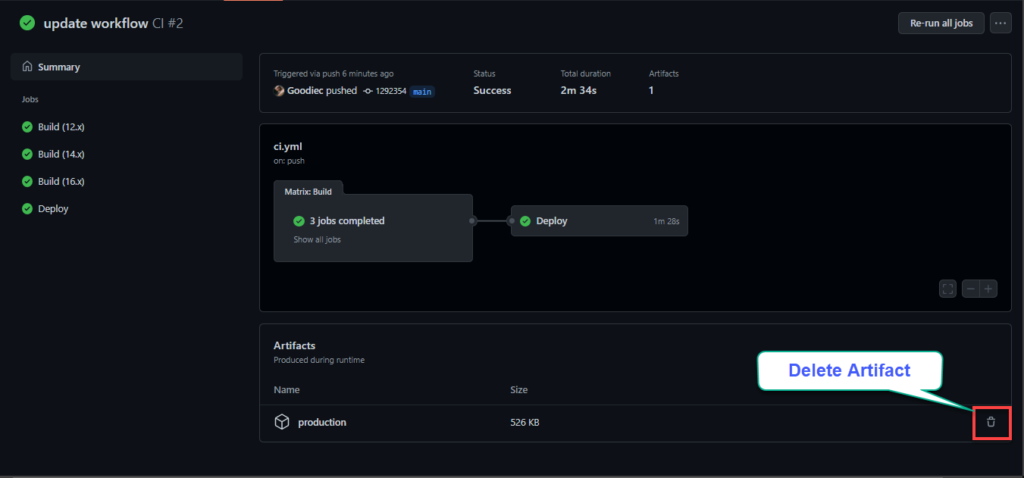
Besides using the retention period setting to delete artifacts after some time, you can also delete the artifact from the workflows page on GitHub:
On your workflow page, click on the delete icon beside the artifact to delete it.
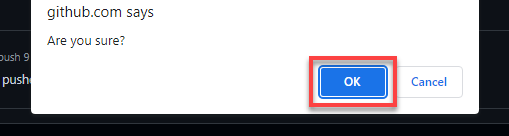
Now, click OK on the prompt (topmost) to confirm deleting the artifact.
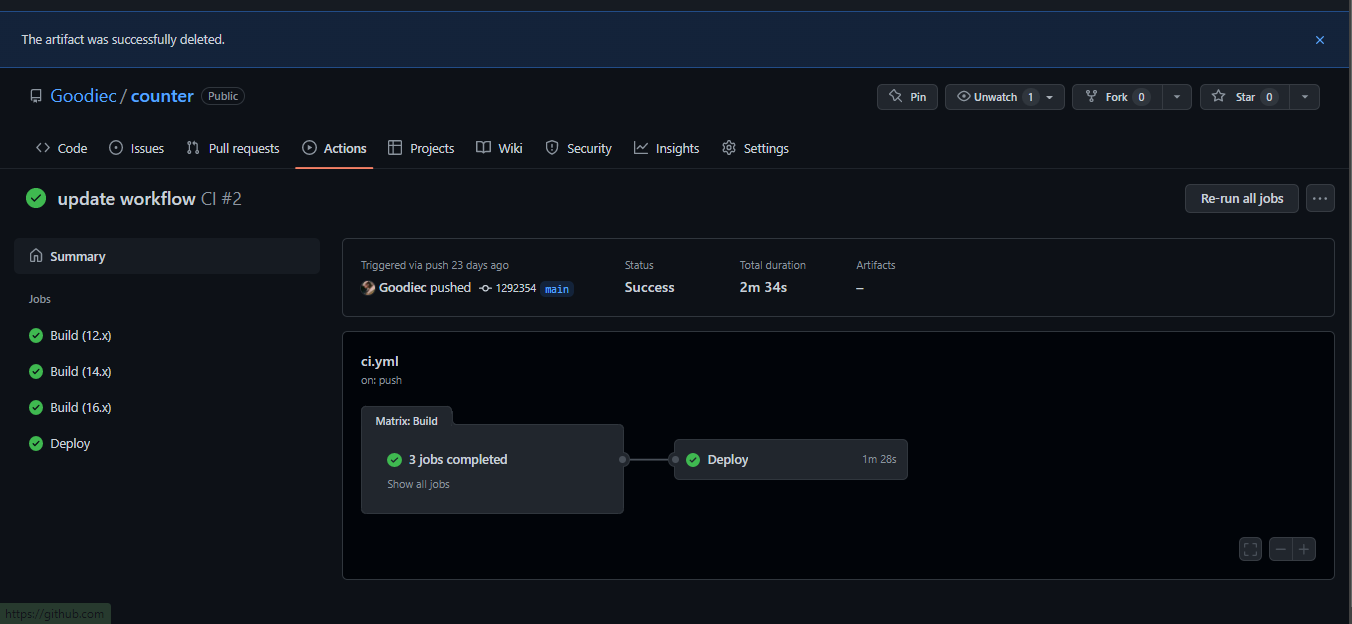
Notice below that the artifact is not on the page anymore, confirming it has been deleted successfully.
Conclusion
You’ve seen how artifacts make it simpler to develop more intricate automation in which one workflow provides information to another. At this point, you should now have a better understanding of GitHub Actions artifacts and how they can be used for your deploy releases.
With this newfound knowledge, why not take advantage of GitHub actions for the workflow automation of your next project?


