

Merging branches in Git can sometimes be a daunting task, but the git merge command simplifies the process significantly. In this tutorial, you’ll learn the essentials of combining branches using git merge, paired with GitHub, a leading project management tool.
Let’s start this journey into the world of Git and GitHub, focusing on the powerful git merge command.
Prerequisites for Mastering Git Merge
Before delving into the intricacies of git merge, ensure you have the following setup:
- Git (Version 2.25.1 used in this tutorial) – Download from Git’s official site.
- A GitHub account – Sign up at GitHub.
- An Ubuntu machine (Ubuntu 20.04 is used here, but any operating system with Git will suffice).
Initializing a Project for Git Merge
To effectively use git merge, you first need a Git project. Let’s set up a demo project for practice.
1. Begin by creating a new directory named ~/git-demo and navigate into it:
mkdir git-demo && cd git-demo2. Create an index.html file in the ~/git-demo directory with the following content. This basic HTML file displays a message about starting with git merge.
<html lang="en">
<head>
    <meta charset="UTF-8">
    <meta http-equiv="X-UA-Compatible" content="IE=edge">
    <meta name="viewport" content="width=device-width, initial-scale=1.0">
    <title>Git Merge Demo</title>
</head>
<body>
    <h4>Let's get started with git merge</h4>
</body>
</html>
3. Initialize a new Git repository in your project directory:
The
git initcommand is used to convert an existing, unversioned project into a Git repository or to start a new project with Git.
git init
4. Confirm the creation of the .git folder in your project directory. This folder is where Git tracks changes:
ls -la
5. Implement the git add command to stage your changes in the project. By staging the index.html file, you’re preparing it for the next commit in the Git workflow.
git add index.html6. Use git status to confirm that your file is correctly staged. This command provides a snapshot of the current state of your working directory.
git status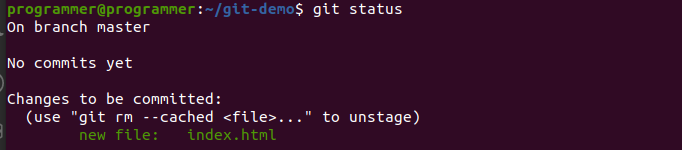
7. Next, commit your changes using git commit. This command saves your staged changes to the local repository, marking a significant step in your version history.
git commit -m "initial commit"
Set your Git identity with:
git config --global user.email "[email protected]"andgit config --global user.name "Your Name"if using Git for the first time.
8. Review your commit history with git log. This command helps you keep track of changes and is vital when preparing for a git merge.
git log
9. Confirm the existence of branches in your repository with git branch. This step is crucial before you perform a git merge.
Note: The default branch is named ‘main’ in recent Git versions, replacing ‘master’.
git branch
Creating a Branch for Git Merge
With your initial Git setup complete and the first commit made, it’s time to create a new branch. This branch will be used to demonstrate the git merge process effectively.
1. Update the index.html file with new content to demonstrate changes in your branch. This version includes user input fields, preparing for a demonstration of git merge.
<html lang="en">
<head>
<meta charset="UTF-8">
<meta http-equiv="X-UA-Compatible" content="IE=edge">
<meta name="viewport" content="width=device-width, initial-scale=1.0">
<title>Git Merge Demo</title>
</head>
<body>
<h4>Enhancing Git Merge Skills</h4>
<form action="">
<input type="text" name="username" placeholder="Username" />
<input type="password" name="password" placeholder="Password" />
</form>
</body>
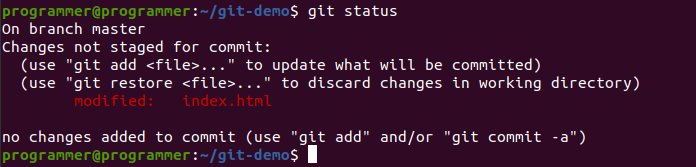
</html>2. Check the status of your repository with git status to view the changes in index.html. It should indicate the file is modified and unstaged, ready for the next steps in the git merge process.
3. Create a new branch named “form” with git checkout -b form. This command not only creates the new branch but also switches your working branch to “form,” essential for implementing git merge.
git checkout -b form
4. Confirm the creation of the new branch by running git branch. You should now see both the “form” and “master” branches, with “form” as the active branch indicated by an asterisk (*).
git branch
5. Stage and commit your changes to the form branch. This action ensures that the form branch reflects the recent updates made to the index.html file, setting the stage for an effective git merge.
## Stage the updated file
git add index.html

## Commit the new changes
git commit -m "Added user input fields to form"
Local Branch Merging with Git Merge
Now that you have distinct branches in your GitHub repository, the next step is to merge them. This section focuses on merging branches locally using the git merge command, a fundamental Git operation.
1. To begin the merge, switch to the master branch, which will receive the updates from the form branch:
git checkout master2. Once on the master branch, execute git merge form to combine the changes from the form branch into master. This is a crucial step in the git merge process.
git merge form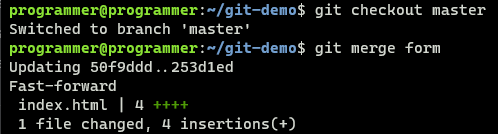
git merge.3. Confirm the merge by ensuring you are on the master branch and checking that the content of index.html has been updated.
# Confirm current branch
git branch
# Check merged content
cat index.html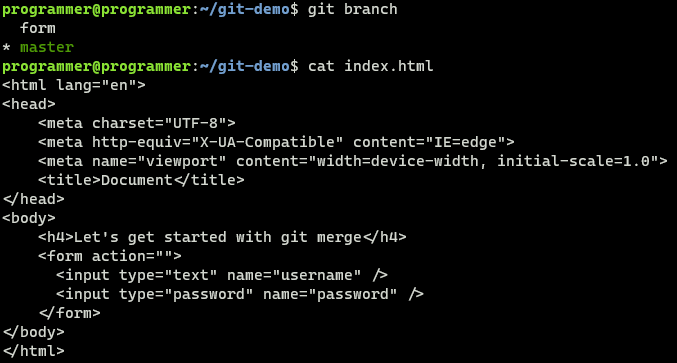
git merge.Streamlining with Git Squash
Squashing in Git is a technique used to clean up commit history. When you have multiple commit messages that are not needed individually, squashing allows you to combine these into a single, comprehensive commit. This practice is especially useful when preparing for a git merge.
Let’s explore the squashing process by making further changes to the index.html file on the form branch, and then squashing these changes.
1. Switch back to the form branch to make additional changes:
git checkout form2. Modify the index.html by adding a form header. This step will create a change that we will later squash during the merge:
<html lang="en">
<head>
    <meta charset="UTF-8">
    <meta http-equiv="X-UA-Compatible" content="IE=edge">
    <meta name="viewport" content="width=device-width, initial-scale=1.0">
    <title>Document</title>
</head>
<body>
    <h4>Mastering Git Merge with Form Updates</h4>
    <form action="">
      <h4>Account Details</h4>
      <input type="text" name="username" placeholder="Username" />
      <input type="password" name="password" placeholder="Password" />
      <button>Submit</button>
    </form>
</body>
</html>
3. Stage and commit the changes with a clear message describing the update:
git add index.html
git commit -m "Enhanced form with a header for git merge"
git merge.4. Enhance the index.html in the form branch by adding a new input field. This modification is part of preparing for an effective git merge.
<html lang="en">
<head>
    <meta charset="UTF-8">
    <meta http-equiv="X-UA-Compatible" content="IE=edge">
    <meta name="viewport" content="width=device-width, initial-scale=1.0">
    <title>Git Merge Example</title>
</head>
<body>
    <h4>Practicing Git Merge</h4>
    <form action="">
      <h4>Enter account details</h4>
      <input type="text" name="fullname" placeholder="Full Name" />
      <input type="text" name="username" placeholder="Username" />
      <input type="password" name="password" placeholder="Password" />
      <button>Submit</button>
    </form>
</body>
</html>
5. Stage and commit these changes with a distinct message, ensuring each step in your work is clearly documented for the upcoming git merge.
git add index.html
git commit -m "Enhanced form with an additional input field"
git merge.6. Next, insert a paragraph element under the form in index.html, further modifying the file in preparation for a git merge.
<html lang="en">
<head>
    <meta charset="UTF-8">
    <meta http-equiv="X-UA-Compatible" content="IE=edge">
    <meta name="viewport" content="width=device-width, initial-scale=1.0">
    <title>Git Merge Practice</title>
</head>
<body>
    <h4>Let's get started with git merge</h4>
    <form action="">
      <h4>Enter account details</h4>
      <input type="text" name="fullname" placeholder="Full Name" />
      <input type="text" name="username" placeholder="Username" />
      <input type="password" name="password" placeholder="Password" />
      <button>Submit</button>
    </form>
    <p>Already a user?</p>
</body>
</html>
7. Again, stage and commit the changes, using a message that captures the essence of this update, crucial for the git merge process.
git add index.html
git commit -m "Added user status paragraph to form"
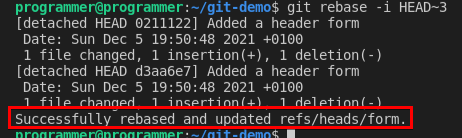
git merge.8. Utilize git rebase in interactive mode to view and edit your recent commits. This step is essential in the process of squashing commits for a clean git merge.
git rebase -i HEAD~39. In the interactive mode, choose to reword the first commit and squash the subsequent ones. This action consolidates your commit history, making your git merge cleaner and more organized.

git merge.10. After rewording and saving, update the consolidated commit message to reflect the cumulative changes. This step finalizes the squashing process, setting you up for a streamlined git merge.

git merge.Confirm the success of your squashing operation, which is an integral part of the git merge process when handling multiple commit messages.
git squash operation.For simultaneous squashing and merging, use git merge --squash. This technique merges and squashes the form branch into the master branch, efficiently combining the commits.
git merge --squash formExecuting the git merge --squash command combines the changes from the form branch into master while condensing all the commits into one. This approach is part of effective git merge strategies.
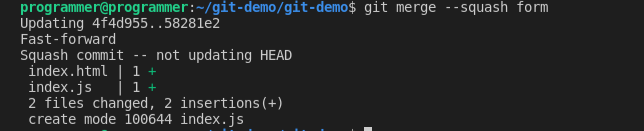
git merge with squash option.Implementing Fast-Forward in Git Merge
For a streamlined commit history, fast-forwarding is an ideal method, particularly for minor updates or bug fixes. It allows you to merge branches without additional merge commits, maintaining a clean and linear history, crucial for efficient git merge processes.
Fast-forwarding happens when there is no divergence in the base branch, typically the master, enabling a seamless integration of histories and pointer updates.
1. Change to the form branch to begin the fast-forward process:
git checkout form2. Create and update a JavaScript file, such as index.js, in the form branch, staging and committing the changes:
git add index.js
git commit -m "Added JavaScript functionality"
3. Finally, merge the form branch into master using a fast-forward approach. This step aligns the master branch with the latest changes from the form branch, creating a smooth, linear git merge path.
git checkout master
git merge form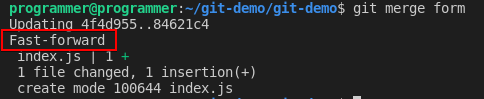
Conclusion
This tutorial has guided you through various techniques to combine branches using git merge. From squashing commits to fast-forwarding, these methods enhance your ability to manage projects collaboratively in Git.
Now equipped with these skills, consider contributing to collaborative projects on GitHub, applying your knowledge of git merge in real-world scenarios.


