


Imagine deploying the same Azure resources repeatedly, like resource groups, policies, and virtual networks. Humans are not efficient in repeating tasks without failing. What if you can package these resources so that you can deploy them in one go? Azure Blueprints is the way to go.
Not a reader? Watch this related video tutorial!In this article, you’ll learn how to get started with Azure Blueprints, what it’s for, and how it can help you become efficient in deploying resources in Azure. By the end of this article, you will have designed a blueprint and deployed resources based on it.
What Are Azure Blueprints?
Think of Azure Blueprints in the same sense as a building’s blueprint. A blueprint helps architects, engineers, and workers ensure that what they are building follows the set standards and the final result will be up to specifications.
In the same manner, Azure Blueprints are templates or a predefined set of configurations based on use cases. They contain components that help organizations implement best practices and policies when deploying new architectures. They help remove the guesswork out of configuring systems.
Blueprints are consist of components called artifacts, which are essentially Azure resources. As of this writing, there are four artifact types available which include:
- Resource group – Serves as a container where you can organize Azure resources.
- Role assignment – Adds existing users or groups to a built-in role to ensure that only intended users have the right access to Azure resources.
- Policy assignment – Defines which existing Azure Policy will apply to the resources you intend to deploy.
- Azure Resource Manager Template – Allows for adding existing Azure Resource Manager (ARM) templates to the blueprint.
Companies can customize their blueprints to conform to internal compliance and company standards.
Why Blueprints?
The goal of cloud infrastructures is to help companies manage their technology resources more efficiently. But, the cloud encompasses many different types of components that add complications to the architecture.
The cloud architects at Microsoft understand how these base-level components should be assembled, which is the motivation for creating blueprints. Companies can piggyback on the knowledge of these architects by using blueprints.
Instead of spending thousands of dollars and months of trial-and-error for configuring systems, IT teams can use and customize blueprints to suit their needs. These blueprints will help configure the environments with the proper components and even the appropriate access via security measures.
Blueprints vs ARM Templates
Users familiar with Azure Resource Management (ARM) templates may wonder why they should use Blueprints to accomplish most of the same functionalities using ARM templates. What’s the difference?
ARM templates are documents typically stored locally or in source control outside of Azure. After deploying resources using an ARM template, there is no longer a connection or relationship between the template and the deployed resources.
On the other hand, Azure Blueprints maintains the relationship or connection between the blueprint definition (what should be deployed) and the blueprint assignment (what was deployed) even after deploying resources. This connection improves tracking and auditing the changes in deployment.
Also, blueprints natively exist in Azure and are globally distributed via the Azure Cosmos DB in the backend without user intervention. As a result, blueprints replicate automatically across Azure regions, which takes the responsibility of maintaining copies away from administrators.
After all that, do you need to choose between blueprints and ARM Templates? Not necessarily. Blueprints can contain one or more ARM template artifacts if needed, which means existing ARM templates are reusable, and the efforts that went into developing these templates will not go to waste.
Blueprints and Azure Regions
Microsoft Azure is composed of data centers distributed around the globe. These data centers are organized for geography and available to end-users by region. These regions are a fundamental piece when talking about governance and deployment on the cloud.
Regional Pairs in Azure
When considering regions for deployment, companies may choose to take advantage of Microsoft’s regional pairs for disaster recovery purposes. A regional pair consists of two Azure regions within the same geography.
Microsoft provides planned maintenance on servers and equipment across regional pairs, ensuring that only one region in each pair updates at a time. With the regional pairs, Microsoft will not perform maintenance on both data centers defined as a pair at the same time.
Using Azure Blueprints, you can deploy resources in regional pairs to ensure that downtime is minimized if not totally eliminated.
Avoiding Regions Due to Compliance Issues
There may be compliance issues when deploying systems and resources to certain regions. Azure Blueprints support policies, which can limit access to the restricted regions.
If a user tries to deploy to those regions via the blueprint, the blueprint’s policies will prevent this from occurring. This deployment strategy can help ensure that your deployments comply with regional legal and regulatory standards.
Tutorial: Creating Azure Blueprints
Now that you have a basic understanding of Azure Blueprints, get ready to dive into the tutorial. Are you up to the task? Let’s find out!
There’s are several methods to create Azure Blueprints. Depending on your preference or skill, you can create Azure Blueprints using Azure PowerShell, Azure CLI, REST API, ARM Template, and Azure Portal. This tutorial will focus on using the Azure Portal to create blueprints.
In this tutorial, you will be creating a basic Azure Blueprint that will deploy a resource group with a Contributor role assignment inside it.
Prerequisites
To follow along with this tutorial, you need an Azure subscription. If you don’t have one, you can register for a free Azure account. Your Azure user account also needs the proper Azure Blueprints permissions.
Creating A Blueprint Definition
Once you have all of the prerequisites in place, you’ll first need to create a blueprint definition. A blueprint definition contains a set of artifacts to deploy. To create a blueprint definition, follow these steps.
1. Open your favorite web browser, navigate and log in to the Azure Portal.
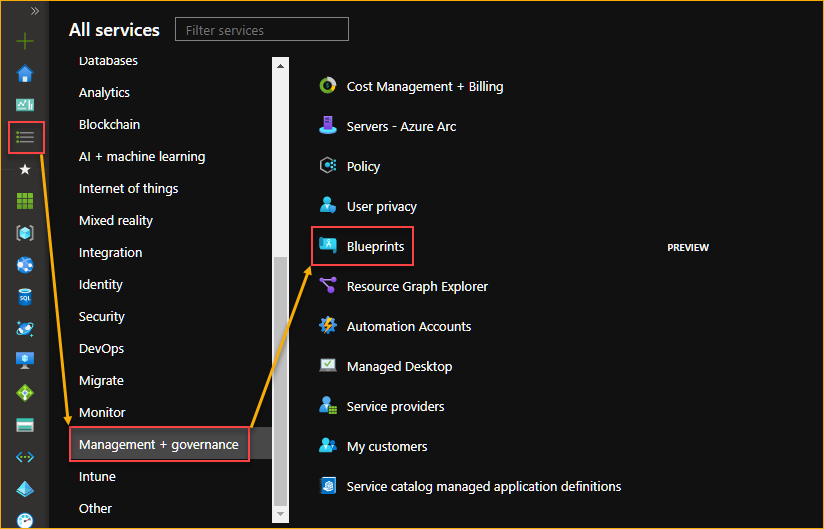
2. Once you’re in the Azure Portal, click All Services —> Management + Governance —> Blueprints.
3. On the Blueprints | Getting started page, click Create.

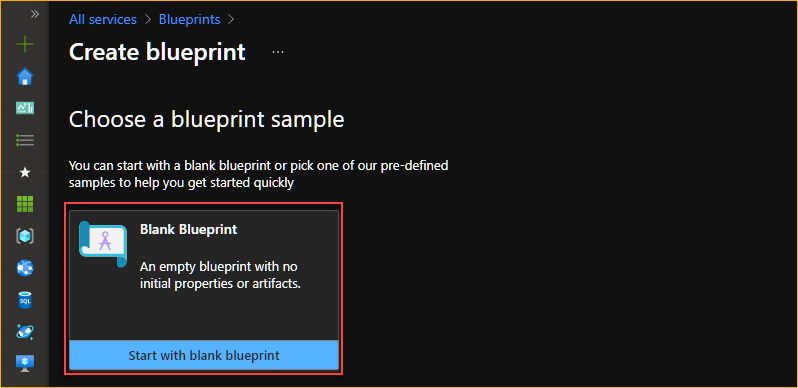
4. Once you’re on the Create blueprint page, click on Start with a blank blueprint. Doing so will allow you to create a new blueprint from scratch.
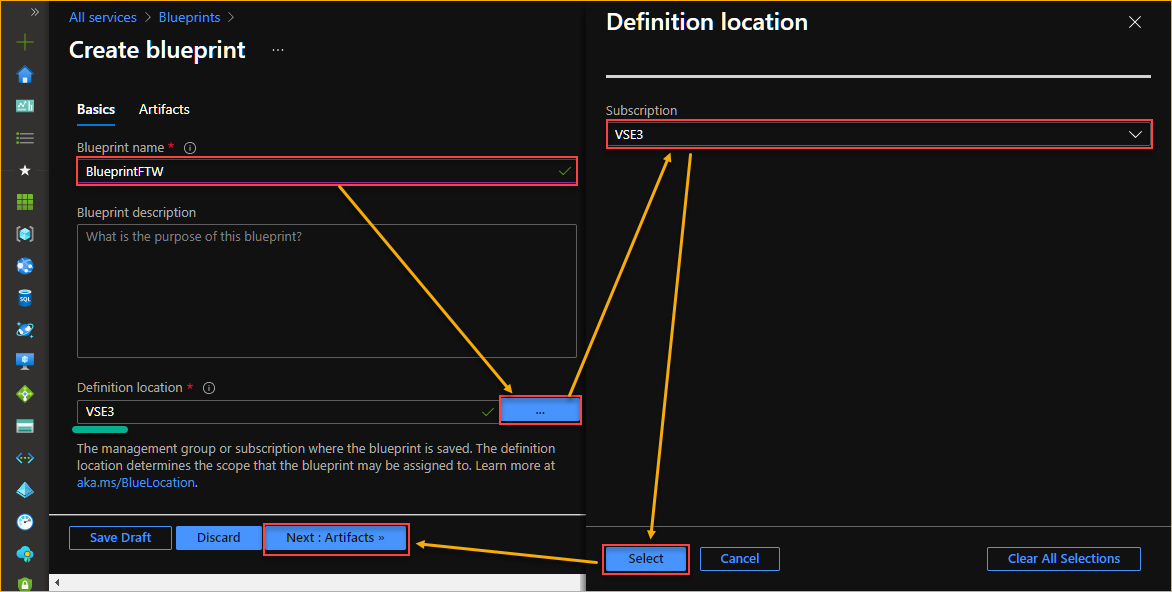
5. Under the Basics tab, enter the name of the new blueprint in the Blueprint box. Names can include letters, numbers, and dashes only. In this example, the blueprint name to use is BlueprintFTW.
Next, click the ellipsis button to the right of the Definition location box to launch the scope selector.
On the Definition location fly-out, select the subscription where you want to create the blueprint and click Select. After choosing the subscription, click Next: Artifacts.
The blueprint definition location may be a subscription or a management group. In this example, only a subscription exists.
6. Under the Artifacts tab, you’ll see the artifacts list, which should be empty because you haven’t added any artifacts yet. Click the Add artifact button under the Subscription tree.
On the Add artifact fly-out that appears, expand the Artifact type dropdown menu and select Resource group and click Add. Adding the Resource group artifact to the blueprint ensures that the deployment will create a new resource group.
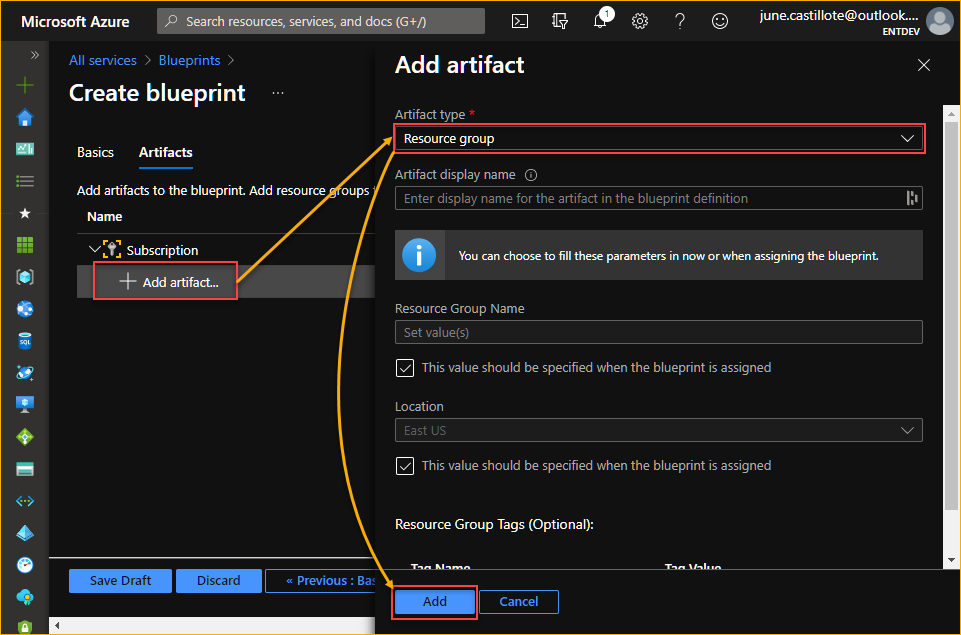
Not every deployment will use the same Artifact display name, Resource Group Name, and Location. Leaving these parameters blank will allow you to specify different values when assigning the blueprint later.
7. Next, add a Role assignment artifact to the blueprint. Doing so ensures that Azure will add a role assignment to the resource group during deployment.
First, click the Add artifact button under the Resource group branch.
Next, on the Add artifact fly-out that appears, expand the Artifact type dropdown menu and select Role assignment, then click Add.
Now, click the Role dropdown box and select a built-in role from the list. This role is what the blueprint will require to add to the resource group during deployment. You can choose any built-in Azure roles. This example will choose the Contributor role.
When you’ve made your selection, click Add.

Not adding an assignee in the Add user, app, or group at this point will allow you to specify the assignee during the resource deployment, especially if there will be different assignees in each deployment.
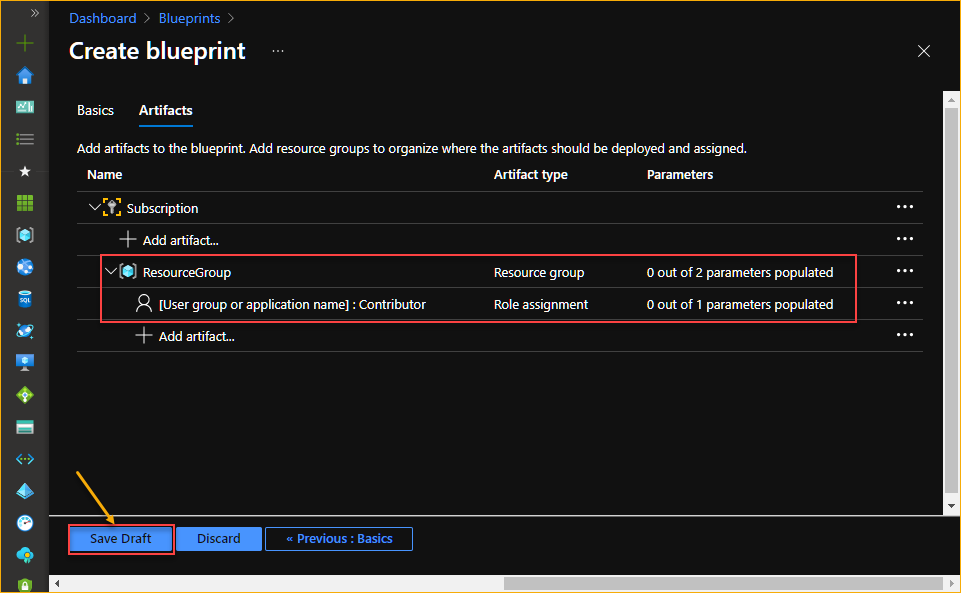
8. At this point, you now have added two artifacts under the subscription you chose where to create the blueprint. Finally, to create the blueprint, click on Save Draft.
After the creation, you’ll have a blueprint definition that will create a resource group with a user or group having a Contributor role access to the resources.
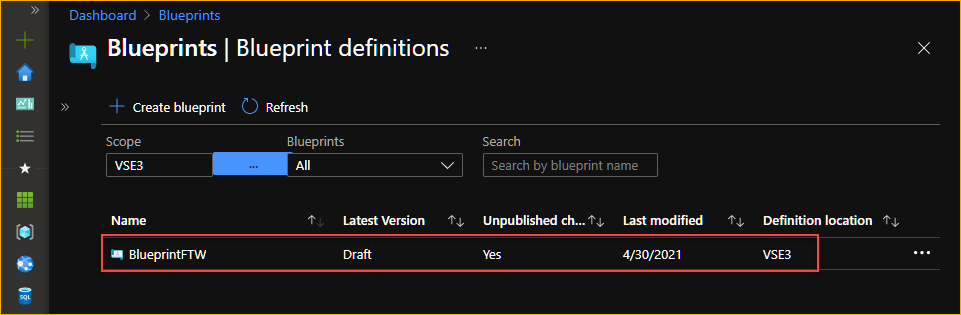
New blueprints always start as drafts. Only when you’ve published them that they’d get assigned a new version.
You will now see the draft blueprint on the list of blueprint definitions.
Publishing A Blueprint
Now that you’ve created the Blueprint definition, you’re ready to get it published. Publishing a blueprint makes it available to use for resource deployments. Follow the steps below to publish the draft blueprint.
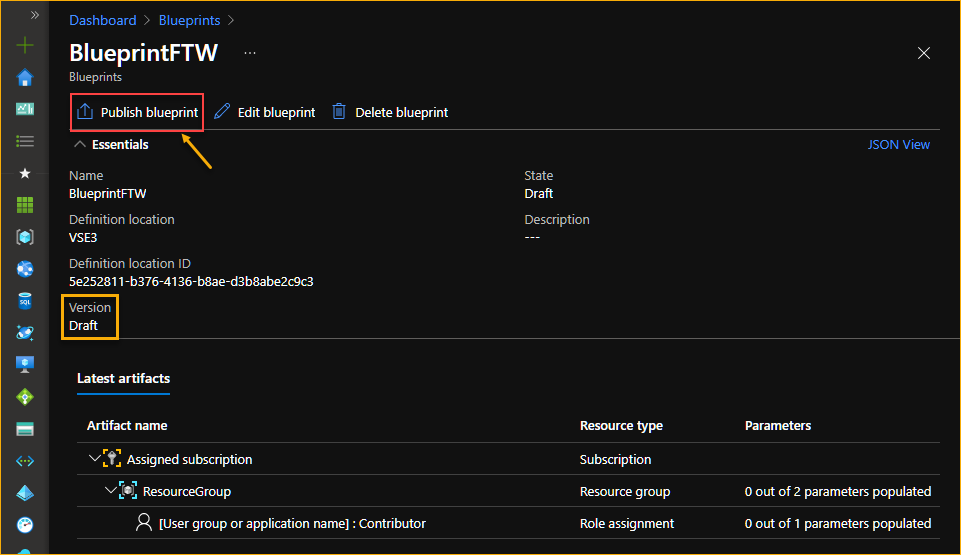
1. On the list of blueprint definitions, click the draft blueprint you’ve previously saved. In this example, the blueprint name is BlueprintFTW.
2.Click on Publish blueprint to begin the publishing steps.
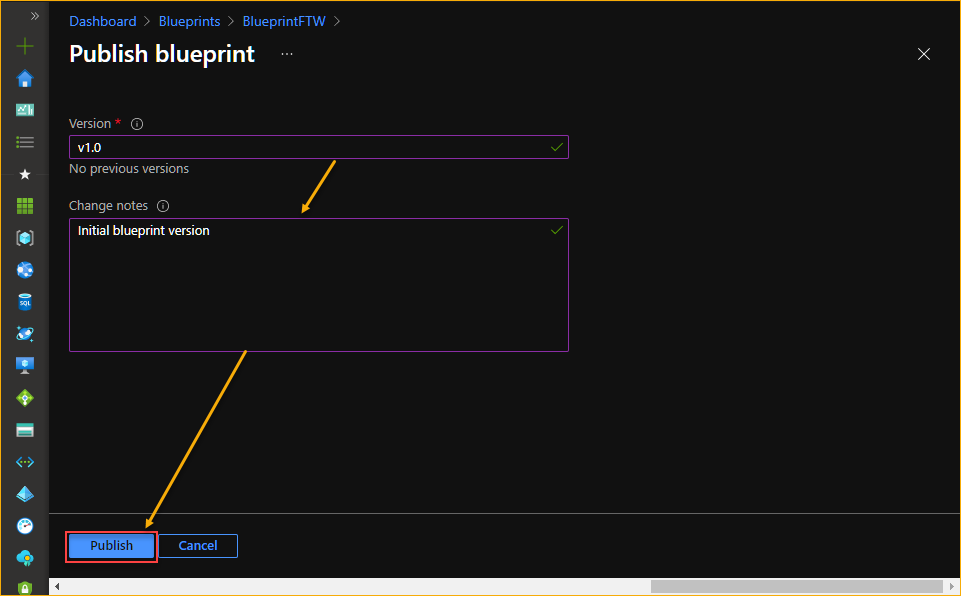
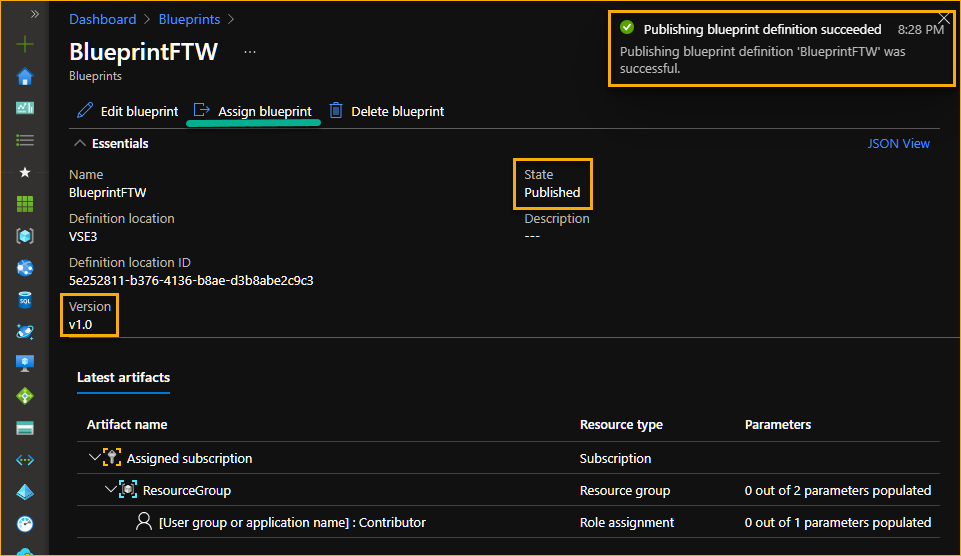
3. On the Publish blueprint page, enter the version you want to assign to the blueprint in the Version box. In this example, the version is v1.0.
Every time you publish a blueprint, you have to assign a new version to it, which means there can be many versions of a blueprint. This versioning allows admins to keep track of changes to published blueprints.
Next, in the Change notes box, type a meaningful description for this version and click Publish.
After successfully publishing the blueprint, you can see the new updated version.
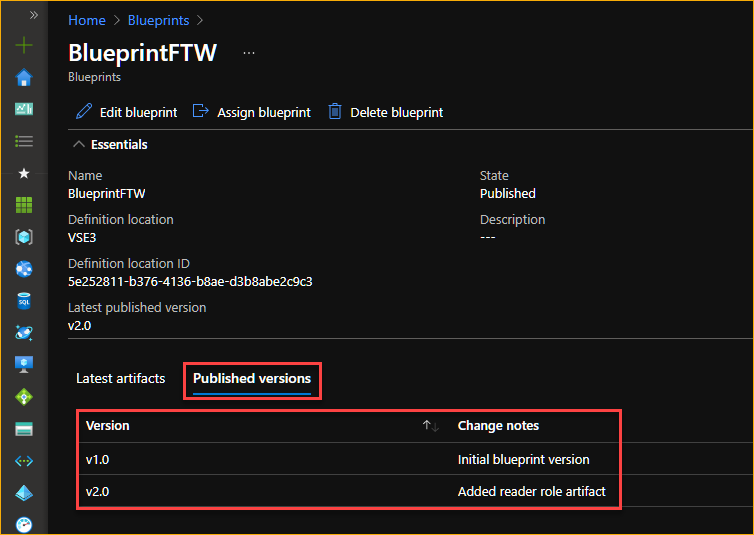
You may need to edit a blueprint from time to time, for example, when adding new artifacts. When then publish the blueprint, you are publishing a new version of that blueprint.
For example, the screenshot below shows two versions of the blueprint. Version v1.0 was the first blueprint, while v2.0 is the edited version. You see the different versions of the blueprint under the Published versions tab.
Assigning A Blueprint
After you’ve published the blueprint, you’re now ready to create a blueprint assignment. Creating a blueprint assignment means assigning the blueprint to a subscription, then deploying the artifacts under that subscription. You can create multiple blueprint assignments to a subscription.
To recap, the blueprint you created in the previous section when assigned, will deploy a resource group and a role assignment under that resource group.
To assign the blueprint, follow these steps.
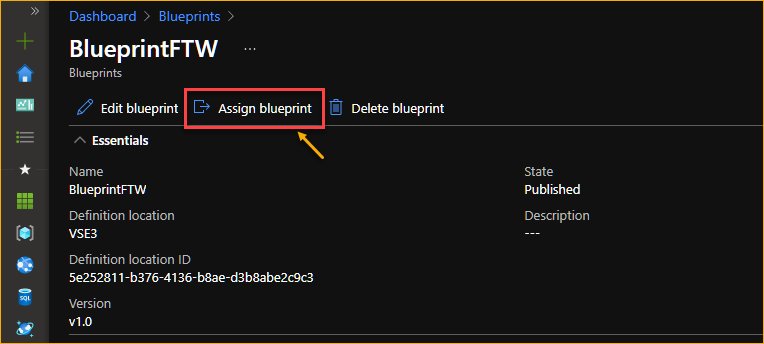
1. On the blueprint page, click on Assign blueprint.
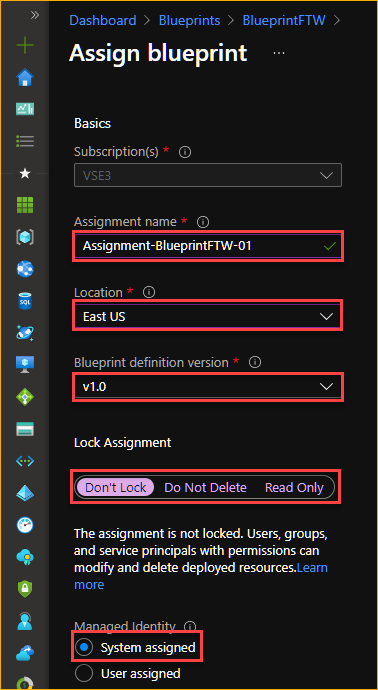
2. On the Assign blueprint page, there are five details you need to fill.
- Subscription(s) – This field is greyed out and will default to the subscription name where you created the blueprint.
- Assignment name – Enter the unique name for this blueprint assignment. In this example, the assignment name Assignment-BlueprintFTW-01.
- Blueprint definition version – Choose the blueprint version. In this example, there is only one blueprint version, which is v1.0.
- Lock Assignment – Choose the resource locking mode that you prefer. The options are:
- Don’t lock – Those who have permission can modify and delete the deployed resources.
- Do not delete – The deployed resources cannot be deleted but can be modified.
- Read Only – The deployed resources cannot be deleted or modified.This example will choose Don’t lock to leave the resource unlocked.
- Managed Identity – Choose whether to automatically create a temporary owner (System assigned) or manually set an existing user (User assigned) to have owner access to the subscription. This identity is needed to deploy all artifacts. This example will choose the System assigned identity. Azure will automatically remove this identity after the artifacts deployment.
- Location – Choose the location for the managed identity that Azure will use to deploy the artifacts. In this example, the location is East US.
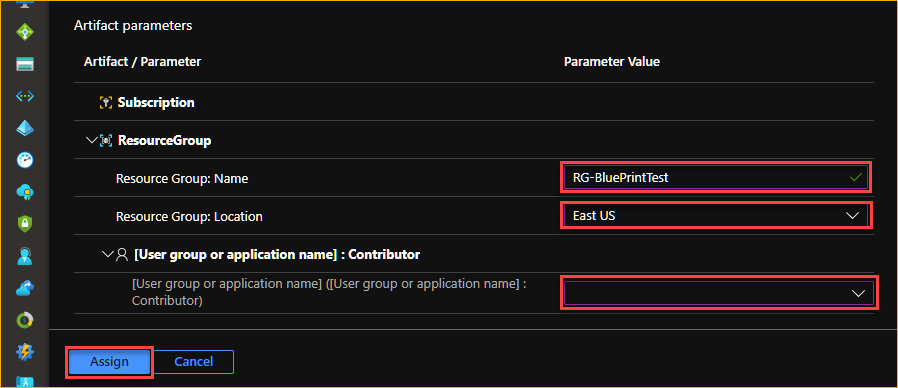
3. Next, fill out the Artifact parameters that you previously left blank when you created the blueprint.
- Resource Group: Name – Set the name you want for the new resource group to deploy. In this example, specify the name RG-BluePrintTest.
- Resource Group: Location – Choose the location where to create the new resource group. In this example, the location is East US.
- [User group or application name] : Contributor – Set the user, group, or application that will have the Contributor role to the resource group.
When you’ve completed specifying the parameter values, click Assign.
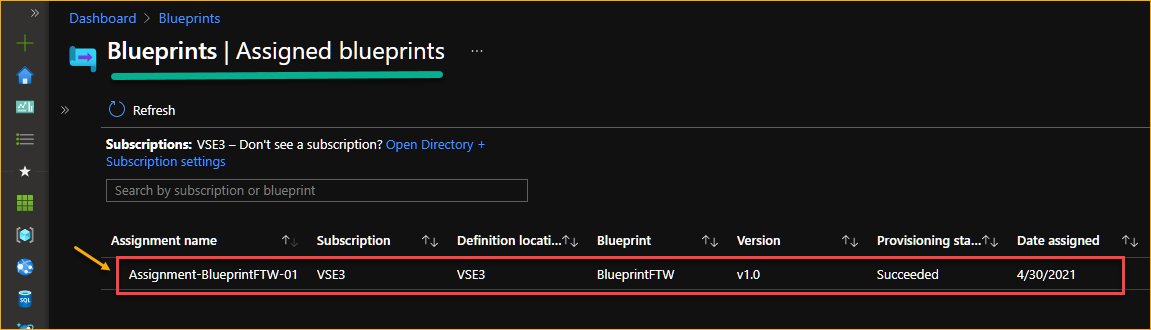
Now that you’ve assigned the blueprint, Azure will begin deploying all artifacts defined in the blueprint. To check the deployment status, navigate back to Blueprints —> Assigned blueprints.
On the blueprint assignments list, click the assignment name you have just created called Assignment-BlueprintFTW-01. Doing so will open the property page for this assignment.
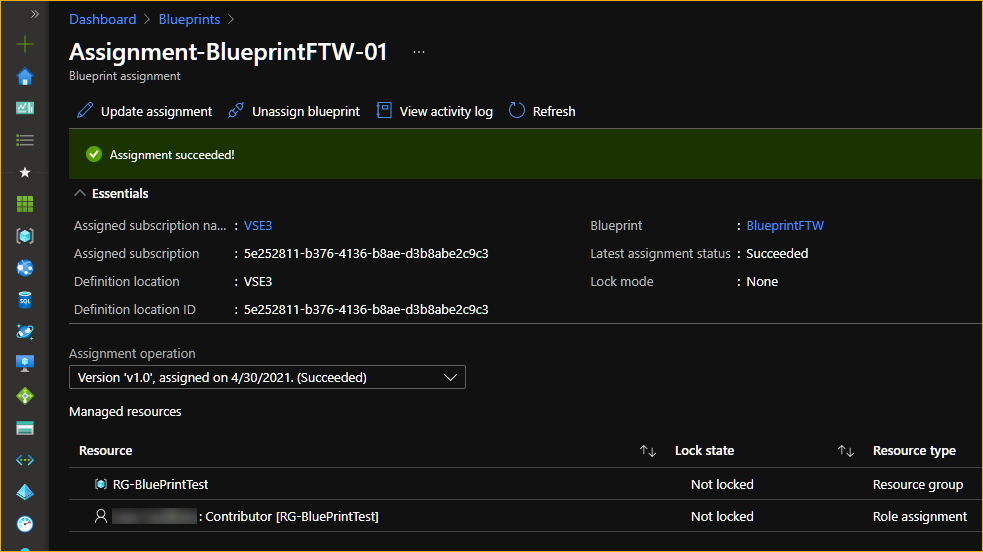
You’ll now see the assignment details for Assignment-BlueprintFTW-01. As you can see below, the assignment status is succeeded, and the list of deployed resources is at the bottom of the page.
Conclusion
This article helped you take the first step to your Azure Blueprints journey. You should now be familiar with and understand how Azure Blueprints can save customers time, headache, and money!
You’ve learned hands-on how to create, publish, and assign Azure Blueprints to deploy Azure resources. But don’t stop there. Try exploring Azure Blueprints more!
How about editing a blueprint and re-publishing it? Or test if unassigning a blueprint will remove the resources it previously deployed? Can you safely delete a blueprint if you don’t need it anymore? There’s a lot more you can learn with Azure Blueprints. Good luck!


