


Deploying a Flask web server has seemed overly stressful with lots of gotchas. But with Cloud Foundry, the process of deploying your application is simplified with just one push.
In this article, you’ll learn how to deploy a Flask application on Cloud Foundry. So save yourself the stress of writing infrastructure configurations while focusing on your code for your application.
Sounds interesting? Well, jump right in!
Prerequisites
This tutorial will be a hands-on demonstration. If you’d like to follow along, be sure you have the following:
- An Ubuntu machine – This tutorial uses Ubuntu 20.04, but other operating systems will work.
- Python – This tutorial uses Python 3.8.10.
- Cloud Foundry CLI– Version 6.53.
- Cloud Foundry SAP Free Tier Account.
Setting up a Flask Server
Before deploying a Flask application, you’ll first need to set up a Flash server. You’ll build a small demo app to deploy later in this tutorial.
1. Run the following commands to create a directory for the project and set up a virtual environment.
# Create a new directory (FlaskAPI) and change the directory
mkdir FlaskAPI && cd FlaskAPI
# Create Virtual Env
python3 -m venv env
# Activate Virtual Env
. env/bin/activate
2. Next, run the pip command below to install flask. pip install flask
pip install flask3. Create a file named app.js with your preferred text editor and add the following code snippet below.
The code below creates a Flask wish list app that adds and returns a user’s wish.
from flask import Flask, jsonify, request
import os

# Create an app instance from flask
app = Flask(__name__)

# Get port number from the environment varriable
port = os.getenv("PORT")

# Create an initial empty wish list
wishes = []

# Define a GET route
@app.route("/api/wish", methods=["GET"])
def getAllWish():
    #Retun all the wishes in the list
    return jsonify(wishes)

# Create A POST route
@app.route("/api/wish", methods=["POST"])
def addWish() -> dict:
    # Get the data from request body
    data = request.get_json()
    # Create a new wish object
    wishObj = {
        "id": len(wishes) + 1,
        "item": data["item"],
        "price": data['price']
    }
    # Add the new wish to list
    wishes.append(wishObj)
    # Return the list object
    return jsonify(wishObj)
4. Finally, add the code below at the bottom of the app.js file’s content.
The code below lets you modify your app to listen to the Cloud Foundry default port in production and port 500 in development. When you deploy an app on Cloud Foundry, a port is dynamically allocated for each app instance.
if __name__ == '__main__':
  # If the app is running locally
	if port is None:
    # Use port 5000
		app.run(host='0.0.0.0', port=5000, debug=True)
	else:
    # Else use cloud foundry default port
		app.run(host='0.0.0.0', port=int(port), debug=False)
Deploying the Flask Web Server
With your Flask application set up, you’re ready to deploy the application. Well, almost. You still need to configure the deployment setup and allocate resources to your application.
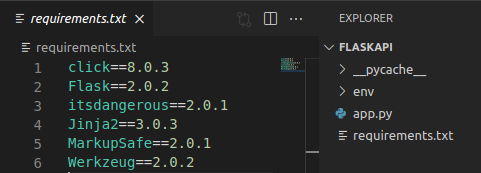
1. Run the pip freeze command below to get the dependencies to install for your application and write the result in a requirements.txt file. The requirements.txt file is a configuration file handy for installing packages in bulk.
pip freeze > requirements.txtAfter running the command, Python creates a requirements.txt file in the project root directory with all dependencies documented like in the screenshot below:
2. Next, create a runtime.txt file in the ~/FlaskAPI directory, and add your Python version like the one below. But for this demo, Python version 3.8.11 is set.
python-3.8.11web: FLASK_APP=app.py python3 -m flask run --host=0.0.0.0 --port=$POR3. Create a vars.yml file in your project root directory, and populate the file with the attributes below.
memory: 128MB       # Sets memory limit of the app
disk_quota: 256MB   # Allocates disk space to the app
random-route: true  # Generate route based on the app name
4. Next, create a manifest.yml file in the project root directory (~/FlaskAPI), and add the following configurations to the file.
The below configuration allocates resources to your application by referencing variables from the vars.yml file.
You can ignore the resource allocation step if Cloud Foundry doesn’t find a manifest.yml file. Cloud Foundry allocates memory for the application depending on the project size.
applications:
 - name: test-app   # Sets application name
	 # Reference memory, disk_quota and random-route from vars.yml file
   memory: ((memory))
   disk_quota: ((disk_quota))
   random-route: ((random-route))
5. Create a Procfile in your project root directory (~/FlaskAPI) and add the following line to the Procfile.
The Procfile specifies the command line to execute the application at runtime. The command-line starts the program in production and binds the webserver to the –host with the IP address 0.0.0.0.
web: python app.py6. Now, open your favorite web browser, and log in to your Cloud Foundry application service. Navigate to your SAP Cloud Platform Cockpit dashboard and note down your API Endpoint URL as you’ll need it in the next step.
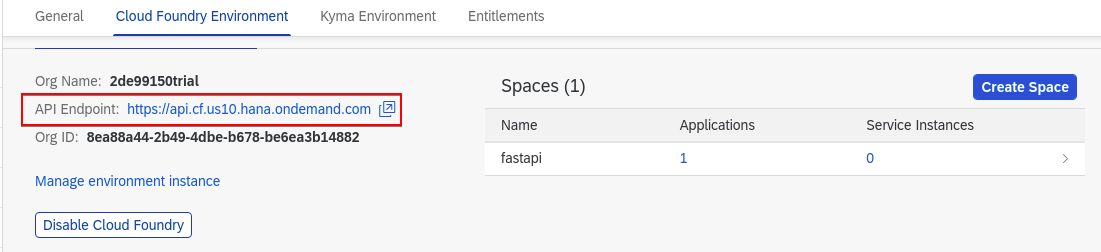
7. Run the below cf login command to log in to your application service, where https://api.cf.us10.hana.ondemand.com is the API endpoint you previously noted (step six). Enter your account credentials when prompted.
cf login https://api.cf.us10.hana.ondemand.comAfter you log in, you’ll get an output like the one below, which verifies you’ve successfully logged in to your application service.

8. Finally, run the cf push command below to deploy your application in the current directory (.).
cf push .If you stored your configuration details in the vars.yml file, run this command below instead when committing changes throughout the tutorial. cf push –vars-file vars.yml
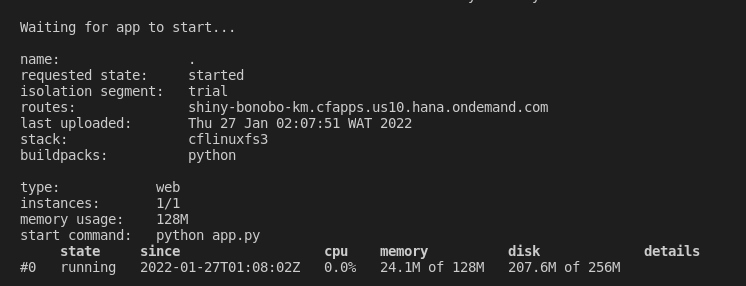
If all goes well, you’ll get an output like the one below, which indicates your application is now live on Cloud Foundry.
Once you’ve deployed your application, Cloud Foundry will alert you and give you the route (URL) assigned to the application. Note the route URL as you’ll need it to test your application in the following section.
Associating Application to a Custom Role
Instead of using the route generated by Cloud Foundry, you can create and associate your application to a custom route.
The routing tier compares each request to a list of all routes associated with apps and attempts to find the best match. Before creating a domain, you’ll need to check all available apps.
1. Run the below command to list all available apps.
cf appsYou’ll see a list of apps displayed on your terminal, like in the screenshot below.

2. Next, run the create-domain command below to create a custom domain (cf.flaskapp.com) for Cloud Foundry organization ID (2de99150trial).
cf create-domain 2de99150trial cf.flaskapp.com
3. Run the following cf create-route command to create a custom route to your domain (cf.flaskapp.com) in your app space (fastapi) in Cloud Foundry for your app (test-app).
cf create-route fastapi cf.flaskapp.com --hostname test-appBelow, you can see that command created a custom route (test-app.cf.flaskapp.com).

4. Run the below command to map the custom route to your app to accept requests.
cf map-route test-app cf.flaskapp.com --hostname test-app
5. Now, run the cf push command below to commit the random-route option on your manifest.yml file and deploy the application again.
cf pushRun the command below instead if you stored your configuration details in the vars.yml file. cf push –vars-file vars.yml
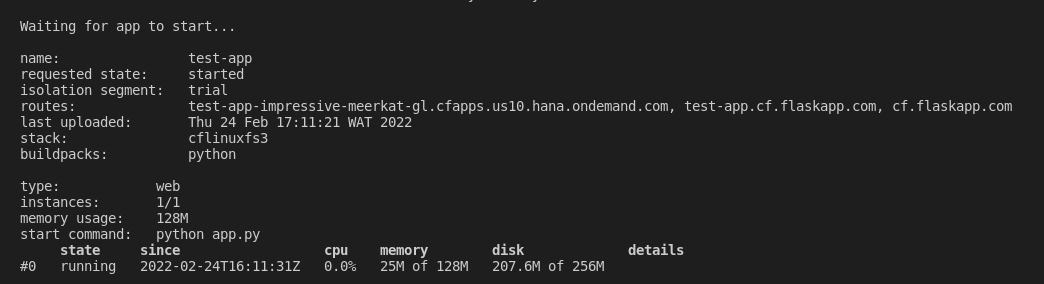
Once the deployment completes, you’ll see your app details displayed on the terminal, like the screenshot below.
6. Finally, open a testing tool like Postman or Insomnia and put the route URL you previously noted in the “Deploying your Flask Web Server” (step eight).
To test your application, be sure to prepend https:// to the URL (e.g., https://your-route-url).

Conclusion
Throughout this tutorial, you’ve learned how to deploy a Flask application on Cloud Foundry by building a demo project. You’ve gone through setting up a Flask Server and ensuring that your application works with testing tools like Postman and Insomnia.
Now, with this newfound knowledge, how do you intend to master the steps you’ve learned in this tutorial? Perhaps build a Flask application with a database? Or deploy your Flask application with Docker?


