


Did you know when you export a new video, create a new slide deck, or even take a picture, you are embedding private information in media? If not, you’re in for a surprise as we cover how to use a command-line tool called exiftool to uncover this hidden information.
Not a reader? Watch this related video.This article is an ATA Ultimate Guide. That means, we’re going deep into exiftool. In this guide, you will learn the basics of extracting and working with metadata all the way up to using some exiftool advanced techniques.
By the end of this extensive guide, you will be able to:
- Remove or modify sensitive metadata
- Parse through and filter hundreds of metadata fields
- Add notes and copyrights to your own media
- Create entire catalogs from your own picture libraries
Let’s get started!
What are Metadata and Tags?
Before you can understand how to use exiftool, you must understand metadata. Exiftool is all about metadata.
Metadata is information embedded into documents and media that are typically hidden from view. Metadata is stored in these files as metadata tags or just tags. Tags are extremely important to understand as nearly everything in exiftool comes back to metadata tags in some way.
Tags are key-value pairs embedded into files that store information about that file. For example, perhaps you take a picture with your phone. When you do, your phone may store the picture and embed a metadata tag in the picture named Flash. The Flash tag may then have a date value that indicates when the picture was taken.
This Flash tag example has a defined set of values it can have; 27 to be exact. Having this standard set of values for tags allows exiftool users to know what values are available for specific tags.
Tag Standards
Tags are categorized by standards. For example, two of these standards are Digital Imaging and Communications in Medicine (DICOM) and Exchangeable image file format (EXIF). These standards define tag “schemas” that dictate the tags assigned to specific files
For example, metadata on an x-ray image taken at a hospital or medical center will follow the DICOM standard. The DICOM standard dictates that the image supports tags like the attending physician’s name, procedure date, and exposure length.
You can add some custom tags not defined by the DICOM or EXIF standard in exiftool and change many tags but not all. Some tags are immutable. If tag holding a medical diagnosis embedded in an x-ray image got changed accidentally, that’d be bad.
Similarly, the EXIF standard dictates metadata schemas for classifying images and sounds recorded by digital cameras. The Flash example described above fits in with the EXIF standard.
Tag Groups and Families
Tags are classified into groups, like DICOM and EXIF. These groups can have different lists of tags and set how those tags are defined within the group. Groups are also categorized into one of seven families depending on what information is defined in each group.
You can find a full list of all tag groups in the exiftool documentation.
You’ll see that tags and exiftool go hand in hand!
What is exiftool?
Exiftool is a command-line utility, technically a Perl library written by Phil Harvey first released in 2003. Since then, exiftool has become the go-to tool for working with metadata at the command line due to the vast array of file formats and types of metadata it supports.
You can find the full list of file and metadata types that exiftool supports here.
Exiftool is a tool with an enormous array of features able to work with over 23,000 tags over 130 different groups. You can even define custom tags too!
Exiftool does more than just read tags though. You can also write your own logic and specify different conditions across entire libraries of images without having to use any kind of shell scripting. Exiftool is meant for a layperson to query and transform metadata without having to be a software developer.
Exiftool is also open-source. If you want to contribute to the project, you can find exiftool on GitHub with instructions on how to build and start using it.
If you’re stuck on a specific issue while using it, you can also find an active user forum where Phil Harvey himself regularly answers questions. The user forum is a great resource for finding out how to troubleshoot exiftool or understand some of the advanced configurations of it that may not fit in this guide.
Before You Start
This guide is going to cover many different ways exiftool can work with metadata. If you plan on trying out anything you read here, you need to know a few things:
- Exiftool can run on any major operating system only with some minor differences in syntax. In this guide, we’ll switch back and forth between the Windows command prompt, PowerShell, and even Bash in Ubuntu. All examples will use exiftool v12.16.
- Throughout this guide, you may see some filenames that start with ./ or may read exiftool.exe instead of exiftool. This syntax is intentional as it shows commands between major operating systems can work almost interchangeably.
- All examples in this guide will be run in a PowerShell console but PowerShell is not required. Exiftool is just as comfortable in a Bash terminal or Windows command prompt.
Installing exiftool
Let’s get started actually using this handy tool and install it.
You can install exiftool in many different ways. You can even build it yourself granted if you have Perl 5.004 installed. One of the easiest ways is to go to exiftool.org and download the package that corresponds to your operating system.
You can also install exiftool using package managers like Chocolatey or homebrew, or apt too!
Using Chocolatey on Windows, for example, you can download exiftool using the command below:
choco install exiftool
If you’d like to run exiftool on Windows, you must install Perl on Windows yourself. Perl comes pre-installed on MacOS and Linux.
Now that exiftool is installed, you can start to read and edit metadata in your files!
Listing Metadata Tags and Groups
One of the easiest tasks to get started with exiftool is listing tags and tag groups. As mentioned earlier, exiftool supports nearly 23,000 tags so just navigating the tags it supports is a skill in of itself!
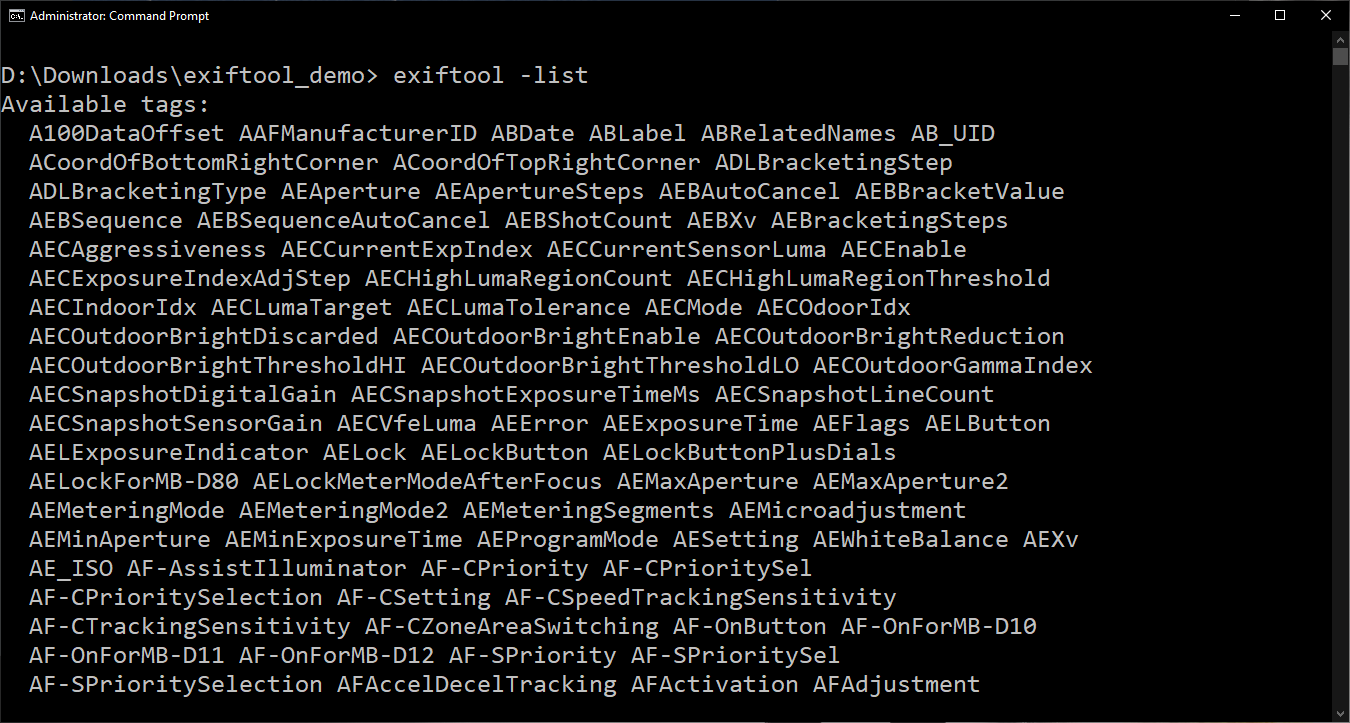
To find all of the tags exiftool understands, run exiftool with the list parameter. This parameter returns every tag exiftool will interpret when reading a file.
You can sometimes use abbreviations for some command names to save keystrokes. For example, instead of using the
printFormatcommand, you can usepinstead.Also, capitalization is important! For example, the
-gflag and the-Gflag will both print a group a tag belongs to, but they both have different formatting. Don’t be afraid to try out different variations of different commands until you get the output that you need.
Filtering Tag Listings
Just running exiftool list produces a lot of output; probably a lot more than you need. To narrow down the scope a bit, you can append a letter to the list parameter as shown below. By changing the list parameter, you can filter the lists of which tags and groups exiftool supports for reading and writing.
| Option | Usage | Effect |
| -list | exiftool -list | Shows all possible tags and command-line aliases. |
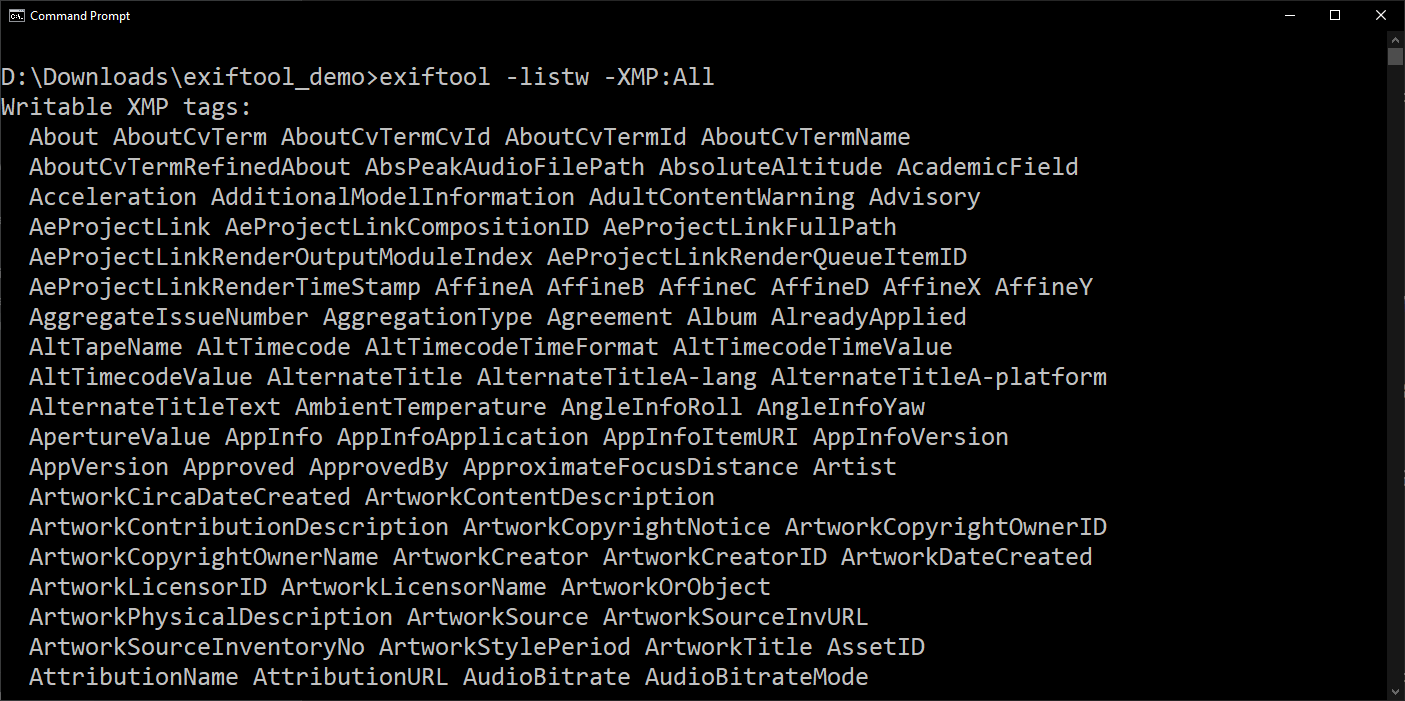
| -listw | exiftool -listw | Shows all writable tag names |
| -listf | exiftool -listf | Shows all supported file extensions |
| -listwf | exiftool -wf | Shows all writable file extensions |
| -listr | exiftool -listr | Shows all recognized file extensions |
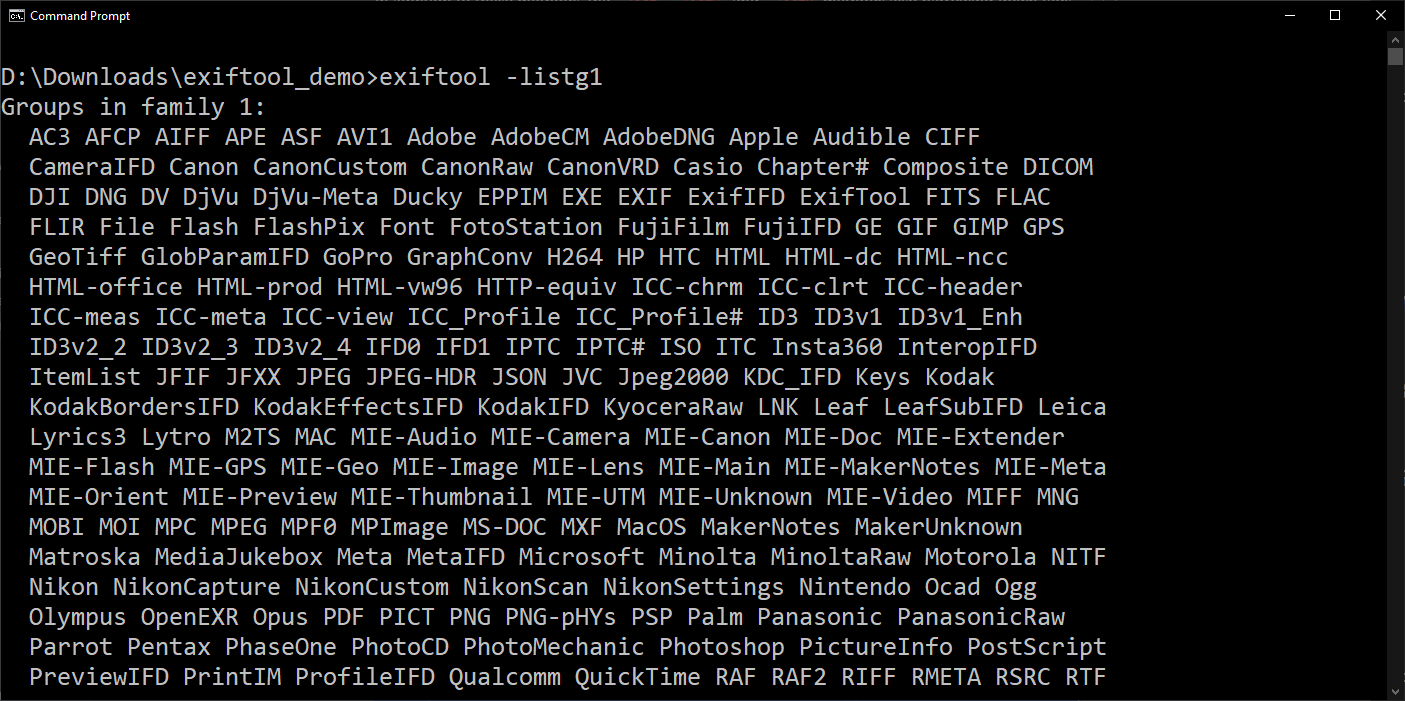
| -listg | exiftool -listg | Shows all tag groups |
| -listd | exiftool -listd | Shows all deleteable groups |
| -listx | exiftool -listx | Shows list of tags, details, and translations in XML format |
Filtering Tag Group Listings
You can also filter tags by group. If, for example, you don’t know the group you’re looking for, you can use the listg parameter followed by a family number as shown below.
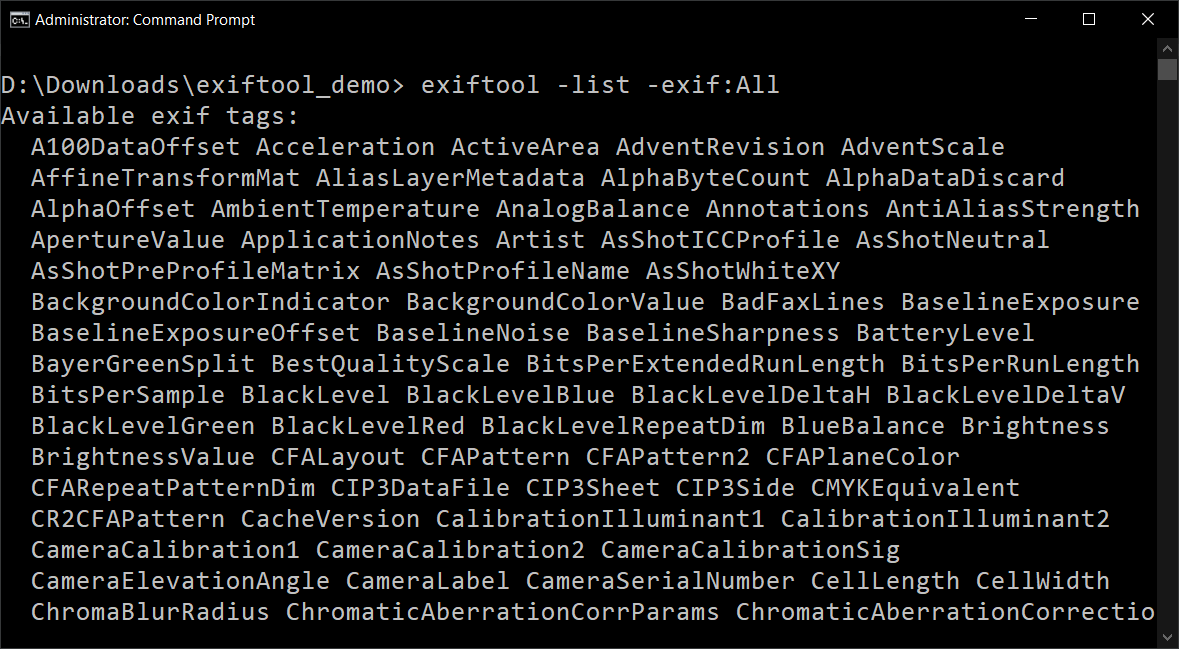
Once you know the group name, you can also narrow down tags by group when using the list, listw, and listx parameters using the group name as a parameter value such as -<GroupName>:All after the command.
If you’re comfortable writing Perl code and want further control over how exiftool parses and interprets files, or to write your own shortcuts and tags, you can use a .config file to customize the tool. You can see an example of that in this file from the documentation.
You can typically filter tags by combining group and family names into a single command. For example, exiftool -EXIF:Time:All <FilePath> will return all of the tags from the EXIF Group that have to do with Time that is present in the file found at <FilePath>. This will start to make more sense as you continue reading about filtering and see more examples of it in practice.
Reading Metadata with ExifTool: A Simple Example
So far, you’ve been learning about what exiftool is capable of. It’s time to see this handy tool in action! Let’s now jump into a simple demo of reading metadata embedded within a sample image.
- Create a new folder on your computer. This step is optional but it’ll be easier to clean things up once you’re done with the demo. This demo will use the folder D:/Downloads/exiftool_demo.
2. Find an image file. If you have a digital camera, you can use the image files from the camera card. If you’re taking pictures from a cell phone, you can find instructions on how to get the image files here.
The type of image doesn’t matter but you will find the most interesting metadata if you take a picture from a cell phone and copy it to your computer. The examples in this section are going to use the picture at this link called TestPic.jpg.
Be sure to download the example image in its original size. If the image is modified in any way, the metadata embedded in the image may be different than the examples provided.
3. Copy the image into the folder.
4. Open up your favorite terminal. The command-line interface will vary depending on the operating system you’re on. This demo will use Windows 10 and PowerShell.
5. Run cd ~/Downloads/exiftool_demo to bring you into the folder where the image is located.
6. Now run exiftool TestPic.jpg. Running exiftool against an image tells the tool to read the image metadata and return all of the default output.
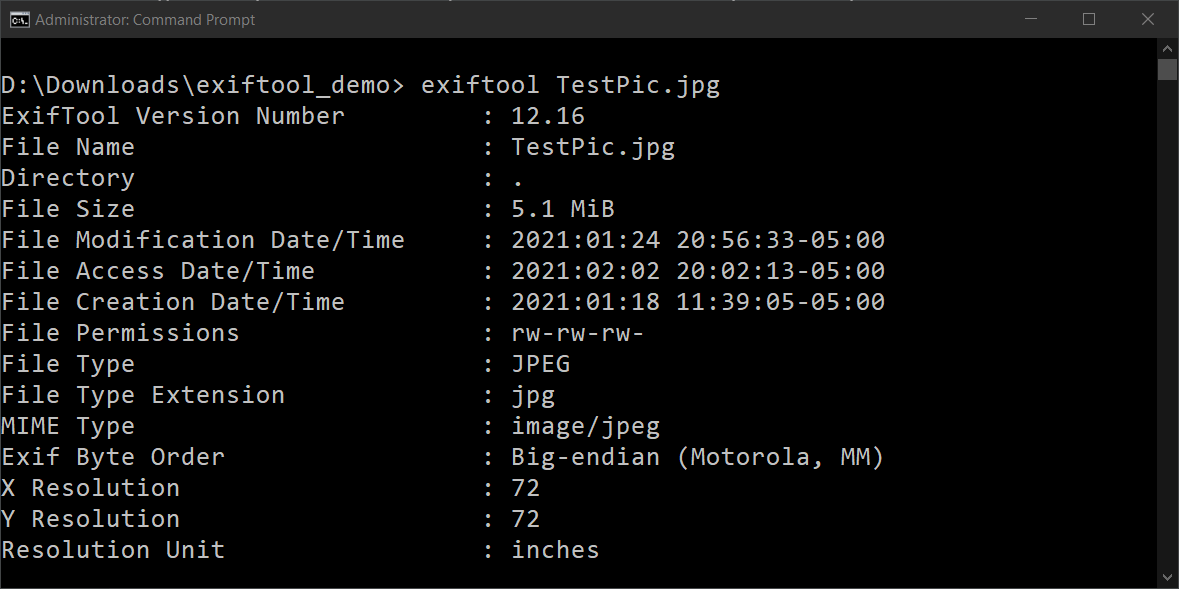
Exiftool, by default, returns all tags it understands. The TestPic.jpg image has 130!
After you’re done being overwhelmed by the number of tags you see, now run exiftool with the same image and add the -a flag.
exiftool TestPic.jpg -a Sometimes, different groups support tags with the same name, but different values. Exiftool hides those duplicate tags by default. But, the -a flag reveals them.
You may have noticed that tag names returned by exiftool don’t match the tag names in the documentation. Why? Because the tag names you see, by default, are there to make the output easier to read. If you’d like to see the real tag names, add the
-sflag.
That’s the extreme basics of reading tags with exiftool. But you’ve got a whole lot more to go! Many of the examples going forward will be built on this simple example.
Including and Excluding Specific Tags
By default, exiftool shows you all of the tags it understands from a file. Typically, you don’t want to see all of the tags. You’re probably only looking for certain ones. You can specify certain tags or even exclude them using - and --.
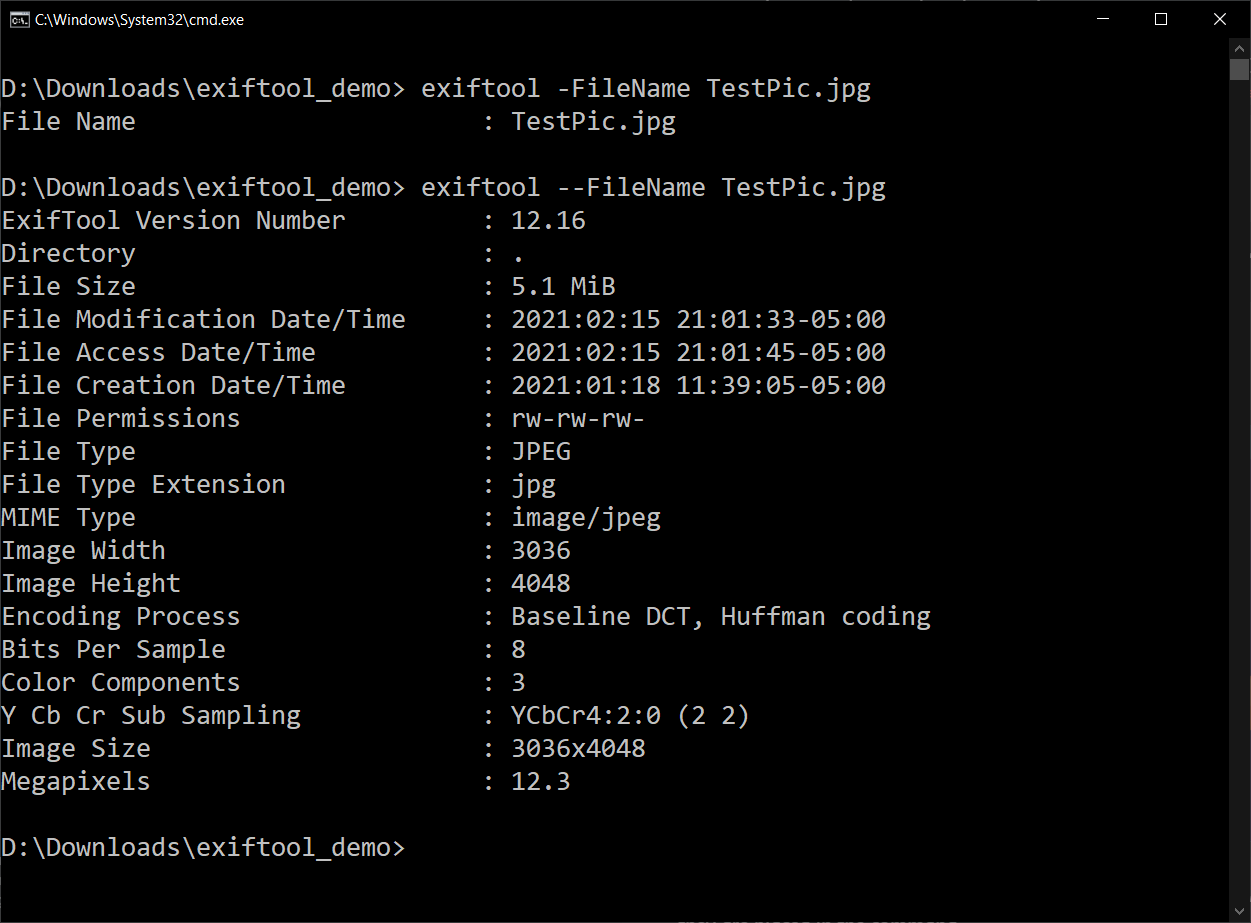
To only return a specific tag, use - followed by the tag name. Perhaps you’d like to read the FileName tag on our example image. To do that, you’d use the -FileName switch as shown below.
exiftool -FileName .\TestPic.jpg
Alternatively, if you need to exclude a specific tag from being displayed, you can use -- followed by the tag name.
exiftool --FileName .\TestPic.jpg
Using Tag Wildcards
The tag parameter also supports wildcards. If you don’t know the specific tag name but know a few characters, you can use wildcards to display tags.
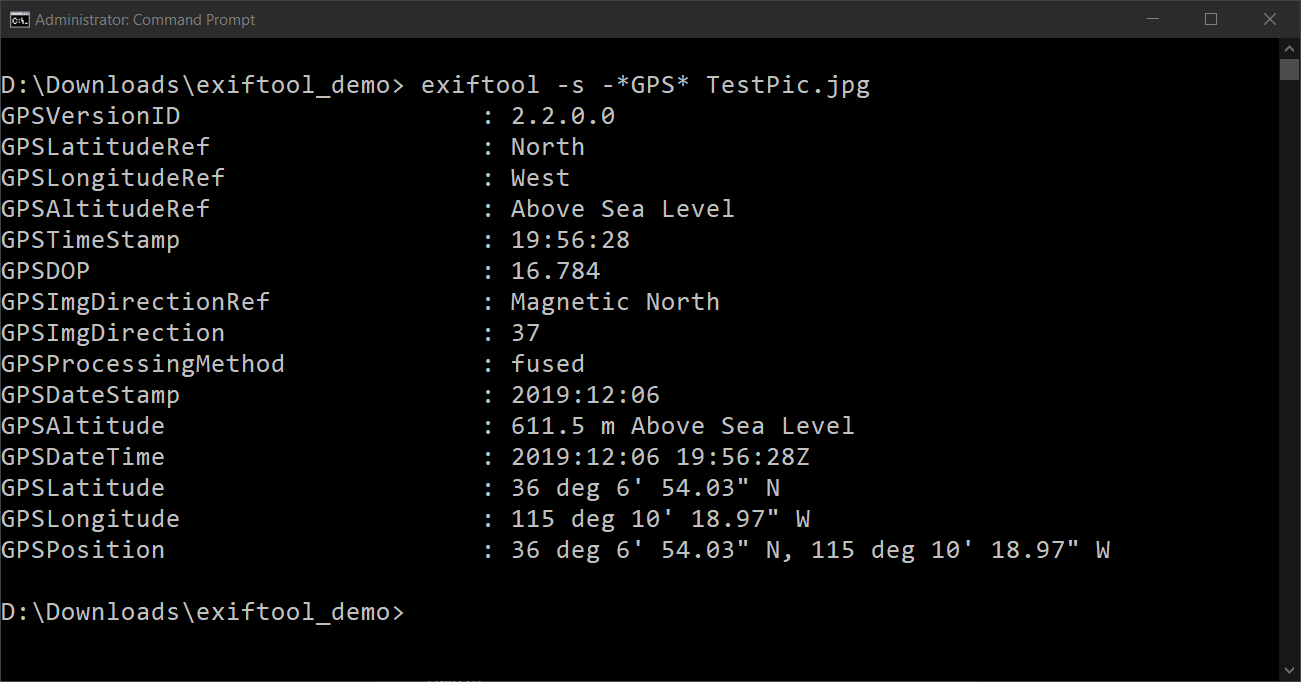
For example, when you use the -*GPS* parameter, exiftool returns all of the tags with GPS in the name, regardless of what group they are in.
Displaying Tag Groups in Output
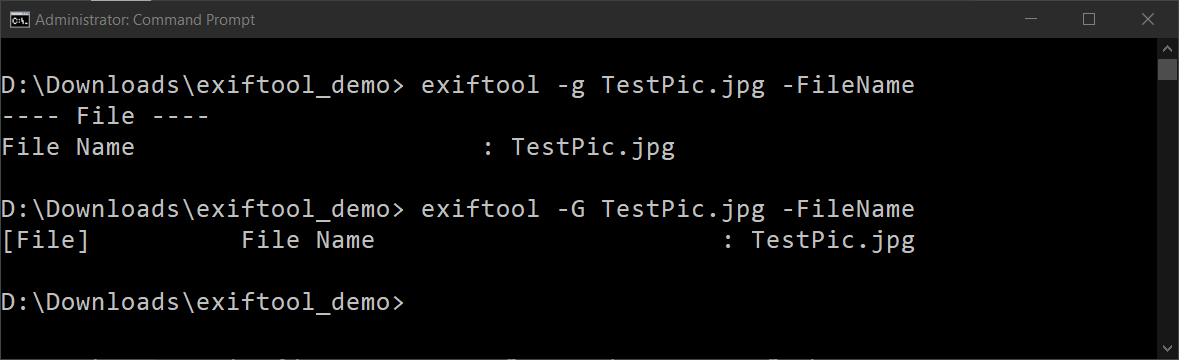
By default, when you run exiftool against a file, you’ll only see tag names and values. But, as you’ve learned, all tags are part of tag groups. If you need to see the group each tag is in, you can use the -g and -G flags.
Since exiftool is case sensitive, using a lowercase -g will add group name above the tags that are a part of that group while upper-case -G will add the group name to each line before the tag name. You can see an example of this below.
Managing Duplicate Tag Names in Different Groups
Tag names are not unique in exiftool output. Names are only unique to the tag group they are a part of. It’s completely possible for the same tag to show up in two different groups. For example, both the EXIF and XMP tag groups have tags with the name ImageHeight and ImageWidth, but only one tag of each per group.
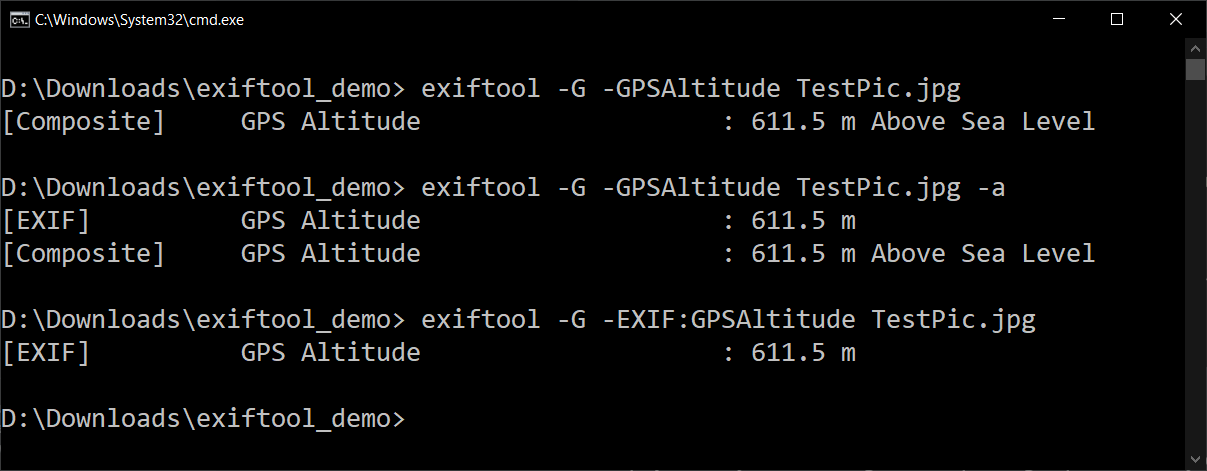
In TestPic.jpg, you will find two different tags called GPSAltitude; one tag is in the Composite group and the other is in the EXIF group. Each of these tags has a slightly different value.
If you know which tag in the specific group you’d like to see, you can get more granular by putting the group name with a colon in front of the tag. You can see a few examples below.
## Only one tag shows up in the Composite group but two actually exist
exiftool -G -GPSAltitude TestPic.jpg

## Both GPSAltitude tags show up in two groups
exiftool -G -GPSAltitude -a TestPic.jpg

## Only one tag shows up in the EXIF group.
exiftool -G -EXIF:GPSAltitude TestPic.jpg
Displaying Only Tags in a Specific Group
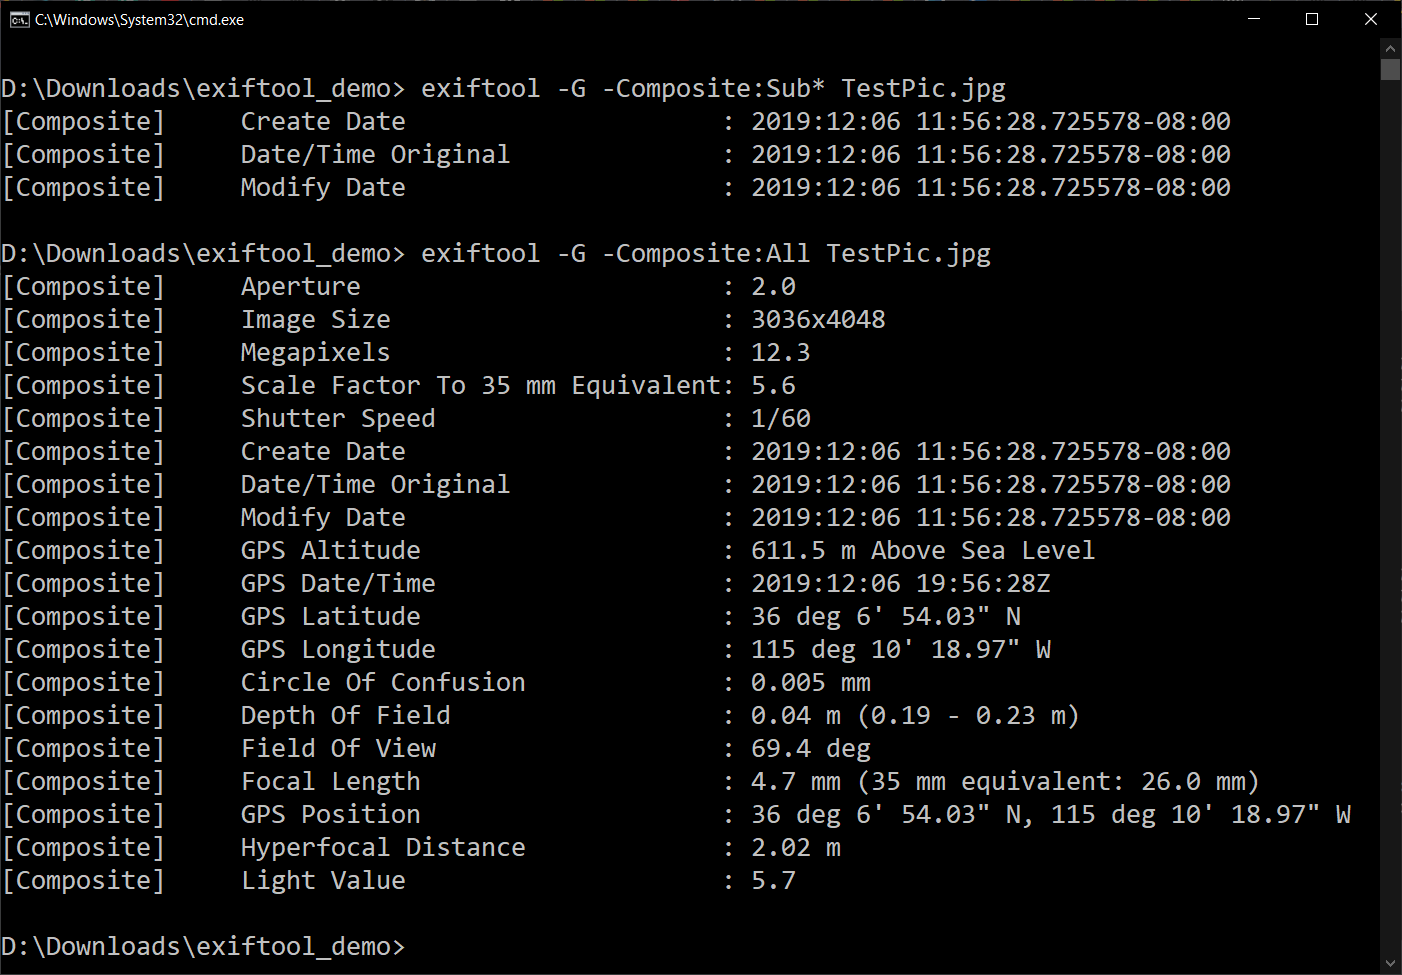
Perhaps you’d only like to see tags from a specific group. To do that, you can use the group name as a switch followed by a “filter” to display certain tags within that group. That filter can be a string with wildcards to match specific tags, or use All to return all found from that group. A tag name or a filter MUST be used when doing this.
For example, to display all of the tags on the example image inside of the Composite group, run the command below.
exiftool -G -Composite:all TestPic.jpg
Sorting Output Alphabetically
By default, output from exiftool isn’t sorted alphabetically. If you need to sort alphabetically, you can add the -Sort switch to your command. This will sort the output from exiftool based on language, which can be changed with the -lang parameter.
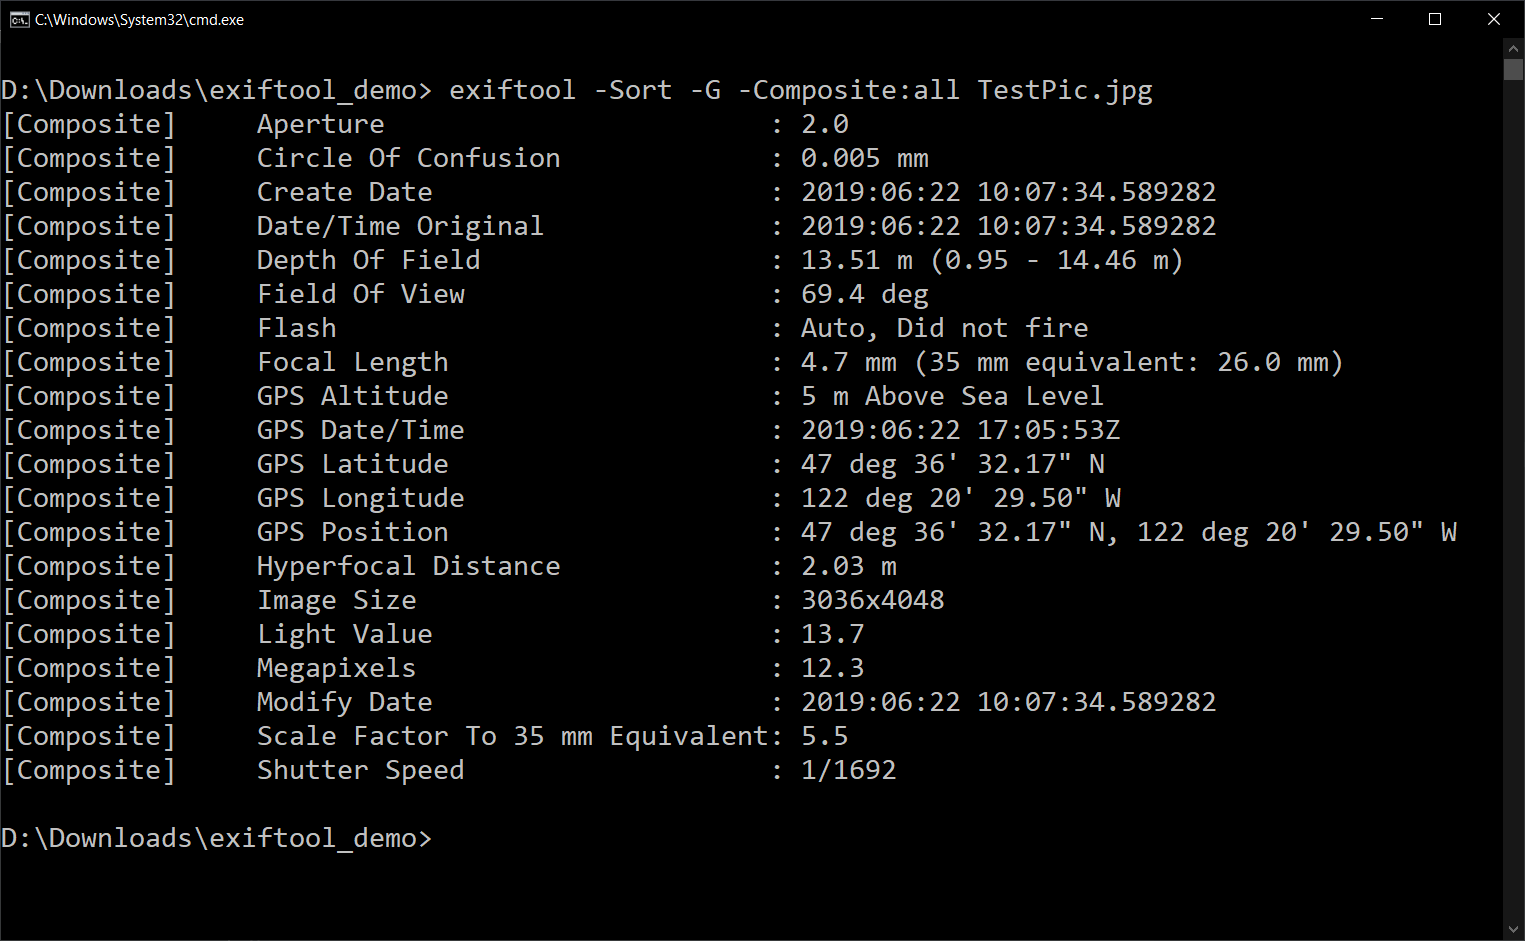
-sort with the command from the previous section.Formatting Output
If you work a lot with bash or other command-line applications, you know that it can be tricky to get the output formatted exactly right. Instead of using other formatting utilities like awk or grep, exiftool has output formatting capabilities built-in.
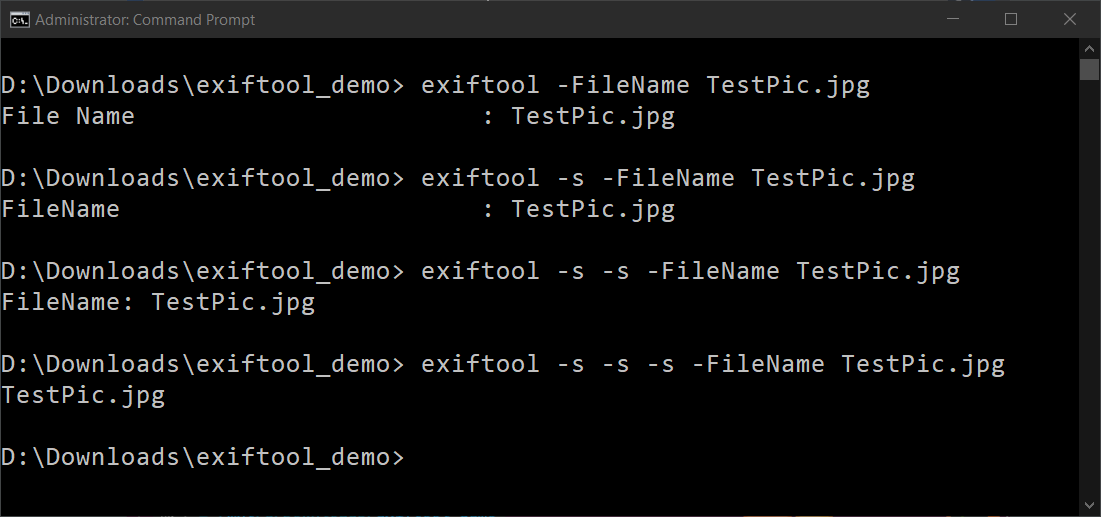
Using -s to Customize Output
Exiftool also supports a number of additional flags to control the format of the output. For example, adding -s will show the names of each tag as exiftool expects it without spaces. When using the -s flag, any tag you see can be copied and used as input for an exiftool filter.
Adding additional -s flags will also affect the output. Using -s -s or -S will remove the spaces between the tag name and the tag value. Using -s -s -s will remove everything except for the value.
Knowing the tag names with the
-soption will also make filtering them easier.
printFormat
One of the most common ways to format output in exiftool is by using the -printFormat or -p parameter. This parameter allows you to return custom strings and define tags as variables in the output.
Perhaps you’d like to return the GPS coordinates a picture was taken at. To do this, you’d use the GPSPosition tag in the Composite group like below.
exiftool -Composite:GPSPosition TestPic.jpg
But maybe you’re building a report and need to include some extra information with those GPS coordinates. If you were writing code, you could declare a variable and then use variable expansion inside of a string like this:
$gpsPosition = $(exiftool -s -s -s -Composite:GPSPosition TestPic.jpg)
echo "This picture was taken at $gpsPosition"
You’d then get an output that looked something like:
This picture was taken at 36 deg 6' 54.03" N, 115 deg 10' 18.97 W"
But you don’t need to be a software developer to use exiftool. Instead, you can use -p to define this “variable” using the $ character.
exiftool -p "This picture was taken at $Composite:GPSPosition" TestPic.jpg

Format Files
If you need to format a more complex output like multiple lines, you can also use a format file with the printFormat parameter. To use a format file:
- Create a new text file in the same folder as the image called format.fmt.
Copy the below text into it. Notice each of the variables. Exiftool will replace these with real values when run.
[HEAD]-- Generated by ExifTool $exifToolVersion --
 File: $FileName - $DateTimeOriginal
 GPS Date: $GPSDateTime
 GPS Altitude: $GPSAltitude
 this is a comment line. It won't print
 Latitude: $GPSLatitudeRef
 Longitude: $GPSLongitudeRef
 Position: $Composite:GPSPosition
 [TAIL]-- end --
Format files have #[HEAD] and #[TAIL] lines. These lines tell exiftool where the start and end of the format file is. The rest of the syntax is the same as when using a string like the first example.
Now run exiftool providing it the format file above. Notice that it’s filled in all of the variables.
exiftool -p format.fmt TestPic.jpb 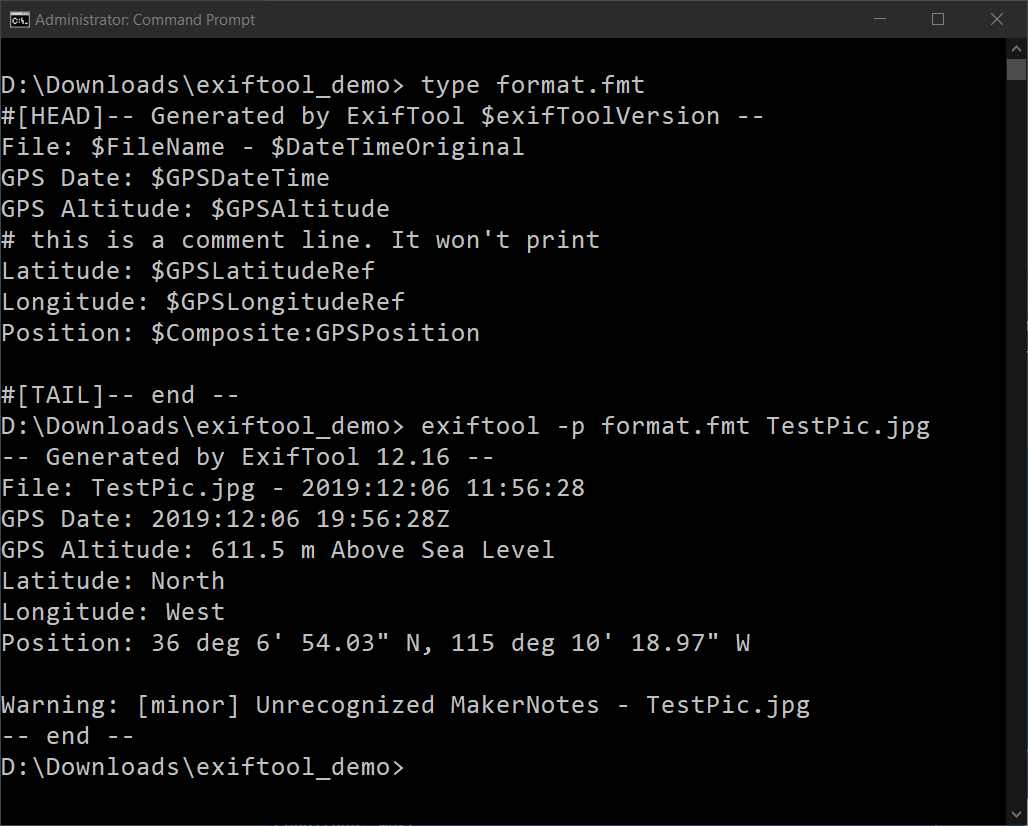
Formatting Multiple Files at Once
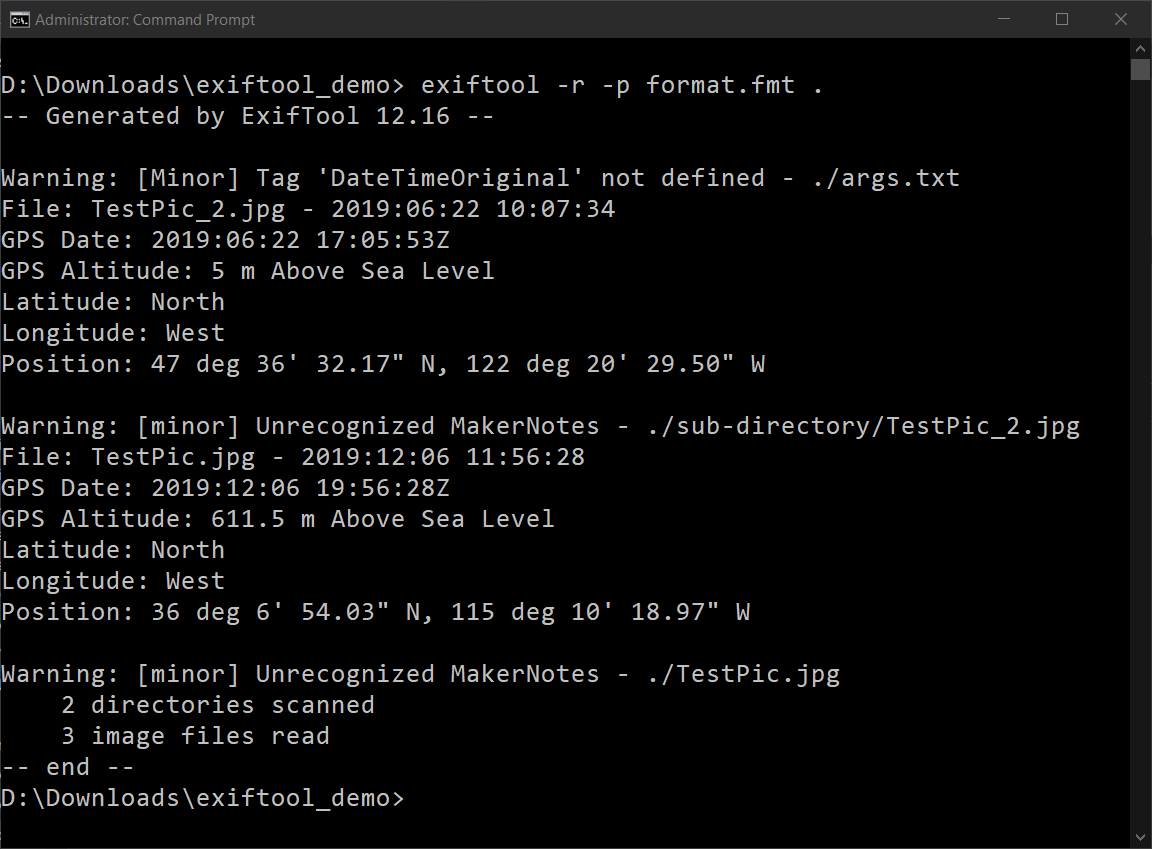
As with all of the previous commands and flags, printFormat also works with multiple files and directories, so you can make lists of specific tags from entire libraries of images.
The below command will recursively (-r) find all files in the current directory (.) and return results formatted with the format.fmt file.
exiftool -r -p format.fmt .
Exporting Tag Lists to CSV, HTML, JSON, and More
If you’re using exiftool to read metadata tags and intend to use that information in another utility or application, you can export results in many different formats.
Take a look at the table below for all of your options and examples of each.
| Type of Output | Example Usage | Example Output |
| CSV | exiftool -csv -FileName TestPic.jpg | SourceFile,FileName ./TestPic.jpg,TestPic.jpg |
| HTML Table | exiftool -h -FileName TestPic.jpg | File Name TestPic.jpg |
| JSON | exiftool -json -FileName TestPic.jpg | [{ “SourceFile”: “./TestPic.jpg”, “FileName”: “TestPic.jpg” }] |
| PHP Array | exiftool -php -FileName TestPic.jpg | Array(Array( “SourceFile” => “./TestPic.jpg”, “FileName” => “TestPic.jpg” )); |
| TSV (Tab Separated Value) | exiftool -t -FileName TestPic.jpg | File Name TestPic.jpg |
| XML | exiftool -X -FileName TestPic.jpg | <?xml version=’1.0′ encoding=’UTF-8′?> <rdf:RDF xmlns:rdf=’http://www.w3.org/1999/02/22-rdf-syntax-ns#‘> <rdf:Description rdf:about=’./TestPic.jpg’ xmlns:et=’http://ns.exiftool.ca/1.0/‘ et:toolkit=’Image::ExifTool 12.14′ xmlns:System=’http://ns.exiftool.ca/File/System/1.0/‘> System:FileNameTestPic.jpg</System:FileName> </rdf:Description> </rdf:RDF> |
Processing Multiple Files at Once
If you are a photographer, you probably have huge folders of thousands of images on a hard drive somewhere. Rather than cataloging the metadata in each of these images individually, you can process them all at once.
When provided a folder name instead of a file, exiftool will look for all files in a folder and even recursively scan sub-folders within those folders.
To demonstrate:
- Create a subfolder inside of the ~/Downloads/exiftool_demo folder and copy a second image inside of that folder.
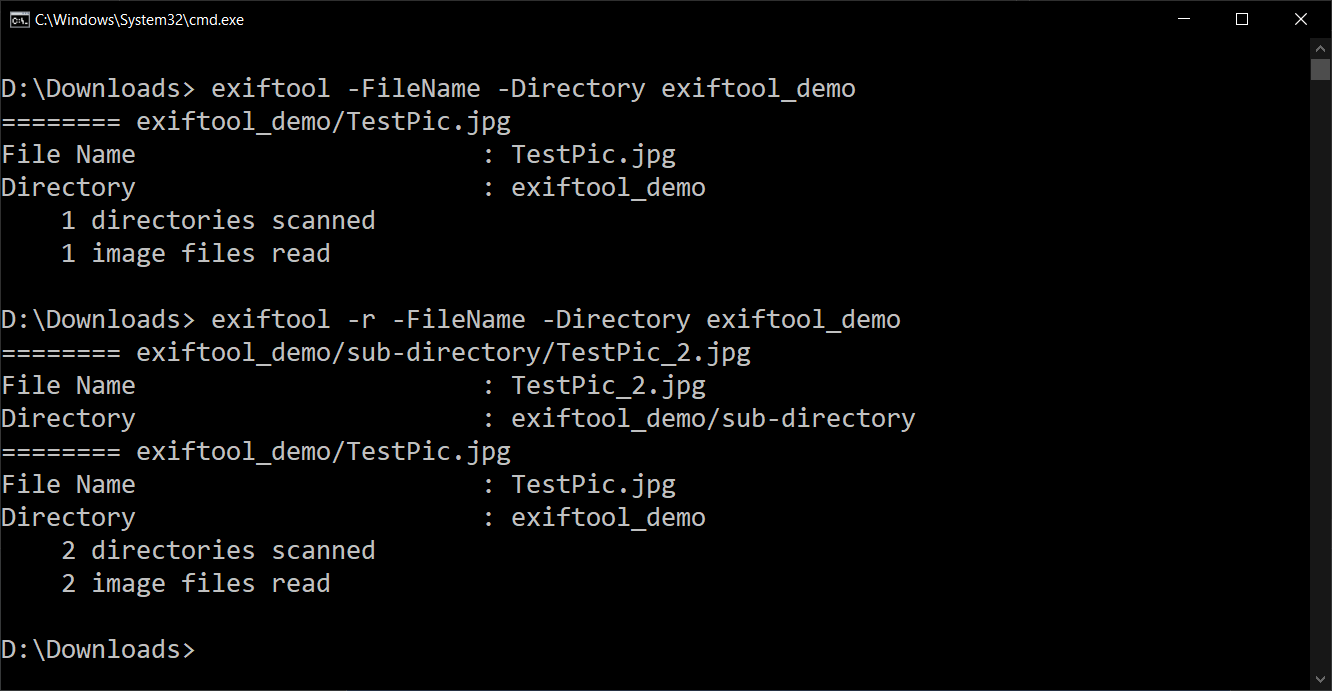
2. Now run exiftool <Foldername> where <Foldername> is replaced with the name of the folder. Exiftool will scan all files in the folder but not the subfolder.
exiftool -FileName -Directory ~\Downloads\exiftool_demo3. To include subfolders, add the -r or -recurse flag to the command before the folder name.
exiftool -r -FileName -Directory ~\Downloads\exiftool_demoThe
FileNameandDirectoryparameters are not mandatory. These parameters are limiting output to only file names and directory paths.
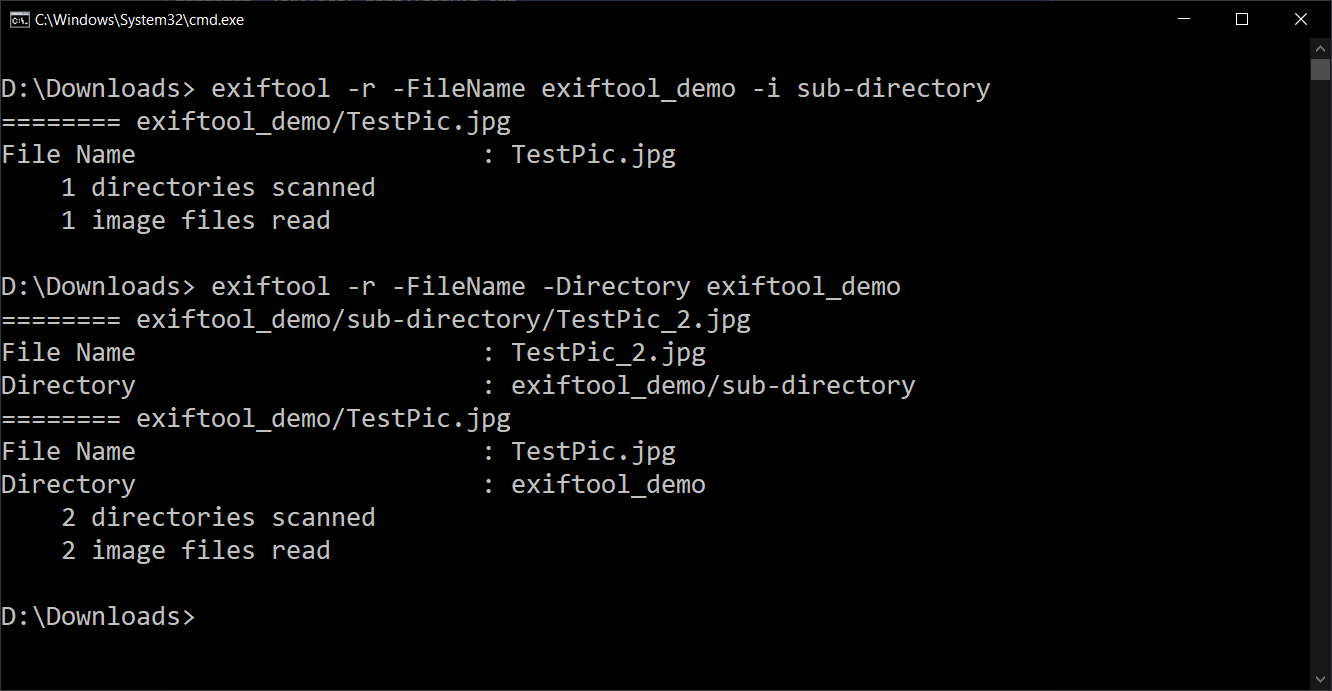
You can also ignore specific subdirectories using the -i or -ignore parameters. When you provide the name of the directory name to ignore, exiftool will skip over those directories.
exiftool -r -FileName -i subfolder D:\\Downloads\\exiftool_demo
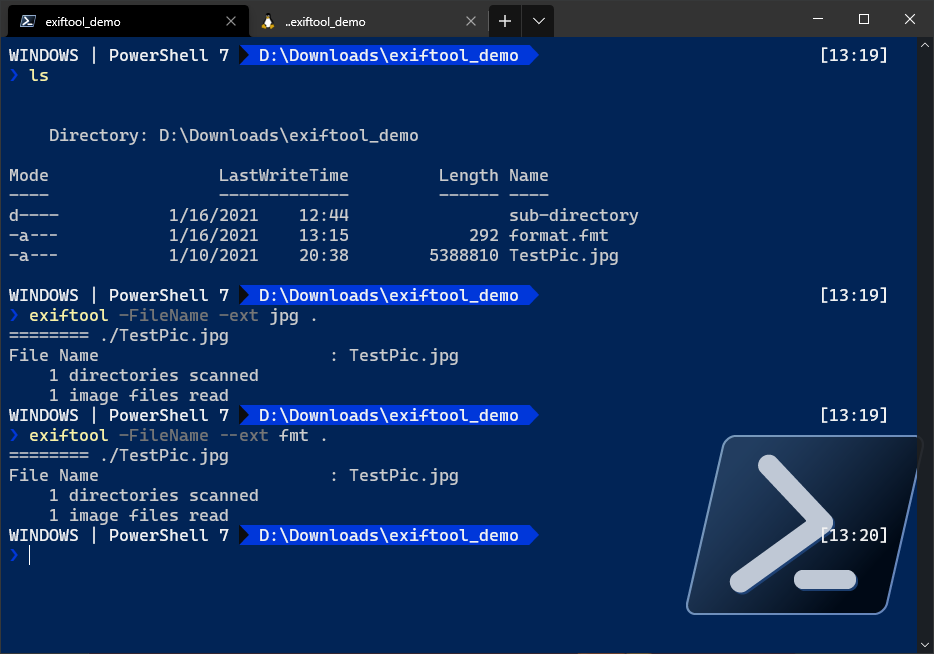
Filtering by File Extension
When running exiftool on a folder, you may only want to run it on specific types of files in that directory. Maybe you want to get the date each of your .jpg files was created, but not the .txt files alongside them.
You can create “file filters” to include some files and exclude others when processing many files at once using the -ext flag. This flag filters what files exiftool should process based on what extension they have. In the example below, you can see that exiftool runs on the .jpg file, but not the .fmt file.
You can also exclude file types by adding a dash and using --ext instead -ext.
Using
-to include something and--to exclude is a common pattern in exiftool.
Filtering with If/Then Conditional Logic
In code or scripting, you can create code to perform a task only if a certain condition is true. This scenario is sometimes called if/then conditional logic. Different shells allow you to perform conditional logic such as Bash or PowerShell.
In the previous sections, you could filter specifically with name, group, and file extension. Using the -if parameter, you can filter on all of those and more in one place.
The -if parameter accepts a string enclosed in quotes that represents the condition you’d like to match for. It uses comparison operators to perform matching like equal to (eq) to compare one value with another and variables.
For example, perhaps you’d like to find to see the metadata tag Megapixels for all images inside of the C:\Images folder but only if those images have a Make tag of Sony. The below example would do that.
exiftool -Megapixels -if "$Make eq 'Sony'" C:\Images
The -if parameter syntax uses Perl. You can use any of the below Perl comparison operators to perform this advanced if/then logic.
A Quick Example
Using if/then conditional logic is an advanced topic so let’s walk through a quick example. To follow along, you’ll need several photos taken by two different cameras. In this case, the demo uses two pictures shown below taken with a Google Pixel XL smartphone and the other two were taken by an Olympus E-300 digital camera.
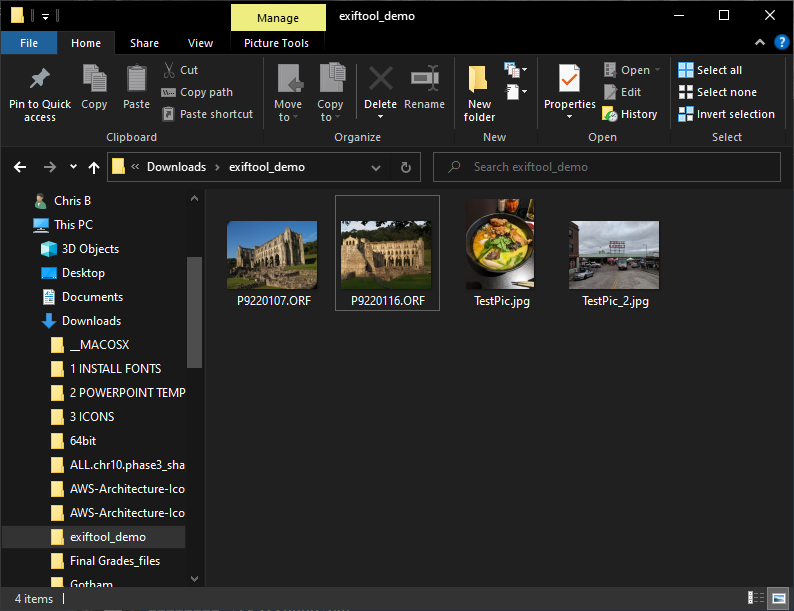
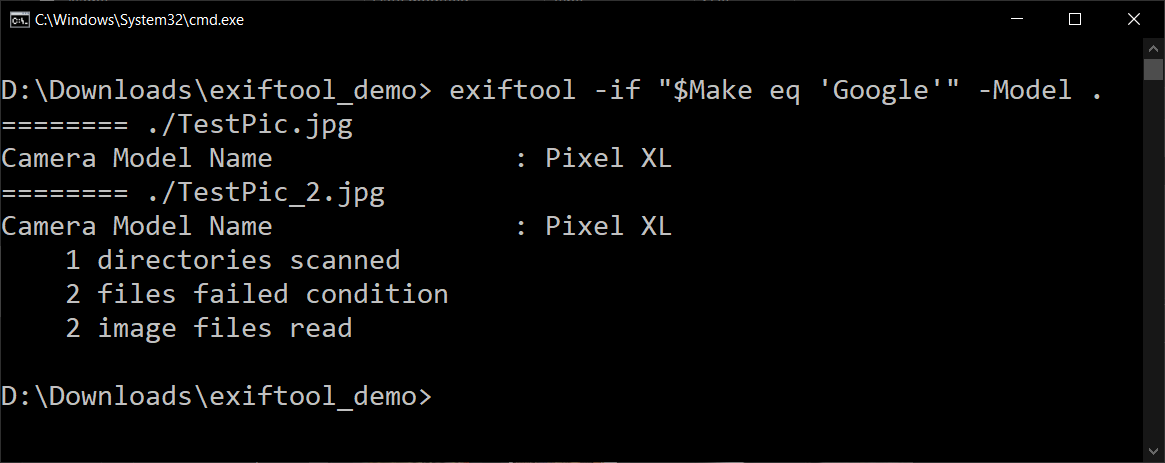
Let’s say you want to find the model of camera used to take the images in the above folder, but only the ones that were taken with a Google phone. In the command below, the -if parameter will only read tags on images where the statement returns true. The -Model tag will be the only tag returned, like on a normal filter, and . will apply that to every image in the current directory.
exiftool -if "$Make eq 'Google'" -Model .
You can also use an
-ifstatement with a tag and no operator and it will return true if the tag is present e.g.exiftool -FileName -if "$GPSLatitude" <Directory Path>.
You can specify as many conditions as you like in a command, but it will only return the results for images that meet all of the conditions.
Issues in PowerShell
If you’re using PowerShell, you may run into some issues with quoting. The exiftool documentation recommends using double-quotes on Windows, but it’s not quite that easy in PowerShell.
If you use double quotes and a dollar sign to represent the variable, PowerShell will interpret that variable as its own. It will try to replace that variable with its own even before exiftool can see it.
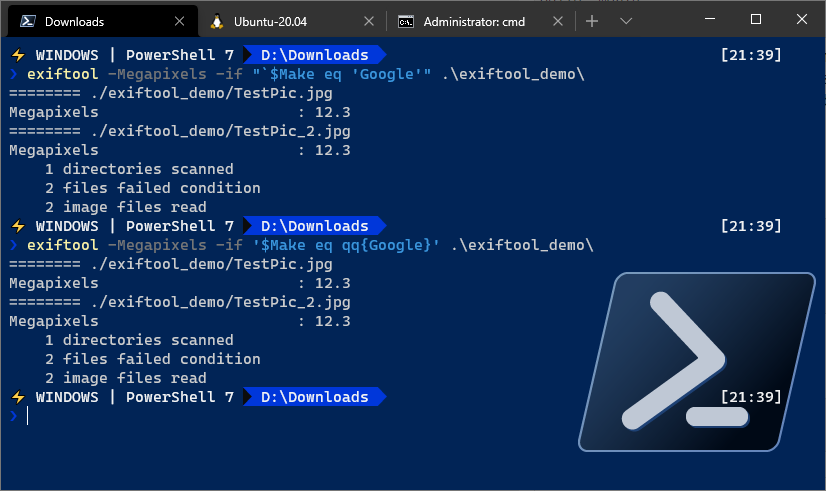
You have two options when working with the -if statement in exiftool from PowerShell:
- Wrap the expression in double-quotes and use a backtick character (“`) before the dollar sign to escape it. By putting a backtick in front of the dollar sign, this tells PowerShell that the variable is not for it and just pass it as-is to exiftool.
- Wrap the expression in single-quotes. Wrapping the expression in single quotes allows you to write the expression as normal but you must use a Perl Quote Operator (
qq{<String>}) to wrap any substrings. The backtick is probably the easiest option, or use cmd.exe.
You can see below that each method of escaping the dollar sign work equally well.
Redirecting Output to Files
Phew, that was a lot of ground to cover! Now that you’ve learned some of the ways to read and filter metadata tags, now it’s time to learn how to save that information into files.
In a typical command-line scenario, you can redirect the output a command returns from showing on the screen to storing to a file using a redirection operator (>). This operator collects everything you see on the command line and simply writes all of that to a file.
While the typical redirection operator still works with exiftool, you can also use the -w, or -textOut parameters. By default, if you pass in an extension (txt in the example below), it will create a text file with the same name as the document containing the output for each file scanned.
exiftool -w txt -FileName -FileType TestPic.jpg
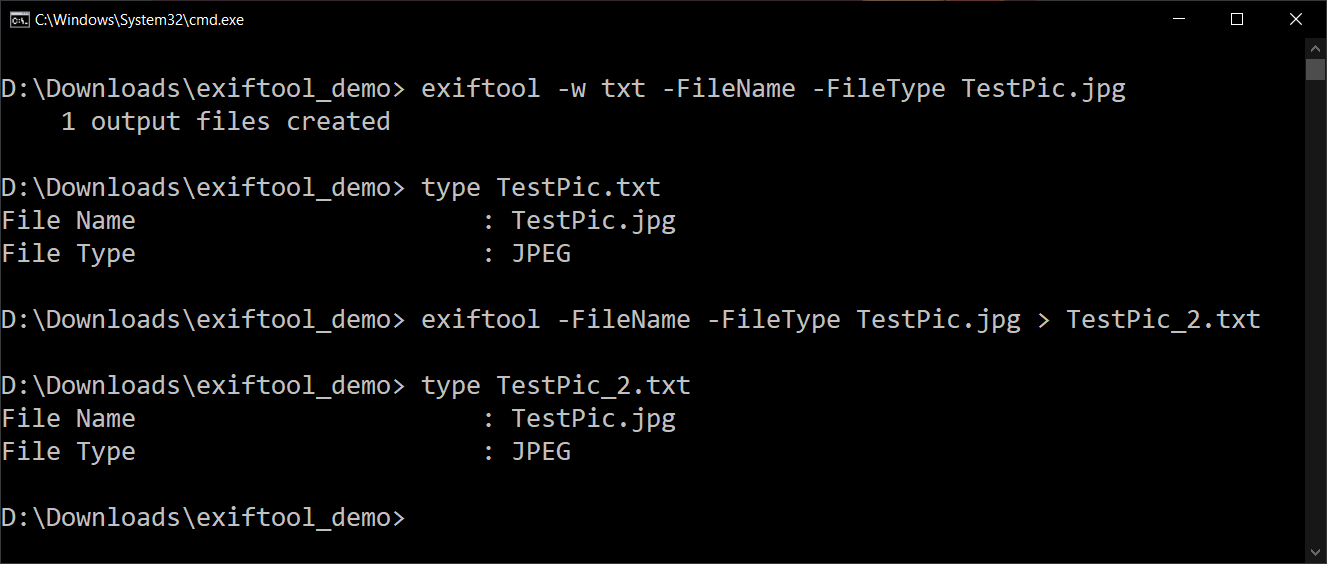
When using a typical redirection operator (>), you can specify the file name to write to. When using the -w switch, you will need to learn some print formatting options. Coupled with the -w switch, you can specify many different ways to define file names and directories to store metadata in.
Don’t get confused if it looks strange at first, just try different combinations to see what works.
| Option | Description | Example Usage | Example Option |
| %d | Returns the directory that contains the file with a trailing forward-slash, eg: ./ | exiftool -w %f%d.metadata TestPic.jpg | TestPic/.metadata |
| %f | Returns the name of the file, not including the file extension | exiftool -w %d%f.txt TestPic.jpg | ./TestPic.txt |
| %e | Returns the file extension | exiftool -w %e/%f.txt TestPic.jpg | jpg/TestPic.txt |
| %c | Appends the a number to an existing output filename | exiftool -w metadata%c.txt TestPic.jpg exiftool -w metadata%c.txt TestPic.jpg | metadata.txt metadata1.txt |
| %D | Same as %d, but does not include a trailing / character | exiftool -w %D%f-metadata TestPic.jpg | .TestPic-metadata |
| %F | Returns the name of the file, including the extension | exiftool -w metadata/%F.txt TestPic.jpg | ./metadata/TestPic.jpg.txt |
| %E | Same as %e, but includes the preceeding . | exiftool -w %E/%f.txt TestPic.jpg | .jpg/TestPic.txt |
| %C | Appends a number to the output filename for each processed file | exiftool -r -w metadata%C.txt . | metadata0.txt metadata1.txt … |
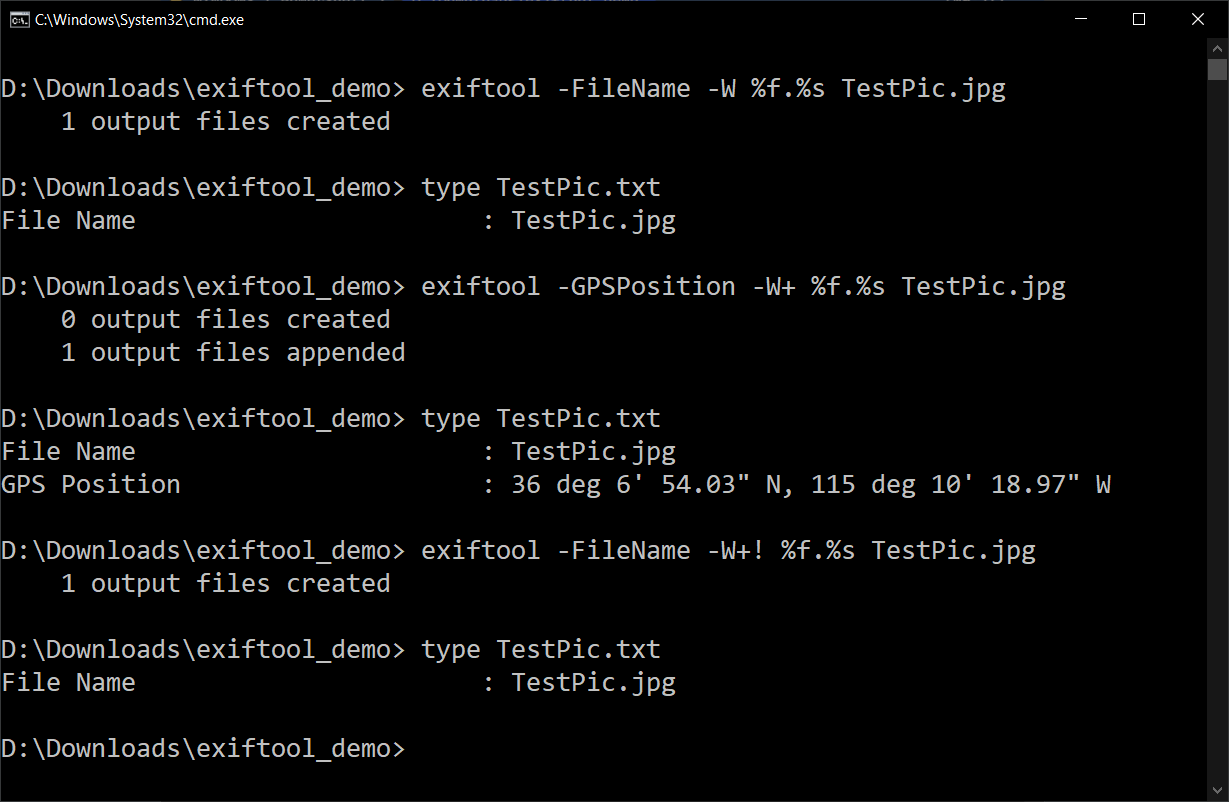
If the above options aren’t sufficient, exiftool has an advanced write mode by using -W. Instead of creating a new output file for each processed file, -W creates a new output file for each tag. Otherwise, -W can use the same options as its lower-case counterpart, as well as a few new ones shown here:
| Option | Description | Example Usage | Example Option |
| %t | Returns the name of the tag scanned | exiftool -FileName -W %t.txt TestPic.jpg | FileName.txt |
| %g | Returns the group of the tag scanned | exiftool -FileName -W %g.txt TestPic.jpg | File.txt |
| %s | Returns the suggested extension for the output file, based on format | exiftool -FileName -W %s.txt TestPic.jpg | txt.txt |
While > will put all of the output from a command into a single file, -w and -W will create different output files for each file that exiftool scans by default. Files created with -w and -W can also be overwritten and appended to by using the +! and + operators respectively.
Translating Tags into Different Languages
Exiftool also supports translating tags into several different languages. This feature helps when localizing metadata, for example.
You can discover all of the supported languages by using the -lang switch as shown below by itself.
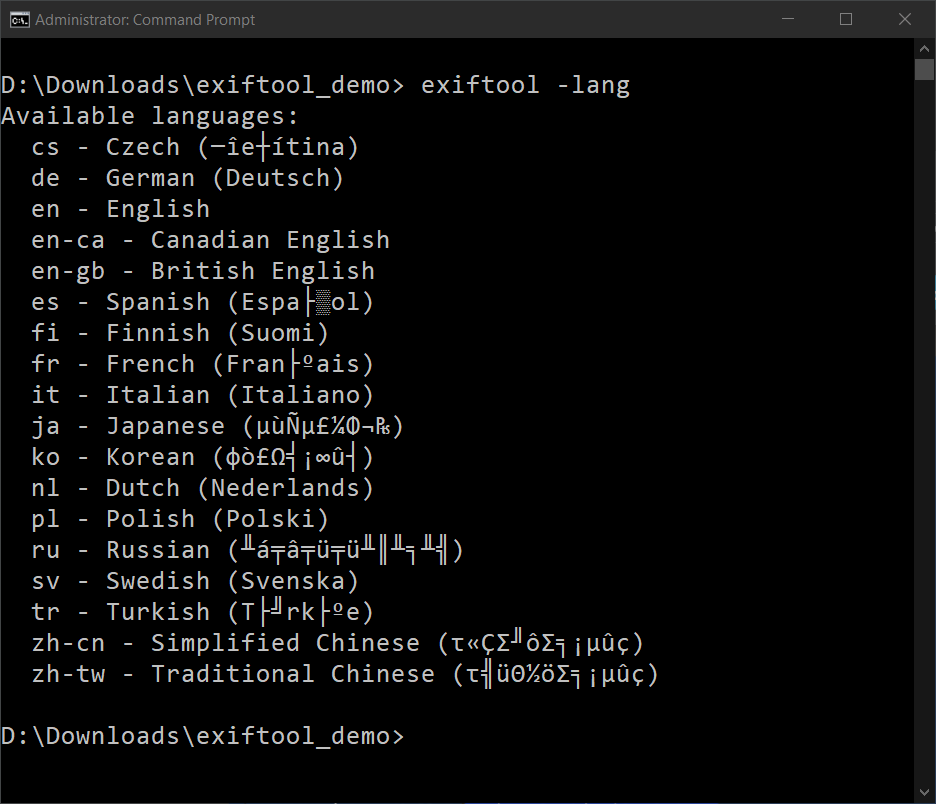
Let’s say you want to translate all of the tags for the example image TestPic.jpg into German or the de language identifier. To do that, you must use the -lang parameter.
Below is an example of returning the tag name Make translated to German.
exiftool .\TestPic.jpg -lang de -Make
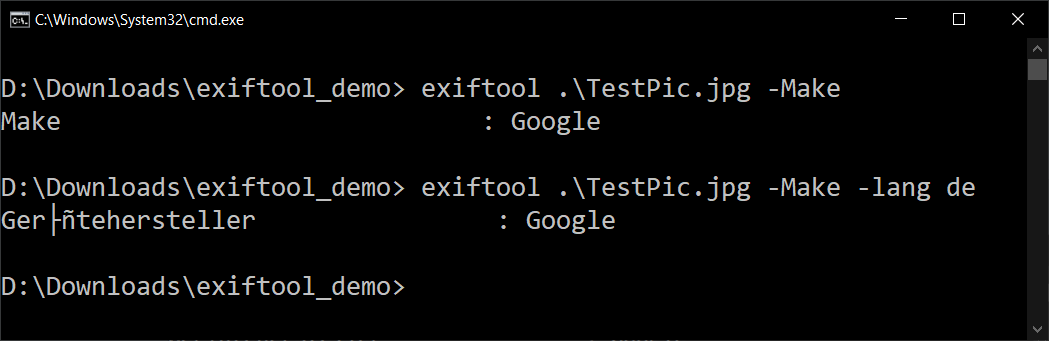
Make tag in English and GermanWhen using the
-sflag, tag language translation will not work. Language translation also doesn’t affect how tags are filtered, which is always using the group/tag name found in the documentation.
Changing Metadata Tags
If you need to modify metadata tags assigned to a file, you can do that with exiftool also. Changing a tag is similar to reading a tag.
WARNING: Changing tags will modify the files you are working on. Take backups before trying these commands otherwise risk damaging or corrupting files!
Online investigators of stalkers and harassers have said that a favorite tactic of theirs is replacing the GPS location data in pictures that their clients post with coordinates from hundreds of miles away to throw abusers off the trail of their victims. Use this power responsibly!
Neither the author nor AdamTheAutomator.com is responsible for how you use any of the tools listed here. If you’re being stalked or harassed, please reach out to law enforcement.
Writeable Tags
For example, if you want to look up the FileName tag on TestPic.jpg, the exiftool command would be:
exiftool -FileName TestPic.jpg
To change the FileName tag to NewTestPic.jpg, the command would be:
exiftool -FileName=NewTestPic.jpg TestPic.jpg
The format of <tag name=<new value> is the same for any writable tag. Take a look at the exiftool documentation for a list of writable tags that you can change.
If there are spaces or special characters in the new tag value, wrap the new tag in single-quotes e.g.
-FileName='New Test Pic.jpg'.
You can also use the formatting placeholders to define variables for tag values using the
-wparameter covered in the previous section.
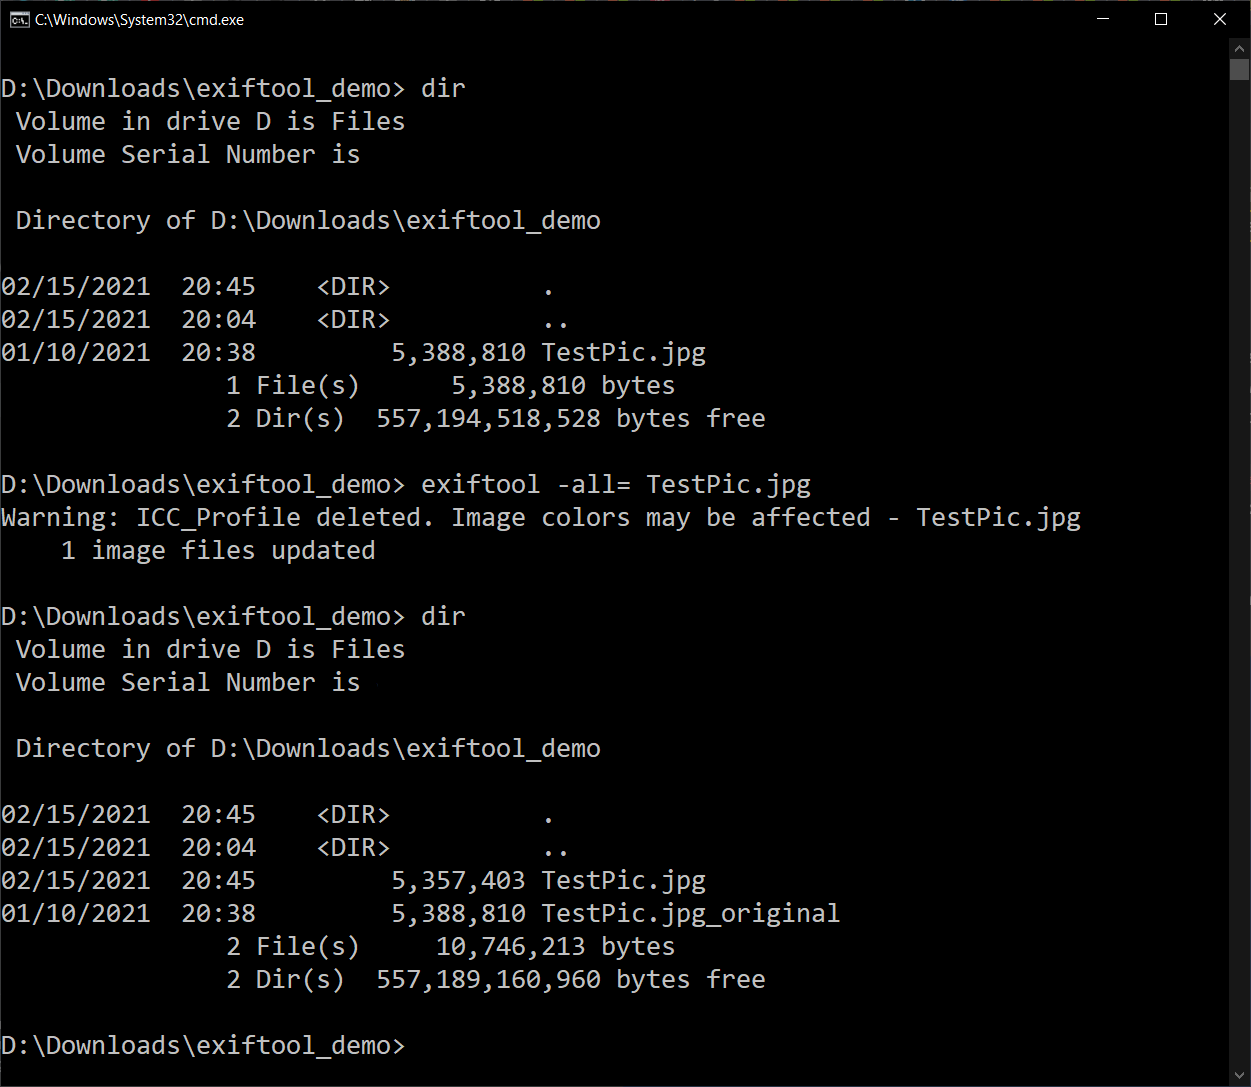
When you modify or delete a tag, exiftool will create a copy of the original file and create a new tag with that value. Exiftool will create a new file with the same name as the original appended with _original. It will then create new tags on the original file.
Non-Writeable Tags
When you attempt to modify a tag that is not writeable, exiftool will create a copy of the original file and create a new tag with that value. Exiftool will create a new file with the same name as the original appended with _original. It will then create new tags on the original file.
If you’d rather not create a file backup, you can use the
-overwrite_originalflag. If so, exiftool will not create a copy and modify the original directly. Make a backup of your files before using this option!
Note in the picture below how the Length property is the same on both the TestPic.jpg from the first command and the TestPic.job_original file in the last command.
Make tag in English and GermanReverting Changes
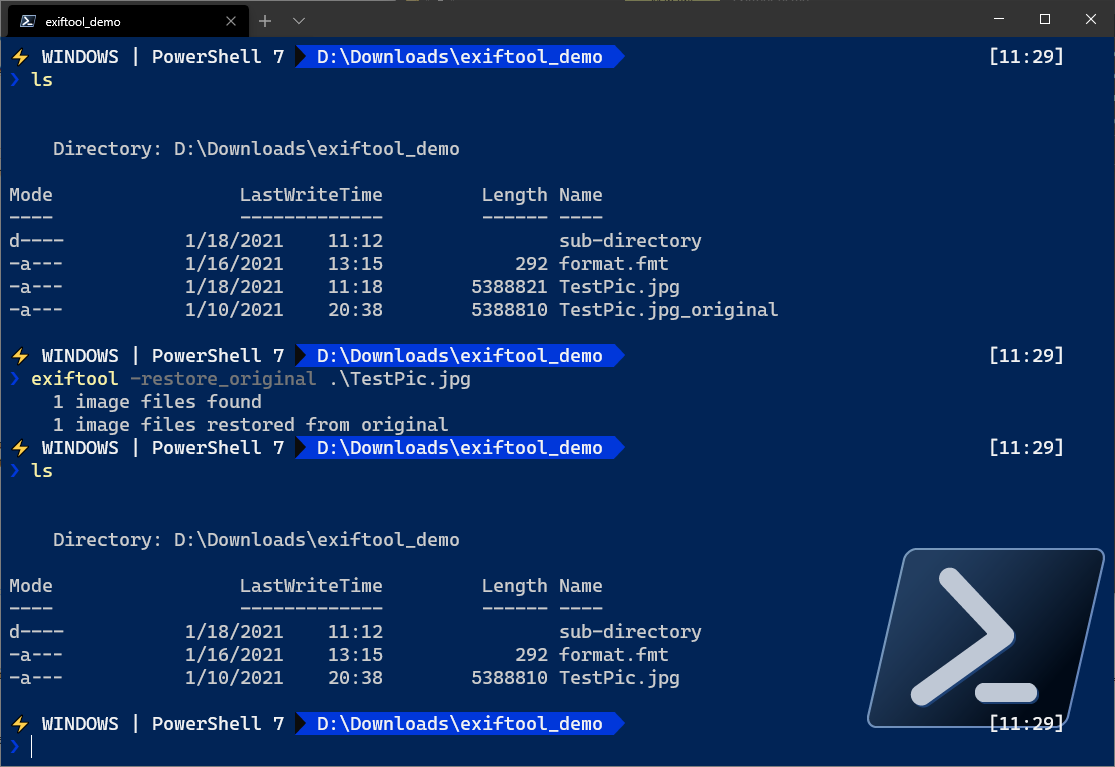
If exiftool created an _original file, you can also revert any changes made to the tags. To do so, delete the file without _original appended to it and remove _original from the other.
You can also use the built-in -restore_original flag to revert the change, or -delete_original if you are satisfied with the changes.
Removing Metadata Tags
Sometimes the tags in your photos are sensitive that you might not want to allow others’ to see. GPS coordinates in particular can contain personal data embedded in each photo and video. If not erased or modified, this information could be used against you as the fugitive John McAfee found out in 2012.
Performed nearly the same way as changing tags, you can remove them also by leaving the metadata tag blank.
The command below removes the tag GPSCoordinates on the TestPic.jpg file.
exiftool .\TestPic.jpg -GPSCoordinates=
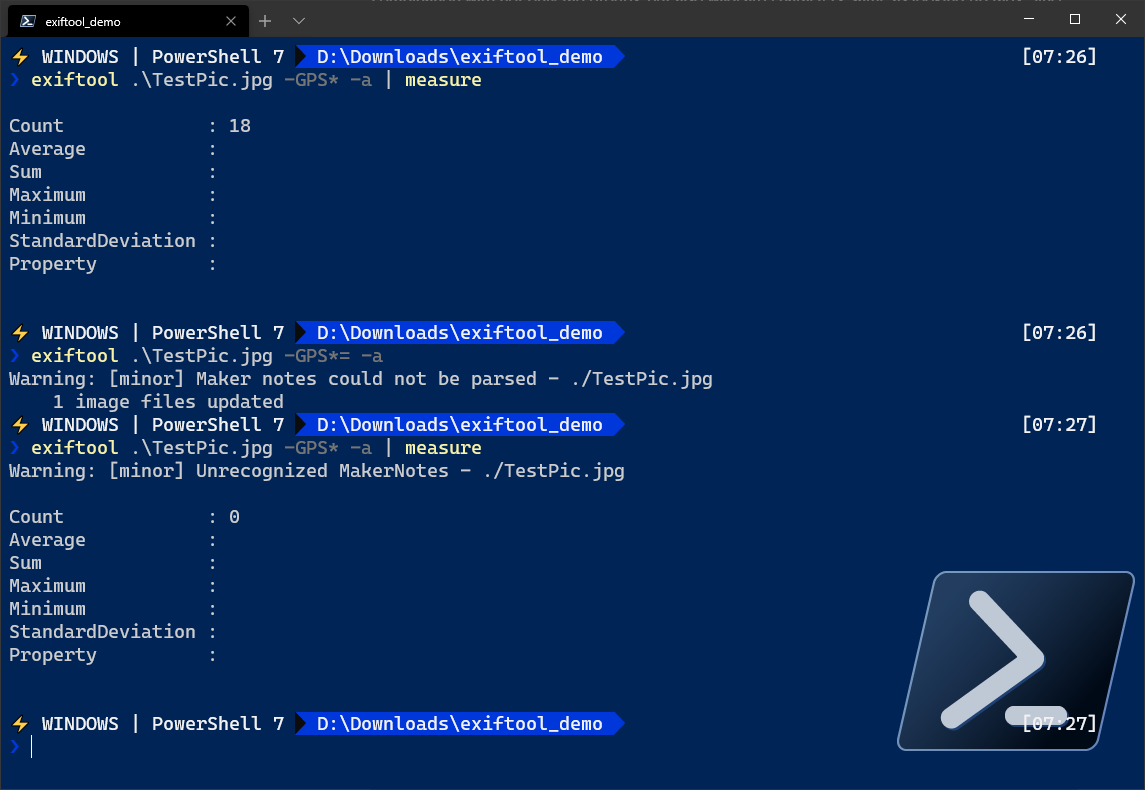
You can also remove tags with wildcard characters. The command below removes all tags starting with GPS. Make sure to use the -a flag to ensure you also remove tags with the same name from different groups! As covered earlier, exiftool hides these by default.
exiftool .\TestPic.jpg -GPS*= -a
Since not all tags support the same values, you can’t write over multiple tags at once. For example, the Flash tag has a specific list of values, and AutoExposure is expecting a real number. It’s not possible to write the same value to these two without using two different parameters. But you can remove multiple tags, or even entire groups at the same time using wildcards.
You can remove all tags possible by using the
-all=key/value.
Watch Your Syntax!
The position of tags in your command is important when modifying and removing them. Take the two commands below:
## Writes a value to *ApertureValue* first, then deletes all of the exif tags,
## including *ApertureValue*.
exiftool TestPic.jpg -ApertureValue="3.0" -EXIF:all=

## Erases all of the tags in the exif group, then writes
## a new value to *ApertureValue*, which is a tag in the exif group.
exiftool TestPic.jpg -EXIF:all= -ApertureValue="3.0"
If you are missing a tag after running your exiftool command, check your positioning, and don’t forget about
-restore_original!
Saving Keystrokes with Argument Files
If you already know what parameters and switches you’d like to pass to exiftool to process metadata, you can use an argument file. Throughout this guide, you’ve been typing out parameters on the command-line over and over. An argument file allows you to store commonly-used parameters inside of a file and simply pass that file to exiftool.
Developers, if you’re writing something using exiftool that is going to be put into version control, this is the section for you! Argument files are nice for developers because they can be versioned and called from a repository rather than continuously modifying any shell scripts that call exiftool.
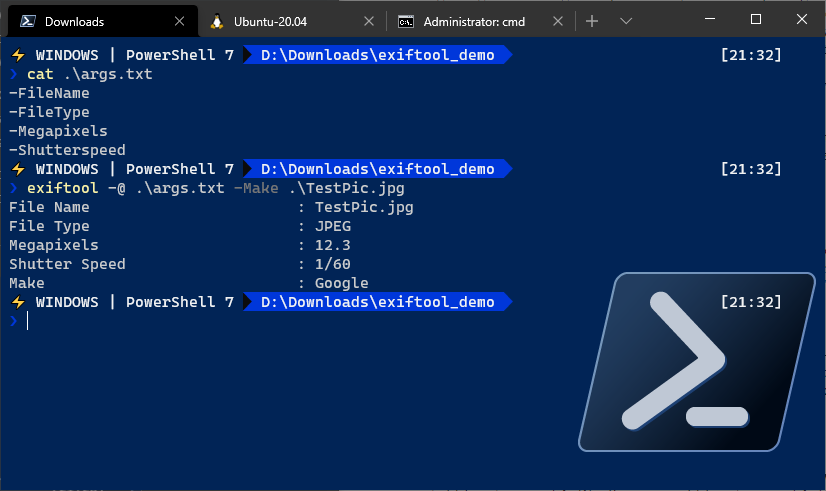
Argument files follow a specific pattern with each parameter on a separate line. For example, perhaps you want to always read the FileName, FileType, Megapixels, and Shutterspeed tags every time you read an image. You’d build an argument file that looks like below:
-FileName
-FileType
-Megapixels
-Shutterspeed
Perhaps you call it args.txt. You’d then pass this argument file to exiftool using the -@ parameter followed by the path to the arguments file.
exiftool -a .\args.txt .\TestPic.jpg
You can also use an argument file as a set of defaults and add parameters as needed. For example, if you’d like to also read the Make tag in the example above, simply use add -Make when calling exiftool with the arguments file.
exiftool -a .\args.txt -Make .\TestPic.jpg
Copying Tags from One File to Another
Perhaps you have two documents and need to ensure image #1 has the same tags as image #2. If so, instead of manually reading image #1 and then overwriting those tags in image #2, you can use the tagsFromFile and -addTagsFromFile parameters to copy tags from one file to another.
Overwriting Existing Tags
If you’d like to overwrite any tags that exist in image #2 with the tags in image #1, use the the -tagsFromFile parameter. This parameter tells exiftool to query and copy all tags from image #1 as they exist and overwrite values for those same tags in image #2.
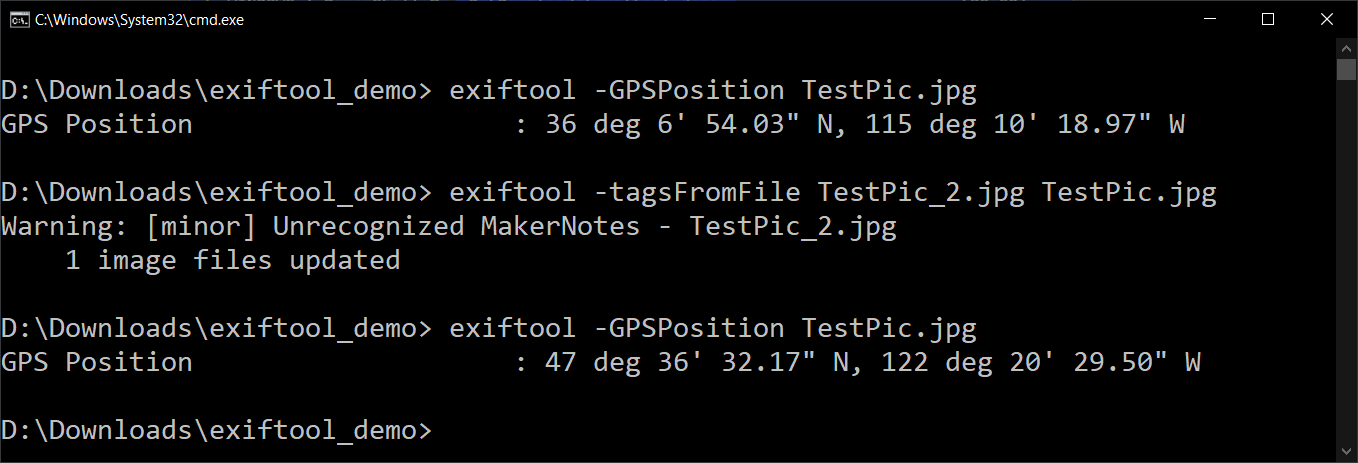
Adding Tags From One File to Another
If you’d rather find all metadata tags in image #1 and then add them as duplicate tags (if those tags already exist in image #2), use the -addTagsFromFile parameter. You can call this parameter identically as the -tagsFromFile parameter.
The
addTagsFromFileparameter won’t add tags that are in the same group. It will only add tags with the same name from a different group.
Conclusion
Exiftool is a powerful tool to read, write, and create new metadata tags on your files, especially for video and image files. There’s a lot to exiftool but hopefully, by using this guide as your anchor, you can leverage all the power it provides!


