Exchange Distribution Groups: Your How-To Ultimate Guide

Published:13 April 2021 - 22 min. read

Exchange distribution groups are collections of recipient email addresses in your organization’s address book. And a topic you should know in and out as an Exchange admin. Do you know how to manage distribution groups using both the Exchange Admin Center (EAC) and PowerShell? If not, you will!

Not a reader? Watch this related video tutorial!
Not seeing the video? Make sure your ad blocker is disabled.

In this tutorial, you’ll learn how to create, modify, and delete different Exchange distribution group types using both the GUI approach and using PowerShell step by step.

The first half of the tutorial will focus on using the EAC while the second half will be all PowerShell. Happy learning!

Manage and Report Active Directory, Exchange and Microsoft 365 with ManageEngine ADManager Plus. Download Free Trial!

Prerequisites

If you plan to follow the instructions in this article, you will need the following requirements.

Understanding Exchange Distribution Groups

To manage various Exchange email addresses as one, admins consolidate recipients into a single point of contact for sending emails called a distribution group.

Distribution groups are also known as distribution lists.

Exchange has two types of distribution groups; static and dynamic.

  • Static distribution group – If you must manually add or remove recipients to/from a distribution group, you have a static distribution group.

Static distribution groups fall under two categories; universal distribution groups (UDGs) and mail-enabled universal security groups (security groups or USGs).

UDGs’ sole purpose is for email delivery. When you send an email to a UDG, every group member receives a copy of the message in their respective mailboxes.

USGs are similar to UDGs, but these groups are also capable of assigning access permissions to resources.

  • Dynamic distribution group – This type of group automatically updates members based on a set of dynamic rules. You’ll see dynamic distribution groups more commonly referred to as dynamic distribution lists (DDLs). A DDL evaluates its members by using filters.

Creating Static Exchange Distribution Groups with the EAC

Let’s now jump into the tutorials and start with creating a static distribution group with the EAC.

Creating a UDG and USG are similar, but to demonstrate creating both types of groups, the settings below demonstrate group creation in parallel and will call out any differences in settings throughout.

To create a distribution group using EAC, follow these steps.

1. In your web browser, navigate to the EAC and log in.

2. In the EAC, navigate to Recipients —> Groups —> Add a group. The add group wizard will show up.

Adding a group
Adding a group

3. On the Choose a group type page, you are presented with a list of groups available to create. Select either to create a UDG or USG Distribution option and click Next.

Choosing the Distribution group type

4. On the Set up the basics page, type the name you want to assign to the new distribution group in the Name box and a description. This tutorial will create both a UDG and a USG called UDG1 and USG1 respectively.

Giving the distribution group a name and description

5. Next, on the Edit settings page, configure the settings for the UDG or USG you are creating as follows:

Settings below for a UDG and USG are different. To differentiate the two types, you will see either [UDG] or [USG] appended to each setting name. If neither [UDG] nor [USG] is specified, that setting applies to both group types.

  • Group email address: First, enter the username part of the email address into the box. Next, choose an email domain from the dropdown list after the @ sign.
  • Communication: To allow email delivery from external senders to the distribution group, click to check the box Allow people outside of my organization to send email to this Distribution group. Otherwise, leave the box unchecked, which is the default.
  • Approval [USG]: To require the group owner’s approval when users request to join the group, click to check the Require owner approval to join the group box. Otherwise, leave the box unchecked, which is the default.
  • Joining the group [UDG]: This setting allows three options for users to join the group.
    • Open – This the default option that allows anyone to join the group without the group owner’s approval.
    • Closed – Choosing this option means only the group owners can add new members to the group.
    • Owner approval – With this option, users can request to join the group, and owners need to approve the request.
  • Leaving the group [UDG]: Group members may leave a group depending on the settings below.
    • Open – With this option, members can leave the distribution group independently without the group owner’s approval.
    • Closed – Choosing this option, members cannot leave the group. Only the group owners can remove members.

6. After configuring the group settings, click Next.

Configuring the Exchange Distribution Group Settings

7. On the Review and finish adding group page, review the summary of settings. To continue creating the new distribution group, click Create group.

Reviewing and finishing the distribution group creation

8. Lastly, at the distribution group creation status page, click on Close.

Closing the Distribution group creation wizard

Adding and Removing Static Exchange Distribution Group Members and Owners with the EAC

So far, you’ve learned to create Exchange distribution groups with only the default settings. But the group has no members yet and a distribution group without members to receive an email distribution is useless. Let’s change that and add some members.

The process of updating the group members of a UDG or USG is the same.

1. In your web browser, navigate to the EAC and log in.

2. In the EAC, navigate to Recipients —> Groups.

3. Under the Groups page, click either the Distribution list or Mail-enabled security tab depending on which type of distribution group you plan to update. This example will use the Distribution list tab.

In the list of distribution lists, click the UDG that you want to update, and a fly-out page shows up. This example will choose the UDG1 to update created in the last section.

Selecting a distribution group to update

4. Click the Members tab on the fly-out page. Under the Members section, click the View all and manage members link.

Opening the Manage group members menu

5. Once you’re on the Add members page, either search for the new members using the search box or select the new members from the list. Once you’ve selected the new members, click on Add.

Selecting new members to add

6. After saving the changes, you’ll see a confirmation similar to the screenshot below. Now, click on the back arrow to return to the distribution group’s main fly-out page.

Returning to the distribution group properties

7. As you can see below, the distribution list page now lists the new members. To close the distribution group fly-out page, click the X button in the upper-right corner.

Viewing the new members listed

8. Suppose you need to remove one or more members from the group. To do that, first, navigate to the Members fly-out page again (refer to steps 1 to 4).

9. Next, to remove group members, select the users you want to remove and click on Remove members.

Removing group members

10. At the next prompt asking you to confirm removing the group member, click Yes.

Confirming group member removal

By default, the user who created the distribution group becomes its owner. To add or remove distribution group owners, follow the same procedure. But instead of clicking View all and manage members (see step 4), you should click the View all and manage owners link.

Creating Dynamic Exchange Distribution Groups with the EAC

Static groups are limited to recipients you manually add and remove. If you have a pre-defined set of criteria to match specific recipients, dynamic groups are better. Dynamic groups allow you to define various filters to automatically match recipients and add/remove them based on those filters.

To create a dynamic distribution group with the EAC:

1. In your web browser, navigate to the EAC and log in.

2. In the EAC, navigate to Recipients —> Groups —> Add group.

3. On the Choose a group type page, click to select Dynamic distribution and click Next.

Choosing the Dynamic distribution group type

4. On the Set up the basics page, type the name you want to assign to the new dynamic distribution group in the Name box. In this example, the name is DDL_Accounts.

5. In the Description box, enter a description of the dynamic distribution group and click Next.

Adding a name and description of the group

6. Once you’re on the Assign users page:

  • Type the group owner’s identity into the Owner box.
  • Under the Members section, choose the recipient types you want to include in the group. You have the option to choose from the following:
    • All recipient types
    • Users with Exchange mailboxes
    • Mail users with external email addresses
    • Resource mailboxes
    • Mail contact with external email addresses
    • Mail-enabled groups

In this example, choose only Users with Exchange mailboxes.

In the dropdown box, select Department and type Accounts into the next box. This is the filter you’re applying to the DDL. Setting the Department to Accounting here will ensure any new account added to the to the Accounts department will automatically become a member of this DDL.

  • Click Next.
Choosing owners and membership filter

7. On the Edit settings page, type in the email address you’d like to assign to the group and select the email domain for your Exchange organization. Click Next.

Adding the dynamic distribution list email address

8. On the Review and finish adding group page, review the dynamic distribution settings and click Create group. Notice the Group type below is set to Dynamic distribution.

Creating the dynamic distribution group

9. Lastly, on the confirmation page, click Close.

Closing the dynamic distribution group creation wizard

Configuring Address Book Visibility with the EAC

Sometimes you need to prevent the general user from sending email to distribution groups. To do that, Exchange admins and group owners can hide distribution groups in the organization’s address book.

As of this writing, changing a group’s visibility in EAC is only applicable to dynamic distribution groups. Only by using PowerShell can you control the visibility of UDG and USG.

To hide or unhide a group using the EAC:

1. In your web browser, navigate to the EAC and log in.

2. In the EAC, navigate to Recipients —> Groups —> Dynamic distribution list.

3. Under the list of groups, click the group you want to edit. This example will use DDL_Accounts for editing.

Selecting the group for editing

4. On the Dynamic distribution list group page, click on the Settings tab.

Under the General settings, check or uncheck the Hide from my organization’s global address list. Checked means to hide the group, while unchecked means that the group will be visible in the address book.

Click on Save after editing.

Saving after Editing

Configuring Delegate Permissions with the EAC

Distribution groups can have delegates who can send emails using the group’s email address. There are two types of delegated sender permission – Send As and Send on behalf. What’s the difference?

When a delegate has the Send As distribution group permission to the group, that user can send messages using the group’s email address. The recipients would see the group’s email address instead of the user.

If a sender’s delegate permission to the group is Send on behalf, the recipients would see the sender as <sender> on behalf of <group> in the email’s From field.

If the delegate has both the Send As and Send On Behalf permissions, the Send As distribution group permission takes precedence.

To add delegates to a group, follow the instructions below.

1. In your web browser, navigate to the EAC and log in.

2. In the EAC, navigate to Recipients —> Groups.

3. Under the Groups page, click the tab depending on which type of distribution group you plan to edit (Distribution list, Mail-enabled security, or Dynamic distribution list). This example will edit the Dynamic distribution list called DDL_Accounts.

Selecting the group for editing

4. On the Dynamic distribution list group page, click on the Settings tab —> Edit manage delegates.

Opening the delegate editor

5. Once you are on the Edit delegates page, type the new delegate’s name or email address to search in the Add a delegate box. Click the name from the results to add it to the delegates list.

6. Next, select the Permission type for each delegate you added to the list. The two choices are Send As and Send on behalf.

7. When you’ve completed assigning permissions, click Save changes.

Editing delegates
Editing delegates

Configuring Sender Restrictions with EAC

Every distribution group you create in your organization has its purpose. A group may allow for internal communications only, for internal and external, or selected senders only. Whatever the reason, know that you can apply these restrictions to any distribution groups as needed.

Follow these steps to configure a group’s sender restrictions.

1. In your web browser, navigate to the EAC and log in.

2. In the EAC, navigate to Recipients —> Groups.

3. Under the Groups page, click the tab depending on which type of distribution group you plan to edit (Distribution list, Mail-enabled security, or Dynamic distribution list). This example will edit the Dynamic distribution list called DDL_Accounts.

Selecting the group for editing

4. On the Dynamic distribution list group page, click on the Settings tab —> Edit delivery management.

Opening the delivery management editor

5. On the Delivery management page and under the Sender options section, select one of the two options.

  • Only allow messages from people inside my organization – Choose this option to allow only internal messages. The group will then automatically reject emails from external senders.
  • Allow messages from people inside and outside my organization – Choosing this option will allow the group to accept messages from internal and external senders.

Next, to restrict who can send messages to the group, type the sender’s email address or name into the search box. Click the name from the results to add it as an allowed sender. Skip this step if you don’t want to restrict email delivery by senders.

When you’ve completed the group’s configuration, click Save changes.

Configuring delivery restrictions

Deleting Exchange Distribution Groups with EAC

When a distribution group is not needed anymore, deleting the group is a good maintenance practice—for example, a distribution group for a project that has already concluded. You can delete groups from EAC in a few steps.

1. In your web browser, navigate to the EAC and log in.

2. In the EAC, navigate to Recipients —> Groups.

3. Under the Groups page, click the tab depending on which type of distribution group you plan to delete (Distribution list, Mail-enabled security, or Dynamic distribution list).

4. On the list of groups, click the three-dot button (More actions) next to the group you want to delete. This example will delete a UDG called UDG1.

5. Next, on the dropdown menu, click Delete group.

Deleting a distribution group using EAC

6. At the confirmation prompt, click Delete group.

Confirming the group's deletion
Confirming the group’s deletion

Creating Static Exchange Distribution Groups with PowerShell

It’s time to dive into the command-line using PowerShell! Throughout this tutorial so far, you’ve been using the EAC. But, know that you don’t have to point and click your way to Exchange management. Instead, you can manage Exchange distribution groups from the command-line and build some handy PowerShell scripts too!

To create distribution groups with PowerShell, use the New-DistributionGroup cmdlet. This cmdlet lets you create a UDG or a USG by issuing a single line of command in PowerShell.

In the previous section, you created a distribution group using EAC with only the default settings. Let’s accomplish the same task using the New-DistributionGroup cmdlet. To do so, run the command below in PowerShell. This command creates a new UDG with UDG2 as its name and whose email address is [email protected]. Make sure to change the email domain to yours first.

New-DistributionGroup -Name UDG2 -PrimarySmtpAddress [email protected]

To create a USG instead, add the -Type Security parameter to the command. Adding this parameter instructs the cmdlet to create a mail-enabled security group.

Run the command below in PowerShell to create a USG named USG2 with an email address of [email protected]. Make sure to change the email domain to yours first.

New-DistributionGroup -Name USG2 -PrimarySmtpAddress [email protected] -Type Security

Managing Static Exchange Distribution Group Members and Owners with PowerShell

As you’ve learned in an earlier section, adding and removing group members and owners follows the same steps using the EAC. But when it comes to PowerShell, the steps are a mix of different cmdlets.

Adding and Removing Distribution Group Members

To add and remove distribution group members, the Add-DistributionGroupMember and Remove-DistributionGroupMember cmdlets are your friends. The example below adds and removes a distribution group member ([email protected]) from the UDG [email protected].

# Add a member to the group
Add-DistributionGroupMember -Identity [email protected] -Member '[email protected]'

# Remove a member from the group
Remove-DistributionGroupMember -Identity [email protected] -Member '[email protected]'

What if you need to add or remove more than one member? You can do so by defining each member in a PowerShell array of member identities and then passing that array directly to the required cmdlet.

Notice the use of -Confirm:$false. By default, the Remove-DistributionGroupMember will prompt you before removing a member. Use the Confirm parameter to disable this prompt.

# Add members to the group
@('[email protected]','[email protected]') | Add-DistributionGroupMember -Identity [email protected]

# Remove members from the group and skip confirmation
@('[email protected]','[email protected]') | Remove-DistributionGroupMember -Identity [email protected] -Confirm:$false

If you have many members to add, manually adding them to an array is impractical. Instead, create a text file that contains the list of members’ identities and use the Get-Content cmdlet to import the list of members into your PowerShell session.

# Add members to the group
get-content .\members.txt | Add-DistributionGroupMember -Identity [email protected]

# Remove members from the group and skip confirmation
get-content .\members.txt | Remove-DistributionGroupMember -Identity [email protected] -Confirm:$false

Adding and Removing Distribution Group Owners

There are times when a group’s ownership must change. Perhaps a change in leadership initiates a change of ownership for a team’s distribution group. To do so, invoke the Set-DistributionGroup cmdlet with the ManagedBy parameter.

To assign a new owner for a distribution group, run the code below in PowerShell. Make sure to change the ManagedBy value to the identity of the new owner first. The command below assigns a distribution group owner [email protected] to the distribution group UDG2.

# Replace the current distribution group owner(s) with only one owner
Set-DistributionGroup -Identity UDG2 -ManagedBy [email protected]

Distribution groups may have more than one owner. To assign multiple owners, change the ManagedBy values to an array or owner identities (eg. -ManagedBy 'owner1','owner2') like the code below.

# Replace the current distribution group owner(s) with only one owner
Set-DistributionGroup -Identity UDG2 -ManagedBy "[email protected]","[email protected]"

On the other hand, you may not want to replace all of the current owners. To add or remove owners without affecting the current owners’ list, create a PowerShell hashtable with a key of either add or remove indicating the action you’d like to take and a value of the recipient’s address ([email protected]).

The below code snippet is adding an owner of [email protected] to the UDG2 distribution group and removing the owner [email protected] from the distribution group.

# Add a new owner
Set-DistributionGroup -Identity UDG2 -ManagedBy @{add="[email protected]"}

# Remove an owner
Set-DistributionGroup -Identity UDG2 -ManagedBy @{remove="[email protected]"}

Creating Dynamic Exchange Distribution Groups with PowerShell

Admittedly, creating DDLs in EAC is convenient. But the membership filters are limited to a specific set of attributes.

There is a limited set of attributes for membership filtering to choose from when creating a DDL in EAC. The only attributes available are Company, Department, State or province, and Custom Attribute (1-15). To learn more about all available filterable attributes, visit Filterable properties for the RecipientFilter parameter on Exchange cmdlets.

When you need to create a DDL with a filter that includes an attribute not available in EAC, that’s where PowerShell comes in. For example, to create a DDL that includes members based on title, you can only do so in PowerShell because the title attribute is not available in EAC.

To create a dynamic distribution group with PowerShell, invoke the New-DynamicDistributionGroup cmdlet as shown below. This code creates a new DDL whose members are those with the title of director or manager.

# Compose the new DDL properties such as name, email address, and recipient filter.
$ddl_splat = @{
	Name = "DDL_Directors and Managers"
	PrimarySMTPAddress = "[email protected]"
	RecipientFilter = "(RecipientType -eq 'UserMailbox') -and (Title -eq 'Director' -or Title -eq 'Manager')"
}
# Create the new DDL
New-DynamicDistributionGroup @ddl_splat

Listing Group Members with PowerShell

Viewing distribution group members in the EAC is possible, but there’s no way to export the list. And viewing dynamic distribution list members is not even possible in the EAC.

What if you need to export the list of members? Maybe for reporting or audit purposes, or perhaps to confirm that your dynamic distribution groups do have members. To do these, you’ll need to use PowerShell.

Static Exchange Distribution Group Members

Using the Get-DistributionGroupMember cmdlet, you can easily find all members of a static distribution group. Whether the group is a UDG or a USG, the command to run is the same. For example, to list the members of the distribution group UDG2, run the command below in PowerShell.

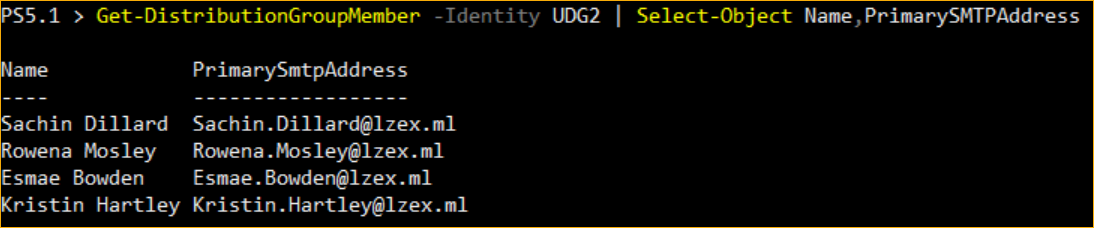
The example below is using the Select-Object cmdlet to limit the properties shown. This command is optional.

# Get the members of UDG2 | List only their name and email address
Get-DistributionGroupMember -Identity UDG2 | Select-Object Name,PrimarySMTPAddress

As you can see below, the command completes and lists the members of the UDG2 distribution group.

Listing distribution group members

Dynamic Exchange Distribution Group Members

To find current members of a dynamic distribution group is a bit more involved. To do so, you must first find the DDL’s RecipientFilter string. This is a string that represents the filter Exchange applies to popular the dynamic distribution group. With this string, you can then find the distribution group members.

Find the Recipient Filter

To get the filter string, use the Get-DynamicDistributionGroup cmdlet. One of the properties this cmdlet returns is RecipientFilter. To discover the string, run the command below which only returns the value of the RecipientFilter property for DDL_Directors and Managers group and assigns it to the variable $filter.

# Get the DDL's RecipientFilter string
$filter = (Get-DynamicDistributionGroup -Identity "DDL_Directors and Managers").RecipientFilter

Find the Recipients

Once you know the filter string, pass that string to the RecipientPreviewFilter parameter on the Get-Recipient cmdlet. You can also optionally return certain properties using the Select-Object cmdlet as the code shows below.

# Get recipients that match the DDL's RecipientFilter string | Show the name, title, and email address
Get-Recipient -RecipientPreviewFilter $filter | Select-Object Name,Title,PrimarySMTPAddress

The screenshot below shows the extracted dynamic distribution group members based on the recipient filter.

Listing dynamic distribution group members

Exporting Distribution Group Members

Now that you know how to list group members, you can export the member list to a file. To do so, pipe the result to the Export-Csv cmdlet, which lets you export PowerShell objects to CSV files.

# Get the members of UDG2 | List only their name and email address | Export to a CSV file
Get-DistributionGroupMember -Identity UDG2 | Select-Object Name,PrimarySMTPAddress | Export-Csv -Path .\udg_members.csv -NoTypeInformation

# Get recipients that match the DDL's RecipientFilter string | Show the name, title, and email address | Export to a CSV file
Get-Recipient -RecipientPreviewFilter $filter | Select-Object Name,Title,PrimarySMTPAddress | Export-Csv -Path .\DDL_members.csv -NoTypeInformation

Configuring Address Book Visibility with PowerShell

Like with the EAC, you can also hide or unhide distribution groups from the global address book with PowerShell.

Hiding Static Distribution Groups

To hide and unhide static distribution groups, invoke the Set-DistributionGroup cmdlet providing the name of the distribution group and using the HiddenFromAddressListsEnabled as shown below.

# Hide the UDG in the address book
Set-DistributionGroup -Identity UDG1 -HiddenFromAddressListsEnabled $true

# Unhide the UDG in the address book
Set-DistributionGroup -Identity UDG1 -HiddenFromAddressListsEnabled $false

Exchange Online updates the offline address book once every 24 to 48 hours, which means that any address book changes may not reflect in Outlook’s offline address book until then.

Hiding Dynamic Distribution Groups

To hide and unhide dynamic distribution groups from the global address book, you’ll use two cmdlets, one to hide and another to unhide.

To hide a dynamic distribution group, invoke the Set-DynamicDistributionGroup cmdlet. This cmdlet allows you to change a dynamic distribution group’s properties, including the group’s address book visibility.

To unhide a dynamic distribution group, the PowerShell command is the same as a static distribution group.

# Hide the DDL in the address book
Set-DynamicDistributionGroup -Identity DDL_Accounts -HiddenFromAddressListsEnabled $true

# Unhide the DDL in the address book
Set-DistributionGroup -Identity DDL_Accounts -HiddenFromAddressListsEnabled $false

Configuring Delegate Permissions with PowerShell

Like the EAC, PowerShell can also configure delegate permissions for Exchange distribution groups both for Send As and Send on Behalf of permission.

Send As Distribution Group Permission

To add Send As distribution group (static or dynamic) permission, use the Add-RecipientPermission PowerShell cmdlet. This cmdlet allows you to add Send As distribution group permission to a trustee.

A valid trustee can be a mailbox user or a mail-enabled security group.

To add the Send As distribution group permission, run the command below in PowerShell. This command gives the recipient [email protected] rights to send as the distribution group UDG2. The AccessRights parameter only accepts SendAs as its value.

Add-RecipientPermission -Identity UDG2 -Trustee [email protected] -AccessRights SendAs

Suppose the trustee no longer needs the Send As distribution group permission, run the Remove-RecipientPermission to remove the trustee.

Remove-RecipientPermission -Identity UDG2 -Trustee [email protected] -AccessRights SendAs

Send on Behalf of Distribution Group Permission

To configure Send on behalf of distribution group permission, run the Set-DistributionGroup for a UDG or USG and Set-DynamicDistributionGroup for a DDL. Both cmdlets have a parameter called GrantSendOnBehalfTo, which accepts the identity of the delegate.

For example, the code below gives [email protected] Send on behalf permission (GrantSendOnBehalfTo) to a distribution group (UDG2).

# Add Send on behalf permission for a distribution group (USG or UDG).
Set-DistributionGroup -Identity UDG2 -GrantSendOnBehalfTo @{add="[email protected]"}
# Remove Send on behalf permission for a distribution group (USG or UDG).
Set-DistributionGroup -Identity UDG2 -GrantSendOnBehalfTo @{remove="[email protected]"}

# Add Send on behalf permission for a dynamic distribution group.
Set-DynamicDistributionGroup -Identity DDL_Accounts -GrantSendOnBehalfTo @{add="[email protected]"}
# Remove Send on behalf permission for a dynamic distribution group.
Set-DynamicDistributionGroup -Identity DDL_Accounts -GrantSendOnBehalfTo @{remove="[email protected]"}

Configuring Sender Restrictions with PowerShell

Let’s now use PowerShell to configure sender restrictions. Like in the previous sections, because you’ll be changing the settings of distribution groups, you’ll be using Set-DistributionGroup and Set-DynamicDistributionGroup to do so.

Restricting Senders to a Distribution Group

A distribution group’s RequireSenderAuthenticationEnabled value determines whether the group allows external emails or internal emails only. If the value is $false, the group accepts emails from external senders. If the value is $true, the group only accepts internal messages.

To allow external and internal senders to the static distribution groups and dynamic distribution groups, run the code below in PowerShell. Make sure to change the Identity values to your groups’ identities.

# Allow the distribution group to receive emails from external and internal senders
Set-DistributionGroup -Identity USG2 -RequireSenderAuthenticationEnabled $false

# Allow the dynamic distribution group to receive emails from external and internal senders
Set-DynamicDistributionGroup -Identity DDL_Accounts -RequireSenderAuthenticationEnabled $false

To allow internal senders only, change the RequireSenderAuthenticationEnabled to $true by running the code below.

# Allow the distribution group to receive emails from internal senders only
Set-DistributionGroup -Identity USG2 -RequireSenderAuthenticationEnabled $true

# Allow the distribution group to receive emails from internal senders only
Set-DynamicDistributionGroup -Identity DDL_Accounts -RequireSenderAuthenticationEnabled $false

Adding Allowed Senders

Suppose you want more granular control as to who can send emails to the group. You can do so by adding allowed senders.

To allow individual senders, specify the senders’ identities to add using the AcceptMessagesOnlyFrom parameter. The example below assigns one user as the only sender allowed.

Valid AcceptMessagesOnlyFrom individual sender types are mailbox, mail users, and mail contacts.

# Set allowed-sender to a distribution group
Set-DistributionGroup -Identity USG2 -AcceptMessagesOnlyFrom [email protected]

# Set allowed-sender to a dynamic distribution group
Set-DynamicDistributionGroup -Identity DDL_Accounts -AcceptMessagesOnlyFrom [email protected]

To add more than one sender, specify an array of sender identities in the AcceptMessagesOnlyFrom.

# Set allowed-sender to a distribution group
Set-DistributionGroup -Identity USG2 -AcceptMessagesOnlyFrom [email protected],[email protected]

# Set allowed-sender to a dynamic distribution group
Set-DynamicDistributionGroup -Identity DDL_Accounts -AcceptMessagesOnlyFrom [email protected],[email protected]

To add or remove allowed senders without affecting the existing entries, apply this syntax to the AcceptMessagesOnlyFrom parameter instead.

  • @{add="sender1","sender2"} to add sender groups
  • @{remove="sender1","sender2"} to remove sender groups.

Apart from allowing individual senders, you can also allow members of different groups. To do so, specify the group’s identity to the AcceptMessagesOnlyFromDLMembers parameter, as shown in the code below.

Valid AcceptMessagesOnlyFromDLMembers group sender types are distribution groups, mail-enabled security groups, and dynamic distribution groups.

# Set allowed-sender group to a distribution group
Set-DistributionGroup -Identity USG2 -AcceptMessagesOnlyFromDLMembers UDG2

# Set allowed-sender group to a dynamic distribution group
Set-DynamicDistributionGroup -Identity DDL_Accounts -AcceptMessagesOnlyFromDLMembers "DDL_Directors and Managers"

To add or remove allowed group senders without affecting all existing entries, apply the following syntax with AcceptMessagesOnlyFromDLMembers

  • @{add="group1","group2"} to add sender groups
  • @{remove="group1","group2"} to remove sender groups.

Deleting Exchange Distribution Groups with PowerShell

Finally, it’s time to clean up and deleting some distribution groups using PowerShell. To do so, invoke the Remove-DistributionGroup cmdlet to remove a static group and the Remove-DynamicDistributionGroup to delete dynamic distribution groups.

The commands below removes the USG2 static group and the DDL_Accounts dynamic group.

# Deleting a static distribution group
Remove-DistributionGroup -Identity USG2

# Deleting a dynamic distribution group
Remove-DynamicDistributionGroup -Identity DDL_Accounts

At the confirmation prompt, press Enter to select the default answer (Yes) to confirm the group’s deletion.

Confirming a static distribution group deletion

Manage and Report Active Directory, Exchange and Microsoft 365 with ManageEngine ADManager Plus. Download Free Trial!

Conclusion

In this article, you’ve learned the most common tasks that an admin can perform on static and dynamic distribution groups. You learned that the tasks you can do in EAC have counterpart steps using PowerShell.

But there are a lot more you can do with PowerShell that are not possible in EAC. You can learn more about working with distribution groups in PowerShell by reading the official Exchange Online PowerShell documentation.

Hate ads? Want to support the writer? Get many of our tutorials packaged as an ATA Guidebook.

Explore ATA Guidebooks

Looks like you're offline!