


If you are new to Docker, you may be yet to discover how to share containers and images with other developers or machines. But is it possible to share containers? Yes! Let the docker save image command and the docker export image command do the trick!
In this tutorial, you’ll learn how to save and export containers and images for sharing by running Docker commands.
Ready? Let’s get started!
Prerequisites
This tutorial will be a hands-on demonstration. If you’d like to follow along, be sure you have the following:
- Docker Desktop or Engine installed as version 20.10.7 is used in this tutorial.
- Any Docker compatible operating system, Ubuntu is used in this tutorial.
Building a Base Docker Application
Before jumping to exporting or saving Docker containers and images, you first need to build an application you’ll use for sharing purposes. You’ll build a basic arithmetic solution as a sample Docker application via a command-line environment.
1. Create a file for your project named Dockerfile, and paste the code below into the newly created Dockerfile.
The code below performs a basic arithmetic operation that results in a value of 10.
# busybox provides Unix utilities in a single executable file,
# which enables you to do some arithmetic.
FROM busybox
# Performs a basic arithmetic operation that results in a value of 10.
CMD echo $(((20*5)/10))
2. Next, open your terminal, and run the docker build command below to build the application named (arithmetic) in the working location (.).
docker build --tag arithmetic .If you are using Linux, you may need to prepend the sudo command to avoid getting a “permission denied” error, like this:
sudo docker build --tag arithmetic. Adding thesudocommand elevates the command as administrator.
3. Execute the command below to run the Docker application you built (arithmetic). Running the Docker app also creates a container for your application automatically.
docker run arithmetic
Exporting Docker Containers
Now that you have a base Docker application it’s time to cover how to export a Docker container. Building a huge application takes a long time and can be a drag if you just want to share the container with your team. So is there a quicker way to share the container? Yes!
Instead of building the application directly from a Dockerfile, export the Docker container.
1. Run the docker command below to list all (ls --all) containers available on your machine. Note the CONTAINER ID of the container you want to share as you’ll need it to export the container in the next step.
Note that you can only export containers, not images.
docker container ls --all
2. Next, run the command below to export the Docker container of your choice (container-id). Replace container-id with the container ID you noted in step one.
When exporting, you save the filesystem of the container in a .tar archive (arithmetic.tar).
docker export container-id > arithmetic.tar3. Finally, check your project folder in your file manager, and you’ll see that a new .tar archive has been created (arithmetic.tar). Since you’ve exported the container to a .tar archive, you can now share it with anyone.
Importing Docker Containers
Instead of exporting, perhaps you need to import a Docker container that a teammate shared with you. If so, the docker import command is what you need. The docker import command takes the exported filesystem and converts it into an image filesystem you can run on your machine.
1. Run the following docker command to import a container (arithmetic.tar) and convert it to an image. When importing, you must attach a tag (latest) and name the image (put_any_name_here), as shown below.
docker import arithmetic.tar put_any_name_here:latest2. Next, run the below command to list all existing Docker images, so you can verify if a new image exists.
docker imagesBelow, you can see that a new Docker image exists.

3. Now execute the docker run command below to open the shell (sh) for the imported image. The container runs interactively and is attached to your terminal (-i and -t flags).
docker run -i -t put_any_name_here:latest shYou can tell by the prompt below (/ #), you’re now in the imported image’s shell.

4. Finally, run the command below to see if the image works as expected.
echo $(((20*5)/10))If the image works, you’ll get an output of 10, as shown below.

If you try running the image directly, you’ll get an error, as shown below, since the imported image is a filesystem image.

Saving Images via Docker Save Image
Perhaps you want to save a Docker image rather than a container. If so, go with the docker save image command instead. Unlike the docker export command, the docker save command lets save one or more images to a tar archive directly and share it with anyone.
Note that you can only save and load Docker images, not containers.
- Run the command below to save a Docker image (arithmetic) to your preferred .tar archive (
arm_image.tar). You can now share the .tar archive with other developers so they can load the image.
docker save arithmetic > arm_image.tar2. Now, run the command below to create a directory with the name of your choice (mkdir arm). But for this demo, the directory is named arm. The command then extracts the image from the .tar archive (-xf arm_image.tar) to the new directory (arm).
Extracting the contents of the .tar archive lets you confirm if the image you saved in the .tar archive exists.
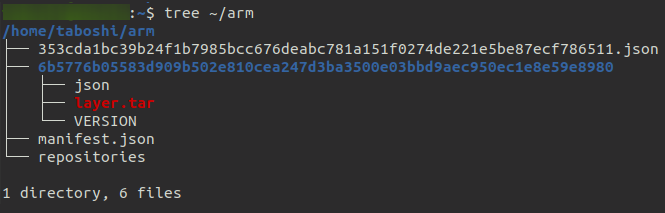
mkdir arm && tar -xf arm_image.tar -C arm3. Finally, run the tree command below to view the directory tree of the image you extracted in the ~/arm directory. tree ~/arm
Below you can see the files and subdirectories inside the directory where you extracted the Docker image.
If you plan to share your Docker image on the Docker hub, the best option is to run the
docker savecommand. Why? With thedocker save command, you’re essentially saving the image exactly how it’s supposed to run. Also, you can only post images on the Docker hub, so definitely, thedocker export commandis not a good option.
Loading Docker Images
Assuming you already saved an image for backup or sharing purposes, how would you load it to a machine? No worries, the docker load command can help. The docker load command lets you load an image or repository to your machine, restoring both images and tags.
To better see how the docker load command works, delete all the Docker images you created previously.
1. Run the command below to list all Docker images in your machine.
docker imagesBelow, you can see that there are two available images. Note each of the images’ IMAGE ID as you’ll delete those images in the next step.

2. Run the below command to delete (rm) Docker images by the image IDs you specify. Replace imageID1 and imageID2 with the image IDs you noted in step one.
docker image rm imageID1 imageID23. Now, run the docker load command below to load an image from a .tar archive (arm_image.tar).
docker load < arm_image.tar4. Rerun the docker images command as you did in step one to list all available images in your machine. docker images
docker imagesBelow, you can see the newly loaded image.

5. Finally, execute the command below to run and test if the image works.
docker run arithmeticNotice that the command returned a value of 10, which indicates the loaded image works.

Conclusion
Throughout this tutorial, you’ve learned how to export and import containers, as well as loading and saving images. You should now have a foundational knowledge of converting your Docker save images and containers into a shareable form, such as a TAR file.
At some point, you’ll need to share your Docker image or container. Now how do you plan to incorporate this newfound knowledge when working with Docker containers and images, perhaps a backup system?


