

A hallmark of Docker containers is immutability. At any time, you can destroy and recreate containers to re-establish the initial state. Using the docker commit command, you can commit new changes to a container image, but it’s not relatively as straightforward as you’d expect.
Let’s explore how to commit changes to a new container image with the docker commit command!
When to Commit Changes to a New Container Image
Containers are built to be immutable (not changed) so why then would you want to commit changes to a container? There are a few reasons.
- During the development of a new containerized service to quickly test changes.
- Perform fast bug fixing of a production service without needing to fix the source image first.
- Use
committo snapshot an image and export the image to a new server.
Though these may not cover all potential scenarios, these are a few that make using docker commit a perfect use case.
Committing Changes to a Simple Image
For a seemingly simple command, this command does a lot.
Below is a simple example commit command. Using a running container ID, d3fdd3517e0a in this example, a new image is created in a repo called myrepository and named changedimage.
The original image is tagged as version2, which is not necessary, but useful for keeping track of changes between similarly named images.
Both
myrepositoryandchangedimageare arbitrarily chosen, but these would typically reflect properly labeled resources such ascustomimages/alpine-linux.
docker commit d3fdd3517e0a myrepository/changedimage:version2Docker containers are a series of read-only images with a read-write layer on top. In the above example, Docker pauses the running container. This pause is to prevent accidental data corruption while Docker creates the image
Since this pause could cause service interruptions, you may use
--pause=false. This could corrupt data, as writes may not be completed successfully.
Additionally, the commit operation omits data contained in volumes mounted within the container. Since volumes are not part of the file system itself of the container, Docker ignores them.
Once the commit operation completes, Docker then creates a new layer with the changes from the original image under the new container image name.
Prerequisites
The only prerequisite in this tutorial is Docker itself. This can be installed via the Docker Desktop software in Windows or installed via a package in Linux.
Related: Deploying Your First Docker Container in Windows
Commiting Changes to a New Docker Container Image
Let’s now look at some common scenarios that the docker commit command may be handy for.
First, pull down an Alpine Linux container image from the public Docker repository. Alpine is known for its slim containers, as noted by the ~5MB size.
# Pull the latest Alpine Linux image
docker pull alpine
# List all Docker images
docker images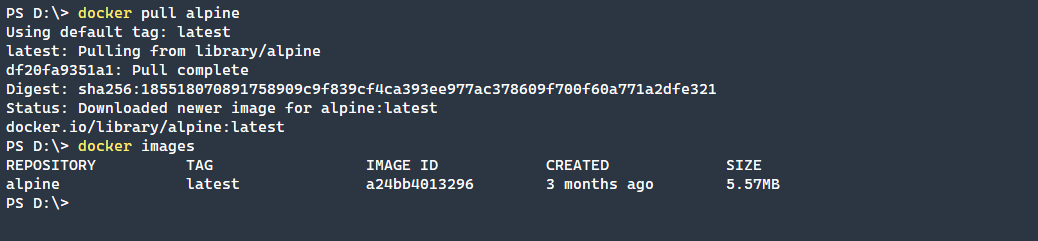
Container Development and Testing
The primary use case for docker commit is the development of a new container image. This image may ultimately be used as the base for other images, or as the production container itself.
In the example snippet below, Docker is:
- Running the previously pulled
alpineimage - Opening an interactive shell to install a package
- Installing the htop package
# Open an interactive shell to the Docker Alpine Linux container
docker run -it a24bb4013296 bin/sh
# Install the HTOP package
apk add htop
You can see below that the package is correctly installed in the container by running the htop command.

Once you’ve installed the package on the new “layer”, you should now commit that change to the original base image. To do that:
- Run
docker ps -ato locate the container ID. - Using the container ID, commit the content of the current layer to a new base image.
In the example below, the new image is named alpine-htop and tagged version1. The image is tagged for ease of tracking docker image versions that are similarly named.
# List all Docker containers regardless of status, -a or --all to show every container
docker ps -a
# Commit the layer to a new image named alpine-htop and tagged version1
docker commit b57e066d5bfa alpine-htop:version1
# List all images available
docker images
Bug Fixing in Production Images
Often you may have a production service that has some error. There may be a known fix and you could apply a fix quicker than modifying the existing configurations and re-deploying. Using docker commit, you can quickly apply the fix, and then work in the background to update the other necessary components.
This example snippet below demonstrates installing NGINX into an Alpine Linux Docker image.
# First List the available images
docker images
# Run an interactive session for the alpine-htop image
docker run -it a24bb4013296 bin/sh
# Install the NGINX package
apk add nginx
# Create the location for the NGINX PID file
mkdir /run/nginx
# Verify that NGINX is installed
nginx -v
# Run NGINX
/usr/sbin/nginx
# Verify that NGINX is properly running
ps | grep nginx
# Kill the NGINX process
kill 18
# Verify that the NGINX process is no longer active
ps | grep nginx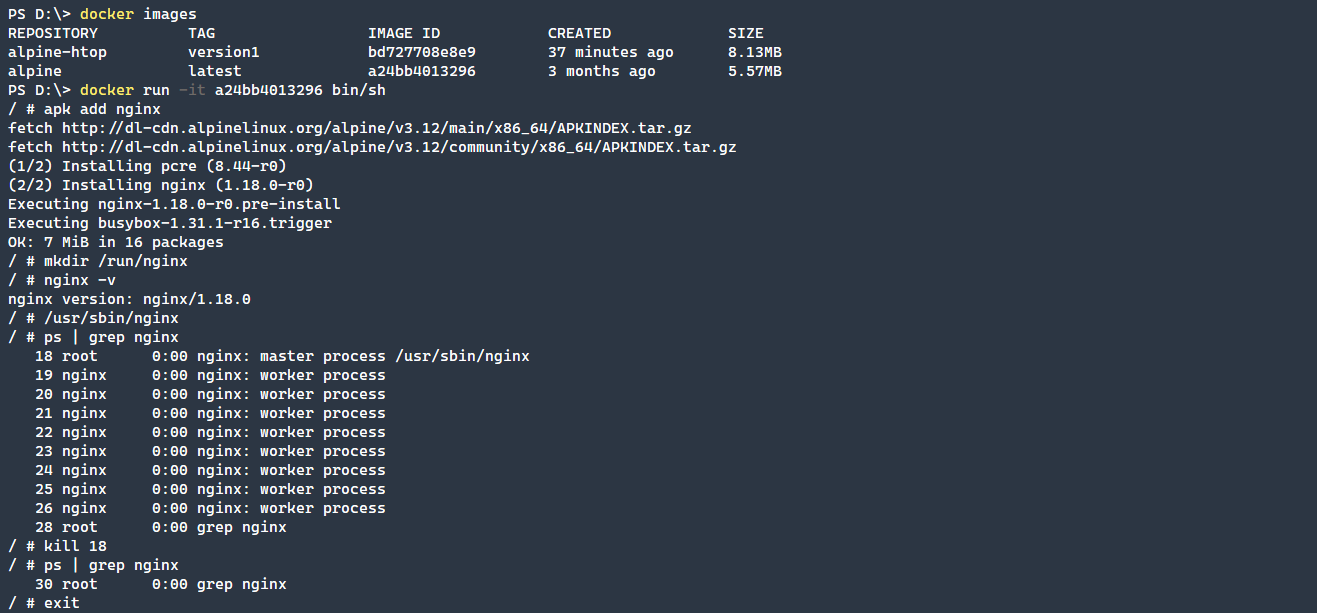
Commit the new NGINX container created above into a new image named alpine-nginx and with the tag, version1. Tagging the image is a best practice, to help differentiate different versions of the same image.
# List all Docker containers regardless of status, -a or --all to show every container
docker ps -a
# Commit the changes to a new image named alpine-nginx
docker commit 37043139525c alpine-nginx:version1
# Verify that the new image was created
docker images
Not every executable will be able to be run in the background, and NGINX is no different. To properly run this container, with NGINX running in the background, pass in the -g 'daemon off;' option to NGINX.
# Run the NGINX container in the background
docker run -d f6b46a3b76be /usr/sbin/nginx -g 'daemon off;'
# Verify that the container is running
docker ps -a
Finally, use the --change switch to expose port 80. By utilizing the --change parameter, the EXPOSE 80 command will be written to the DockerFile of the container. Once this change has been made, start the new container. After the new container has been started proceed to stop the previous container that was incorrectly run without the exposed port. This will help to gracefully transition the non-working container to the working container.
# List all running containers
docker ps -a
# Commit the changes to a new image with an exposed port 80
docker commit --change "EXPOSE 80" c649c813d985 alpine-nginx:version2
# List the running containres
docker ps -a
# List all Docker images
docker images
# Run the newly created image
docker run -d c71f0f9cef7b /usr/sbin/nginx -g 'daemon off;'
# List running containers
docker ps -a
# Stop the prior container without the exposed port 80
docker stop c649c813d985
# List running containers
docker ps -a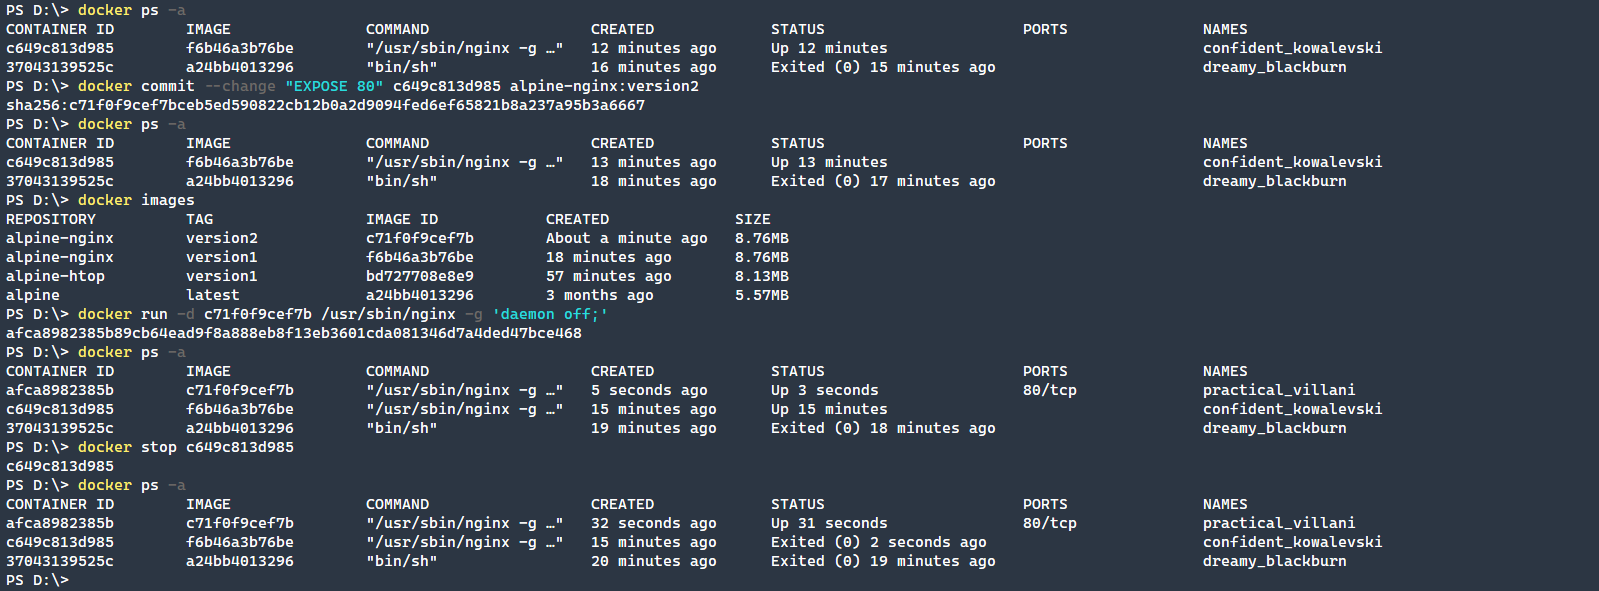
Snapshotting a Docker Image
Finally, what about a scenario where you may need to snapshot, a point in time image, of a running container to move the container over to a new server? The docker commit command works well to do that, as you can see below.
The commands below create a running container that we will stop and commit to a new alpine-nginx version.
# List running Docker containers
docker ps -a
# Create a new running Docker NGINX container
docker run -d c71f0f9cef7b
# List running Docker containers
docker ps -a
# Stop the Docker container
docker stop 7ff99f2bcf6b
# Create a new alpine-nginx version to export
docker commit 7ff99f2bcf6b alpine-nginx:version3
# List the Docker images available
docker images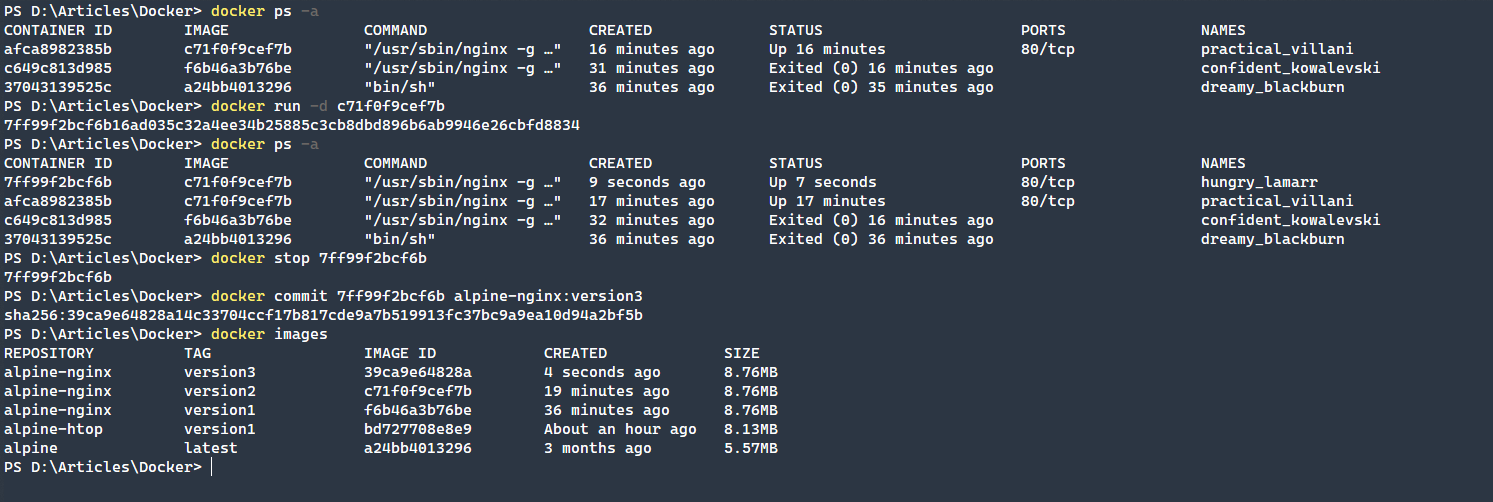
Export the Docker image to a file. In this example, the export file is named export.tar, but name the file according to your needs. Finally, import the export.tar file back into Docker, demonstrating the end-to-end process.
Make sure to export using the format
repo:tagif you want those labels to be maintained when re-importing the image.
# Save the image to a file on the local disk
docker save -o export.tar alpine-nginx:version3
# Verify that the image exists
ls
# Remove the just exported Docker image
docker rmi 39ca9e64828a
# List Docker images and verify that the image is removed
docker images
# Load the Docker image back in
docker load -i export.tar
# List Docker images and show that the image has been loaded back in
docker images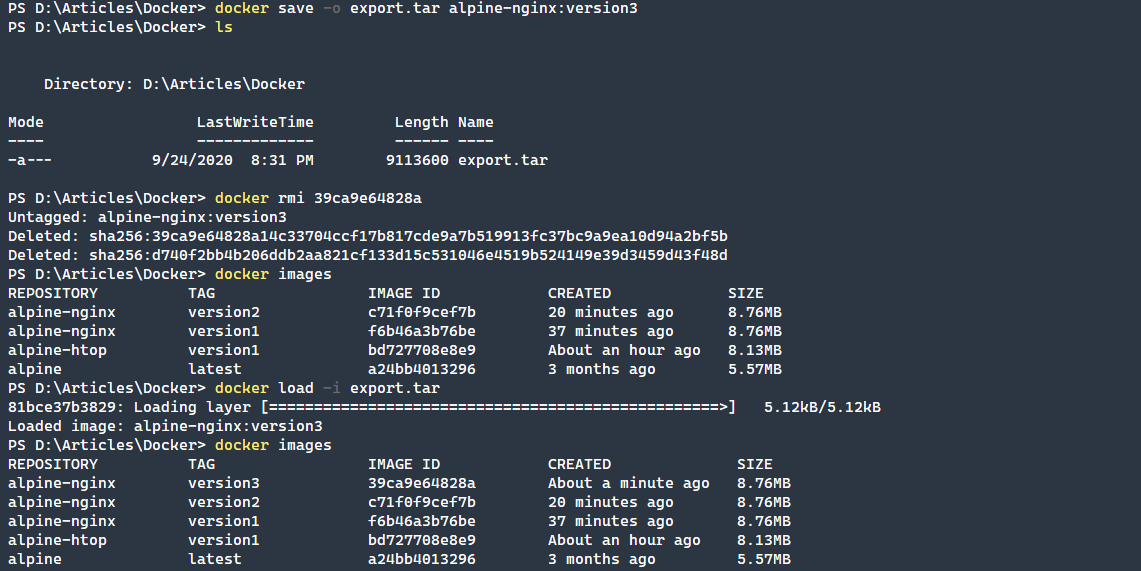
Additional Options for Docker Commit Command
Leveraging the additional options available to the commit command, many different scenarios are supported.
Pausing the Container
To not pause the container while it is running, you can pass in the --pause=false command to disable the pausing feature. This is often used when backing up a production service and pausing that service would be detrimental.
The pause command also has a shorthand of -p that may be quicker to use. Be aware though that by bypassing the pausing of the container, you are risking data corruption, if there is a filesystem write occurring, which could cause incomplete or corrupt data to be written.
Leaving a Commit Message
Familiar to many developers is that of providing a right commit message. Just like in using source control, you ideally want to give a useful message that explains why a new version of the container was committed.
This can be done by using the --message="message to commit" command. As before, there is a shorthand version of this command, -m. To see the list of Docker commit messages, use the docker history command.
Defining the Author
To properly denote who is creating the change, you can provide an author value that will give some additional context to who is making the change. This can be used via the --author="Jane Author ([email protected])". This command can also be used via the shorthand of -a. Using docker inspect you will be able to retrieve a JSON listing of container information, including labels such as author.
Applying DockerFile Changes in Parallel
Finally, the most complicated command that can be used in the docker commit command is the change parameter. This parameter applies changes in the container to the DockerFile at the same time as the commit.
You can use the change parameter by passing instructions to the Dockerfile like so, --change="ENV TEST true". This command puts the text, ENV TEST true into the DockerFile. Now when the container starts again, the changes that you designate here would be already applied.
Instead of the
--changename, you can take a shortcut and use the-calias.
With this command, you can also chain multiple --change parameters together. This allows you to easily add multiple changes to a DockerFile in one commit command.
Change Parameter Options
You can only use a few commands with the change parameter as shown below.
CMD– The CMD instruction takes the form of CMD ["executable","parameter1","parameter2"]. This is the preferred method, but keep in mind that only oneCMDcan exist in a DockerFile at a time. The lastCMDwill be the one that takes effect. The primary purpose ofCMDis to provide default execution commands for a container upon creation.ENTRYPOINT– Similar to the CMD command, ENTRYPOINT uses the syntax ofENTRYPOINT ["executable","parameter1","parameter2"]. This syntax begs the question of why use ENTRYPOINT over CMD?
The ENTRYPOINT command run an executable as the primary process ofPID 1. This action then allows you to shut down the process usingdocker stopgracefully. Additionally, you can useCMDwith this by leaving off theexecutableportion which passes those parameters into theENTRYPOINTexecutable.ENV– Since most applications consume environmental variables, the ENV command lets you set these simply in the key-value format ofENV key=value. Access these key=value variables as standard Linux environmental variables.EXPOSE– The EXPOSE command exposes a port and optional protocol outside of the container. This command maps ports within the container to the outside of the container and allows containers to interact with outside resources such as a web server serving content.LABEL– The LABEL command adds metadata to a container. You can add metadata by using the format,LABEL version="2.0"to view the additional metadata use the docker image inspect command.ONBUILD– The ONBUILD command adds an instruction to execute later when the image is used as a base for another container build. This parameter uses the ADD and RUN commands to add content with the ADD command or RUN an executable.USER-The USER command sets the user name (or UID) and optionally the user group (or GID) to use when running the image. This looks likeUSER myuser:mygroupin practice.- VOLUME – With most containers, it’s necessary to access data in some way. The VOLUME command will create a mount point with a specified name that marks it as holding an externally mounted volume. This is commonly used like so,
VOLUME ["/data"]. WORKDIR– Finally, the WORKDIR command sets the working directory the CMD or ENTRYPOINT commands. This is used like so,WORKDIR /path/to/directory. WORKDIR is useful when you need to start an executable but the location is not in the default PATH environmental variable.
Conclusion
The docker commit command is surprisingly complex. Though there is a simple syntax, with the ability to add DockerFile changes while using the commit command, you can quickly make changes that persist upon the next creation of the container via the DockerFile.
This command may not be necessary for all situations, but for fast troubleshooting and to snapshot containers that can be easily moved across servers, the commit command quickly becomes very useful!


