


If your Windows 10 has been misbehaving and becoming bothersome for quite a while now, your Windows 10 possibly got corrupted. Can you still fix it? It depends, but the DISM cleanup-image can help!
At the end of this tutorial, you’ll learn how to make your computer work like a charm by using a series of DISM cleanup-image commands. All this for free and for your peace of mind.
Read on and get your Windows 10 fixed without resorting to a reset!
Prerequisites
This tutorial will be a hands-on demonstration. If you’d like to follow along, be sure you have the following:
- A Windows 10 PC – This tutorial uses Windows 10 Version: 21H2, but other versions will also work.
- A Windows user account with administrator privileges.
Scanning for Corrupted Items with dism cleanup-image
Before running DISM commands, don’t waste time repairing your Windows 10 image just to hit a roadblock. Essentially, check if your image is still repairable with the DISM cleanup-image option and two arguments (/ScanHealth and /CheckHealth).
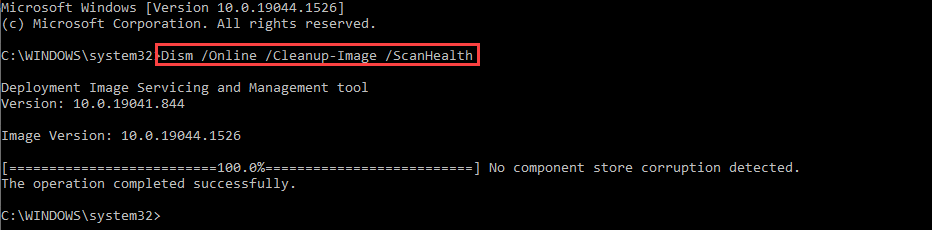
In this tutorial, you’ll first use the /ScanHealth argument, which tells DISM to check individual items for corruption in the component store. The component store tracks and services all components that make up the Windows operating system.
Launch your command prompt as an administrator, and run the DISM command below to scan (/ScanHealth) your Windows image and log errors and/or corruptions when detected. The /Online switch in the command targets the running Windows 10 OS.
Remember to always run command prompt as administrator before running DISM commands since DISM requires elevated permissions.
Dism /Online /Cleanup-Image /ScanHealth
Depending on the volume of your Windows 10 image, scanning corrupted components will take time to complete. When the scan completes, you’ll see a similar image to the one below if no component store corruption has been detected.
With
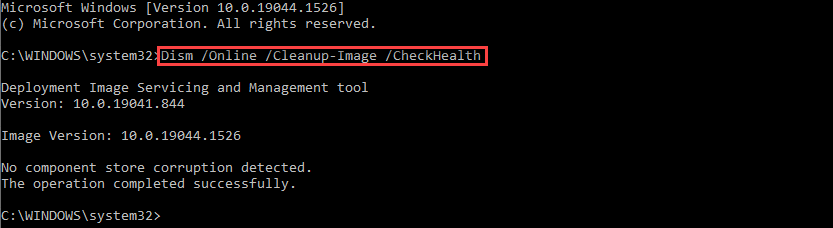
/CheckHealth, DISM tells you whether the image is healthy, repairable, or non-repairable. According to Microsoft Support, if the image is non-repairable, “you should discard the image and start again“, implying reinstalling your Windows 10.
Checking the Component Store for Existing Detected Corruptions
Like the /ScanHealth argument, the /CheckHealth argument lets you check if any corruption has been detected, but /ScanHealth only takes a few seconds to complete. Yes! Scanning takes less time because the /CheckHealth argument reports existing error logs readily available.
1. Run the following command to check existing error logs for detected corruption in your system files.
Dism /Online /Cleanup-Image /CheckHealthBelow is an example output after appending the /CheckHealth argument. As you can see, the message says No component store corrupted detected. This output raises your chances of getting your Windows 10 image repaired.
2. If your image is repairable, run the sfc /scannow command below to check for, and repair corrupted or modified system files.
sfc /scannowAfter running the command, you’ll see verification progress, like the one below.
Do not close the command prompt until the scan reaches 100 percent and the repair completes.
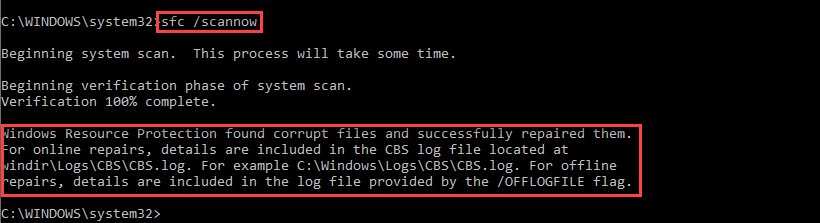
If you get an error after running sfc /scannow command, check Microsoft’s documentation about using the System File Checker.
3. Finally, when you’ve successfully repaired your Windows 10 system files, restart your device to test if the repair fixed your Windows 10 issues.
Tidying Up the Component Store
Knowing that your Windows 10 image is repairable, take this opportunity to free up some disk space by reducing the size of the component store. Insufficient storage is known to cause issues, not just with Windows 10 but also other OS.
But before cleaning up the component store, you’ll first have to use the /AnalyzeComponentStore argument together with a DISM command.
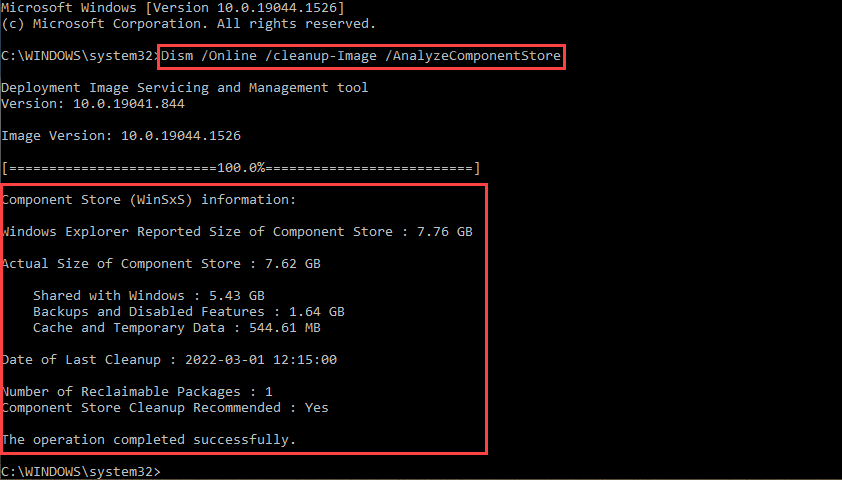
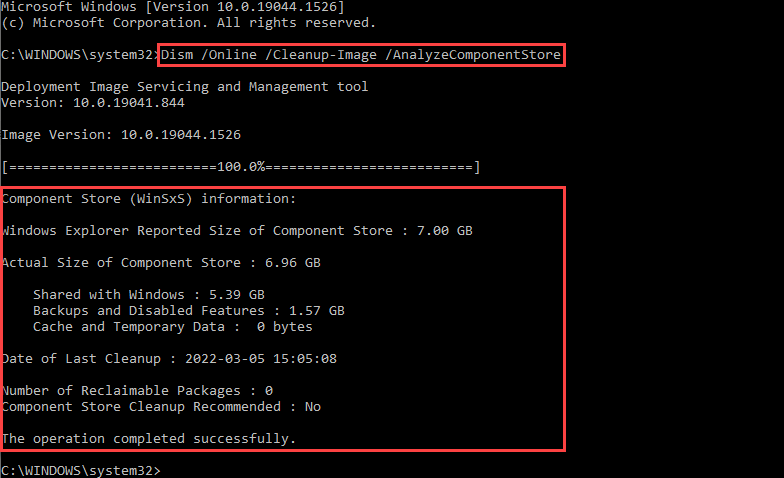
1. Run the following command to tell DISM to analyze the component store (/AnalyzeComponentStore). This command will show you the size of the component store, so you can see if there are reclaimable packages and if cleanup is recommended.
Dism /Online /Cleanup-Image /AnalyzeComponentStoreIn the analysis report as below, you can see the following information:
- Windows Explorer Reported Size of Component Store : 7.76 GB.
- Date of the Last Cleanup : 2022-03-01 12:15:00.
- Number of Reclaimable Packages : 1.
- Component Store Cleanup Recommended : Yes.
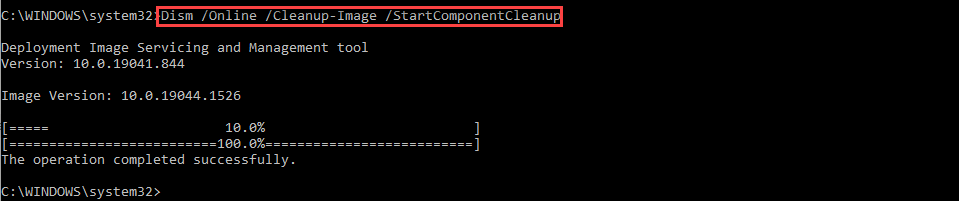
2. Next, run the below command to free up disk space (/StartComponentCleanup). The command eradicates outdated items in the component store or the earlier versions of updated components.
Dism /Online /Cleanup-Image /StartComponentCleanupYou can see below that the operation was completed successfully.
3. Now, execute the below command to make the component store size even smaller with the /ResetBase argument.
Note that you can’t uninstall Windows updates installed since the /ResetBase argument tells DISM to reset the base of the superseded components.
Dism /Online /Cleanup-Image /StartComponentCleanup /ResetBaseAdditionally, you can run the following command, appending /Defer, to delay long-running cleanup operations to the next automatic maintenance.
Dism /Online /Cleanup-Image /StartComponentCleanup /ResetBase /Defer4. Lastly, rerun the command below as you did in step one to see the changes after cleaning up the component store.
Dism /Online /Cleanup-Image /AnalyzeComponentStoreThe result below shows the new component store size is now 7.00 GB from 7.67 GB before cleaning up.
The /ResetBase argument was not used in this cleanup.
Repairing an Image Online
If you’re still unsatisfied with how your Windows 10 performs after cleaning up the component store, then it’s time to jump into repairing your Windows 10 image.
There are two ways to repair an image using the online method, using /Online switch and /Online switch with /Source argument. But you’ll start with the /Online switch for this tutorial as it does not require a lot of effort.
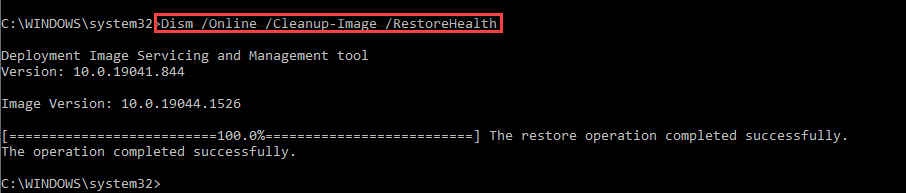
Run the command below to repair (/RestoreHealth) your Windows 10 image (/Cleanup-Image). The /Online switch below targets the current working Windows 10 OS to repair, while /RestoreHealth restores your image tip-top shape.
This command uses Windows Update to get the required files to fix corruptions on your Windows 10 image.
Dism /Online /Cleanup-Image /RestoreHealth
Now, restart your device after successfully repairing your Windows 10 image, and see if there are changes in how your Windows 10 performs.
Repairing an Image Offline with a Windows 10 Image Copy
If, for any reason that repairing your Windows 10 image online fails, you can repair your image offline with a fresh copy of a Windows 10 image. How? You’ll use the Windows Media Creation Tool to download an ISO file of a Windows 10 image.
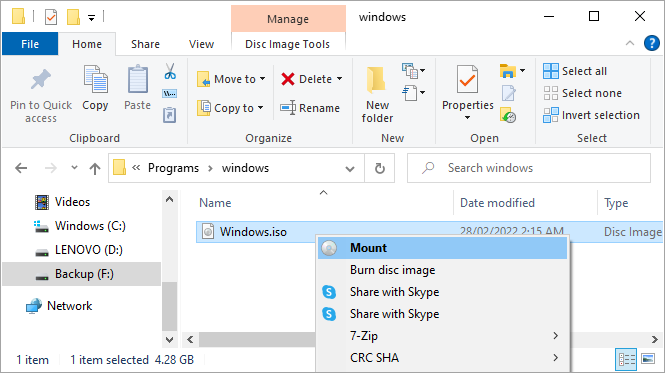
1. Download and use the Windows Media Creation Tool to get a fresh copy of the Windows 10 image in an ISO file.
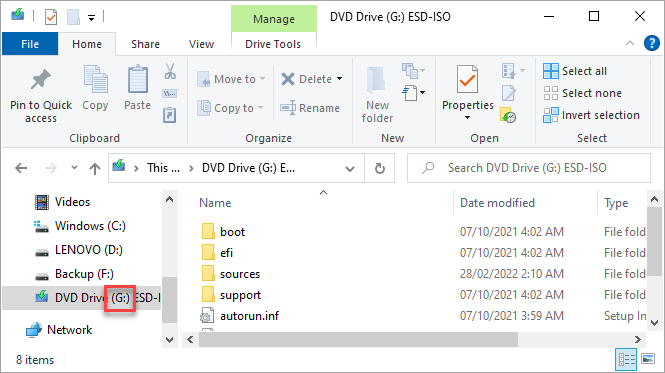
2. Next, open File Explorer, and locate your ISO file. Right click on the ISO file, and select Mount, as shown below, to mount your ISO file.
There’s no need to burn the ISO file into a blank DVD because Windows 10 can virtually mount ISO files.
3. After you mount the image, take note of the mounted drive letter, and check the sources folder of your image to confirm if you have either install.wim or install.esd. You’ll need this information for the next step.
4. Run the following command to repair your image with a Windows 10 image source (/Source). The /LimitAccess parameter prevents DISM from using Windows Update as a repair source. Replace the following value in the command accordingly:
G:– with the actual drive letter you noted in step three.
win_image– with either install.wim or install.esd that you noted in step three.
Dism /Online /Cleanup-Image /RestoreHealth /Source:G:\sources\win_image /LimitAccess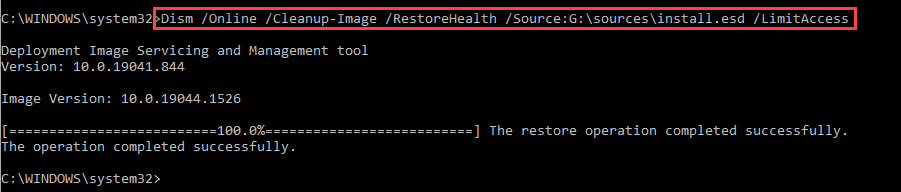
5. Finally, restart your device after the successful repair, and your Windows 10 should now be fully functional.
Repairing an Image Offline
Perhaps a client tasked you to repair an offline Windows 10 image. If so, appending the /Image switch can help, where you’ll specify the path to the root directory of the offline image copy.
1. Mount your ISO and confirm the drive letter as you did in the “Repairing an Image with a Windows 10 Image Copy” section (steps two-three).
You can skip this step if you have an image only instead of an ISO.
2. Next, check whether you have the install.esd or install.wim file. If you have the install.esd file, convert the file to install.wim, so you can mount the image on a folder (step four).
If you have the install.wim file already, you can jump to step five to repair your Windows 10 image.
For this tutorial, the converted install.wim file is saved on the C:\ drive directly, but you can save it on your preferred location.
Converting the image from .esd to .wim is required since /Mount-Wim option only mounts .wim files.
3. Create a folder with your preferred name where you’ll mount the offline image (install.wim). But for this tutorial, the folder is named C:\Offline.
4. Now, run the below command to mount the image (install.wim) to your dedicated folder (C:\Offline). Replace C:\install.wim with your image’s file path and C:\Offline with your dedicated offline image’s root folder.
DISM /Mount-Wim /WimFile:"C:\install.wim" /index:1 /MountDir:"C:\Offline"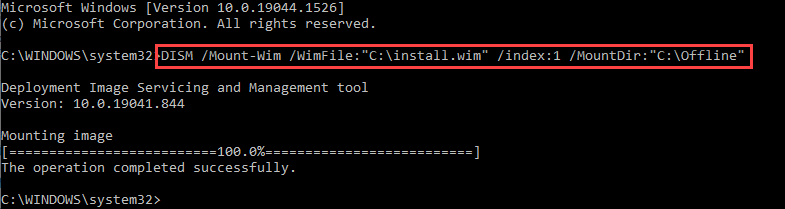
5. Finally, run the following command to repair your Windows 10 image offline (/Image) using your mounted Windows 10 image as the source (/Source).
Change the paths in the command below accordingly:
G:\sources\install.esd– your mounted Windows 10 image path.
C:\Offline– the root directory of your offline Windows 10 image.
Dism /Image:C:\Offline /Cleanup-Image /RestoreHealth /Source:G:\Sources\install.esd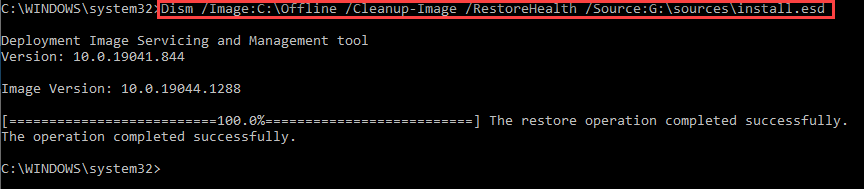
Repairing an Image Using /Cleanup-MountPoints
You’ve seen how DISM commands can fix your image online and offline. But on some occasions, an image can be corrupted while altering it with DISM. How do you fix it? You’ll clean up the mount points of your image with the /Cleanup-Mountpoints option.
Run the below command to clean up your image’s mount points. This command does not unmount any mounted image but removes resources associated with a corrupted image.
Dism /Cleanup-Mountpoints
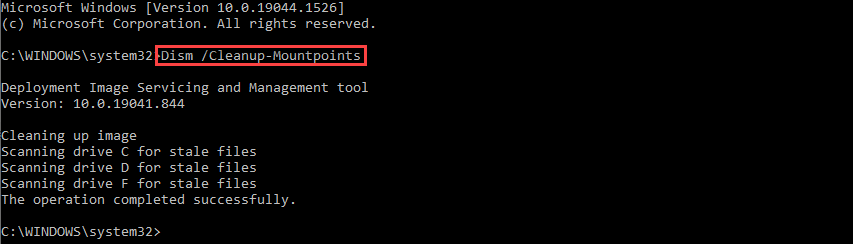
Now, restart your device after the cleanup and see if your Windows 10 image is working fine.
Conclusion
In this article, you have learned to scan, check, and restore your Windows 10 image using DISM cleanup-image. Cleanup-Image is an excellent tool for getting your computer back on track and is just one of the commands you can run with DISM.
Learning how to repair your computer is one thing and applying that knowledge is another. Now that you know how to do it yourself, it’s up to you to take action.


