

In the fast-paced realm of the web, the proliferation of websites has led to a surge in the need for robust web hosting solutions. DirectAdmin (DA) stands out as a user-friendly and efficient web hosting control panel designed to simplify the management of both websites and servers.
This tutorial walks you through installing DA on a Linux server, ensuring you have control over your web hosting environment at your fingertips.
Read on and dive into effortless website management!
Prerequisites
Before diving into this robust web hosting solution, ensure the following are in place to follow along in this tutorial:
- A Linux server running Ubuntu 18.04 or later – This tutorial uses Ubuntu 20.04 for demonstrations.
- Root access to your server or sudo privileges for a standard user.
- An active license for DA.
- A fully qualified domain name (FQDN) pointing to your server’s public IP address.
Downloading and Installing DirectAdmin
Now that you have met the prerequisites, your next goal in achieving smooth server management is to install DA on your system. The best way to install this control panel on your Linux server is via its official installation script, tailored to automate the installation process.
The installation script is intelligent enough to recognize different Linux distributions. As a result, the script installs the necessary packages and dependencies to ensure a seamless and compatible setup.
1. SSH into your Linux server, logging in as the root user or user with sudo privileges.
2. Once logged in, run the following command, which provides no output but navigates (cd) to the root directory (~).
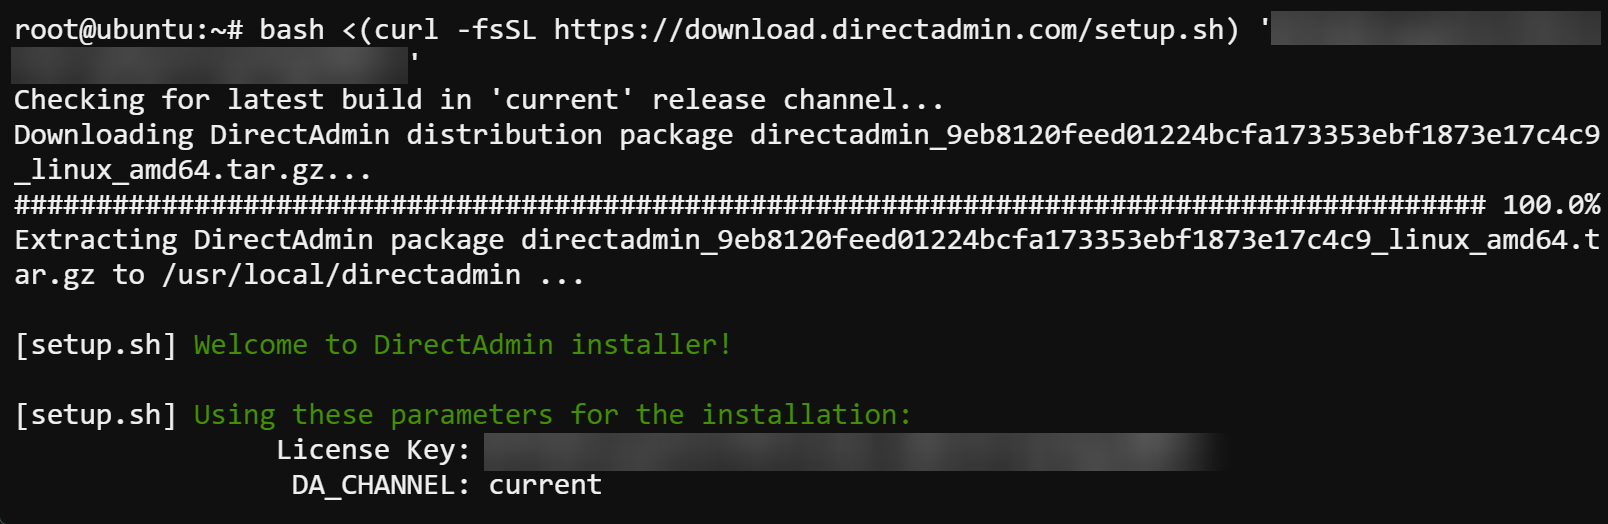
cd ~3. Next, execute the following command to fetch (curl) and execute (bash) the installation script (setup.sh).
Make sure to replace your_license with your actual DA license key.
bash <(curl -fsSL https://download.directadmin.com/setup.sh) 'your_license'Downloading and installing all necessary packages and dependencies may last a few minutes.
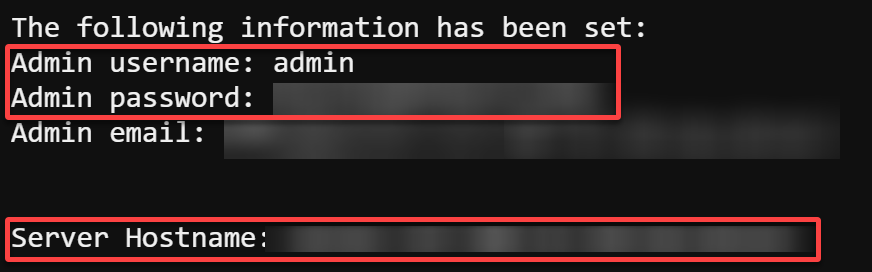
4. Note the admin username, password, and server hostname from the output, as you will need them later to access DA.
💡 Your login credentials and other configuration details are automatically generated and stored in a file named
/usr/local/directadmin/conf/setup.txton your server. You can check this file’s content via the followingcatcommand.
cat /usr/local/directadmin/conf/setup.txt
Accessing the DA Control Panel
With your DA installation now complete, the doorway to efficient server management is wide open. Explore DA’s user-friendly web interface, commonly known as the Control Panel—your hub for server command.
This Control Panel is where you can effortlessly navigate settings, configure domains, and unlock the full potential of your hosting environment.
To access the DA Control Panel, ensure you have the admin credentials handy and follow these steps:
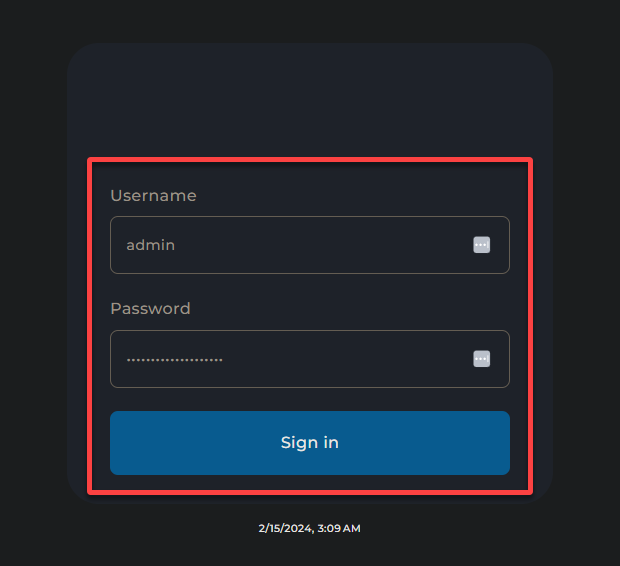
1. Open a modern web browser of your choice. Google Chrome, Firefox, or Safari are recommended for the best experience.
2. Next, navigate to the hostname you have noted during the installation, which redirects your browser to the DA login page (step three).
For a secure connection, ensure you prefix your hostname with https:// (i.e., https://hostname).
3. Sign in to DA with the admin username and the password you noted in the last step of the “Downloading and Installing DirectAdmin.”
If successful, your browser redirects to the DA Control Panel, shown in step four.
Below is the DA Control Panel, where you can manage websites, create databases, set up FTP and email accounts, and much more.
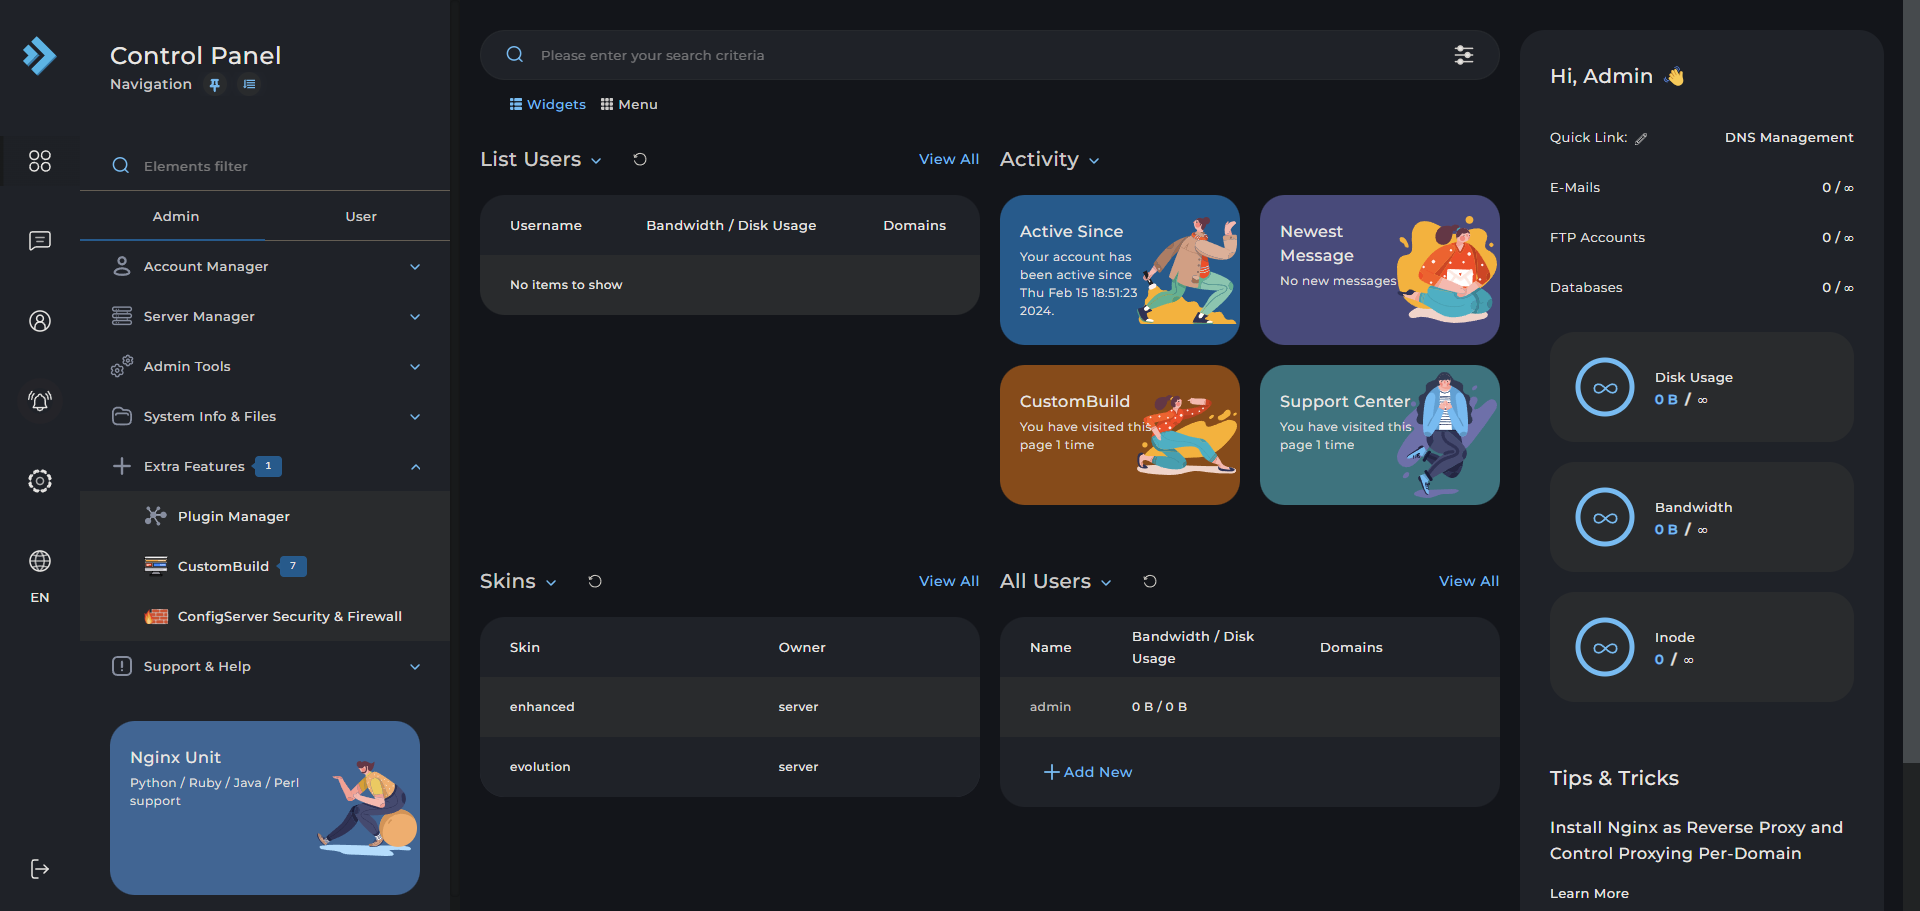
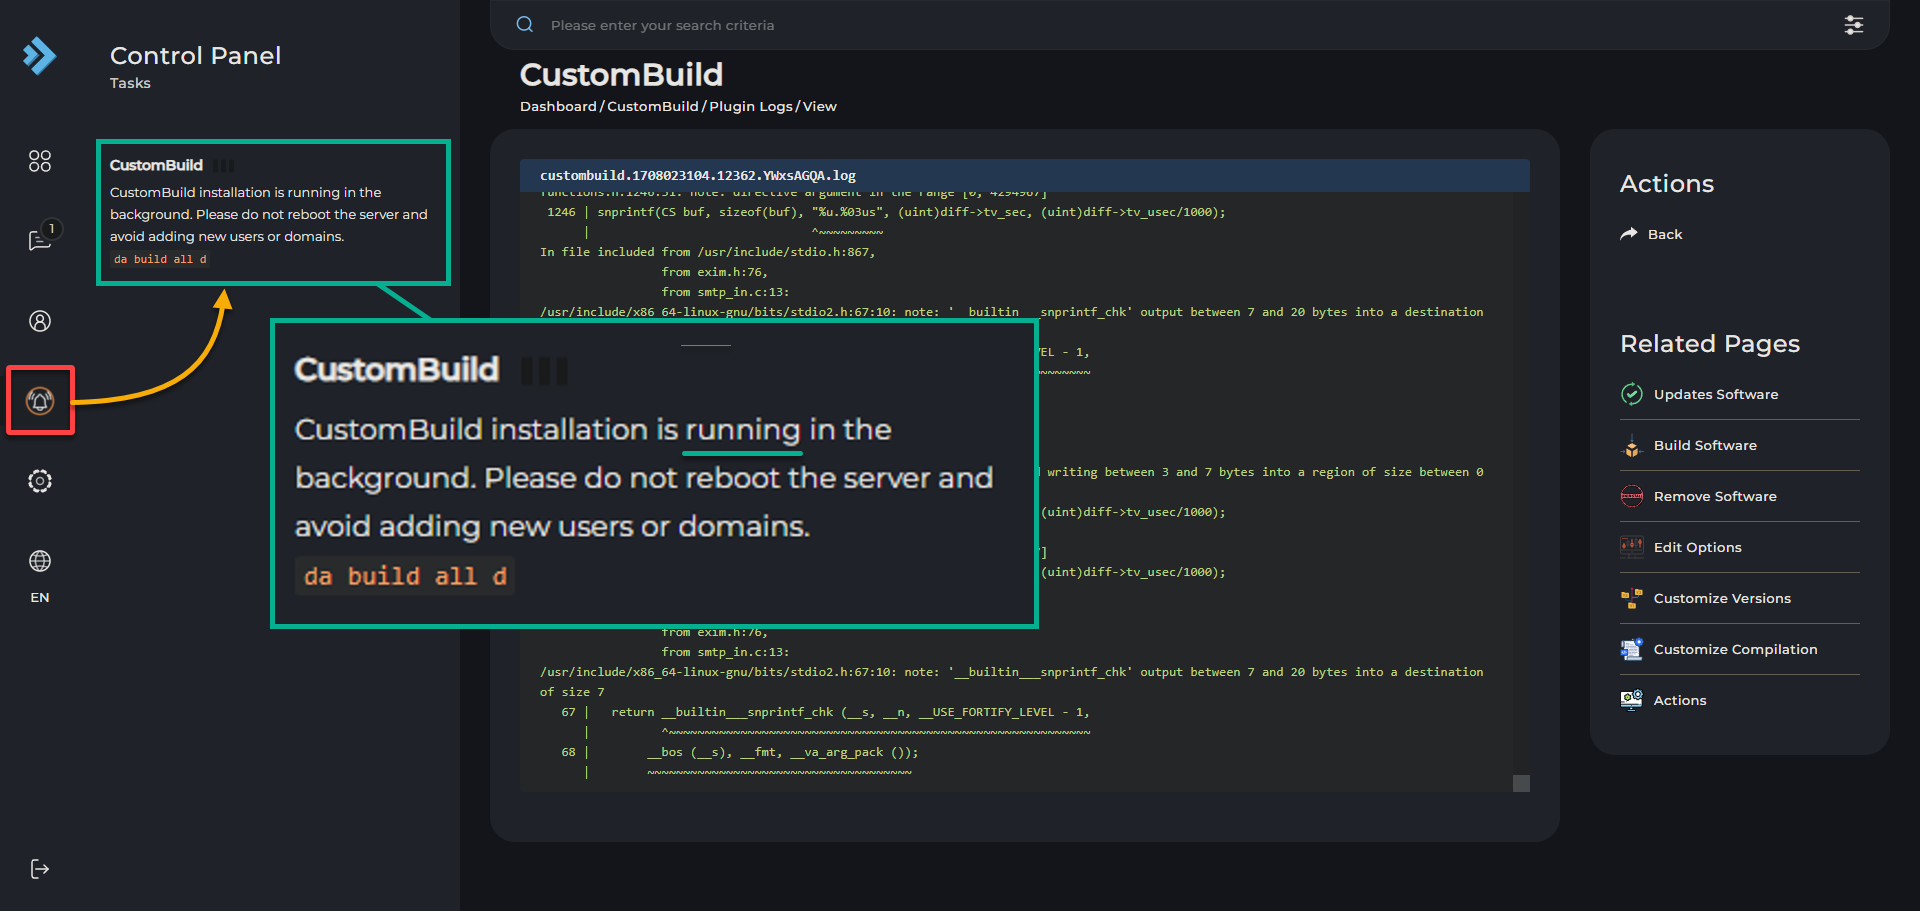
4. Now, click the bell icon (left pane) to view updates and important notifications about your server’s status.
Initially, you may notice that the CustomBuild process still runs, as indicated in the log viewer. Do not reboot your server or make changes, such as adding users or domains, during this time. CustomBuild is finalizing the setup of your server’s environment, which can take some time.
Streamlining WordPress Installation on DA
With secure access to the DA Control Panel, you are only a few steps away from launching your first WordPress site. Gone are the days of complex setups and manual configurations—the DA Control Panel simplifies this process, allowing for a quick and efficient setup.
To set up a live WordPress site via DA, carry out the following:
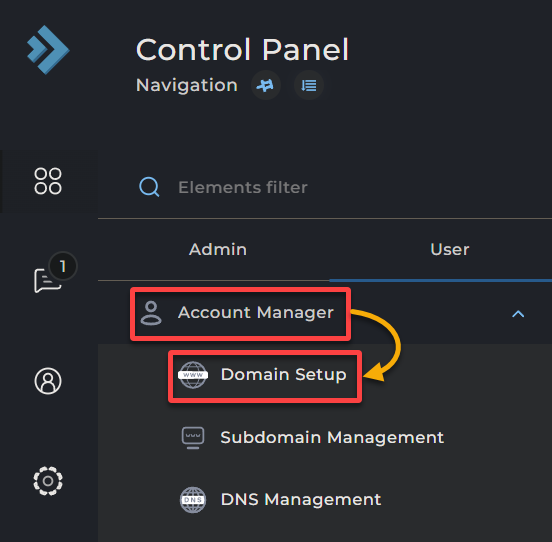
1. Expand Account Manager (left pane) on the DA Control Panel, and choose Domain Setup to configure domains within DA.
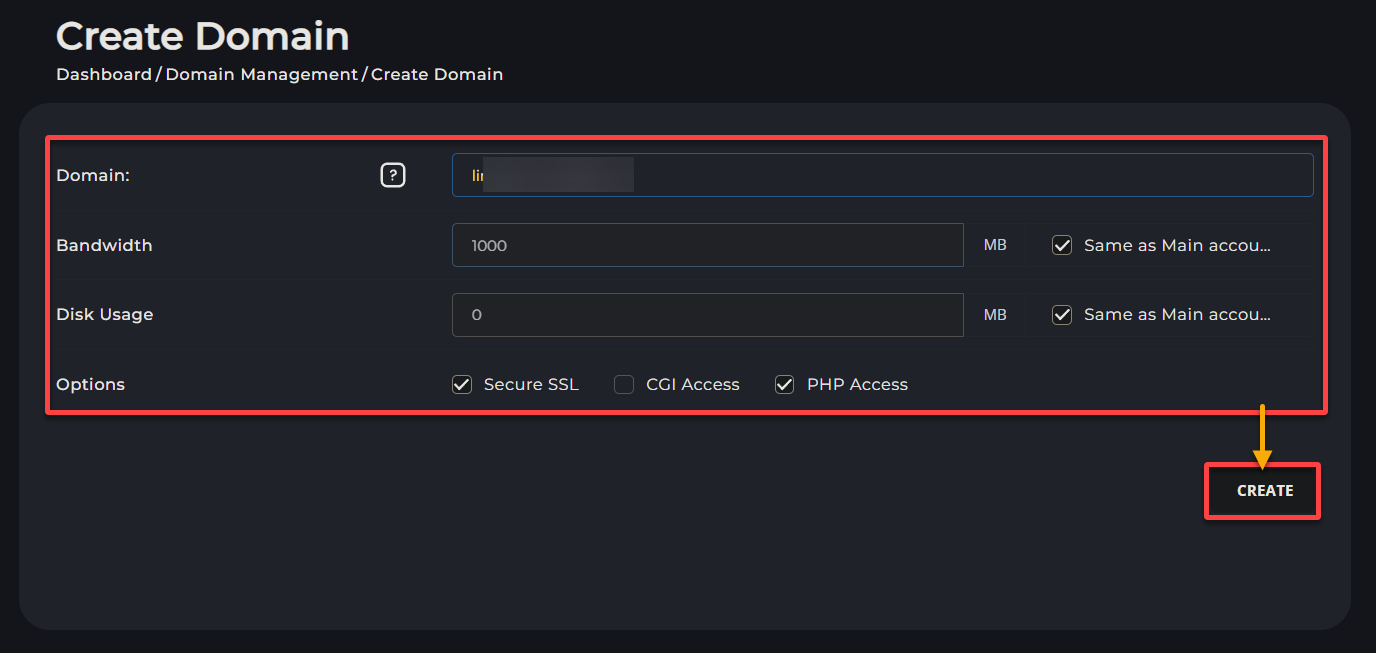
2. Fill in the required fields in the Create Domain page, and click CREATE, as shown below, to create your new domain. This domain is essential for establishing a distinct online identity for your website.
This action creates a document root at domain/your_domain/public_html, the directory on your server designated for your website’s files. Also, this document root is the future home of your WordPress installation.
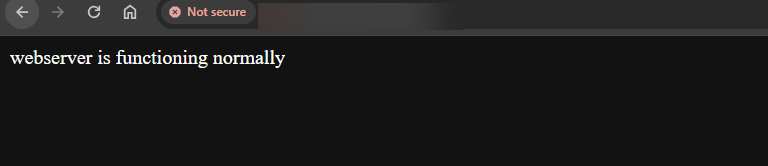
3. Next, visit your FQDN on your browser, and you will encounter the default page with the following message. This message confirms your domain correctly points to your server.
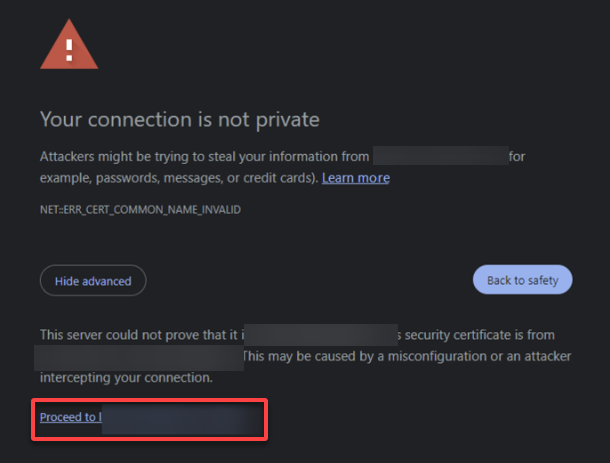
If your browser displays a security warning stating “Your connection is not secure,” as below, click Advanced → Proceed to… to bypass this warning.
There is typically no need for immediate concern when you see this warning. This warning often occurs because the website’s SSL certificate is either self-signed or not recognized by your browser.
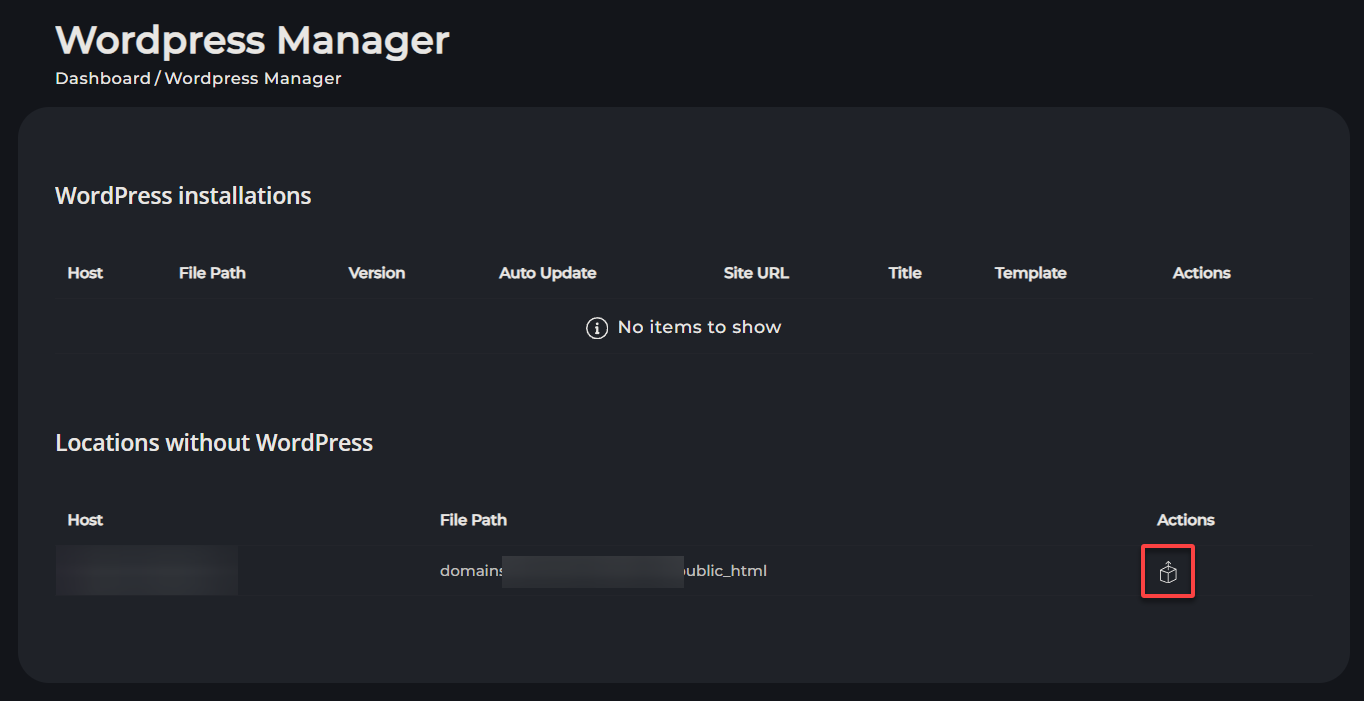
4. Expand Advanced Features and choose WordPress Manager to access specialized tools and functionalities for managing WordPress installations.
DirectAdmin enhances this experience with a seamless one-click WordPress installation feature, streamlining the process further.

5. Under Locations without WordPress, click the cube icon under Actions adjacent to the domain you added in step two. This action prompts the system to create necessary directories and configurations tailored for hosting a WordPress installation.
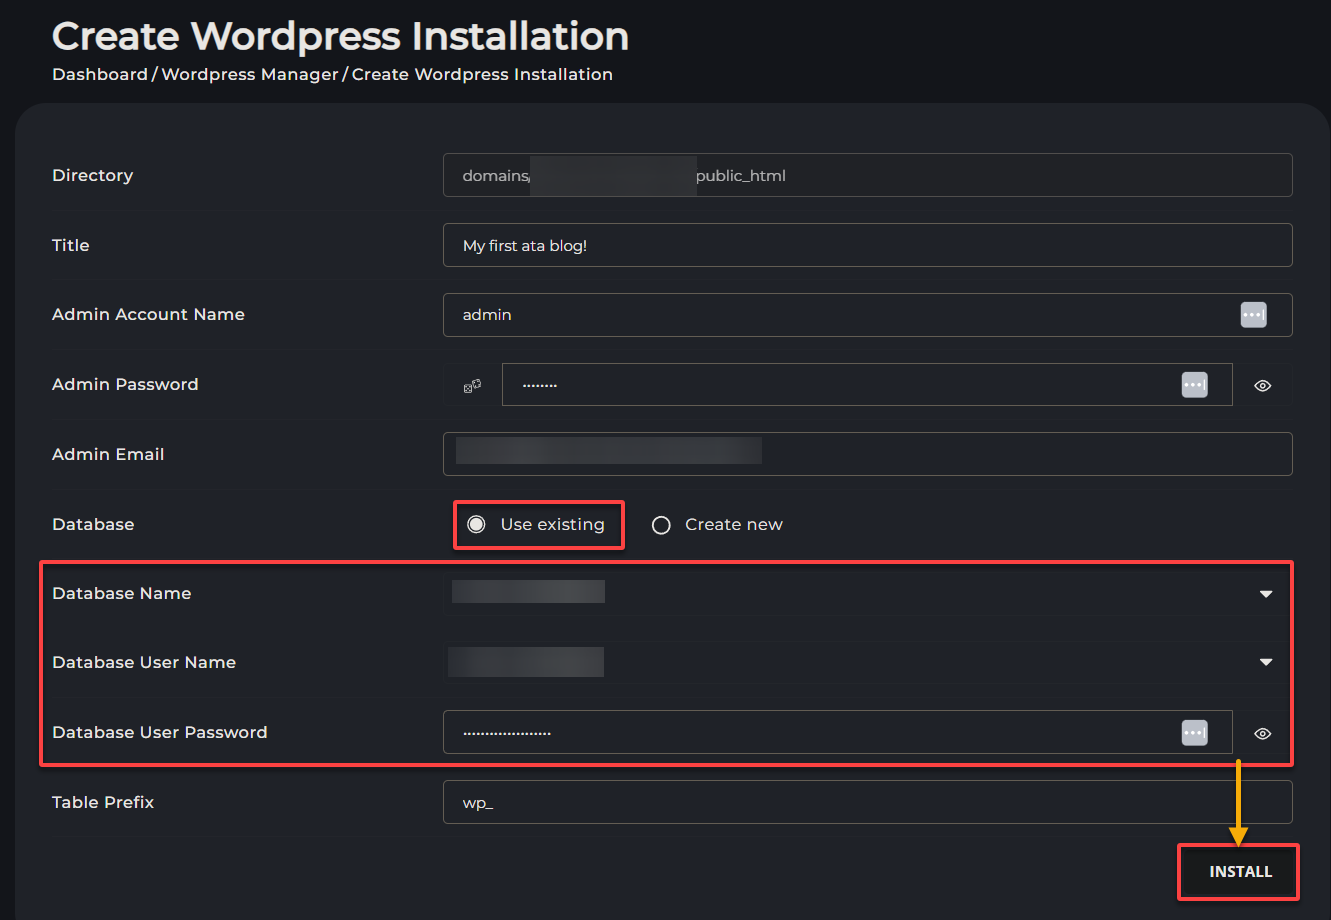
6. On the following screen, input the necessary details, select the Create new option, and then click CREATE to set up a new database for your WordPress.
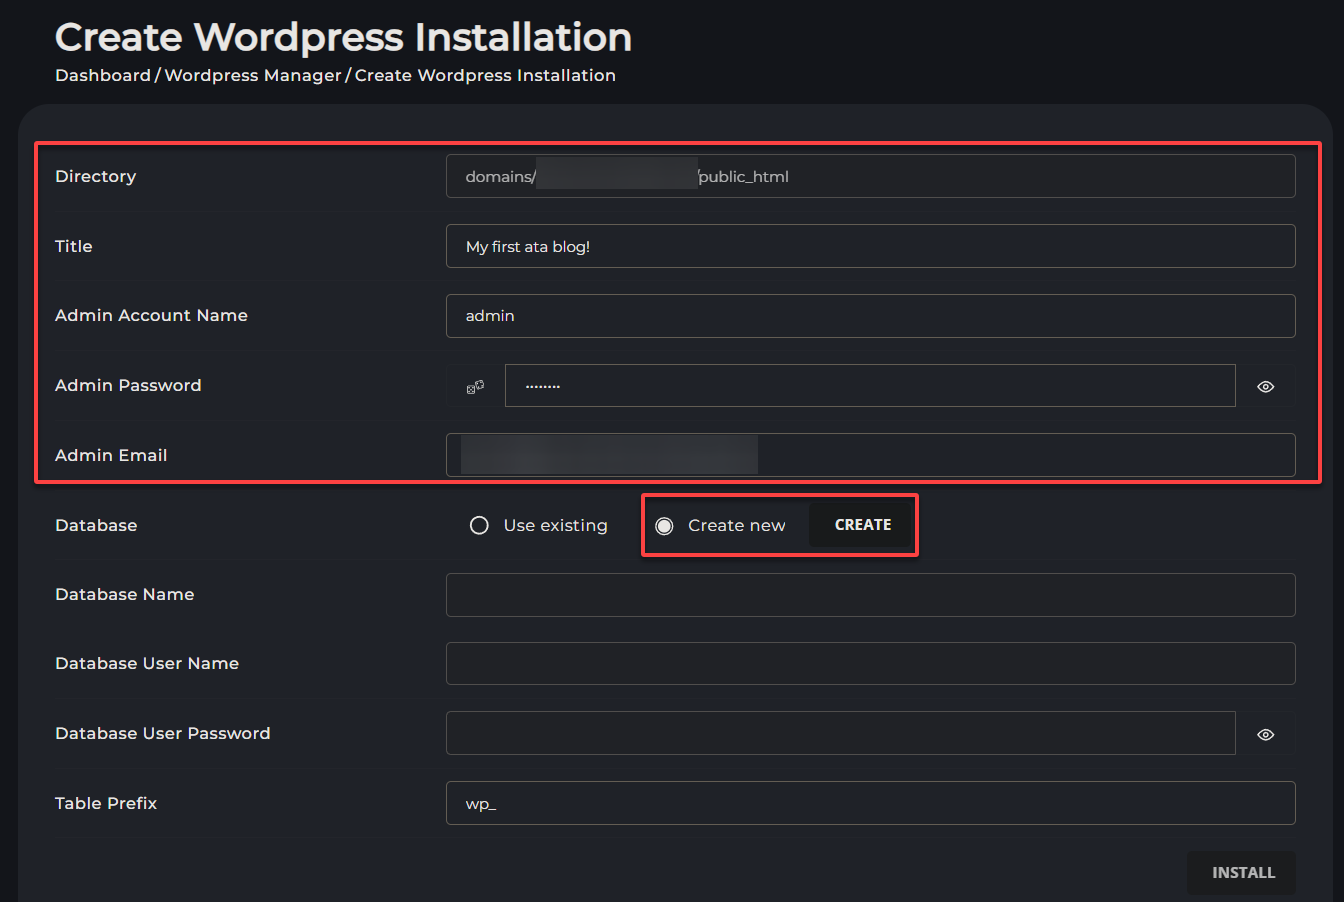
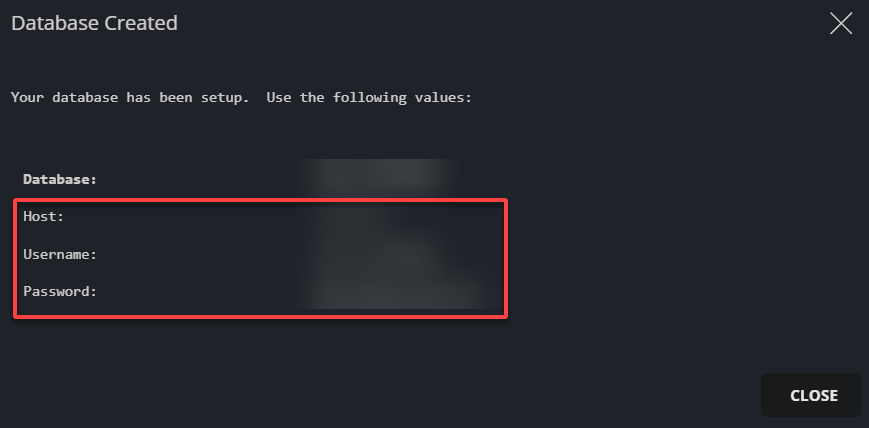
7. Copy the database credentials on the popup window that appears, and click CLOSE to dismiss the popup and return to the installation page.
8. Now, select Use existing, set the database credentials you noted in step six, and click INSTALL (lower-right) to start the installation.
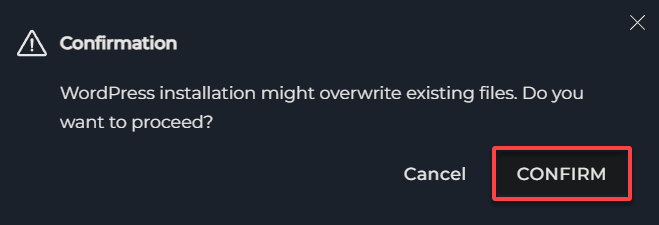
9. When prompted, click CONFIRM to continue with the WordPress installation.
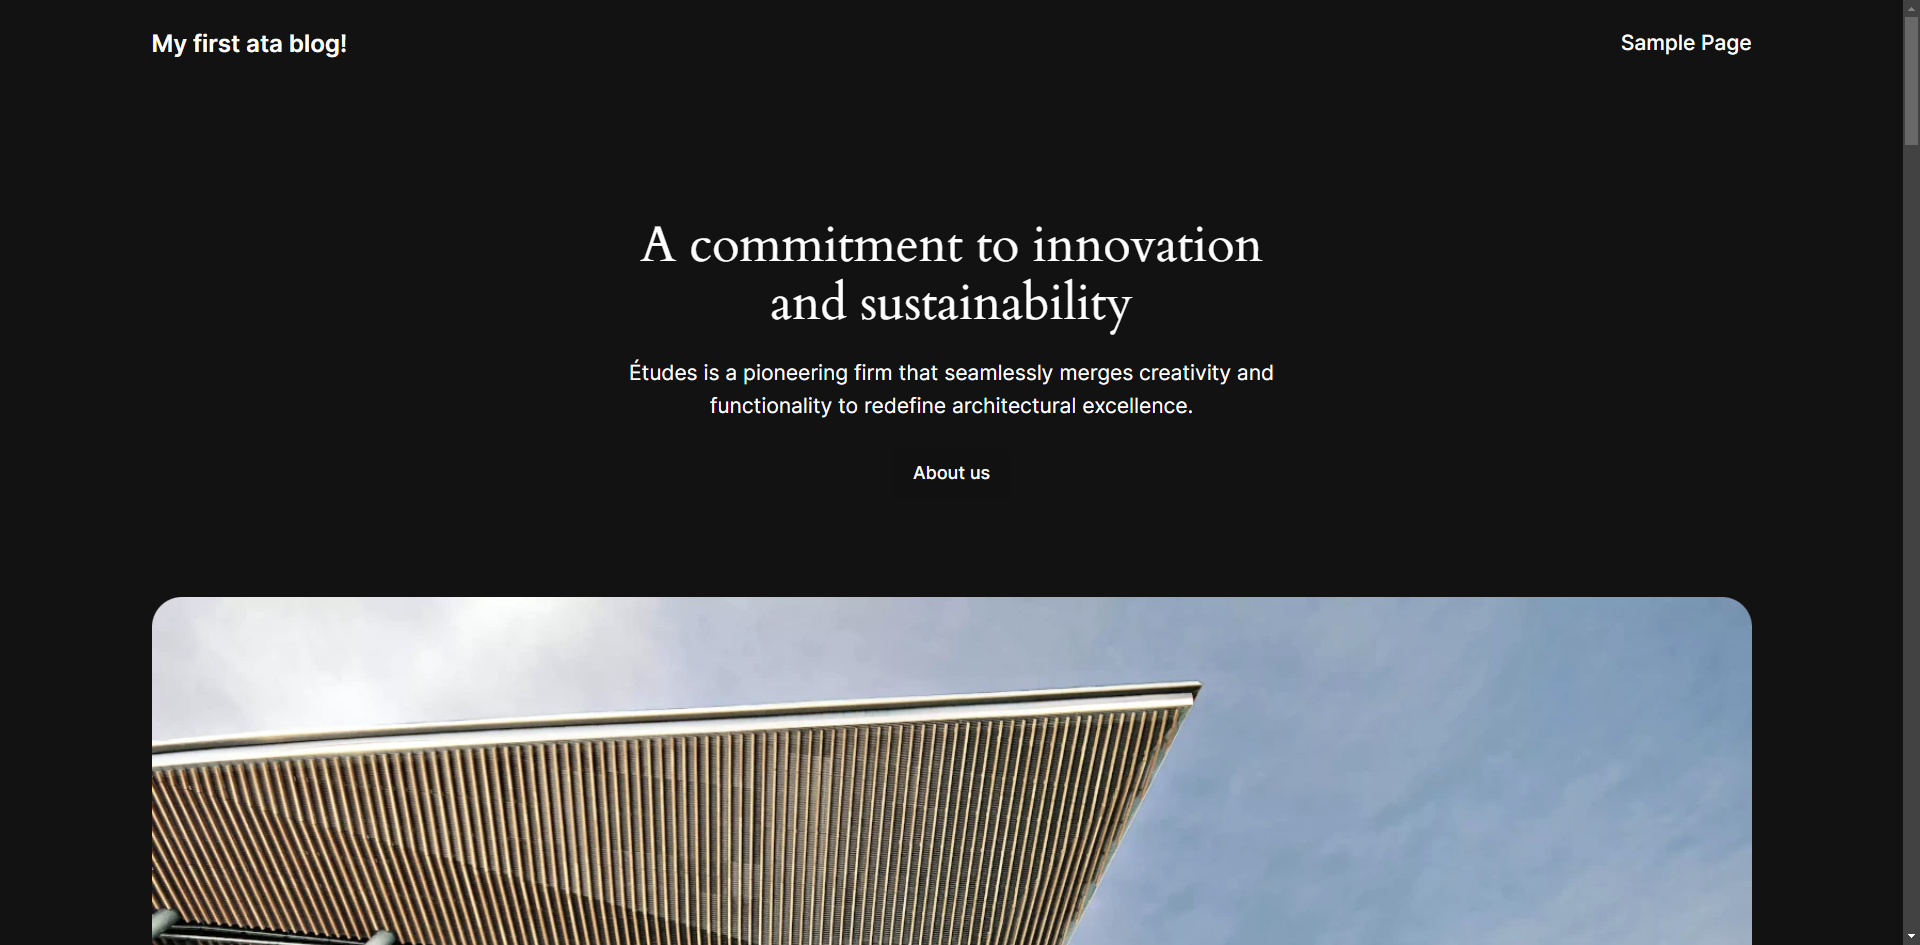
10. Finally, revisit your FQDN; you will see a WordPress page instead of the server default.
This outcome signifies a successful setup, indicating your site is ready for customization.
Conclusion
You’ve successfully set up and accessed the DirectAdmin Control Panel, mastering the essentials of server management. Through streamlining WordPress installation on DA, you have empowered your web development journey.
DA’s seamless installation process, web interface, and WordPress integration make DA an excellent choice for administrators seeking an efficient and reliable hosting solution.
After mastering the basics, would you explore more advanced features? These features include server migration, email management, and database optimization. Or perhaps integrate additional third-party plugins to optimize your web hosting environment further?
Keep exploring and learning, and watch your online projects thrive!


