


Connecting to Office 365 with PowerShell can be a pain sometimes. You have to constantly remember different commands and modules. Let’s change that.
Not a reader? Watch this related video tutorial!In this article, you’ll learn how to connect PowerShell to Office 365. You’ll do this by using the Azure AD PowerShell for Graph module and the Azure Active Directory module for Windows PowerShell.
Microsoft 365 Backup For Dummies eBook addresses the data security challenges by outlining the out-of-the-box security features in Microsoft 365. Get eBook
Prerequisites
To run through any of the examples in this tutorial, please be sure you have the following ahead of time:
- Windows PowerShell 5.1 or PowerShell 7
- An Office 365 tenant
- Microsoft Online Services Sign-In Assistant for IT Professionals RTW
You can download PowerShell 7 from the Microsoft website
Using PowerShell to connect to office 365
Office 365 includes an abroad range of services that include and are not limited to:
- Azure Active Directory.
- Exchange Online.
- Microsoft Teams.
Office 365 services are all available via a common landing web portal called https://portal.microsoft.com. This portal gives you access to domain setup, Tenant configuration, billing, and managing user’s settings. But if you need to go to Office 365 services, such as Exchange Online or Microsoft Teams, you need to click on the service name in the portal which will take you to the service admin center, such as Exchange Admin Center, and so on.
Each service has its own admin center portal and PowerShell module. So if you need to connect to manage users on Exchange Online, you need to download the Exchange online PowerShell module. If you want to manage users on Teams, you need to download the Teams module and also for the Azure active directory PowerShell module.
Downloading and installing Office 365 PowerShell Module
An easy approach is to use PowerShell itself to find, download and install the PowerShell module. Let’s try to get the Exchange Online PowerShell module. Start by opening PowerShell and type the following PowerShell command line to find the available modules related to Exchange online.
Find-Module Exchangeonline*
You can use a wildcard to search for all related PowerShell Module
Using the Find-Module helps in searching for a module in the PowerShell gallery, you might find multiple PowerShell modules. The one we are looking for is ExchangeOnlineManagement. To download and install the module, use the install-module cmdlet
If no error returns, then you are good to go and start using the module. The next step is to start using the module
Since PowerShell 3, PowerShell can import the module automatically the first time you run any command related to the installed module.
The same method of downloading the module is applicable to any other module, all you need is to know the module name and download it.
Connect PowerShell to Office 365 Services
Each Office 365 has its own PowerShell module, this makes cross services management a bit challenging. Usually, any Office 365 module has a similar cmdlet Connect-*ServiceName*
- Connect to Exchange Online, you can use the cmdlet
Connect-ExchangeOnlinewhich is available in ExchangeOnlineManagement Module - Connect to Microsoft Teams use the following cmdlet
Connect-MicrosoftTeamswhich is available in MicrosoftTeams Module - To connect to Azure AD using Azure AD PowerShell for Graph, use
Connect-AzureADwhich is available in the AzureAD Module - Connect to Sharepoint Online, use
Connect-PnPOnlinewhich is available in the Microsoft.Online.SharePoint.PowerShell Module. - Connect to Azure AD for Windows PowerShell module, use
Connect-MsolServicewhich is available in MSOnline Module
PowerShell Core doesn’t support the Azure AD for Windows PowerShell module and cmdlets with Msol in their name.
Why Two Azure AD Modules?
When working with Office 365 using PowerShell, you’ll probably have to use two different modules. You’ll use Azure Active Directory PowerShell for Graph with the module name AzureAD and Azure Active Directory Module for Windows PowerShell with the module name of MSOnline.
AzureAD and MSOnline both allow you to work with Office 365 services using PowerShell so why two? AzureAD is the successor to MSOnline and from what I can gather will replace MSOnline at some point. All new functionality is in the AzureAD module but there still is some overlap with the MSOnline module.
You’ll find tasks such as managing users, groups, and license administration still exists in the MSOnline module.
If you need to connect to Exchange Online via MFA, Microsoft provides a great guide entitled Connect to Exchange Online PowerShell Using Multi-Factor Authentication.
Using PowerShell to Connect to multiple Office 365 Service
Office 365 PowerShell modules look like a big list, yes?!. But it’s possible to connect to all the services in one console and then do all the tasks in the same console by using the following PowerShell code.
$CloudCred=Get-Credential
$TenantName="Test for test.onmicrosoft.com"
Connect-AzureAD -Credential $CloudCred
Connect-PnPOnline -Url https://$TenantName.sharepoint.com -Credentials $CloudCred
Connect-ExchangeOnline -Credential $CloudCred
Connect-MicrosoftTeams -Credential $CloudCred
You might get the following error when connecting to Sharepoint
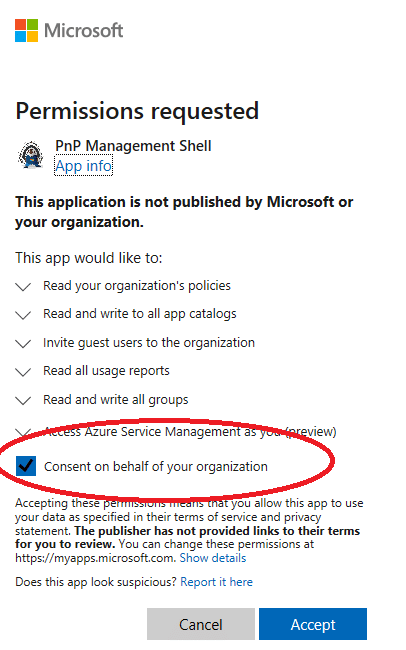
Connect-PnPOnline : AADSTS65001: The user or administrator has not consented to use the application with ID ‘31359c7f-bd7e-8888-86db-fdb8c937548e’ named ‘PnP Management Shell’. Send an interactive authorization request for this user and resource.Trace ID: b9913a0b-b47d-4ffe-bdc7-70ed81143000
To fix this issue, run the Register-PnPManagementShellAccess cmdlet, type the username and password and then make sure to check the “Consent on behalf of your organization“
Always make sure that your modules are up-to-date, as new features and compatibility are added frequently, most of the Office 365 PowerShell modules now supports Multi-Factor Authentication
Microsoft 365 Backup For Dummies eBook addresses the data security challenges by outlining the out-of-the-box security features in Microsoft 365. Get eBook
Summary
Office 365 has many services but fortunately, you can manage them all with PowerShell. Once you’ve installed both modules and connected using the Connect commands, you are on your way to managing Office 365 with PowerShell!


