


Suppose you published a website from your home network, and you created a DNS record that points to your router’s public IP address. How do you keep your DNS record updated when your public IP address changes? Perhaps you should consider setting up a Cloudflare dynamic DNS.
Internet service providers (ISP) typically assign dynamic IP addresses to their subscribers, which may change at any time. As a result, your DNS record remains pointing to an IP address that is no longer yours, and your website becomes inaccessible.
Keep reading because this tutorial will help you keep your DNS record updated using Cloudflare’s application programming interface (API) and PowerShell. Let’s get the ball rolling!
Prerequisites
If you plan to follow this tutorial hands-on, below are the requirements you need.
- A computer with PowerShell 7.1 where you’ll run the Cloudflare dynamic DNS update script. This tutorial will use a Windows 10 computer.
- A script editor of your choice. This tutorial will use Visual Studio Code v1.59.1 (recommended).
- A domain that you already own. The example domain in this tutorial is lazyexchangeadmin.cyou.
Free top-level domains (TLD), such as .ml, .ga., .tk, .cf, and .gq, are not applicable for Cloudflare dynamic DNS automation and will not work with this tutorial.
- A Cloudflare account. A free account is enough to use in this tutorial.
- You must have already added your domain to Cloudflare.
- You must have already added a DNS record under your domain in Cloudflare. The DNS A record in this tutorial will be demo.lazyexchangeadmin.cyou with an initial IP address of 0.0.0.0.

What is Cloudflare Dynamic DNS?
DNS records are inherently static, and it does not play well with dynamic IP addresses. Now, to solve that problem, you’ll need to set up dynamic DNS. Fortunately, Cloudflare provides an API that allows you to manage DNS records programmatically.
To set up a Cloudflare dynamic DNS, you’ll need to run a process on a client inside your network that does two main actions: get your network’s current public IP address and automatically update the corresponding DNS record.
The image below shows the high-level diagram of how the Cloudflare dynamic DNS update flow happens.
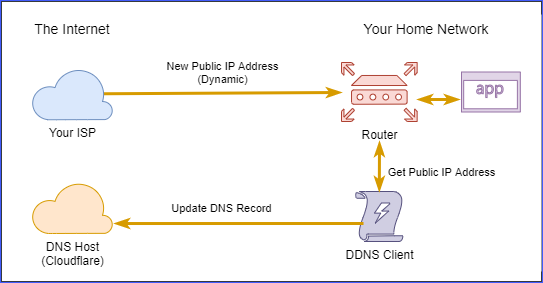
Many dynamic DNS clients are available to install, mostly for Linux systems, like on an Ubuntu server or Raspberry PI. Third-party dynamic DNS services also exist that may be paid or free. But in this tutorial, you’ll be deploying a DNS updater script that runs on PowerShell 7.1.
Getting a the Cloudflare API Token
When updating the Cloudflare dynamic DNS record programmatically, your script must authenticate itself to the Cloudflare API. Only then will Cloudflare allow you to make changes to the DNS records in your account.
Cloudflare allows you to create API tokens with enough permissions for its purpose. In turn, you can then use your Cloudflare account’s username and the resulting API token to authenticate with the Cloudflare API.
To create a Cloudflare API Token, follow these steps.
1. Open your browser, navigate to https://dash.cloudflare.com/login/, and log in to your Cloudflare account.
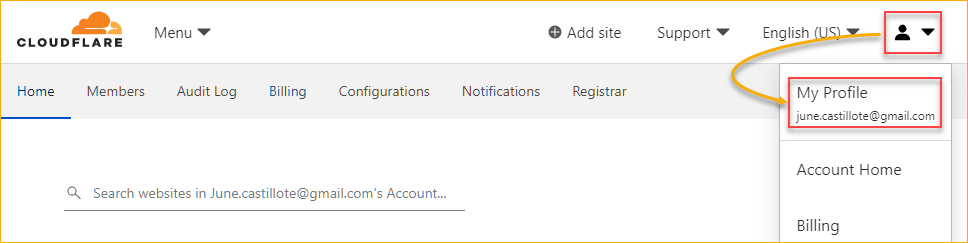
2. After logging in to the Cloudflare dashboard, click on the profile button on the upper-right corner and click My Profile.
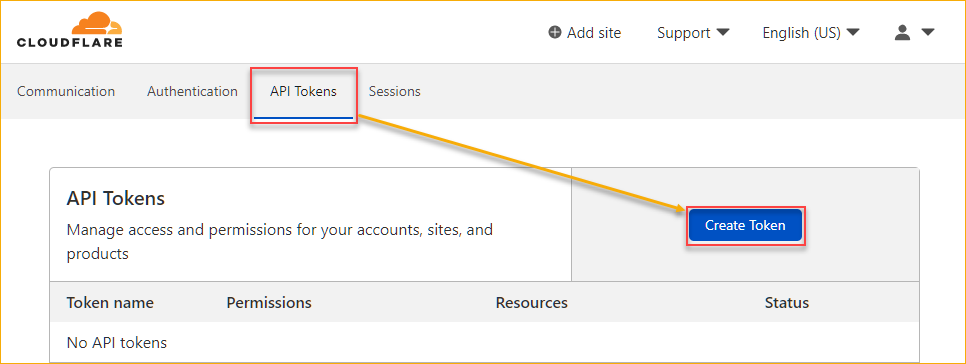
3. Next, click the API Tokens tab link. Under the API Tokens section, click the Create Token button. The example below assumes that you have not created any API tokens yet.
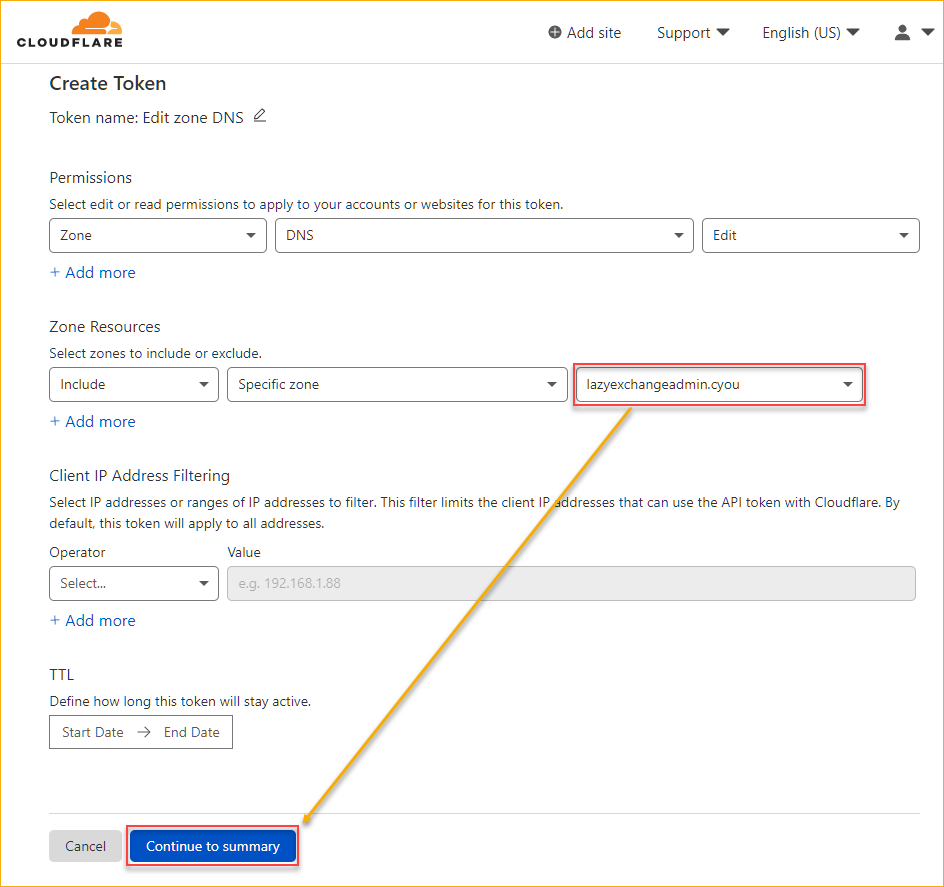
4. On the list of API token templates, click the Edit zone DNS template to use it. This template allows you to create an API token with edit permission to all or selected DNS zones in your account.

5. Under the Zone Resources section on the Create Token page, click the right-most dropdown box and select the DNS zone to include in this API token’s access. After choosing the DNS zone, click Continue to summary.
Optionally, to limit the API token’s validity period, fill in the Start Date and End Date under the TTL section. If left blank, the API token will have no expiration date.
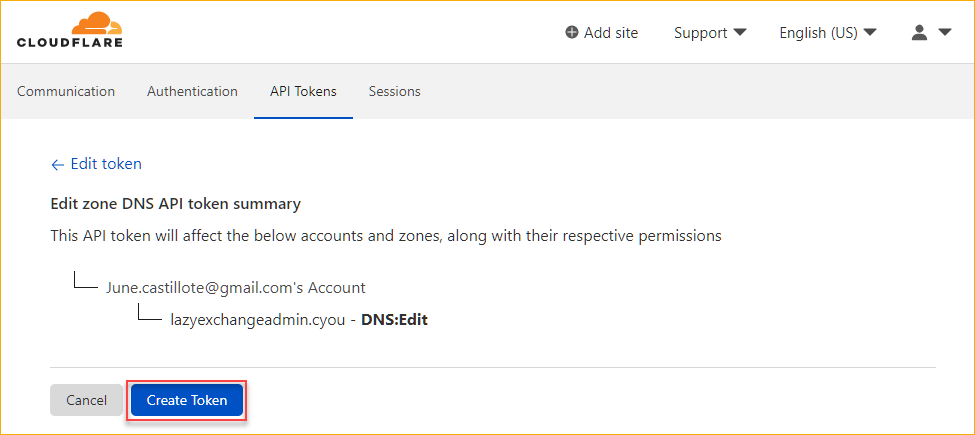
6. Review the summary and ensure that the API has DNS:Edit permission to the previously selected DNS zone. Finally, click Create Token to create the API token.
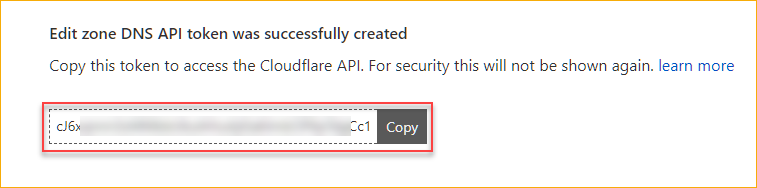
7. After creating the API token, copy the token value and make sure to store it securely. Treat the API token like how you would treat a password.
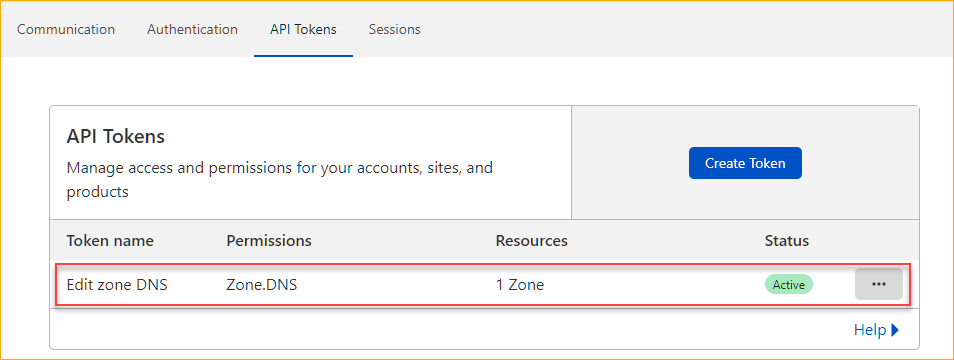
8. Go back to the API Tokens tab and confirm the existence of the API token you created.
Setting Up the Cloudflare Dynamic DNS Update Script
You now have the Cloudflare account and the Cloudflare API Token with permission to edit a DNS zone. What’s next? You’ll need to put the API token to use and integrate it with a script that would programmatically update the Cloudflare dynamic DNS record.
This tutorial provides you with a working PowerShell script specifically for updating a DNS record in Cloudflare.
Saving the Script
Follow the steps below to save the Cloudflare dynamic DNS PowerShell script on your client computer.
1. Decide to which folder to store the script and create that folder if it does not exist yet. In this example, the script location is in C:\CloudflareDDNS.
2. Open your code editor, such as VSCode, and create a new PowerShell script file called Update-CloudflareDDNS.ps1. Save the script inside the C:\CloudflareDDNS folder.
3. Copy the script below, paste it into your code editor, and save the file. Refer to the inline comments to understand what the script does.
#requires -Version 7.1

[cmdletbinding()]
param (
    [parameter(Mandatory)]
    $Email,
    [parameter(Mandatory)]
    $Token,
    [parameter(Mandatory)]
    $Domain,
    [parameter(Mandatory)]
    $Record
)

# Build the request headers once. These headers will be used throughout the script.
$headers = @{
    "X-Auth-Email"  = $($Email)
    "Authorization" = "Bearer $($Token)"
    "Content-Type"  = "application/json"
}

#Region Token Test
## This block verifies that your API key is valid.
## If not, the script will terminate.

$uri = "https://api.cloudflare.com/client/v4/user/tokens/verify"

$auth_result = Invoke-RestMethod -Method GET -Uri $uri -Headers $headers -SkipHttpErrorCheck
if (-not($auth_result.result)) {
    Write-Output "API token validation failed. Error: $($auth_result.errors.message). Terminating script."
    # Exit script
    return
}
Write-Output "API token validation [$($Token)] success. $($auth_result.messages.message)."
#EndRegion

#Region Get Zone ID
## Retrieves the domain's zone identifier based on the zone name. If the identifier is not found, the script will terminate.
$uri = "https://api.cloudflare.com/client/v4/zones?name=$($Domain)"
$DnsZone = Invoke-RestMethod -Method GET -Uri $uri -Headers $headers -SkipHttpErrorCheck
if (-not($DnsZone.result)) {
    Write-Output "Search for the DNS domain [$($Domain)] return zero results. Terminating script."
    # Exit script
    return
}
## Store the DNS zone ID
$zone_id = $DnsZone.result.id
Write-Output "Domain zone [$($Domain)]: ID=$($zone_id)"
#End Region

#Region Get DNS Record
## Retrieve the existing DNS record details from Cloudflare.
$uri = "https://api.cloudflare.com/client/v4/zones/$($zone_id)/dns_records?name=$($Record)"
$DnsRecord = Invoke-RestMethod -Method GET -Uri $uri -Headers $headers -SkipHttpErrorCheck
if (-not($DnsRecord.result)) {
    Write-Output "Search for the DNS record [$($Record)] return zero results. Terminating script."
    # Exit script
    return
}
## Store the existing IP address in the DNS record
$old_ip = $DnsRecord.result.content
## Store the DNS record type value
$record_type = $DnsRecord.result.type
## Store the DNS record id value
$record_id = $DnsRecord.result.id
## Store the DNS record ttl value
$record_ttl = $DnsRecord.result.ttl
## Store the DNS record proxied value
$record_proxied = $DnsRecord.result.proxied
Write-Output "DNS record [$($Record)]: Type=$($record_type), IP=$($old_ip)"
#EndRegion

#Region Get Current Public IP Address
$new_ip = Invoke-RestMethod -Uri 'https://v4.ident.me'
Write-Output "Public IP Address: OLD=$($old_ip), NEW=$($new_ip)"
#EndRegion

#Region update Dynamic DNS Record
## Compare current IP address with the DNS record
## If the current IP address does not match the DNS record IP address, update the DNS record.
if ($new_ip -ne $old_ip) {
    Write-Output "The current IP address does not match the DNS record IP address. Attempt to update."
    ## Update the DNS record with the new IP address
    $uri = "https://api.cloudflare.com/client/v4/zones/$($zone_id)/dns_records/$($record_id)"
    $body = @{
        type    = $record_type
        name    = $Record
        content = $new_ip
        ttl     = $record_ttl
        proxied = $record_proxied
    } | ConvertTo-Json

    $Update = Invoke-RestMethod -Method PUT -Uri $uri -Headers $headers -SkipHttpErrorCheck -Body $body
    if (($Update.errors)) {
        Write-Output "DNS record update failed. Error: $($Update[0].errors.message)"
        ## Exit script
        return
    }

    Write-Output "DNS record update successful."
    return ($Update.result)
}
else {
    Write-Output "The current IP address and DNS record IP address are the same. There's no need to update."
}
#EndRegion
Running the Script
Now that you’ve saved the Cloudflare dynamic DNS update script, what’s next? Before deploying the script, testing whether its functionality works is essential. Running the script requires four details to be successful, and those are:
Email– which is the email address for your Cloudflare account.Token– the API token that you previously created from your Cloudflare account.Domain– the DNS domain name that contains the DNS record you want to update. (e.g., lazyexchangeadmin.cyou).Record– the DNS record you want to update. (e.g., demo.lazyexchangeadmin.cyou).
To run the script, proceed as follows.
1. First, open a PowerShell session. Or, if you’re using VSCode, use the VSCode PowerShell terminal instead.
2. Next, perform a DNS record lookup to confirm the current DNS record’s IP address. To do so, run the Resolve-DnsName cmdlet, as you can see below. Make sure to provide the fully qualified domain name (FQDN) with the -Name parameter.
Resolve-DnsName -Name demo.lazyexchangeadmin.cyouThe command should return the DNS record you looked up, including its IP address.

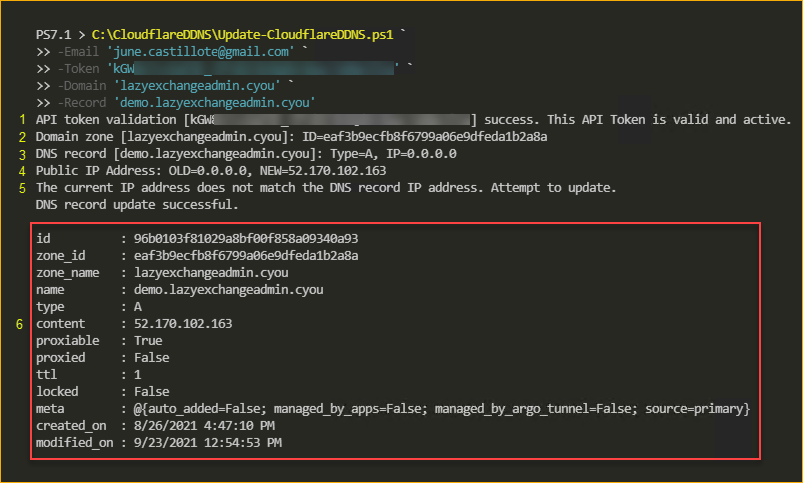
3. Now, invoke the Update-CloudflareDDNS.ps1 script to update the DNS record in Cloudflare by running the command below. Make sure to change the Email, Token, Domain, and Record. The command below assumes that your script is in C:\CloudflareDDNS\Update-CloudflareDDNS.ps1.
C:\CloudflareDDNS\Update-CloudflareDDNS.ps1 `
-Email '[email protected]' `
-Token 'kGW8n........eJl5a' `
-Domain 'lazyexchangeadmin.cyou' `
-Record 'demo.lazyexchangeadmin.cyou'
The script then performs the following actions, as you can see on the screenshot below.
- Validates the API token.
- Find the domain containing the DNS record to update.
- Find the DNS record to update.
- Compare the DNS record IP address with the actual external or public IP address.
- Update the DNS record IP address in Cloudflare.
- Display the dynamic DNS update result.
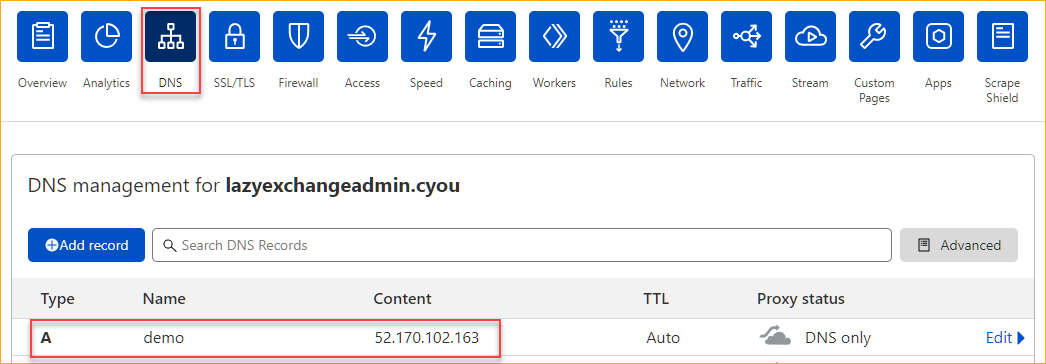
4. Go back to your Cloudflare dashboard and verify that the DNS record reflects the new IP address. The screenshot below shows that the IP address has changed to the external IP address value after running the update script.
5. Finally, perform another DNS record lookup as you did in step 2 to confirm whether the new IP address already publicly propagated.
Resolve-DnsName -Name demo.lazyexchangeadmin.cyouDNS record propagation may take several minutes, hours, or even days. In this example, Cloudflare propagation only took less than a minute.

Scheduling the Cloudflare Dynamic DNS Update Task
At this point, you now have a working script that updates your Cloudflare dynamic DNS record. But running the script manually each time is not the goal. You must make sure that the dynamic DNS update runs on a schedule automatically as often as necessary.
Depending on which operating system you’re using, how you schedule the script to run varies, like a cron job in Linux. This tutorial will create a Windows scheduled task that runs the Cloudflare dynamic DNS update script every five minutes.
Defining the Scheduled Task Action
Your scheduled task has to have an action, which you can create by running the New-ScheduledTaskAction cmdlet. In this example, the action is to run the Update-CloudflareDDNS.ps1 script using the PowerShell executable file pwsh.exe.
To do so, open a new PowerShell window as admin. Next, copy and run the code below in PowerShell. Make sure to change the $scriptPath, $Email, $Token, $Domain, and $Record variables.
# Define the scheduled task action properties
## Enter the PowerShell script path
$scriptPath = 'C:\CloudflareDDNS\Update-CloudflareDDNS.ps1'
## Cloudflare account's email address
$Email = '[email protected]'
## Cloudflare API Token
$Token = 'kGW8n........eJl5a'
## DNS Domain Name
$Domain = 'lazyexchangeadmin.cyou'
## DNS Record to Update
$Record = 'demo.lazyexchangeadmin.cyou'

# Create the scheduled task action object
$taskAction = New-ScheduledTaskAction `
    -Execute "pwsh.exe" `
    -Argument "-File $scriptPath -Email $Email -Token $Token -Domain $Domain -Record $Record"
Creating the Scheduled Task Trigger
After you’ve defined what the task will do, you must next create a trigger or schedule for the task by running the New-ScheduledTaskTrigger cmdlet. Copy the code below and run it in PowerShell to create a new task trigger that runs every five minutes within a ten-year duration.
# Create a bew scheduled task trigger schedule
## Trigger = every 5 minutes for 10 years.
$taskTrigger = New-ScheduledTaskTrigger `
-Once `
-At (Get-Date -Minute 0 -Second 0) `
-RepetitionInterval (New-TimeSpan -Minutes 5) `
-RepetitionDuration (New-TimeSpan -Days 3650)
Registering the New Scheduled Task in the System
Finally, you’re ready to register the new scheduled task on the computer. In doing so, you’ll need to run the Register-ScheduledTask cmdlet, same as the code below. Copy the code below and run it in PowerShell to register the scheduled task.
The resulting scheduled task will run under the local SYSTEM account. Feel free to assign a different user account to run the scheduled task as necessary.
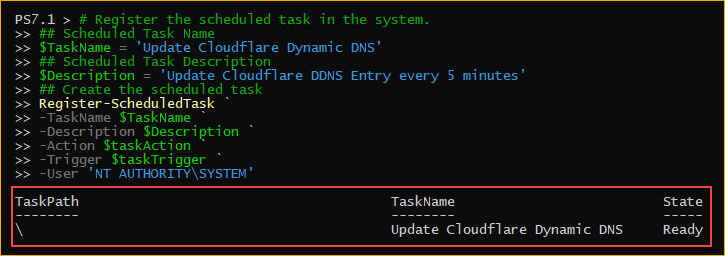
# Register the scheduled task in the system.
## Scheduled Task Name
$TaskName = 'Update Cloudflare Dynamic DNS'
## Scheduled Task Description
$Description = 'Update Cloudflare DDNS Entry every 5 minutes'
## Create the scheduled task
Register-ScheduledTask `
-TaskName $TaskName `
-Description $Description `
-Action $taskAction `
-Trigger $taskTrigger `
-User 'NT AUTHORITY\SYSTEM'
As you can see below, the command created the scheduled task, and the status is ready. From this point forward, the script will be running at a five-minute interval.
Conclusion
Keeping DNS records updated with dynamic IP addresses changes doesn’t have to be a challenge. You don’t need to pay for a dynamic DNS service either! By managing your DNS zones in Cloudflare, you can take advantage of their API, allowing you to update your DNS records programmatically.
You learned in this tutorial how to update a Cloudflare dynamic DNS record using a combination of API calls, PowerShell 7, and scheduled tasks. All of which allows you to configure your Cloudflare dynamic DNS update mechanism once and keep the update running at an interval unattended.
Would you consider managing your DNS zones with Cloudflare to reap the benefits of its API? Or is there a more convenient and accessible way that you know of?


