


Are you tired of having to change file and directory permissions manually? Are you looking for a faster, more efficient way to modify your files and directories permissions? If so, then you’ve come to the right place because, in this article, you will learn how to change file and directory permissions using the command chmod recursively!
Read on to learn more!
Prerequisites
To follow along, you need a Linux device and a directory whose files and sub-directories permissions are available to practice with.
Learning About Linux Users and Groups
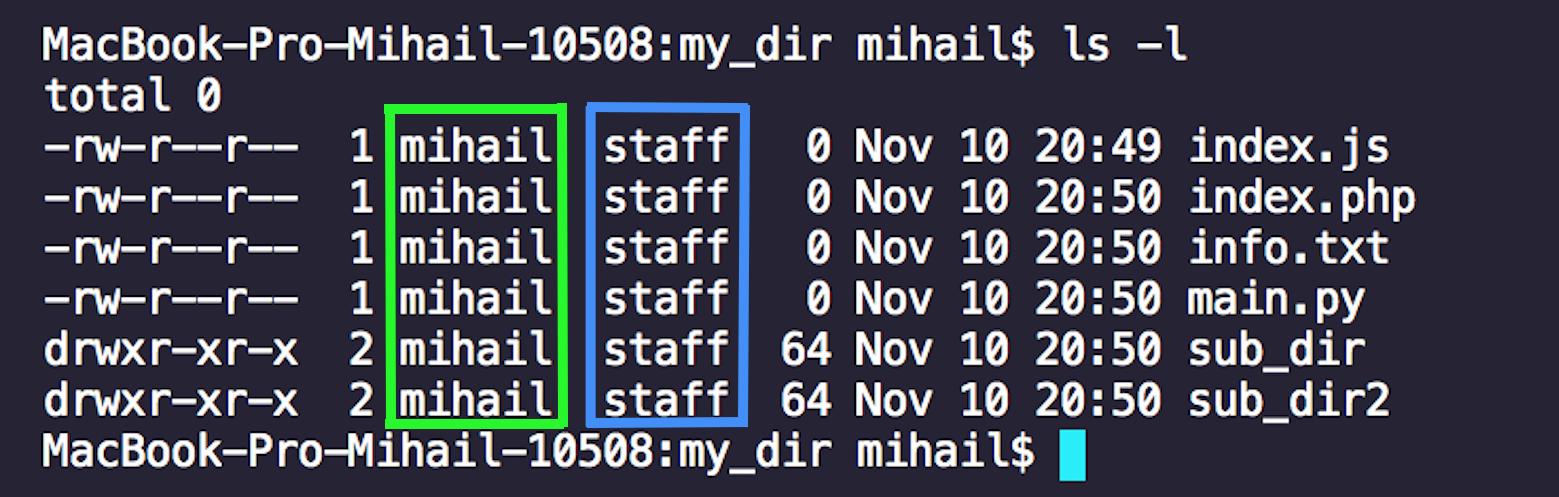
Owners and groups are important in Linux, necessary to securely manage files and directories. The owner is to whom a file or directory is assigned, which is the creator, by default. In Linux, files and directories also belong to groups. Both users and groups are set via the chown command.
In the screenshot below, the content highlighted in green shows the user who owns the file or directory, mihail in this example. The content highlighted in blue shows which group the file or directory belongs to, owned by the staff group in this example.
Understanding Linux File and Directory Permissions
Permissions set what actions a user or group may perform on a given file or directory. They are indicated by a character representation and also assigned a numerical value.
- Read (
ror4): Indicates whether a user or group may read the contents of the file or directory. The read permission is granted by default to all newly created files and directories for all parties. - Write (
wor2): Indicates whether a user or group can edit the contents of an object. This permission is granted by default only to a file or directory owner. - Execute (
xor1): Indicates whether a user or group can execute a file or execute commands inside a directory. The execute permission is granted by default only to directories but not to files.
If you do not give the user (
u) execute permissions to a directory, they will not be able to list contents as the user will not be able to execute commands within the directory!
An example is shown below, the output of the command ls -l demonstrates the different permission types. Those permissions preceded by the d value, indicate a directory.
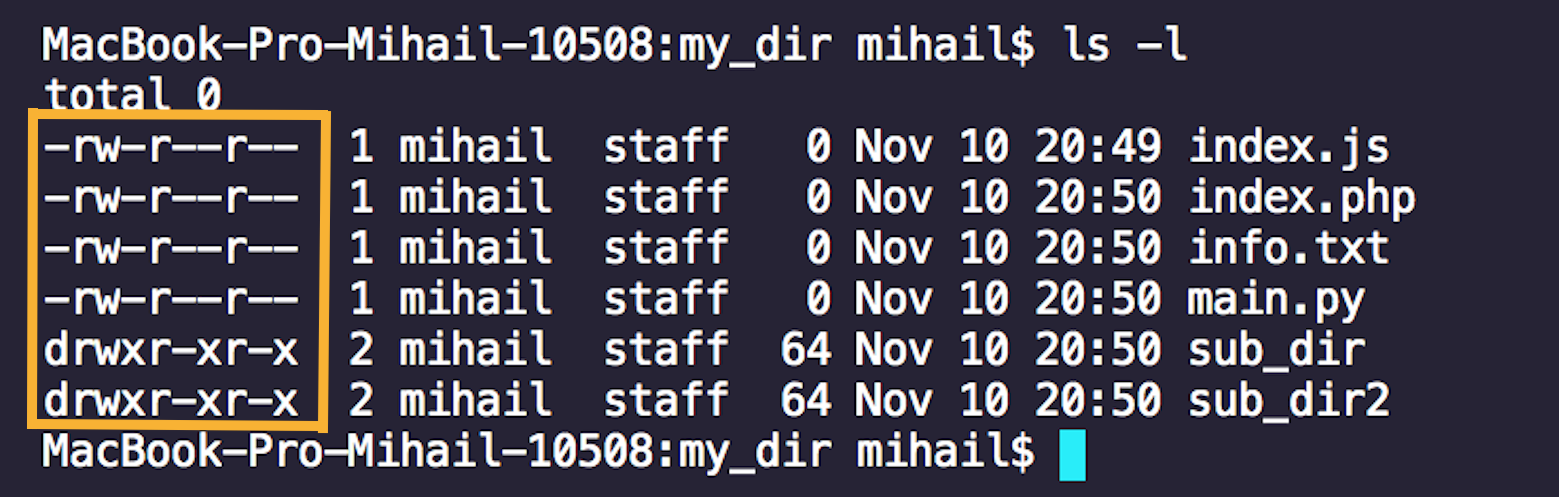
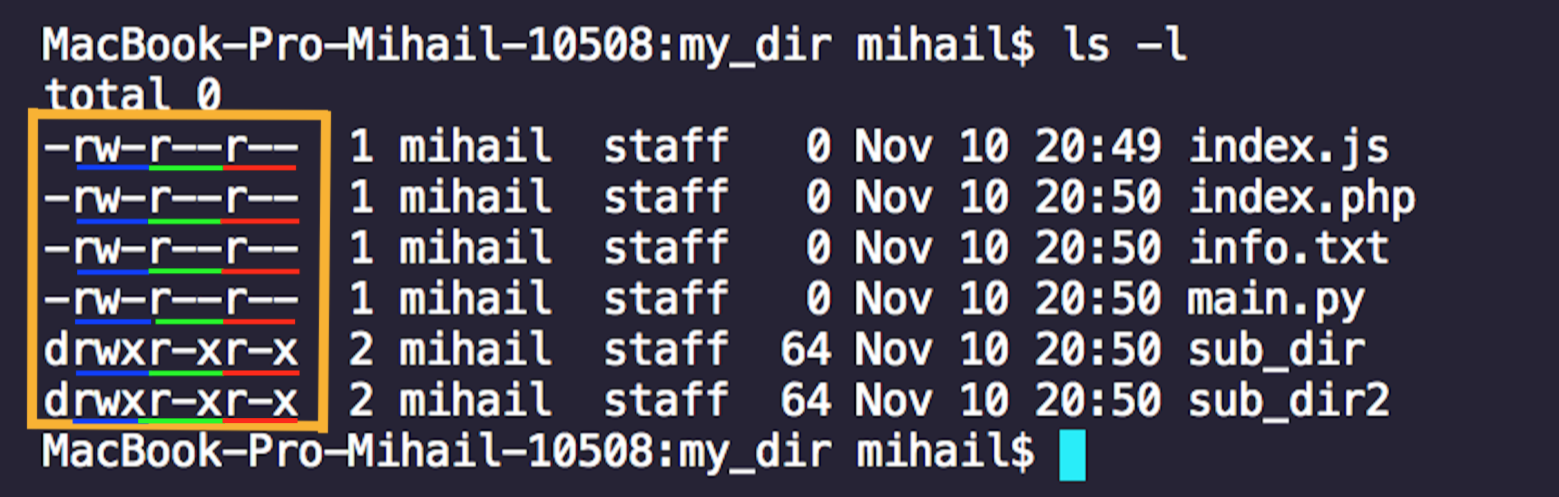
Why then are there seemingly three sets of permission for each object? Granular control of permissions is achieved by dividing permissions into the sections (referenced as parties for the purpose of this tutorial) listed below.
- User (
u): The owner of a file or directory, highlighted in blue. - Group (
g): Members of the group to which a file or directory belongs, highlighted in green. - Other (
o): All additional users and groups not explicitly assigned, highlighted in red.
Changing File Permissions via the chmod recursive Command
With the proper Linux permission understanding, read on to learn how to change file permissions. Permissions are modified via the chmod recursive command as shown in the below examples.
1. First, check the current permissions with the ls -l command. Here, the my_dir/index.js file is shown.

2. Run the chmod command, specifying the party, a (all), and the permissions, rwx, or read/write/execute. The full command follows: chmod a=rwx index.js.

3. As you can see, running chmod recursive doesn’t return any output. To verify that permissions have changed run the command ls -l again.

Setting File Permissions via Numeric Values
Remember the numbers associated with permissions such as read or write? Instead of specifying the character values, you may specify specific permissions via a number. By adding the values, you create a specific permission such as 6 which is a combination of write (2) and read (4) permissions.
In the example below, set permissions for the main.py file via the command chmod 664 main.py. The numerical values break down as follows.
- User: Read and Write (
6). - Group: Read and Write (
6). - Other: Read (
4).

Once permissions are changed, verify the new permissions for the main.py file with the command ls -l.

Removing and Adding File Permissions
The non-numerical commands you have run so far used the assignment parameter (=) with chmod recursive, to set explicit permissions. Instead, you may remove (- ) or add (+) permissions to existing permission sets.
1. First, list the existing permissions for the README.md file via the command ls -l README.md.

2. Next, add (+) execute (x) permissions to the user party (u), while removing (-) read (r) permissions from the other party (o) for README.md, with the following command chmod u+x,o-r README.md. Differing party permissions are separated by commas (,).

3. Run the ls -l README.md command to verify that permissions were modified.

Recursively Changing File and Directory Permissions
Although you are making progress, you are only operating on one file at a time. What if you have a large number of files to change permissions for? Time to step up your game and learn to change permissions for multiple files.
One of the options to change multiple files is to run chmod recursive with the -R (recursive, and not the capital) option. The recursive option will change the permissions for all the files, including those under sub-directories, inside a given path.
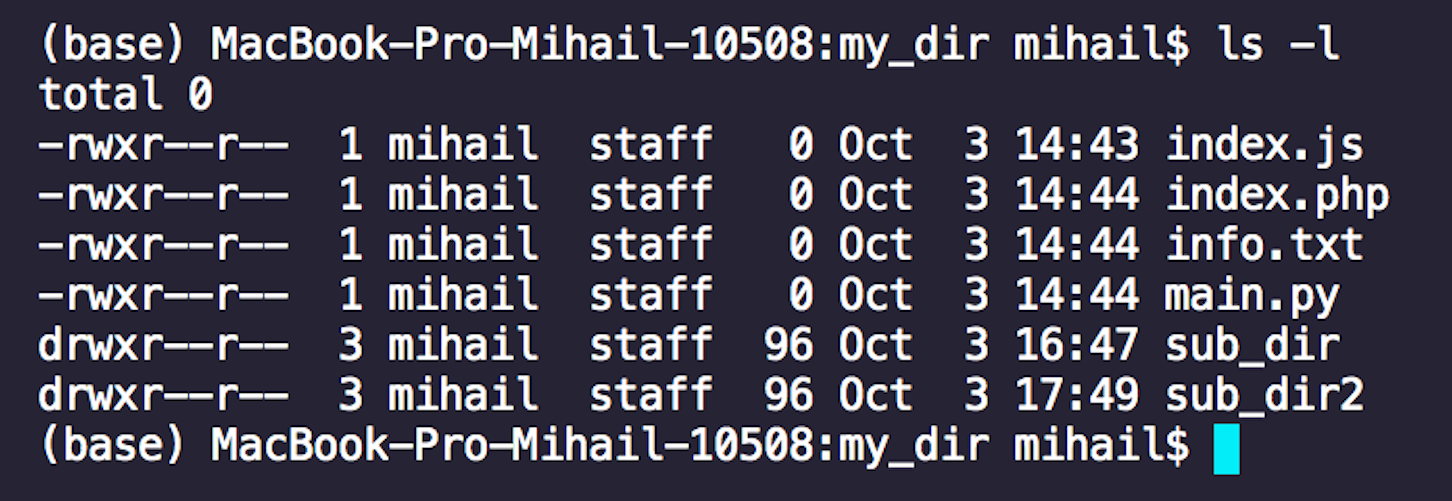
1. Consider the following command, chmod -R a=r,u=rwx my_dir. Most of the options you have already seen before.
This command will change the permissions for all files in the directory, my_dir and sub-directories, via the recursive option (-R). The files are set to readable (r) for all (a), with differing permission for the current user (u) set to full permissions (read, write, execute).
In the screenshot below, you see the resulting permissions after executing the command, which has no resulting output.
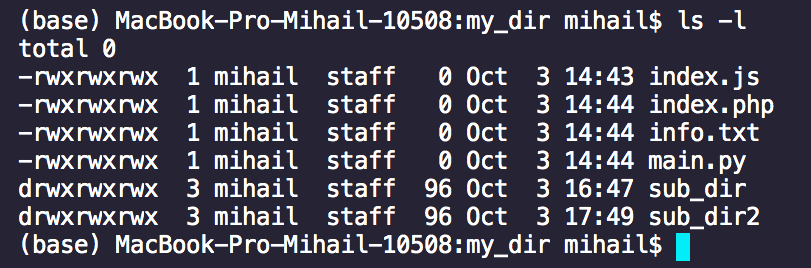
2. Suppose you run the command, chmod -R a=rwx my_dir, on the same directory as before, my_dir. Once again, you are changing all files in my_dir, and its subdirectories, to set give all (a) full permissions (read, write, execute). Here is the result of the command, as chmod recursive does not display output.
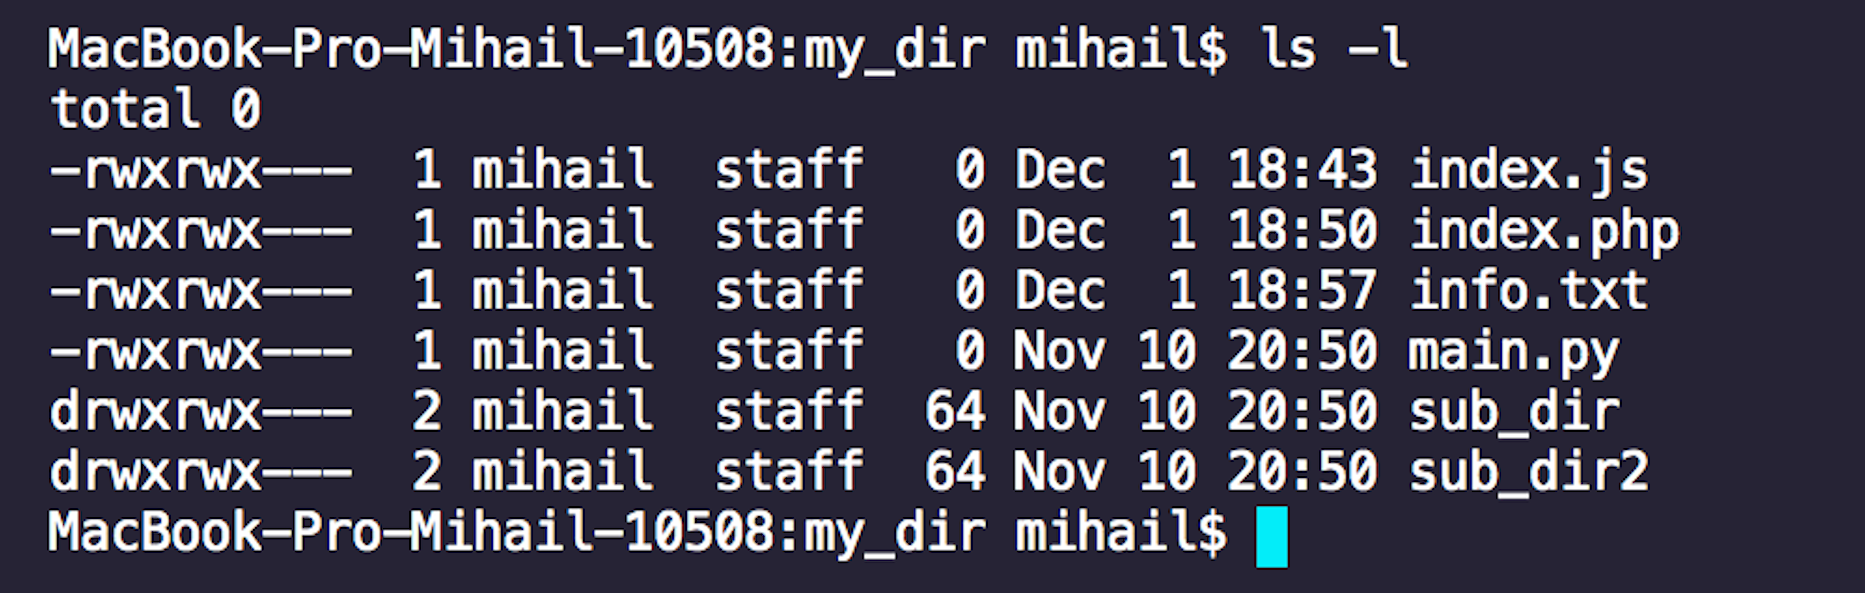
3. How about the numeric method? As shown below, the recursive method also works with numeric permissions, chmod -R 770 my_dir. Here you are giving full permissions to the user and group, but no permissions to the other party.

4. Run ls -l to check that my_dir files and sub-directories permissions are set with the numeric method.
Defining File and Folder Behavior via Special Permissions
Special permissions allow for several additional privileges unique from the standard permission sets. There are three special permissions. Here is how these special permissions work and how you can add them to a file or directory.
Setting the SUID (User + S) Permissions
Commonly noted as SUID, it is a special permission for the user. The SUID has a single function: a file with SUID always executes as the user who owns the file, regardless of who is executing the file.
For example, consider index.js. To give the additional SUID permission, run chmod u+s index.js.
Now, if you run ls -l index.js, you’ll find that the user has an s in their permissions instead of an x.

Setting the SGID (Group + S) Permissions
Commonly noted as SGID, this special permission has two functions:
- If set for a file, it allows the file to be executed as the group that owns the file, regardless of who is executing the file.
- If set for a directory, any files created in the directory will have their group ownership set to that of the directory owner.
Practice on the index.php file. To add the SGID permission to this file, run the following command: chmod g+s index.php.
Now, if you run ls -l index.php, you’ll find that the group has an s in their permissions.

Move on to a directory: my_dir. You can add the SGID permission to this directory using the following command: chmod g+s my_dir. Any files created in this directory will now have their group ownership set to the directory owner. You can check the directory new permissions using ls -ld my_dir (the d parameter limits output to directories only).

Changing the Sticky Bit Permission
The last special permission is also known as the “sticky bit.” This permission does not affect individual files. But, at the directory level, it restricts file deletion. Only the owner of a file can remove a file within that directory.
Add the sticky bit to the old familiar my_dir directory. To do that, run the command as follows: chmod +t my_dir.
Note that, to add the sticky bit, you do not indicate the other group(o) before the
+t.
When you check my_dir‘s new permissions, you will see a capital T in the other permissions, as shown in the screenshot below.

Conclusion
Congratulations! You covered a lot of topics on chmod recursive. You are now ready to tackle any pesky permission problems that arise with the almighty chmod tool. You even learned how to leverage the power of the recursive (-R) option.
How do you intend to implement chmod versatile functionality to your advantage next time you’ll need to manage file or directory permissions?