

Have you ever been stuck searching for a file and could not remember where you saved it, let alone the filename itself? On Linux, the Bash find command will help you scour your system to find that file.
The Bash find command in Linux offers many ways to search for files and directories. In this tutorial, you’ll learn how a file’s last-time access, permissions, and more can help find files and directories with the Bash find command. Let’s get started!
Prerequisites
If you’d like to follow along with the various demos in this tutorial, be sure you have the following:
- A Linux PC – This tutorial uses Ubuntu 20.04, but any Linux distribution should work.
- The
findutility – The Bash find utility should already be on all Linux distributions. This tutorial uses v4.7.0.
The Bash find Command 101
Finding a file requires some criteria; a part of the file name, a file type, permissions on the file, etc. The find command allows you to define those criteria to narrow down the exact file(s) you’d like to find. The find command finds or searches also for symbolic links (symlink). A symbolic link is a Linux shortcut file that points to another file or a folder on your computer. Let’s first cover the most basic way to use the Bash find command.
Perhaps you’re in your home directory, looking for a directory named snap and all files and subdirectories under it. In that case, run the find command, followed by the directory’s name ("snap"), and that’s it!
Since there are no other command line arguments below, you can see the list of files and directories found recursively inside the snap directory.
find "snap"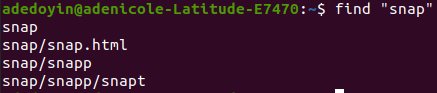
If you don’t specify the
nameparameter,findwill assume the first argument should be for thenameparameter, e.g.,find "snap"is the same asfind -name "snap.”
Finding Files with Tests (aka Filters)
You have seen the most basic form of the find command and how it works. But perhaps you want to narrow down the search a bit to define more specific criteria. If so, you’ll need to apply tests. Tests are criteria you provide to the find command.
Tests tell the find command to filter the output based on many different criteria.
Finding Files by File or Directory Name
Perhaps you only remember how the name of the file starts, maybe in a case-insensitive manner. In that case, you can use a wildcard to help narrow down the results.
# Find files and directories with names starting with 'snap'
find -name "snap*"

# Find files and directories with names starting with 'snap'
# in case insensitive manner (For example:'Snap', 'snap', 'SNaP', etc.)
find -iname "snap*"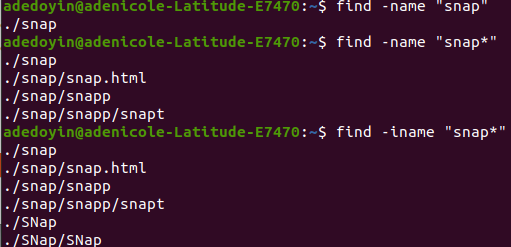
-name TestFinding Files and Directories by File Type
Like the -name test, the -type test is another efficient way of finding files and directories. The -type test lets you filter the result of the find command by either files or directories.
# Find a file named 'snap'
find "snap" -type f
# Find a directory named 'snap'
find "snap" -type d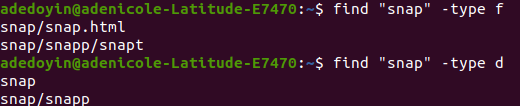
-type TestTo further narrow down the file search, combine the -name and -type tests by running the command below.
The find command below looks for directories only (-type d) with names (-name) that start with snap.
find -name "snap*" -type d
Finding Files and Directories with Tests and Operators
Now that you’ve learned the basics of the find command combined with tests, it’s time to take the file-searching up a notch. Perhaps you need to find files or directories that match more than one condition, such as the name and file type. In that case, you need to combine conditions.
When you need to add more than one condition to find files, you can combine conditions with operators. Operators are elements that allow you to combine conditions to form more complex tests/filters.
Combining Two Conditions with the -and Operator
Perhaps you need to find some files or directories that match a specific name and type. To do that, you can use the -and operator. The -and operator allows you to combines two or more expressions and outputs the result only if the find command returns a true value. Expressions are the representations of certain conditions, like when filtering files by name (-name "snap").
To demonstrate how the -and operator combines two conditions, run each following commands.
# Find files only (-type f) and (-and) ensure the names (-name) start with snap
# in the current directory and subdirectories.
find -name "snap*" -and -type f

# Find directories only (-type d) and (-and) ensure the names (-name) start with snap
# in the current directory and subdirectories.
find -name "snap*" -and -type d

# Find files only (-type f) and (-and) ensure the names (-name) start with snap
find -name "snap" -and -type f

# Find directories only (-type d) and (-and) ensure the names (-name) start with snap
find -name "snap" -and -type d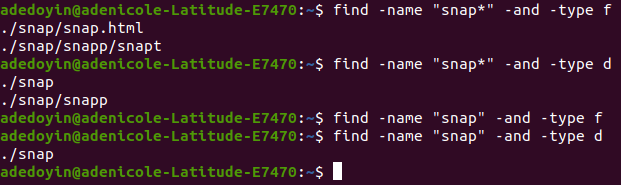
-and OperatorCombining Two Conditions with the -or Operator
Like the -and operator, the -or operator (-o) also combines two separate expressions. The difference is that the find command will output results even if only one expression is true.
Below is a basic syntax of how to combine two conditions with the -or operator. The find command outputs the result even if only one, either expr1 or expr2, returns a true value.
find <expr1> -or <expr2>Perhaps you’d like to find a file name using the -name parameter of a specific type using the -type parameter. If so, run the find command below to look for files (-type f) with names (-name) that start with snap -or chart.
find -name "snap*" -type f -or -name "chart*"
Filtering out Files with the -not Operator
Unlike the first two operators where you filter the contents you’re looking for, the -not operator (!) is the contrary. The -not operator excludes files and directories that you don’t want to see in the search result.
Maybe you want to find files only with names that don’t start with a specific name. In that case, run the following command. Notice the find command below looks for files only (-type f), with names (-name) that don’t start with snap.
find -not -name "snap*" -type f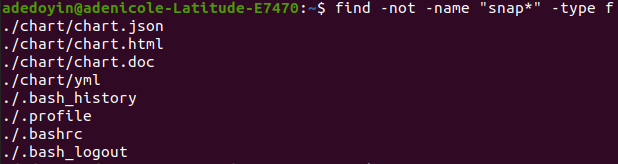
-not OperatorFinding Files by Grouping Expressions
By now, you’ve learned how to use tests and operators to filter the find command’s result. But what if your target result is a bit complex? If so, you need to look into grouping expressions. The Bash find command allows you to group expressions which means to define two or more conditions “sets.”
Grouping Expressions with Parentheses
Let’s say you need to find files or directories with different names. You’ll soon find the task impossible by using the find command basics, as covered earlier. As a solution, you’ll need to use parentheses to combine the expressions to form a single complex expression.
In this example below, the find command will either look for files (-type f) with .html extension or directories (-type d) with names that start with chart.
Both open and close parentheses are escaped with a backslash (
\) to allow the terminal to read the parentheses literally. The escape character tells thefindcommand to treat the character literally.
find \( -name "*.html" -type f \) -or \( -name "chart*" -type d \)
Rather than using parentheses, you can also use commas to group expressions like
find -name "snap*" -type d -delete, -name "chart*" -print. Grouping expressions by commas is basically a running series of tasks in a single command.
Searching for Files from the Parent Directory
In all of the previous examples, the Bash find command found files only from the current working directory and all subdirectories. But maybe you need to start your search at the parent directory instead. If so, give the -depth option a shot. The -depth parameter lists files and directories in depth-first order, as shown below.
The find command below lists the contents from the parent directory first and down to the working directory (snap).
find "snap" -depth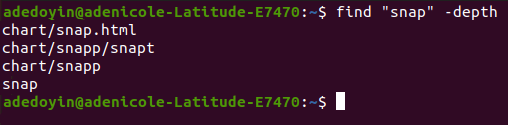
Finding Files and Directories by Permission
Instead of finding files filtered by name and type, the find command also lets you find files and directories filtered by permission. In Linux, every file and folder has specified permissions for owners, group owners, and other users. The find command lets you take advantage of those permissions to filter the search result for files and directories with the -perm option.
Before you try to find files and directories with the
-permoption, you’ll need to familiarize yourself with reading permissions. Permissions indicate who has access and can modify certain files and directories.
Finding Files via Symbolic Mode
Now that you understand the concept of file permissions try to find files via symbolic mode. The symbolic mode uses a combination of letters and symbols to represent file permissions.
To demonstrate how to find files via symbolic mode, run each of the following commands.
# Find only files (-type f) in the working directory (.)
# with read, write and execute permissions for user, group and others in the current
find . -perm u=rwx,g=rwx,o=rwx -type f

# Find files (-type f) in the working directory (.)
# with any of the read, write and execute permissions (not the exact)
# for user, group and others in the current
find . -perm -u=rwx,g=rwx,o=rwx -type f

# Find files (including hidden files) where either of the user, group or others
# have read, write and execute access to files in the working directory (.)
find . -perm /u=rwx,g=rwx,o=rwx -type f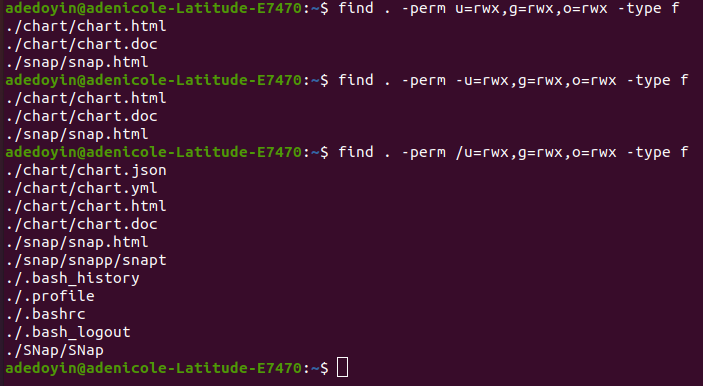
Finding Files and Directories via Absolute Mode
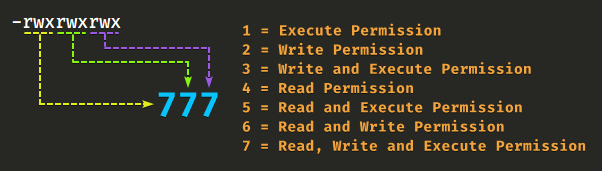
If you don’t prefer to find files via symbolic mode, then absolute mode may pique your interest. Absolute mode defines permissions in octal numeric representation vs. using letters.
Below you can see that the symbolic mode -rwxrwxrwx is equivalent to the absolute mode 777.
Let’s say you only want to find files and directories with read-only permission for user, group and, others. If so, run each of the commands below to see the results you’ll get when finding files and directories via absolute mode.
# Find files and directories only with read-only permission
# for user, group and others in the working directory (.)
find . -perm 444

# Find files and directories only that have least the read-only permission
# for user, group and others in the working directory (.)
find . -perm -444

# Find files and directories only (including hidden files and directories)
# that have least the read-only permission
# for user, group and others in the working directory (.)
find . -perm /444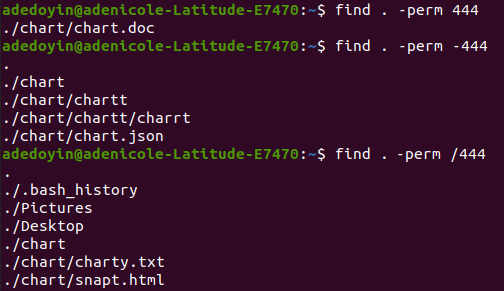
Modify Search Result Output with the -print Parameter
Instead of just displaying file paths in the search result, perhaps you want to see their properties as well. Using the -print action, you can modify the output the find command produces.
The -print parameter is the default behavior when you run the find command where it prints out the search result of files, each on a new line. So running either of the commands below to find files and directories named snap, you’ll get the same result.
find -name "snap" -print
find -name "snap"
find command produces with the -print actionFinding and Printing Files Names Without White Spaces
Unlike the default -print parameter, the -print0 option lets you clear white spaces or newline characters in a search result returned by the find command. Especially when you’re passing the result to another command like grep to search for patterns.
The command below lets you find and output a directory without white spaces or newline characters.
# Find a file or directory named 'snap', print the result
# removing white spaces and newline characters
find -name "snap" -print0
Finding and Printing File with Properties via Print Formatting
To change up the format of the output, the find command also has a -printf parameter. This parameter allows you to create directives or “formatters” that define how the search result will look.
Perhaps you need to find files along with their properties like the last time they were accessed. If so, run the following commands.
# Find files only with names starting with 'snap', then print each file
# along with their last-time access properties, full path and filename
# each on a new line
find -name "snap*" -printf "%a %p \n"

# Find files with .html or .json extension
# then print each file owner's username, group name, full path and filename
# each on a new line
find \( -name "*.html" -type f \) -or -name "*.json" -printf "%u %g %p \n"
Below is a list of directives available to work side by side with the -printf action:
%a– Returns the last time a file was accessed.%b– Returns the amount of disk space used for a file in 512-byte blocks.%d– Returns a file’s depth in the directory tree.%g– Returns a file’s group name or numeric group ID if the group has no name.%k– Returns the amount of disk space used for a file in 1K blocks.%m– Returns permission bits of a file (in octal).%p– Returns a file’s exact filename.%s– Returns a file’s size in bytes.%t– Returns a file’s last modification time in the format returned by the-ctimeoption.%u– Returns a file owner’s user name or numeric user ID if the user has no name.
Limiting the Depth of Finding Files
Perhaps you wish to narrow down further and limit the search in directories; you’ll need to use the -maxdepth option with the find command, as shown below.
The -maxdepth parameter tells the find command to limit the search scope to only a certain number of subdirectories down the directory tree.
# Find files and directories one step down from the working directory
find . -maxdepth 1 -name "chart*"

# Find files and directories two steps down from the ~/chart directory
find ~/chart -maxdepth 2 -name "chart"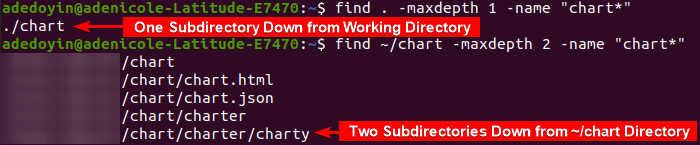
Finding Files Limited to Working Directory with -prune Option
If you need to limit a search to only the current working directory and not recurse into any subdirectories, check out the -prune parameter.
In the command below, you’ll find files and directories which names (-name) do not start with snap and is limited (-prune) to the working directory (.).
To get search results for files and folders with names starting in
snapinstead, remove the-oroperator and-print action, like this:find . -name "snap*" -prune
find . -name "snap*" -prune -or -print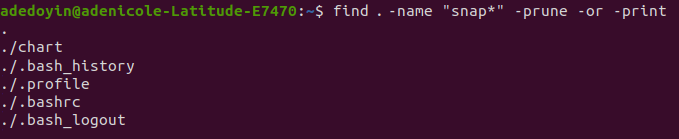
Finding Files and Directories via Last Time Access
Pruning particular files surely narrow down the search result. But what if the only thing you remember about the file you’re looking for is the last time you accessed that file? Well, the good news is that the find command lets you search for files and directories via their last-time access. Let’s dive in!
Finding Files via File’s Last Day Access
Let’s say you still remember the last day you accessed a file or directory, then the -atime option combined with the find command is all you need, as demonstrated below. If a file’s last time access does not fall under that value you specified, the find command returns a false value and skips that file.
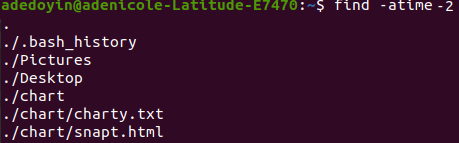
# Find files and directories you last accessed between 2-3 days ago
find -atime 2
# Find files and directories you last accessed within the past 2 days
find -atime -2
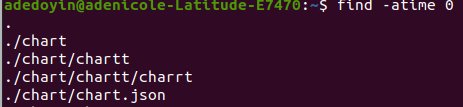
# Find files and directories you last accessed within the past day
find -atime 0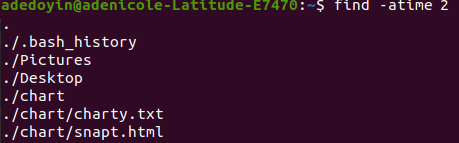
Perhaps you also want to see the last time access of a file or directory, then add the
-printfaction with directives. The command line below lets youfindfiles accessed within the past day (-atime 0). Then the-printfaction outputs the last time access (%a) of files or directories and the filenames (%p), each on a new line (\n), as shown below.
find -atime 2 -printf "%a %p \n"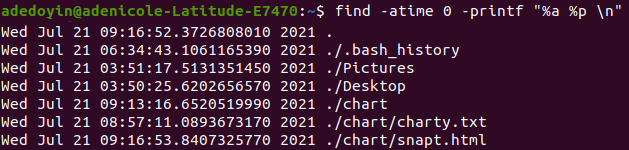
Finding Files via File’s Last Minute Access
Let’s say you need to find files based on the minute. Like the -atime option, the -amin functions the same. But instead, you’ll get search results for files filtered by their last time access based on the value you specified, as shown below.
# Find files and directories accessed within the past 40 minutes
# Not ideal most of the time as you will get result of tons of files and directories
find -amin 40

# Find directories accessed within the past 40 minutes
find -name "snap*" -type d -amin -40

# Find files accessed within the past 40 minutes
find -name "snap*" -type f -amin -40
Finding Files and Directories via Last Time Change
Finding files or directories via last time access may output tons of results, which would look confusing if the filenames are similar. So to further narrow down the search result, go with the -ctime option instead. The -ctime option filters the search result by the last time you made changes to the file or directory based on a specified value (within the past days).
Perhaps you want to find files that you modified last two days ago. If so, run the sample commands below.
# Find files and directories you modifed in the past two days
find -ctime -2

# Find files and directories with names starting with 'snap'
# which you modifed in the past two days
find -name "snap*" -ctime -2
Executing a Command After Finding File or Directory
The find command doesn’t just find files and directories; it can also execute commands right after displaying search results using the -exec parameter. This feature is great for times when you want to open a file in a text editor or remove a file or directory once found, for example.
Be sure to escape the semicolons (
;) with a backslash (\) to prevent them from being interpreted.
# Find a file named 'snap.doc' then open the file in vi editor
find -name "snap.doc" -exec vi {} \;

# Find a file named 'snap.doc' then remove the file
find -name "snap.doc" -exec rm {} \;
Removing Files and Directories with the -delete Action
The find command doesn’t just let you find files as you’ve learned so far. The find command also gives you an option to delete a file automatically once it’s found. Perhaps you need to delete empty files or directories with a specific name or matching a specific pattern. Then the find command with the -delete action will definitely come in handy.
To demonstrate deleting files and directories with the -delete action, create a directory and a file first. Below, the command lines let you create (mkdir) a directory named (thanos), then a file named snap inside the thanos directory.
mkdir thanos
touch thanos/snap
The -delete action only deletes empty directories. So if you try to delete the thanos directory with the command line below, you’ll get a message saying find: cannot delete ‘thanos’: Directory not empty.
To delete a single file (
snap), specify the-typetest when you run the find command, like this:find "snap" -type f -delete
# Find a directory named 'thanos', then delete the directory
# This command fails since the 'thanos' directory is not empty
find "thanos" -type d -delete

# Find a file named 'thanos.snap', then delete the file
find "thanos.snap" -type f -delete
To delete the ~/thanos directory, apply the -depth option, as shown below. The find command will search for the thanos directory and recursively delete (-delete) the contents of the ~/thanos directory and delete the directory itself.
find "thanos" -depth -deleteConclusion
This article aimed to teach you different ways on how the Bash find command lets you locate files, get file properties and even modify an output in certain formats. Before, finding a lost file was filled with obstacles along the way. But now, you can jump over the obstacles and go straight to the finish line—is that considered cheating?
Well, regardless of which method you tried to find your file, the experience is surely satisfying! So, which test, action or option did you find most interesting?


