


Azure virtual machine scale sets are a handy high-availability feature to have for VMs in Azure. Using Azure PowerShell, you can build Azure Scale Sets with PowerShell to automate tasks is a great value add.
Performing an Azure VM Scale Set deployment is a great way to get autoscaling and high availability out of the box. Azure VM Scale Sets have many baked-in features like automatically scaling to meet demand, deploying across availability zones, and more.
When you need to deploy an Azure Virtual Machine Scale Set, you’ve got a few options such as using the Azure portal, the AZ CLI, or PowerShell. In this article, let’s dive into what it takes to build some Azure PowerShell code to create a scale set and configure them.
Most of the code for this article was created by my friend, Josh Duffney, as he studied for the AZ-103 certification. I’ve chosen to write a tutorial around it since I found the code so useful. Catch up on what Josh is doing at his blog.
Tutorial Overview
In this article/tutorial, you’ll learn how to use PowerShell to perform many common actions around Azure VM Scale Sets from:
- Creating an Azure VM Scale Set
- Creating a network security group (NSG)
- Assigning an NSG to a Scale Set’s subnet
- Deploying IIS and a sample application to a scale set
- Adding additional VMs to the scale set
- Allowing inbound RDP to all scale set instances
- Tearing down the scale set
By breaking down actions in this way will allow you to get a full breadth of knowledge on what it takes to manage a full lifecycle of an Azure VM Scale Set.
Prerequisites
To follow along with this tutorial, you should have a few prerequisites in place before starting. Be sure you have each of these requirements met before attempting the steps in this tutorial.
- An Azure subscription. If you don’t have one already, you can get Azure for free.
- Have already set up Azure Cloud Shell and are logged in. To prevent having to install any dependencies, all examples you’ll be seeing will be run inside of the Azure Cloud Shell.
- Assuming Azure global administrator permission. Laziness is in strong effect here obviously. You don’t have to be a global admin but you know what I mean.
If you don’t have any Azure credits, you will incur some charges by following this tutorial. However, they should be minimal. Don’t forget to clean up when you’re done!
Options for Creating Azure Scale Sets with PowerShell
Your first task is to create an Azure VM scale set using the New-AzVmss cmdlet. To manage high availability and redundancy, a scale set consists of different types of resources such as a virtual network, load balancer, public IP address, and the VM instances themselves. The New-AzVMss cmdlet takes care of all of that.
You have two options when creating a VM scale set with the New-AzVmss cmdlet. You can either use the simple parameter set which quickly creates a pre-set scale set and assumes much of the configuration for you or provide each configuration option separately.
Creating an Azure VM Scale Set with PowerShell
In this tutorial, you’ll be focusing on specifying out each resource separately but if you’d like to create a simple scale set, you can do so with only two parameters; Credential and VMScaleSetName. The Credential parameter is a PSCredential object for the local administrator account for each VM instance.
You can see an example below on how to create everything required for a scale set with PowerShell.
$vmssName = 'vmssScaleSet-simple'
$vmPassword = ConvertTo-SecureString '<somepassword>' -AsPlainText -Force
$vmCred = New-Object System.Management.Automation.PSCredential('<somelocaladminaccountname>', $vmPassword)

## Create a VMSS using the default settings
New-AzVmss -Credential $vmCred -VMScaleSetName $vmssName
Once started, you will then be presented with a progress indicator as shown below.

When complete, the easy route will net you:
- A Resource Group
- A virtual network
- A load balancer
- A public IP
- A VMSS with two Windows instances
You can see what the vmssScaleSet-simple resource group looks like via the Azure portal below.

Creating an Azure VM Scale Set: The Better Way
You’re not taking the easy route in this tutorial. You need to learn how this stuff works! The remainder of this article will be built off of a scale set where you define each resource for a scale set yourself to create an Azure Scale Sets with PowerShell.
The simple parameter set covered above covers creating everything including a resource group but going it on your own does not. If specifying each resource to support the scale set with the New-AzVmss cmdlet, you’ll have to create the resource group yourself. No biggie.
To create a resource group with Azure PowerShell, use the New-AzResourceGroup cmdlet providing the name of the resource group and the region/location.
The below example is creating a resource group called vmssPractice in the eastus region.
PS Azure:\> New-AzResourceGroup -Name vmssPractice -Location eastus

ResourceGroupName : vmssPractice
Location          : eastus
ProvisioningState : Succeeded
Tags              :
ResourceId        : /subscriptions/1427e7fb-a488-4ec5-be44-30ac10ca2e95/resourceGroups/vmssPractice
Once the resource has been created, you can then call the New-AzVmss cmdlet again. But this time, define each of the resource names yourself. To do so, you’ll notice below you have options to name each resource that builds the scale set like the subnet, load balancer, and more.
Upgrade Policies
Notice below you’re using the UpgradePolicyMode parameter. Later in this tutorial, you’ll be modifying the scale set and this will be important. An upgrade policy determines how VMs are brought up to date when a change is made to the scale set model.
A scale set model is how a scale set is represented in Azure. It is a schema of how a scale set should look. Within each scale set is a scale set instance that represents the current runtime state or what the scale set looks like right now.
The three modes for the upgrade policy are:
- Automatic – VMs may be rebooted in a random order even taking all VMs temporarily down at the same time.
- Rolling – The scale set deploys updates to instances in batches with an optional pause time between batches.
- Manual – Nothing happens to existing VMs when an update is initiated.
Since this tutorial is just an example, the UpgradePolicyMode is set to Automatic to ensure the VM instances are automatically brought up to date when you do that later.
$vmPassword = ConvertTo-SecureString '<somepassword>' -AsPlainText -Force
$vmCred = New-Object System.Management.Automation.PSCredential('<somelocaladminusername>', $vmPassword)

$params = @{
    ResourceGroupName = 'vmssPractice'
    Location = 'eastus'
    VmScaleSetName = 'vmssScaleSet'
    SubnetName = 'vmssSubnet'
    PublicIpAddressName = 'vmssPublicIpAddress'
    LoadBalancerName = 'vmssLoadBalancer'
    UpgradePolicyMode = 'Automatic'
    Credential = $vmCred
}

New-AzVmss @params
Even though the upgrade policy is set to Automatic, doesn’t mean that the scale set will be automatically updated when the model is. This simply defines how the VMs are rebooted when an update is made. Refer to this blog post for more information.
The scale set and related resources will take a few minutes to be created.
Step one done for Azure Scale Sets with PowerShell.
Setting up Networking
Now that the scale set and all related resources are created, it’s time to perform some common maintenance actions to build Azure Scale Sets with PowerShell. As-is, the scale set is wide open to the Internet. You need to lock it down. To do that, you first need to create a network security group (NSG).
Setting up the Network Security Group (NSG)
To create an NSG for the scale set, you’ll:
- Get the scale set model with
Get-AzVmss. - Create a configuration object representing the rules you’d like to configure.
- Create the NSG using the newly-created rule.
First, use the Get-AzVmss cmdlet to find the newly-created scale set model as shown below.
$vmss = Get-AzVmss -ResourceGroupName vmssPractice -VMScaleSetName vmssScaleSetThe
Get-AzVmsscmdlet doesn’t actually query the scale set itself. Instead, it queries the scale set’s model. To query the realtime view of the scale set, you can use theInstanceViewparameter.
Creating the Network Security Rule
Next, you’ll need to create a network security rule as a prereq to creating Azure Scale Sets with PowerShell. A network security rule represents all of the firewall rules that will eventually be applied to the NSG. Think of a security rule as something similar to a Windows Firewall rule.
To create a network security rule, use the New-AzNetworkSecurityRuleConfig cmdlet. Since you’ll eventually be deploying an IIS web service to this scale set, you need to allow HTTP traffic to the load balancer. You can see an example below of how to do this.
The example below is creating a rule called allowHTTP allowing all TCP traffic coming in on port 80 access to the load balancer. The output is being saved to the $nsgRule variable to pass to the next command.
$nsgRuleParams = @{
    Name = 'allowHTTP'
    Protocol = 'Tcp'
    Direction = 'Inbound'
    Priority = 200
    SourceAddressPrefix = '*'
    SourcePortRange = '*'
    DestinationAddressPrefix = '*'
    DestinationPortRange = 80
    Access = 'Allow'
}

$nsgRule = New-AzNetworkSecurityRuleConfig @nsgRuleParams
Creating the Network Security Group
Once the rule is created, you can now create the NSG and apply the rule using the New-AzNetworkSecurityGroup cmdlet as shown below.
$nsgParams = @{
    ResourceGroupName = 'vmssPractice'
    Location = 'eastus'
    Name = 'vmssNSG'
    SecurityRules = $nsgRule
}

$nsg = New-AzNetworkSecurityGroup @nsgParamsAssigning the NSG to the Subnet
When the scale set was created, a virtual network was created with it. Since the NSG is created, it’s now time to assign that NSG to the subnet within the virtual network to create the Azure Scale Sets with PowerShell. To do so requires three steps:
- Getting the created virtual network
- Adding the NSG to the virtual network’s subnet configuration
- Applying the change to the virtual network
First, find the virtual network with Get-AzVirtualNetwork.
$vnet = Get-AzVirtualNetwork -ResourceGroupName vmssPractice -Name vmssScaleSetNext, create a subnet configuration object that “attaches” the NSG to the subnet using the Set-AzVirtualNetworkSubnetConfig cmdlet. Since a virtual network can have more than one subnet, below you’re ensuring only the first one is selected.
$subnet = $vnet.Subnets[0]
$subnetConfigParams = @{
    VirtualNetwork = $vnet
    Name = 'vmssSubnet'
    AddressPrefix = $subnet.AddressPrefix
    NetworkSecurityGroup = $nsg
}

$subnetConfig = Set-AzVirtualNetworkSubnetConfig @subnetConfigParams
Finally, apply the new subnet change to the virtual network using the Set-AzVirtualNetwork cmdlet.
Set-AzVirtualNetwork -VirtualNetwork $vnetYou’re one step closer to creating Azure Scale Sets with PowerShell!
Updating the Scale Set Model
At this point, the scale set model doesn’t yet know of the NSG that’s been added to the vNet. You must now update it to reflect this change. To do so, use the Update-AzVmss cmdlet to update Azure Scale Sets with PowerShell. This cmdlet has a parameter called VirtualMachineScaleSet which represents a scale set model containing the updated information.
By providing the resource group name, name of the scale set and the updated scale set model, you can now make the VM instances aware of the newly added NSG as shown below.
$vmss = Get-AzVmss -ResourceGroupName vmssPractice -VMScaleSetName vmssScaleSet
Update-AzVmss -ResourceGroupName vmssPractice -Name vmssScaleSet -VirtualMachineScaleSet $vmss
Deploying a Sample Application
Creating Azure Scale Sets with PowerShell is only an end to a means. In a production environment, you’ll use a scale set to run workloads like a web service. Let’s now install IIS to our scale set and create a simple default web page.
You can find a simple, sample PowerShell script stored in a Microsoft GitHub repo here. This PowerShell script, called automate-iis.ps1 contains just two lines to install IIS and create a default webpage as shown below.
Add-WindowsFeature Web-Server
Set-Content -Path "C:\inetpub\wwwroot\Default.htm" -Value "Hello World from host $($env:computername) !"
To invoke this script, set up an Azure Custom Script Extension for the VM scale set. You’ll do this using the Add-AzVmssExtension cmdlet which downloads the automate-iis.ps1 PowerShell script from GitHub and runs it.
You can see an example of how to do this below.
$publicSettings = @{
    "fileUris" = (,"https://raw.githubusercontent.com/Azure-Samples/compute-automation-configurations/master/automate-iis.ps1");
    "commandToExecute" = "powershell -ExecutionPolicy Unrestricted -File automate-iis.ps1"
}

$vmss = Get-AzVmss -ResourceGroupName vmssPractice -VMScaleSetName vmssScaleSet

$extParams = @{
    VirtualMachineScaleSet = $vmss
    Name = 'CustomScript'
    Publisher = 'Microsoft.Compute'
    Type = 'CustomScriptExtension'
    TypeHandlerVersion = 1.8
    Setting = $publicSettings
}

Add-AzVmssExtension @extParams
To update all VM instances for the Azure Scale Sets with PowerShell, update the scale set once again.
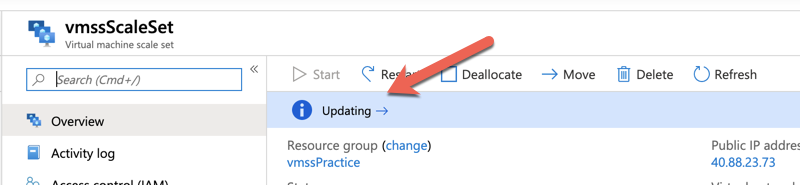
Update-AzVmss -ResourceGroupName vmssPractice -Name vmssScaleSet -VirtualMachineScaleSet $vmssIf you’d look in the Azure Portal, you’d now see the scale set being updated as seen in the screenshot below.
When the update is complete, you should now have IIS installed and a default webpage set up on all of the VM instances.
Verifying Application Deployment
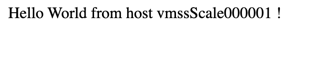
To verify the update has happened, first find the public DNS name of your scale set as shown below.
(Get-AzPublicIpAddress -Name vmssPublicIpAddress).DnsSettings.FqdnNow navigate to http://<FQDN> in your browser. If all went well, you should see the webpage below.
Scale the Virtual Machine Set
Let’s say your awesome web application is getting tons of traffic and you need to add more instances to the scale set. Doing so only requires updating a single property on the scale set object queried earlier.
By setting the SKU capacity to the number of instances you need and sending the update to the scale set, the scale set’s instance count will soon be increased.
$vmss.sku.capacity = 3

Update-AzVmss -ResourceGroupName vmssPractice -Name vmssScaleSet -VirtualMachineScaleSet $vmss
This provisions a new VM instance and adds it to the scale set. The process may take a few minutes. Be patient!
Tearing it Down
Since this was just a tutorial on creating Azure Scale Sets with PowerShell, let’s now tear down the work you’ve done. Since the scale set and everything included with it is all in a single resource group, you now just need to remove the resource group. This will clean up all of the resources provisioned in this article.
Remove-AzResourceGroup -ResourceGroupName vmssPractice

