


Do you wish you knew how to utilize Azure Machine Learning but feel lost at the thought of having to learn another technology? You’re not alone. Most people who want to use machine learning simply don’t know where to start.
The good news is that this tutorial is meant for someone who wants to learn the basics of Azure Machine Learning and doesn’t have a lot of time to spare. You’ll learn what Azure Machine Learning is, what it can do for you, and how to get started with a use case.
Get ready to start your Azure Machine Learning journey!
Prerequisites
This tutorial will be a hands-on demonstration. If you’d like to follow along, be sure you have an Azure account with an active subscription, but a free Azure trial will suffice.
What is Azure Machine Learning?
What is Azure Machine Learning anyway? Azure Machine Learning is a cloud-based service that lets you develop and deploy machine learning models.
With Azure Machine Learning, you can train your models using data from your own environment. Or tap into pre-trained machine learning models available in the Azure Marketplace.
You can use Azure Machine Learning to:
- Develop machine learning models using popular open-source frameworks, such as scikit-learn, TensorFlow, and Seaborn.
- Deploy and host your machine learning models in the cloud, so they’re always available and scale on demand.
- Integrate your machine learning models into your existing apps and workflows.
Creating Your First Machine Learning Workspace
Enough with all the Azure Machine Learning introductions. It’s time to create your first machine learning workspace. A workspace is a logical container in the cloud that holds all resources related to your machine learning experiments, projects, and models.
To create your first machine learning workspace, you’ll need access to Azure Portal:
1. Open your favorite web browser and sign in to Azure Portal with your Azure account credentials.
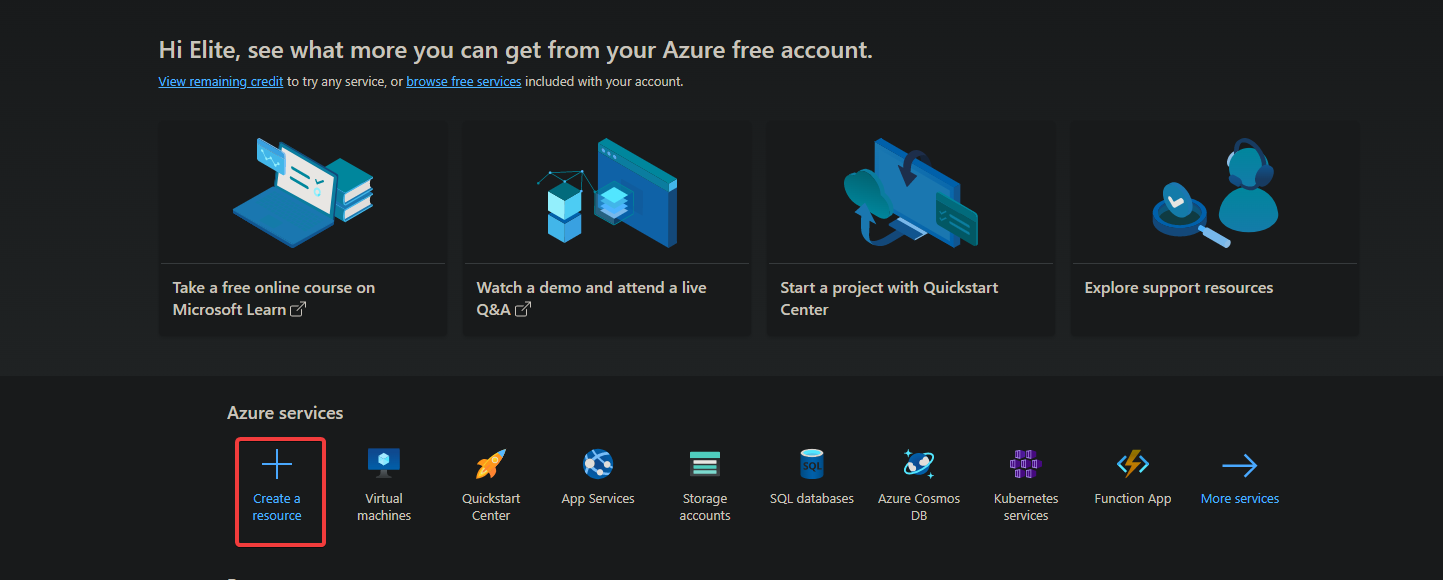
2. On Azure Portal’s home page, select Create a resource to access Azure Marketplace, where you can select a resource to create.
3. Create a machine learning service through Azure Marketplace with the following:
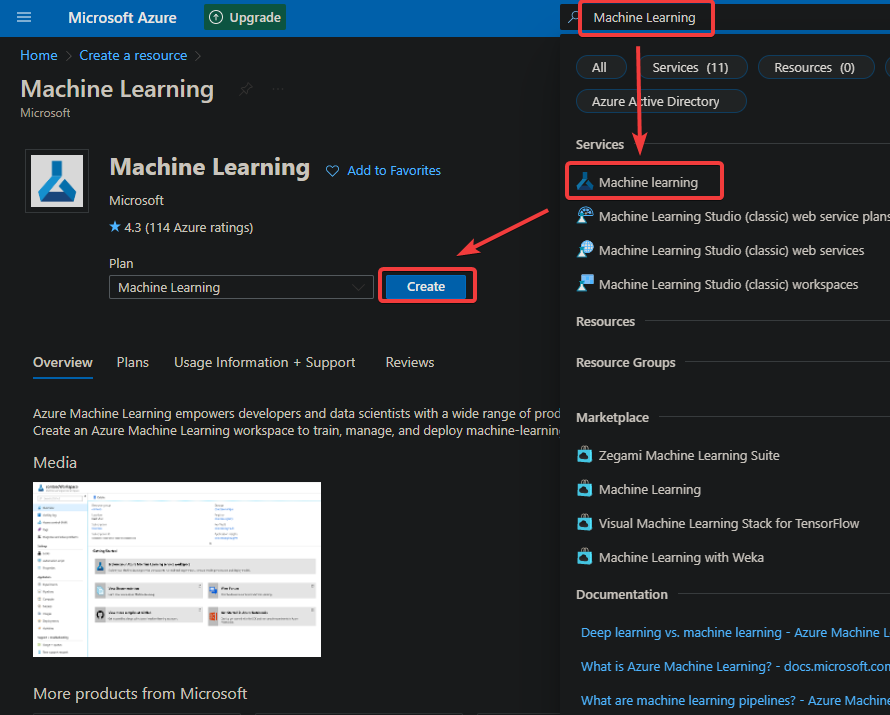
- In the Search box at the top, type in Machine Learning, and select the Machine Learning service to open the service’s overview, as shown below.
- Click on Create in the Machine Learning pane to create a new Machine Learning service.
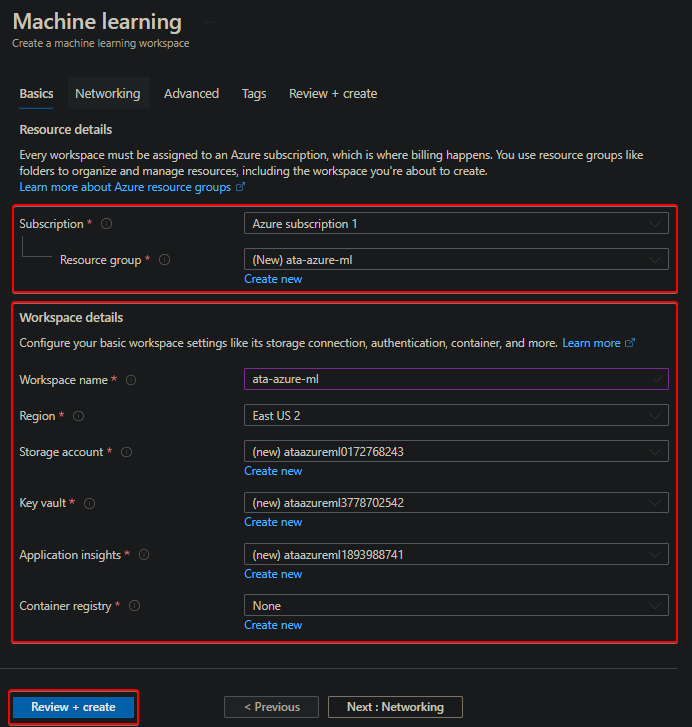
4. Now, configure your Machine Learning service with the following information:
- Subscription – Select the active subscription you want to use for this workspace.
- Resource group – Click on the Create new hyperlink to create a new resource group or choose an existing one. But this tutorial creates a new ata-azure-ml resource group.
You should create a new resource group for each machine learning service you create. This group helps you manage and monitor all your Azure resources in one place.
- Workspace name – Enter a descriptive and unique name for your workspace. The name must be between 1 and 32 characters, can contain only letters and numbers, and must start with a letter.
The workspace name must be unique from all other Azure resource groups in your Azure subscription.
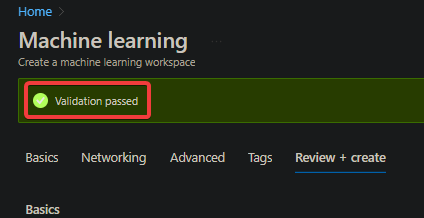
- Keep all other default settings and click Review + Create at the bottom to validate the settings and create the workspace.
Take note of your workspace and subscription name. When you create your first experiment in the next section, you use these values to confirm that you’re working with the correct Azure resources.
The validation might take a few minutes to complete. After the validation succeeds, you will see a Validation passed message, as shown below.
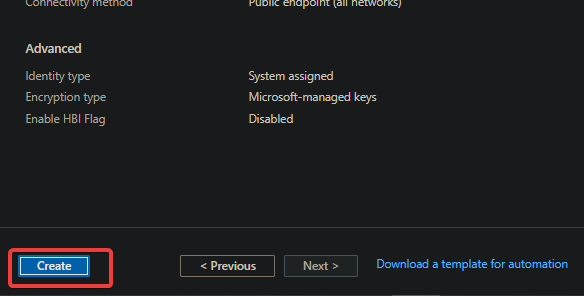
5. After validation, click on Create at the bottom to create the new workspace.
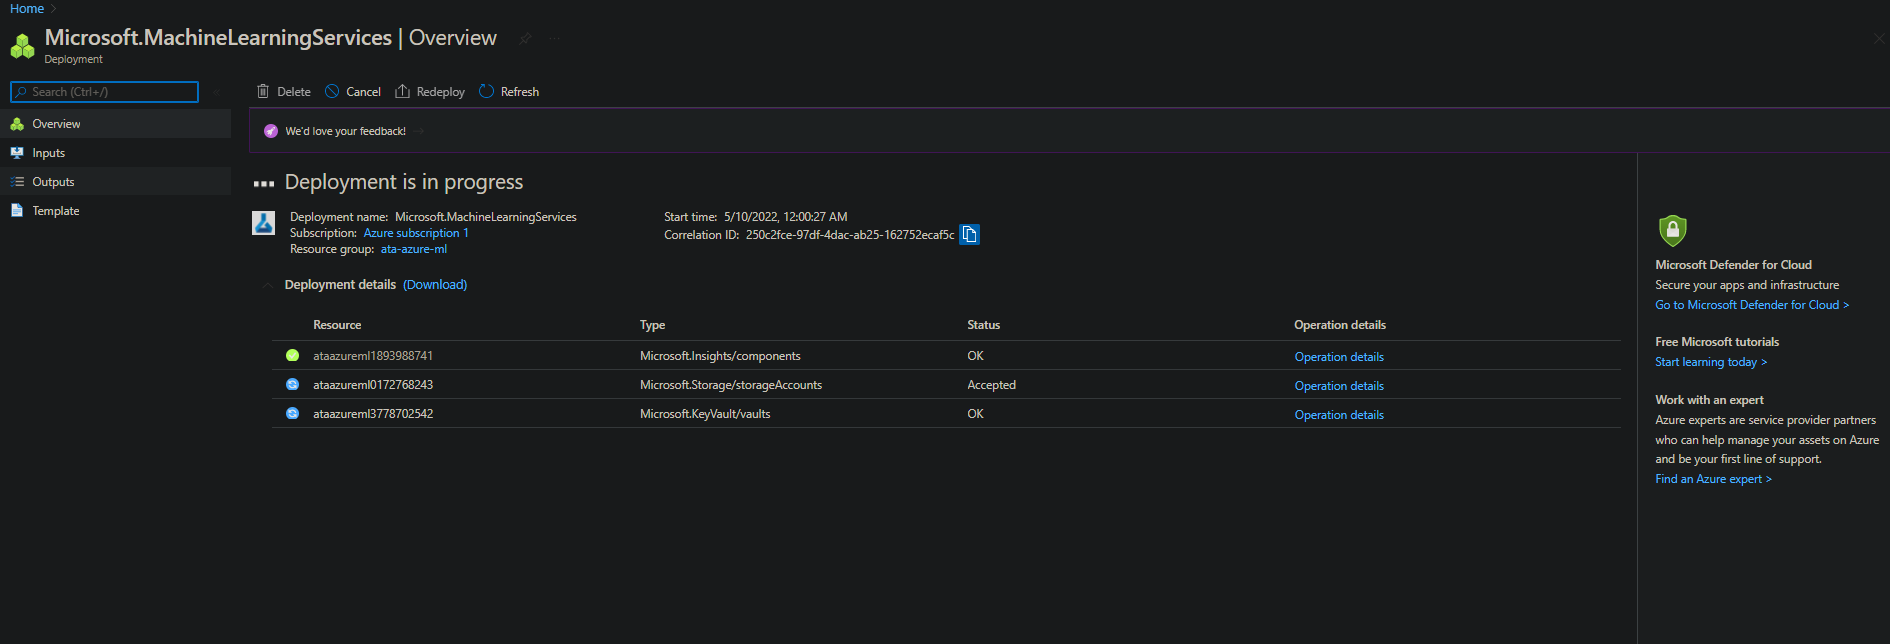
As you can see below, provision and deployment of the new workspace are in progress, which can take up to 15 minutes.
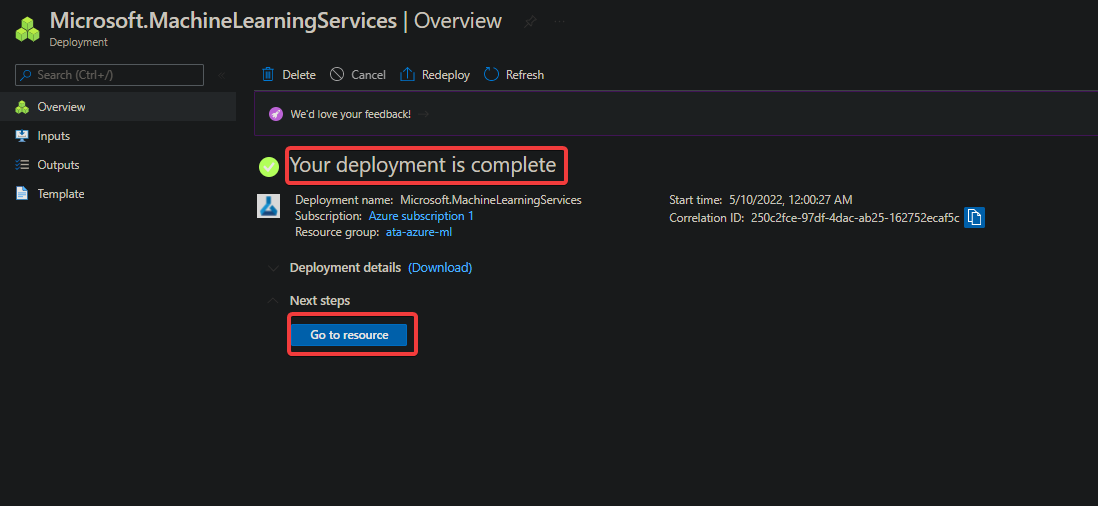
6. Once your deployment is complete, click on Go to resource to view your new workspace.
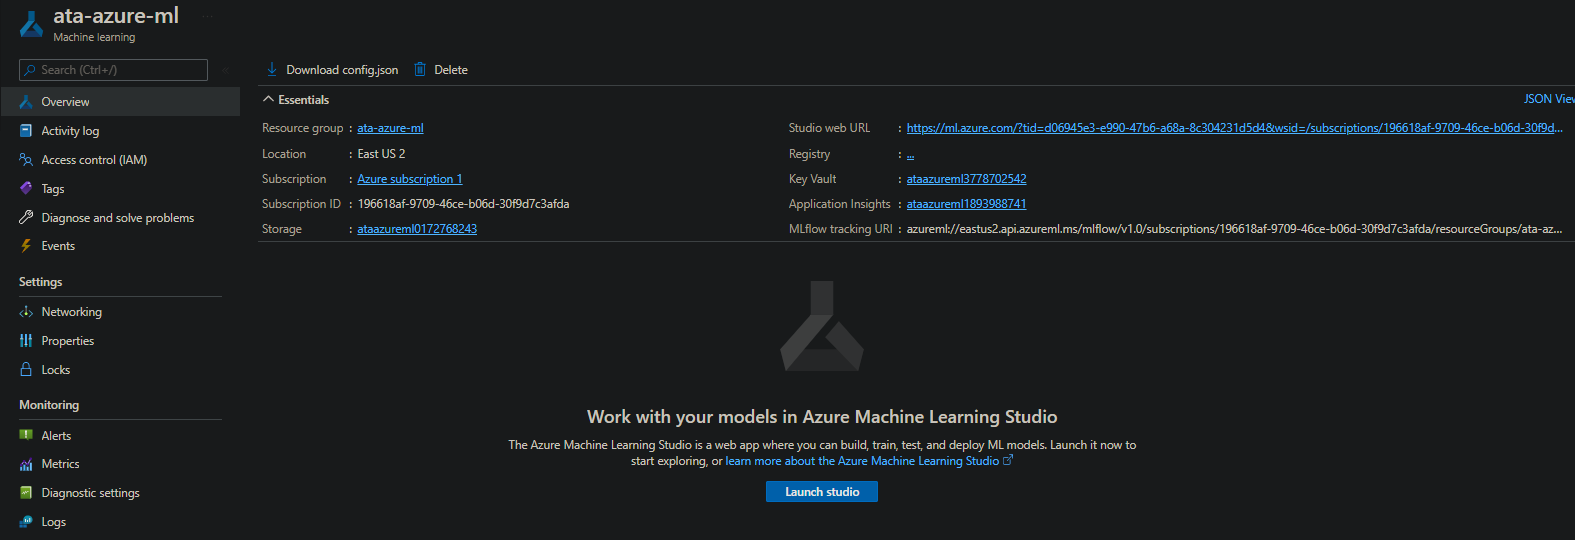
Below, you can see the Overview page of your new workspace. You now have a machine learning workspace. But at this point, your workspace doesn’t contain any experiments, projects, or models yet, which you’ll work on in the following sections.
Inserting Sample Datasets Using Azure Open Datasets
You now have a workspace, but you still need some data to train your machine learning models. The first place to look for datasets is Azure Open Datasets. Azure Open Datasets is a gallery of 100+ free public datasets you can use to train your machine learning models. The datasets are easily accessible via Azure Machine Learning Studio and the Azure Portal.
Take advantage of these free datasets by inserting them into your workspace:
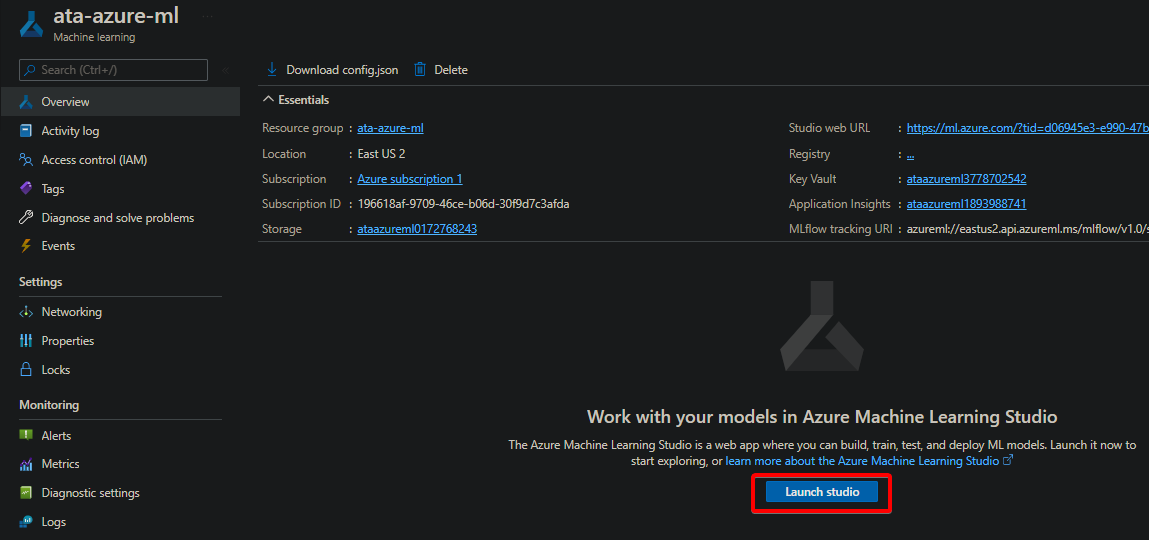
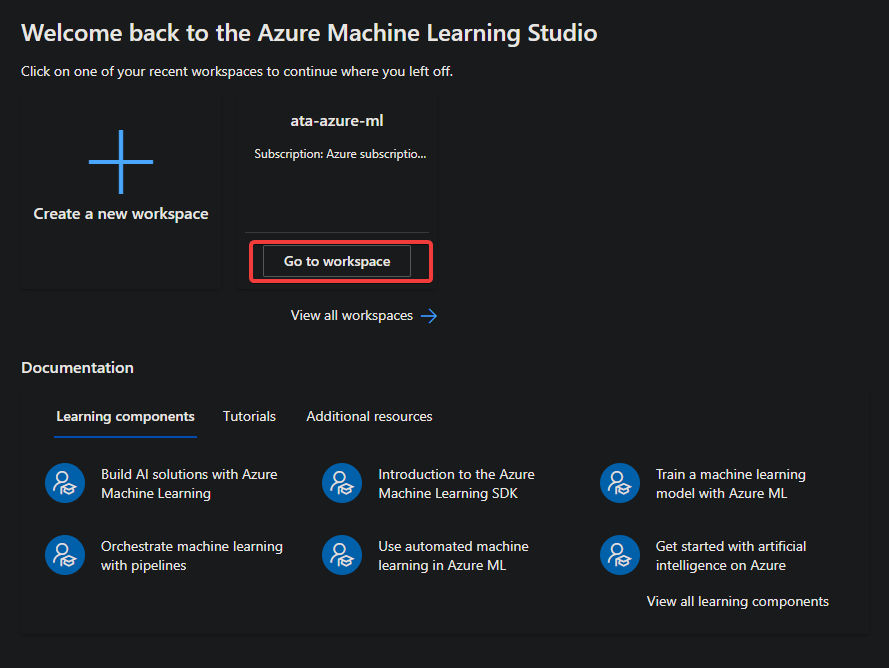
1. On your workspace’s Overview page, click on Launch studio to open Azure Machine Learning Studio in a new browser tab.
You might be prompted to sign in with your Azure account credentials if you are already signed out of your Azure session.
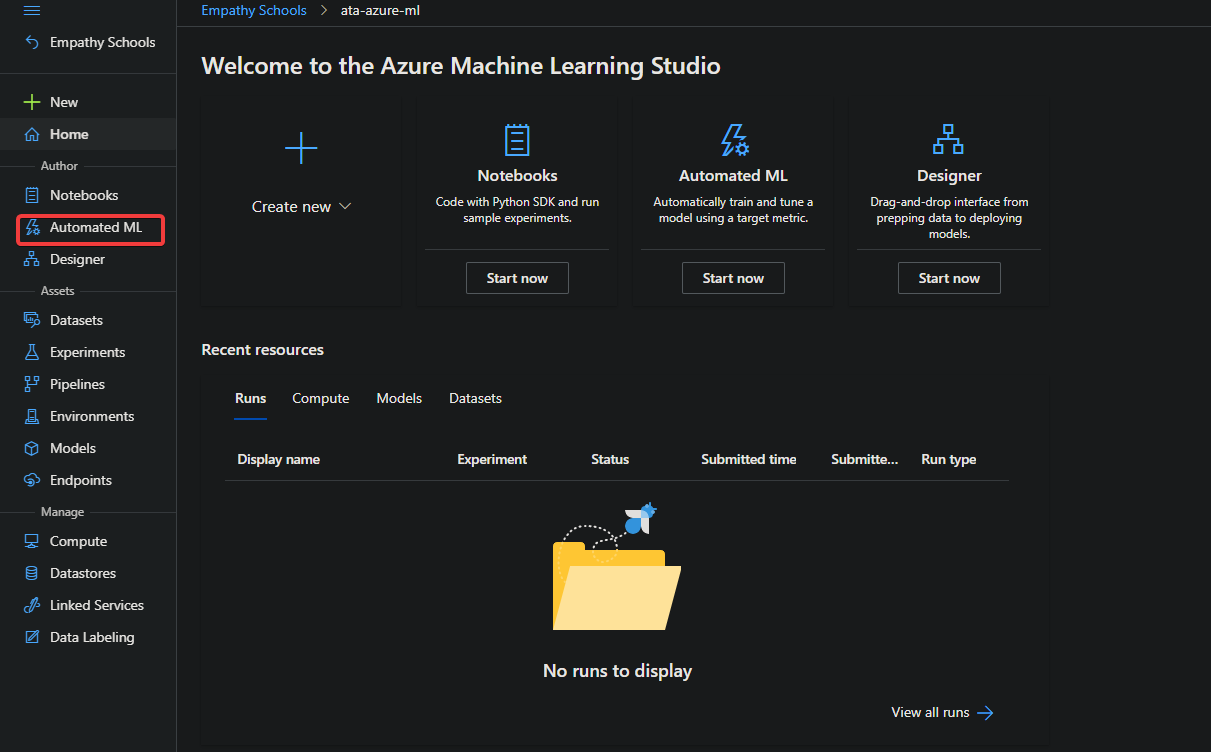
2. Select the Automated ML model under the Author section in the left-side navigation panel, as shown below. Your browser redirects to a page where you can create a new Automated ML run.
You’ll use this model to automate the task of machine learning model development and tuning without having to write any code. This model rapidly iterates over different feature engineering, algorithm, and hyperparameter combinations to find the best model for your data.
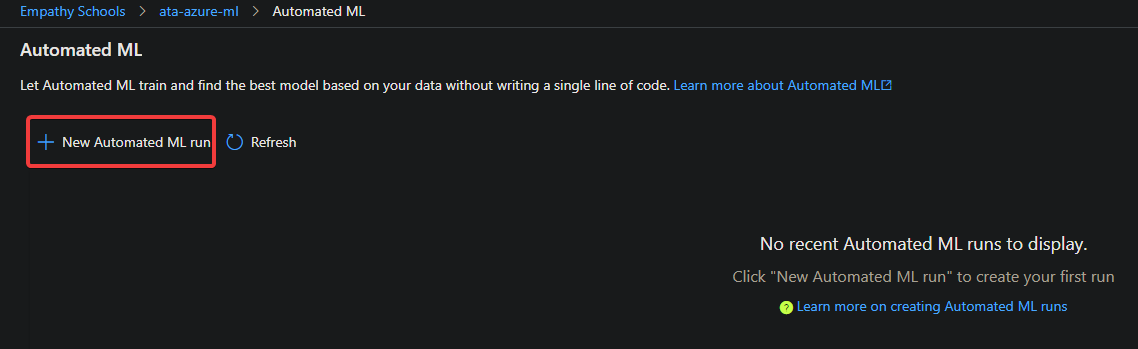
3. Next, click on the New Automated ML run button to initialize creating a new Automated ML run. This action redirects your browser to a page where you’ll configure the new Automated ML run.
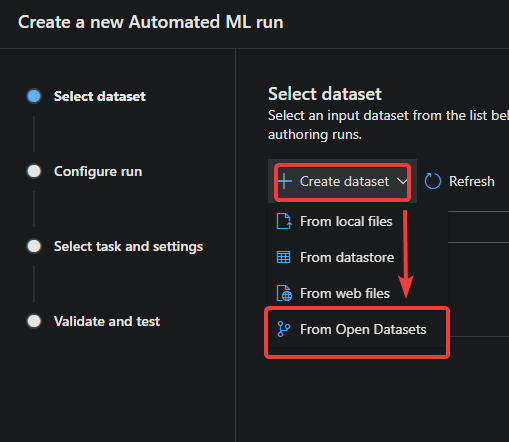
4. On the Select dataset page, click on the Create dataset drop-down menu —> From Open Datasets to see the list of available datasets.
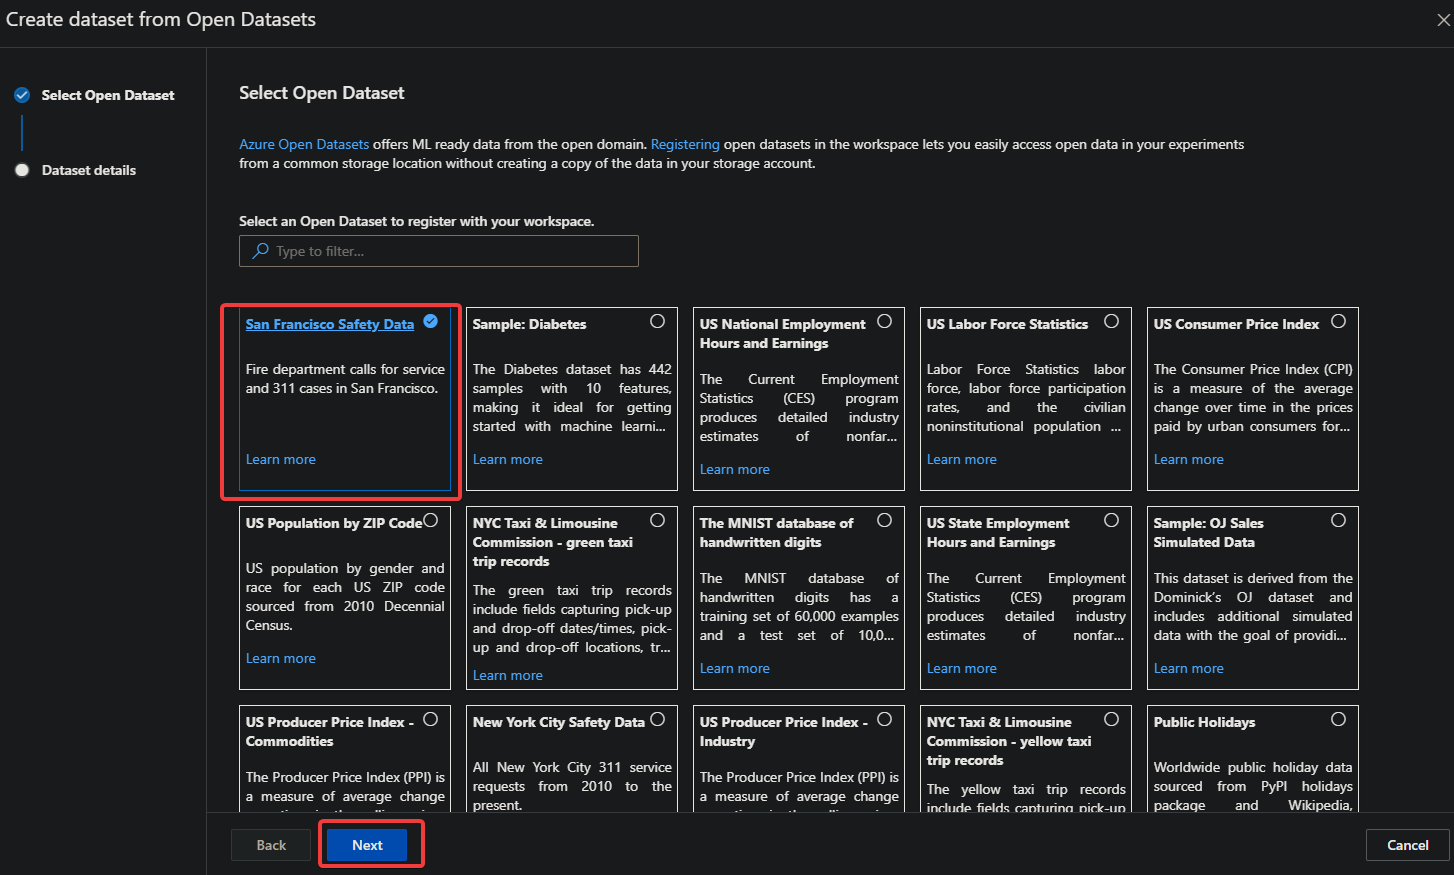
5. Select any dataset from the list below, and click Next. This tutorial uses the San Francisco Safety Data dataset.
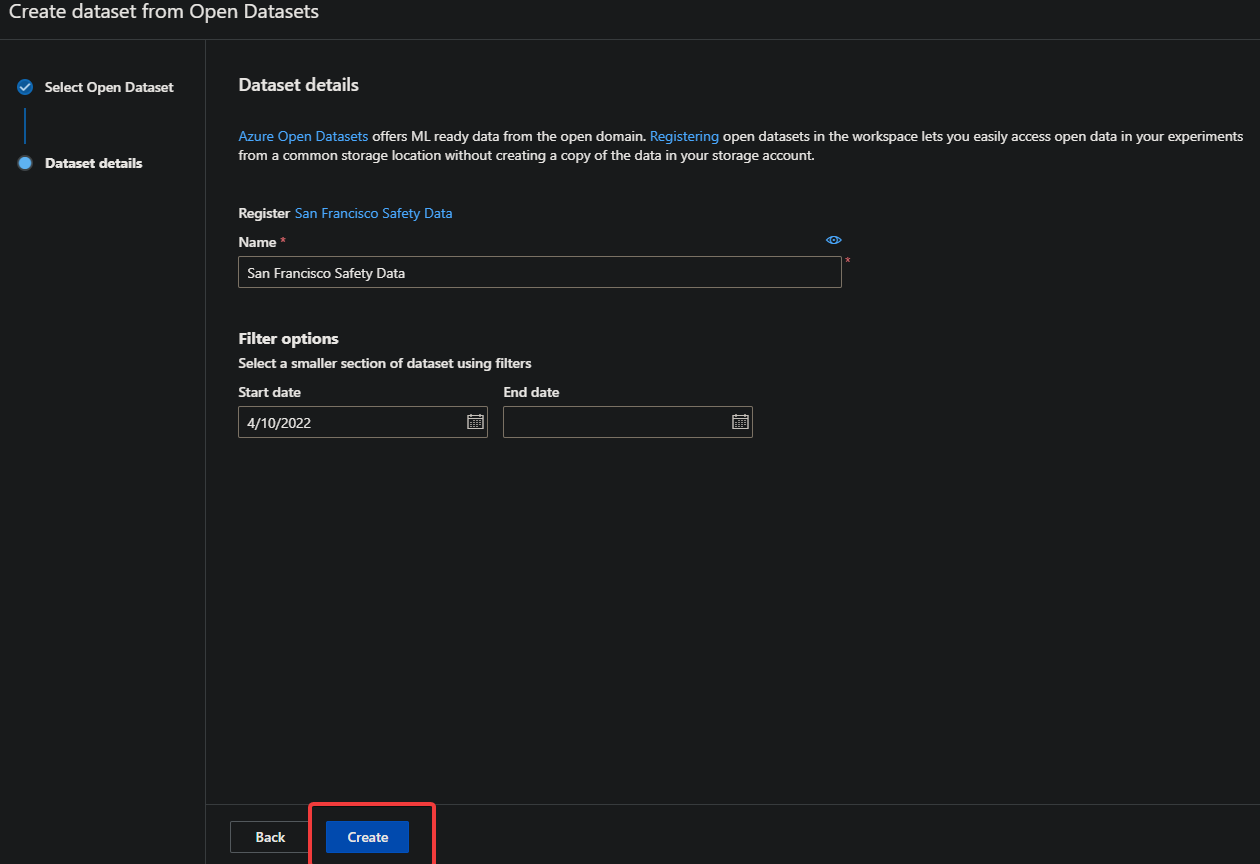
6. Keep all the default settings on the Dataset details page below and click on the Create button to create the new dataset.
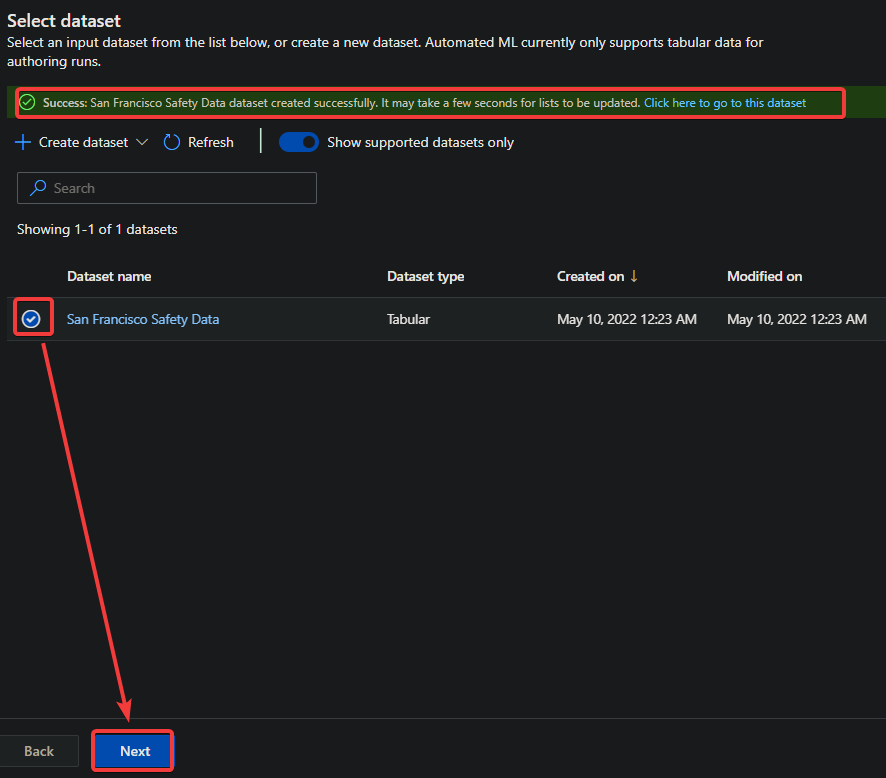
7. Lastly, select the radio button next to your dataset and click the Next button to configure your new Automated ML run. The browser redirects to the Configure run section in the Create a new Automated ML run page.
Configuring and Running an Automated ML Experiment Run
You’ve successfully inserted your dataset into your workspace. But right now, it’s not doing much unless. So it’s time to configure your Automated ML run, a process that iterates over different algorithms and hyperparameters to find the best model for your data.
Following the previous “Inserting Sample Datasets Using Azure Open Datasets” section, you should be on the Configure run page. This page is where you’ll configure the settings for your Automated ML run.
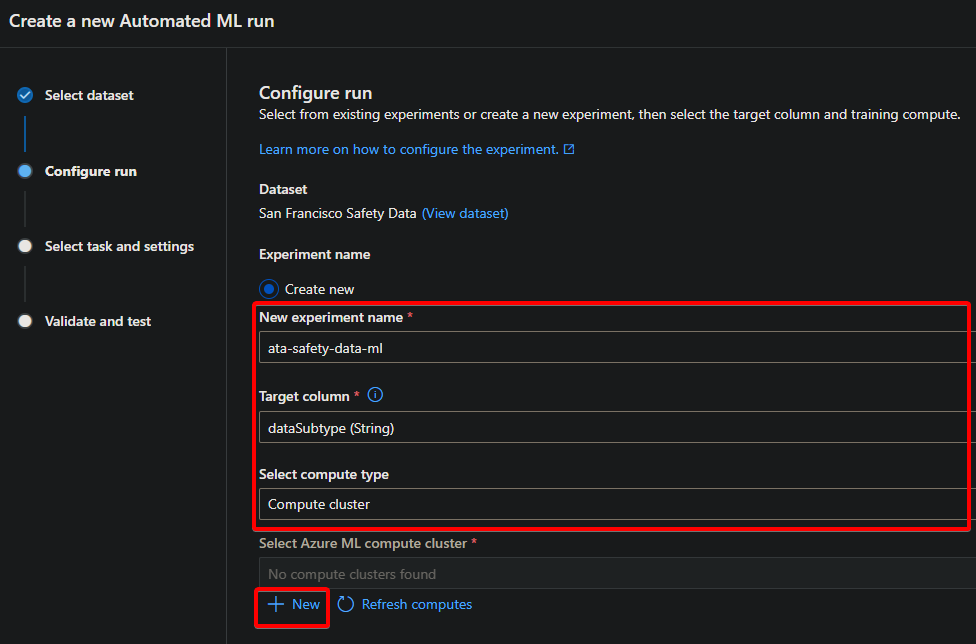
1. Configure your Automated ML run with the following:
- New experiment name – Enter a descriptive and unique name for your experiment.
- Target column (drop-down field) – Select dataSubtype (String), which allows you to specify the type of data that you are working with (text, images, tabular, and time series). This option can be helpful when you are working with large data sets.
- Select compute type – Select Compute cluster as it allows you to train your models faster and more efficiently and handle large amounts of data more effectively than a single machine.
With compute cluster, you can scale your training process up or down as needed, which can save you time and money.
- Select +New to configure a new Azure computer cluster for this experiment.
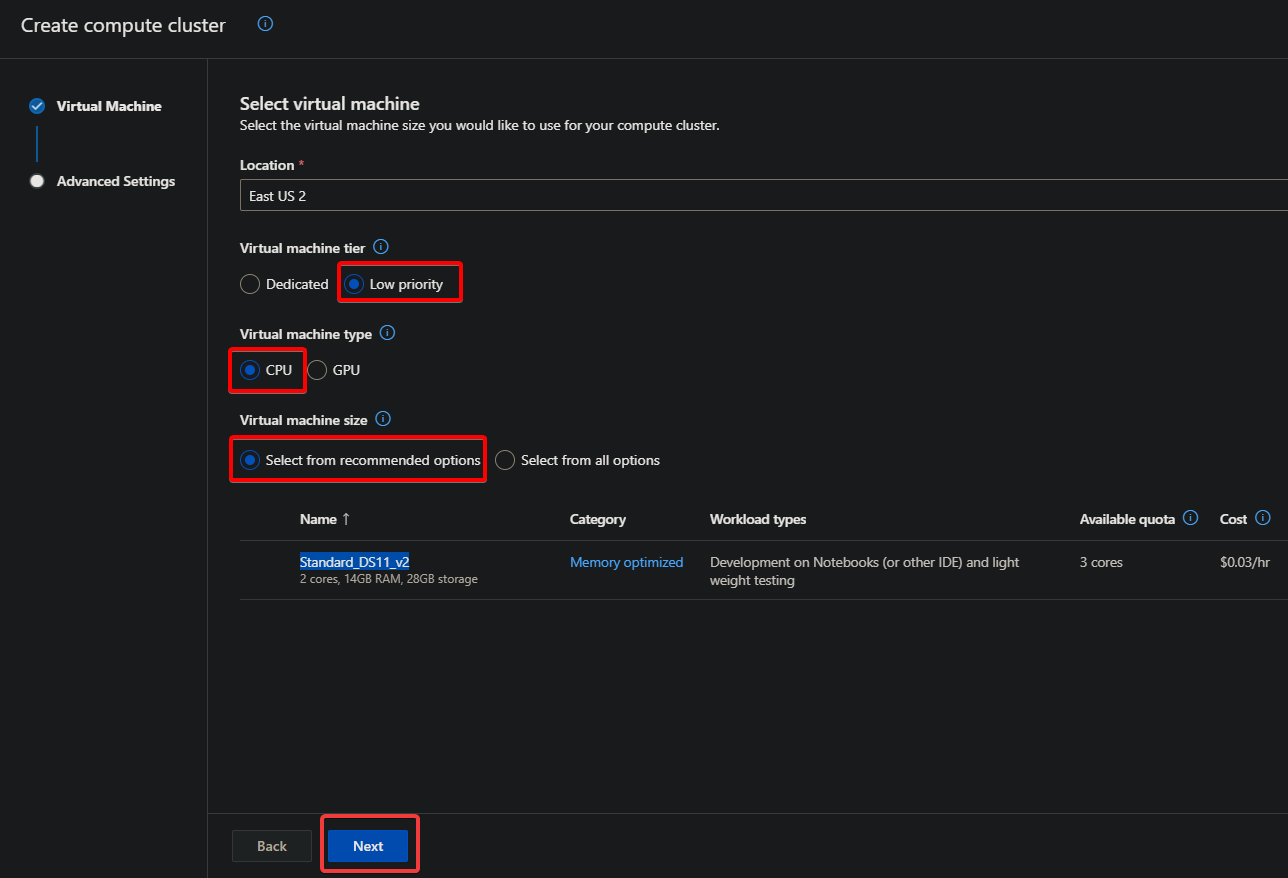
2. In the Create computer cluster pop-up page, configure the Virtual Machine with the following:
- Virtual machine tier – Select either Dedicated or Low priority. But the VM tier is set to Low priority in this tutorial (for a free trial subscription).
- Virtual machine type – Select the virtual machine type you prefer for this experiment (GPU or CPU), but this tutorial uses CPU (for a free trial subscription).
- Virtual machine tier – Select the virtual machine size you like to use for this experiment.
- Click Next to configure the experiment settings. The experiment settings determine how long an Automated ML run will take to complete.
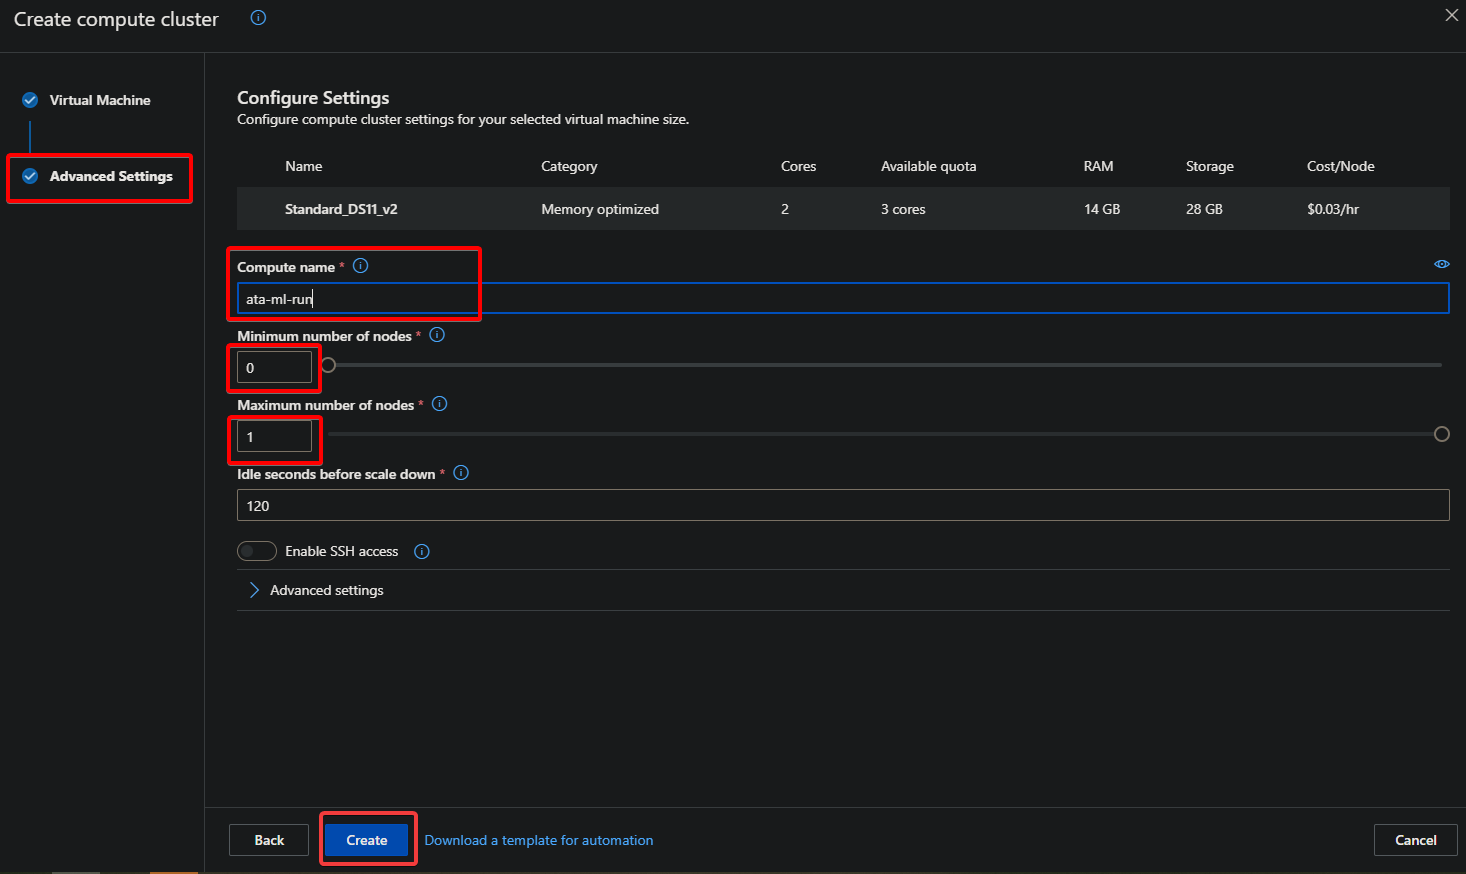
Under the Advanced Settings page, configure the experiment settings with the following:
- Compute name – Enter a unique name for your cluster.
- Minimum number of nodes – Enter the minimum number of nodes you want in your cluster. You should enter zero (0) to avoid charges while the experiment is not running.
- Maximum number of nodes – Enter the maximum number of nodes you want in your cluster. Depending on your subscription, you can enter up to 100 nodes in a cluster.
The more nodes you use, the faster your experiment will run. But using more nodes also increases the cost of running the experiment.
- Keep all other default settings and click Create to create your cluster, which might take a few minutes. After creating your cluster, the Configure run page reappears (step three).
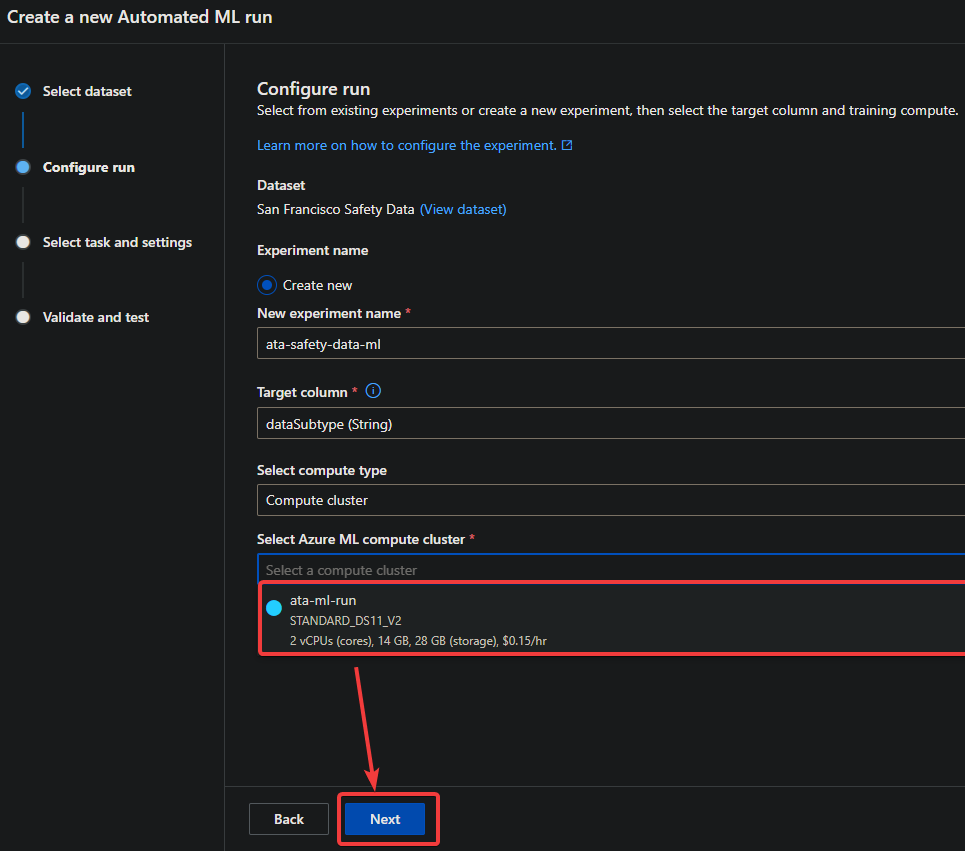
3. Select your newly created cluster from the Select Azure ML compute cluster drop-down menu, and click Next.
Your browser redirects to the Select task and settings page, where you’ll define actions your Automated ML run will take (step four).
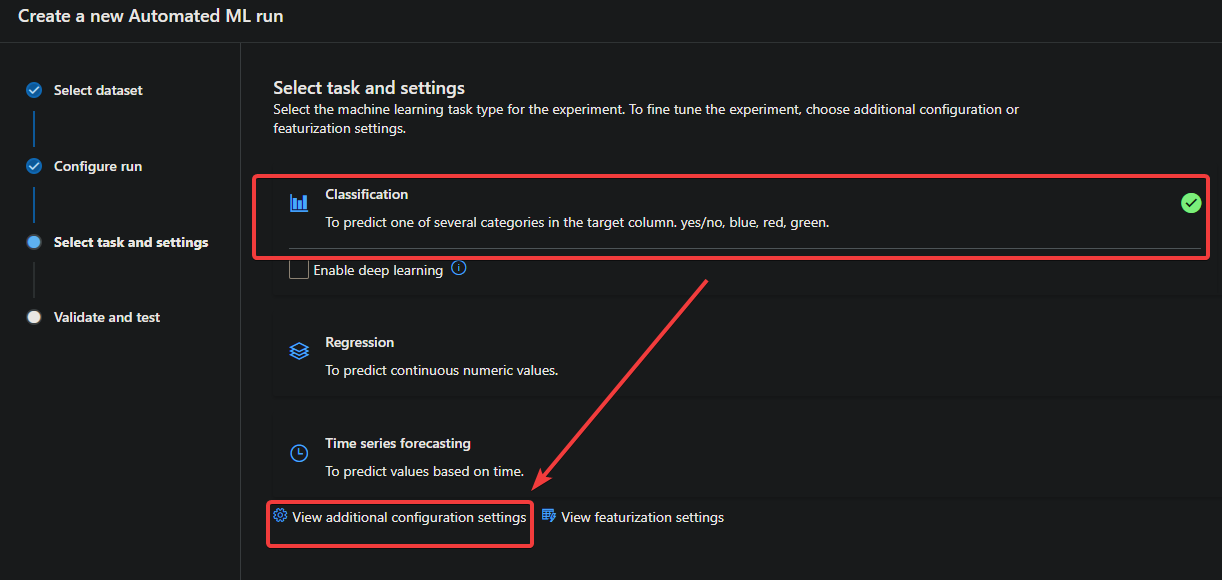
4. Select Classification as the task type on the Select task and settings page, then click View additional configuration settings.
An additional pane appears on the right side of the page with some advanced settings. These settings are optional but can be used to fine-tune your experiment.
5. In the Additional configurations pane, click Exit criterion to expand that section, then set the Training job time (hours) to 0.5. This value ensures that the training job will stop after running for 30 minutes.
The default value of the training job time is six hours, but you will not need that much time for this tutorial.
Keep all other default settings, and click Save to save your changes, and the Select task and settings page reappears.
Note that in real-world scenarios, the time required to train a model can vary depending on the size and complexity of your data. Typically you’d need to let the training process run for at least two hours or more to get accurate results.
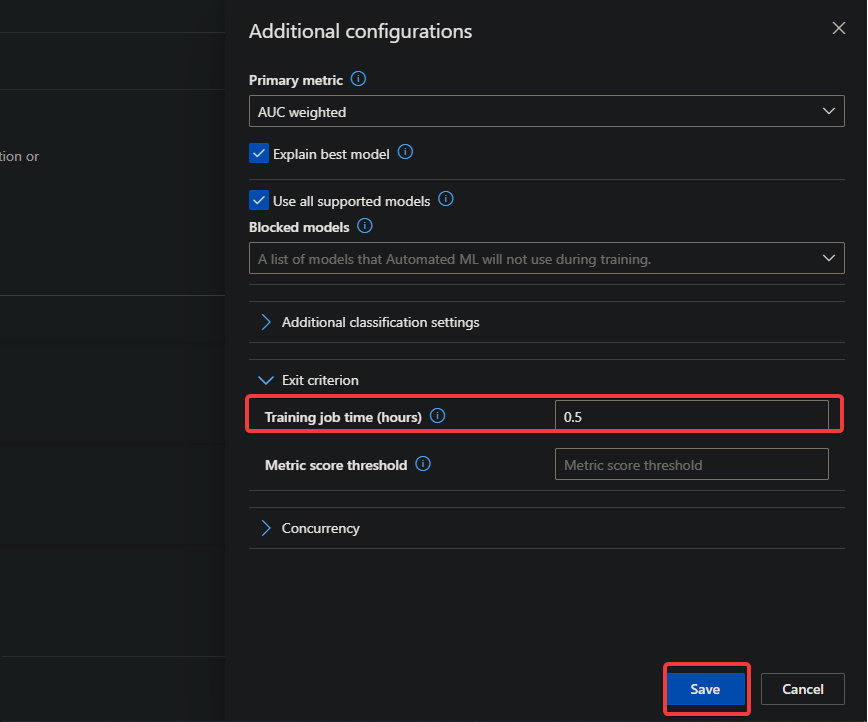
Note that 0.5 is the minimum value you can enter for the Training job time. If you enter a lower value, you’ll get an error message shown below.

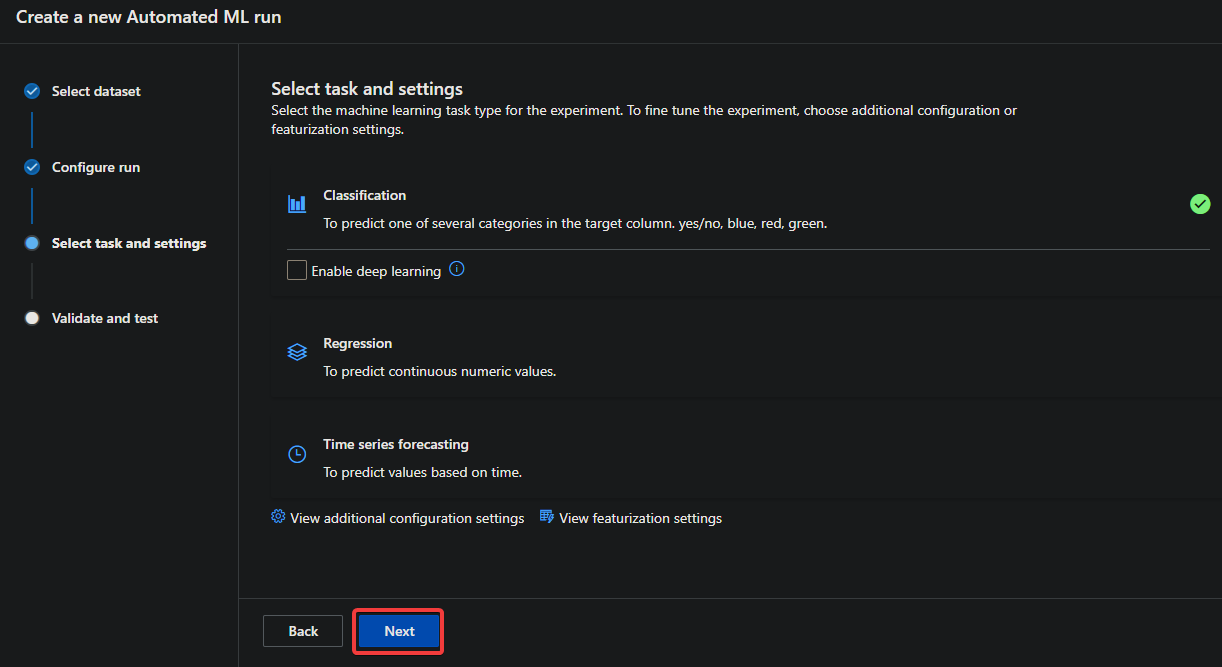
6. Back to the Select task and settings page, click Next. Doing so opens a page where you’ll select validation and test type.
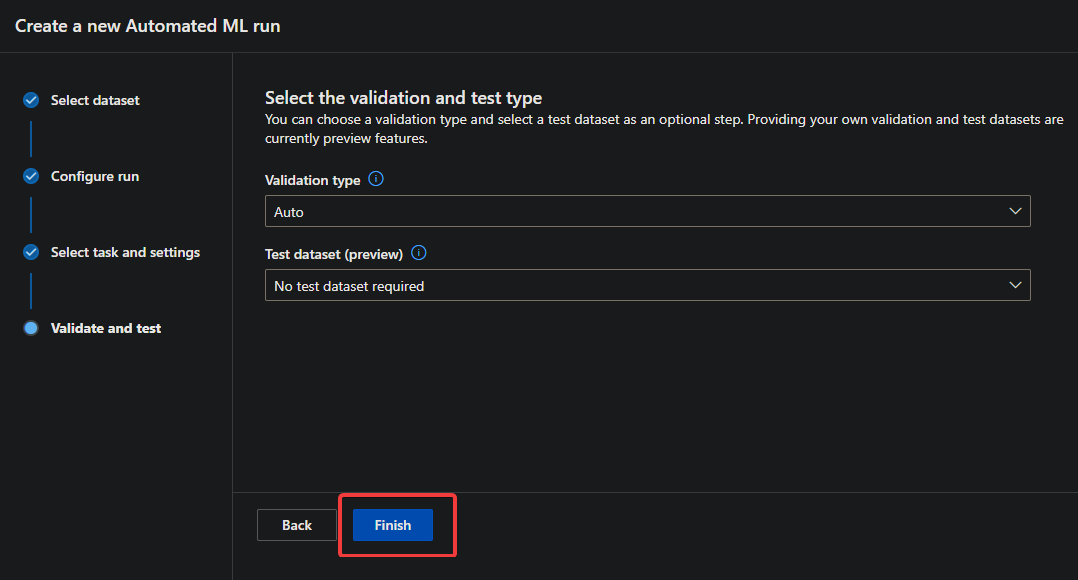
7. Keep all the default settings, and click Finish on the Validate and test page. You don’t need to validate or test your model for this tutorial, as you’ll only be running the experiment for a short time.
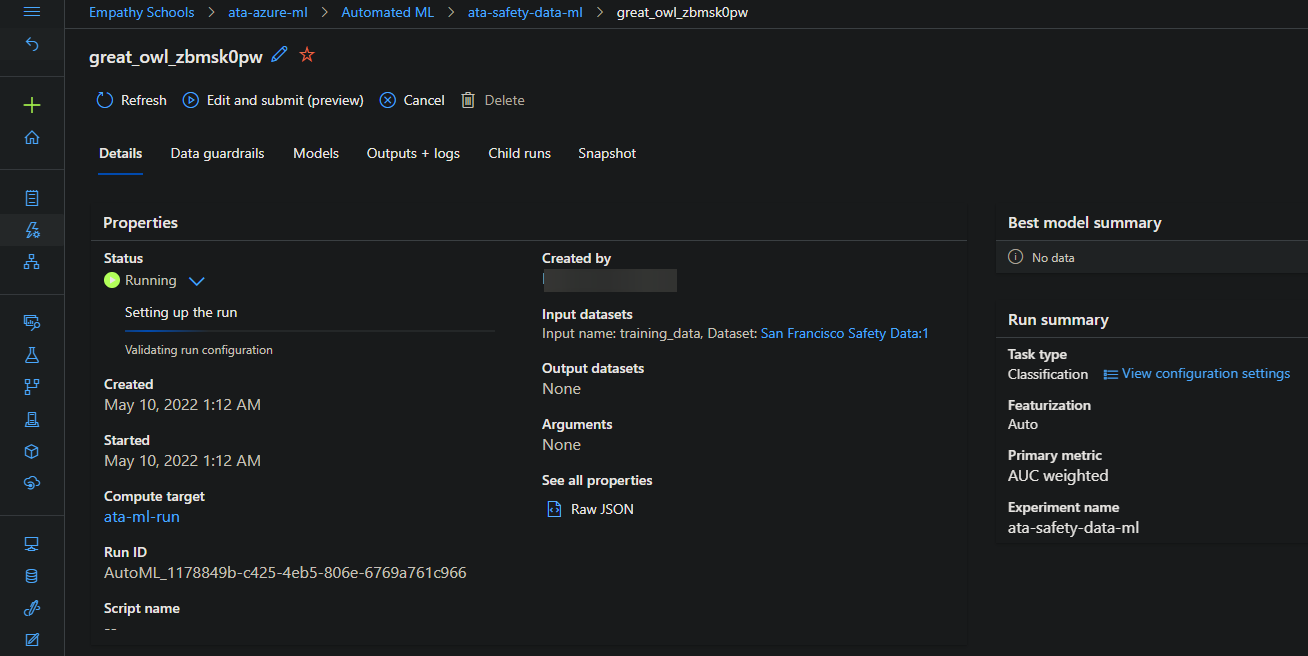
At this point, you have now configured and run your first Automated ML experiment! Azure automatically takes care of the details of training models and selects the best one for your data. All you need to do is sit back and wait for the results.
The preparation stage that Azure ML does before starting the training process can take 15 minutes or more to complete. Each iteration of the training process will take about 10 minutes to complete.
So, your experiment might take a lot longer than 30 minutes to finish if you let it run to completion, which is why the default training time limit is set to six hours. This value should give Azure ML enough time to train a high-quality model.
Azure will print out the run detail and the run status, as shown below. The run detail shows information about your experiments, such as the cluster used, the input data, and the settings.
Once the training process completes, you’ll see a green check icon and a message that says Completed under the Status section.
The Warning: Experiment timeout reached message only tells that Azure stopped the training process after 30 minutes as you configured earlier in step five.
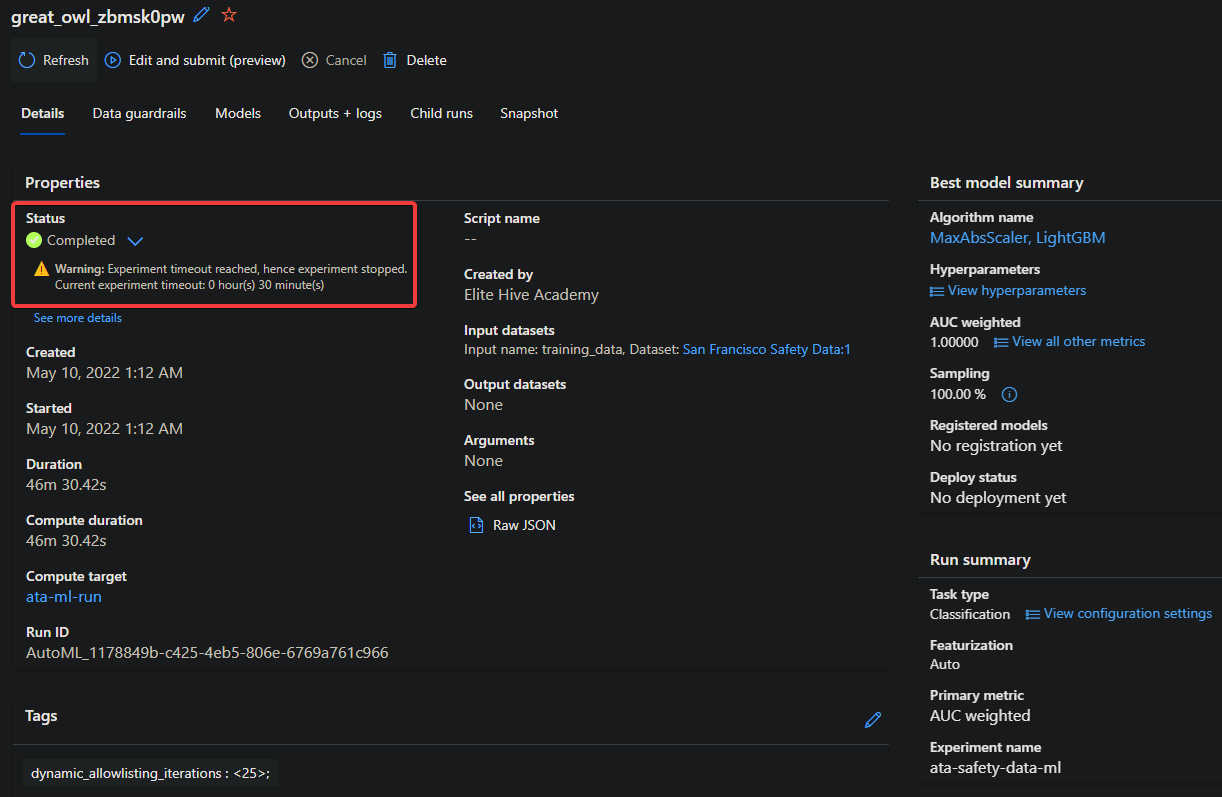
If you wish to get the latest status of your experiment, you can click on Refresh.

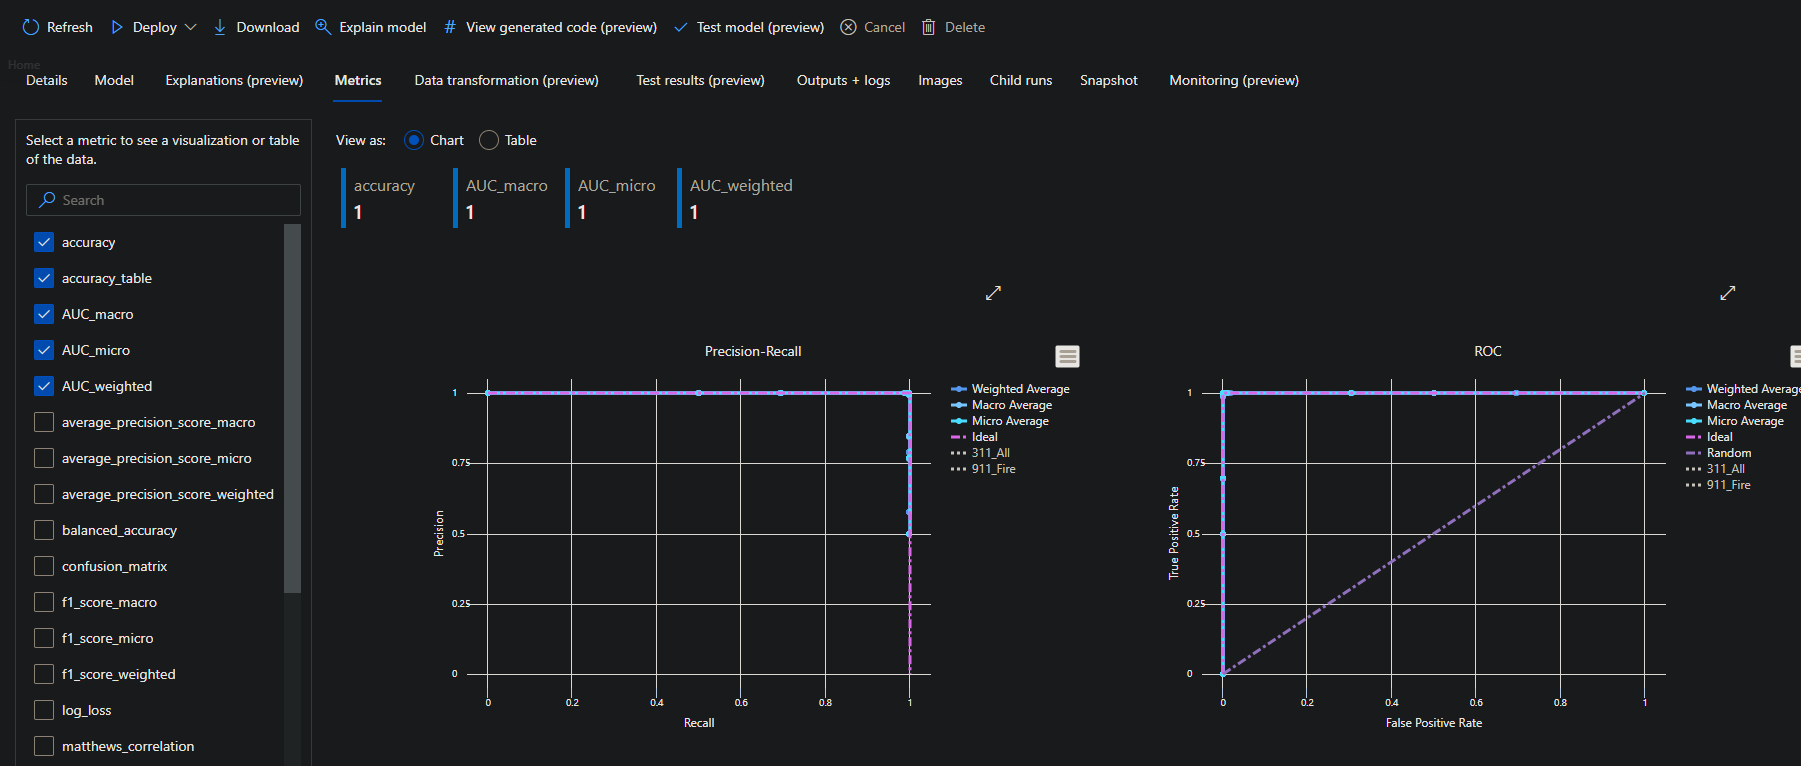
8. Now, click on the Models tab to see all the tested models during the training process. You’ll see a list of models with information, such as the Algorithm name, Duration, Hyperparameter values, etc.
The list in this tutorial is sorted in descending order by the AUC_weighted metric. This metric measures how well the model can distinguish between different classes.
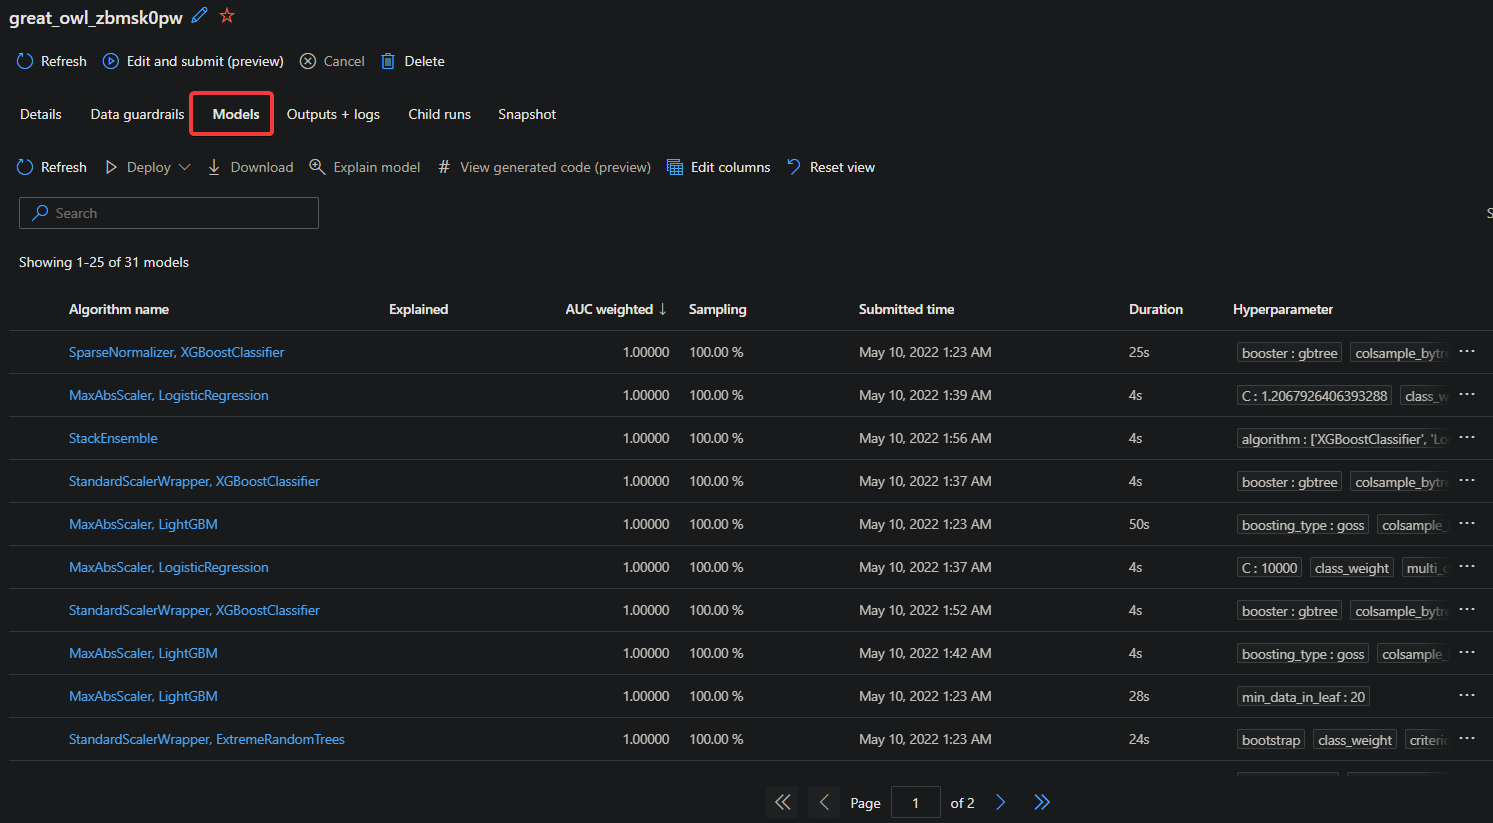
9. Click on a specific model name to see more information about that model and its performance on the sample data. But for this tutorial, choose MaxAbsScaler, LightGBM under the Algorithm name shown below.
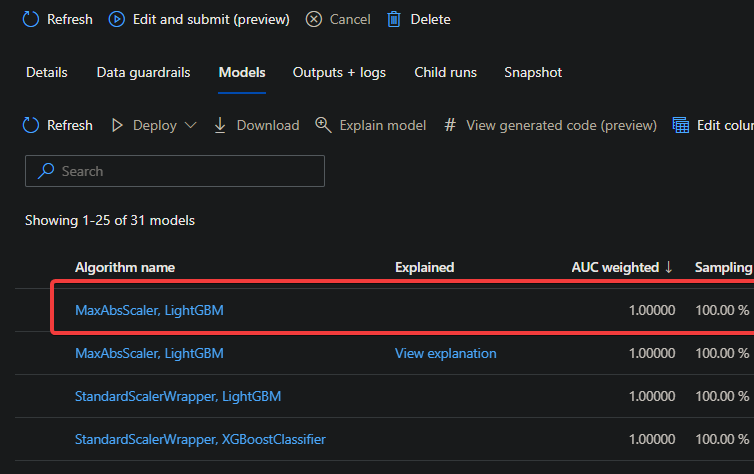
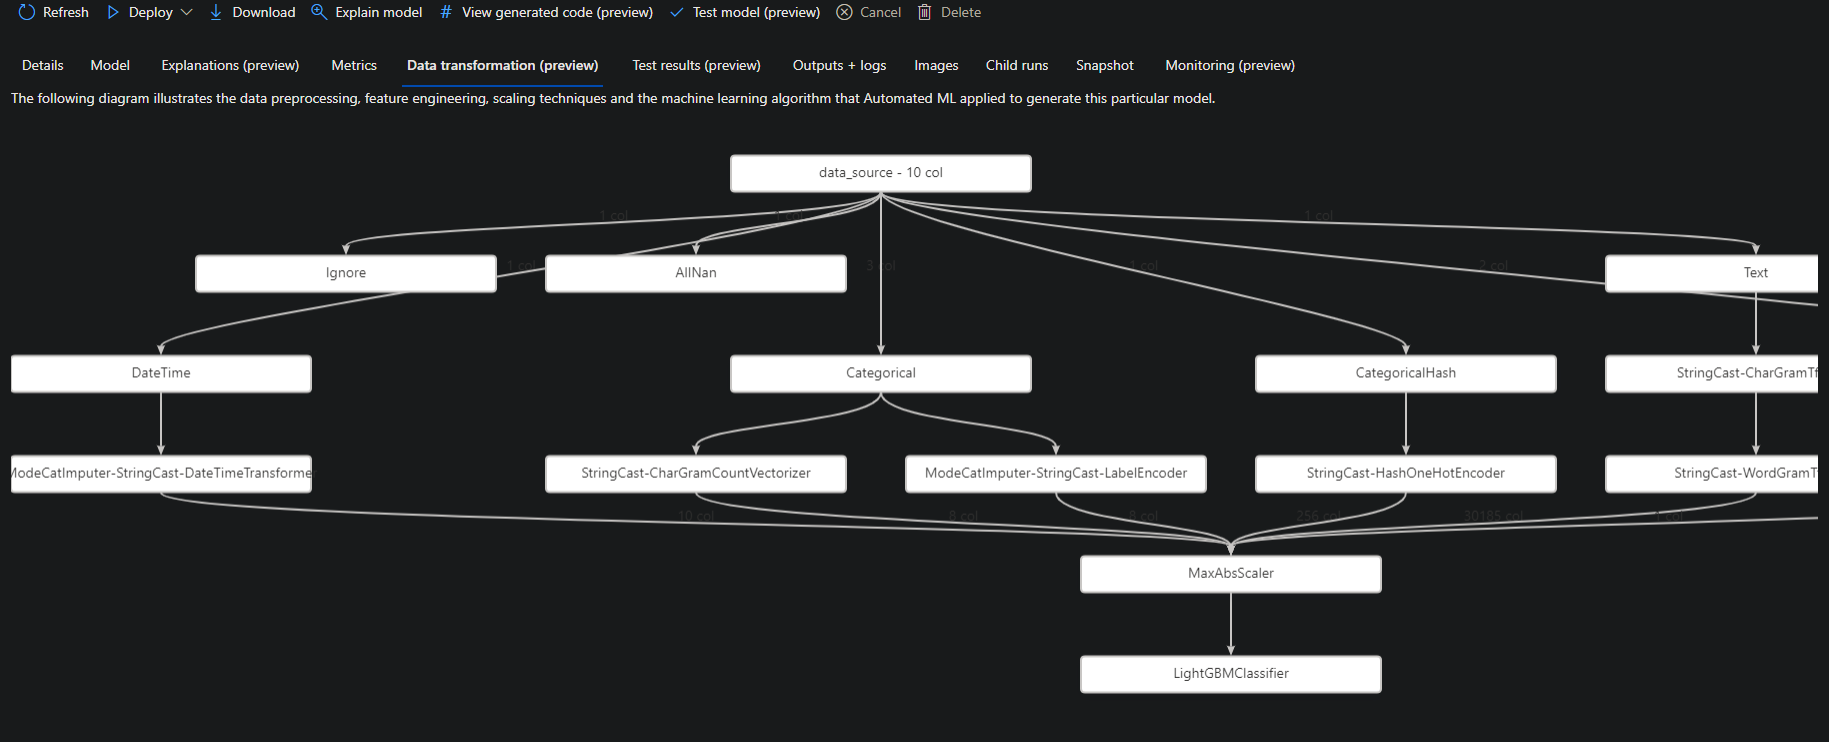
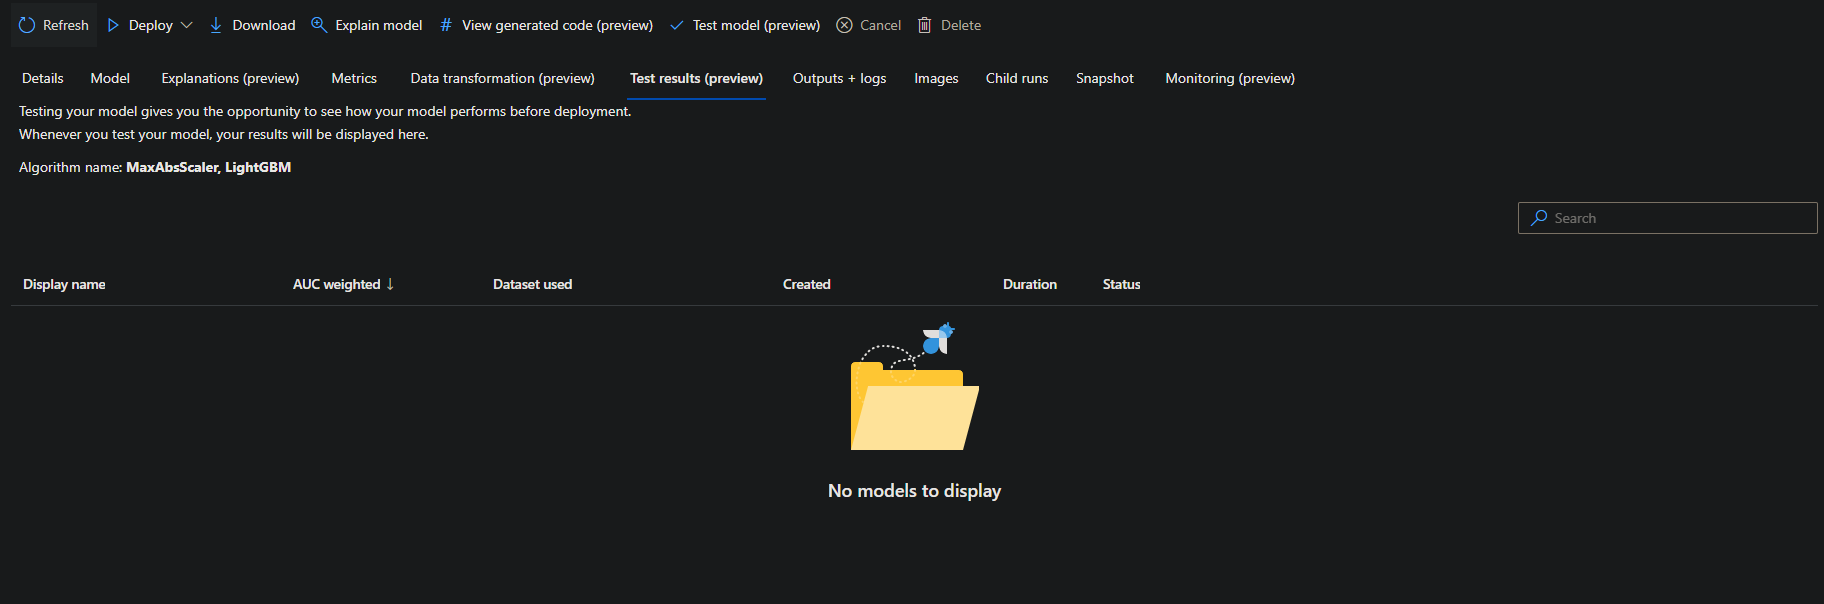
10. Finally, click on any menu tab (from Metric to Data transformation to Test results, and so on) to explore the MaxAbsScaler, LightGBM model’s data visualization.

Cleaning up Azure Resources
You’ve seen how to get started in Azure Machine Learning and manage your resources. But remember Azure charges per hour for the resources you used. So cleaning up the resources you used for this tutorial is important not to get charged unnecessarily.
If you plan to use the resources created in this tutorial for other purposes later, then you can skip this section.
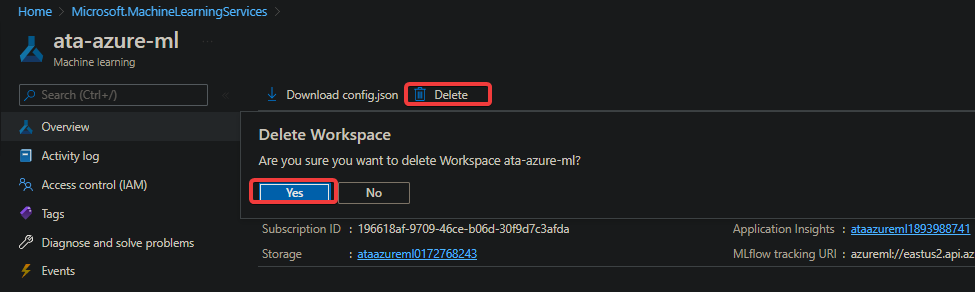
1. Navigate to the Azure Machine Learning studio home page and select your Azure Machine Learning Workspace.
2. Next, click on the Delete button on the Overview page to delete all the resources you created for the selected workspace.
Click Yes in the confirmation message to proceed.
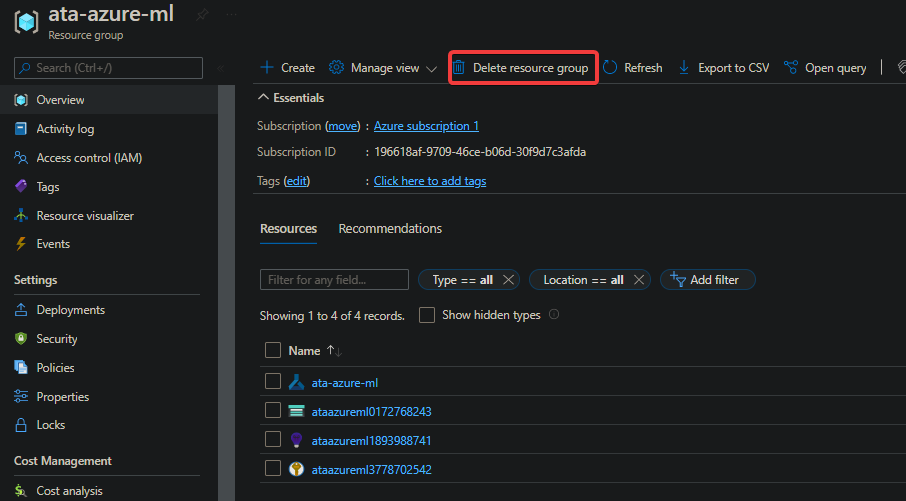
3. Navigate to your Azure Machine Learning Resource group and click on the Delete resources group button. You’ll see a pop-up pane on the right side of the page where you’ll search for your resource group (step four).
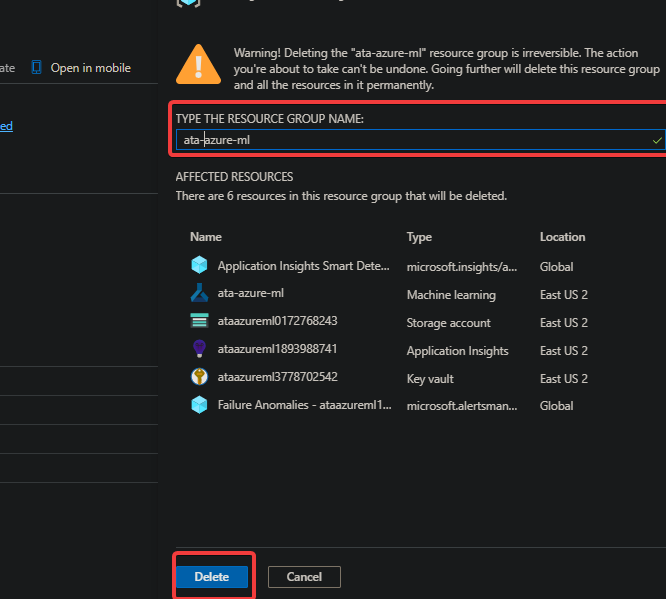
4. Finally, enter the exact name of your resource group in the text box and click the Delete button.
And that’s it! You’ve now successfully deleted all the Azure Machine Learning resources you created for this tutorial.
Conclusion
In this tutorial, you’ve learned how to create your first Azure Machine Learning workspace and experiment, select, and explore different models created by Azure Machine Learning.
From this point on, you can now use Azure Machine Learning to automate the process of training and selecting the best models for your data. This process saves you time and effort as you don’t have to worry about the details of training models or to choose the best one for your data. You provide the data and let Azure Machine Learning take care of the rest.
Why not build on this newfound knowledge by exploring why your machine learning models made the predictions that they did? This SDK package is helpful if you’re trying to understand which factors most influenced a model’s predictions or avoid bias in your models.


