


Are you a developer that wants to create a cloud-native application but not sure where to start? Or maybe you’re a system administrator that needs to automate the management of Azure resources. This Azure Functions tutorial might just be your ticket!
Not a reader? Watch this related video tutorial!Azure Functions is an event-driven, serverless compute platform used to run snippets of code in Azure. Azure Functions provide flexibility in deploying applications and creating automation. If you are modernizing your application from on-premises server infrastructure, consider upgrading to Azure Functions.
In this article, you will learn about serverless concepts, Azure Function components and follow a tutorial building your first Azure Function.
Understanding Serverless Cloud Computing
So what is serverless cloud computing anyway? Serverless computing hosts and runs code in the cloud. It is “serverless” in the sense that you do not need to install or maintain servers to run code.
No Infrastructure Headache
Code runs on servers hosted by the cloud provider. Developers write and deploy code without worrying about the infrastructure required to execute it.
Typically, when a developer needs to run code, they had to set up and maintain their own server. Configuring servers for applications is a time-consuming activity and often not a developer’s strength.
Serverless computing eliminates this infrastructure barrier for developers. Servers are still running the code, but developers no longer need to worry about them. Developers can quickly deploy code without waiting for system administrators to install servers, patch operating systems, or configure networking.
Pay for Only What You Use
Think about servers you manage in an on-premises data center. You have servers hosting applications, but those applications aren’t always in use. But, they are always consuming resources.
Using serverless, you only pay for the compute resources needed to execute the code. This consumption model saves costs by only using compute resources when required.
Automatic Scaling
Now that you’re only paying for the resources as you need them, you can scale up or down quickly with auto-scaling. Auto-scaling adds or removes compute resources to meet changes in demand. Compute resources include items such as CPU, memory, and networking.
Imagine you host an e-commerce website with a big sale coming up. You’re not sure how much web traffic will increase during the sale. As more visitors go to your website, serverless will add more resources to meet the demand.
As the sale ends, serverless will use fewer resources as the number of visitors decreases. Developers and administrators do not need to worry about installing more servers and deploying code to meet these changes in demand.
Getting to Know Azure Functions
Not to be left out, Microsoft jumped on the serverless bandwagon with their own solution called Azure Functions. Azure Functions is Microsoft’s event-driven serverless solution and is what this Azure Functions tutorial is all about.
With Azure Functions, you can build application components into blocks of code locally or in the Azure Portal that can execute whenever needed.
Azure Functions vs. Functions Apps vs. Functions
When working with Azure Functions, you’re going to see many ‘functions’ thrown around. For a beginner, this nomenclature may get confusing fast. There are three ‘function’ names you need to be aware of.
- Azure Functions (capitalized) – This is the name of the service itself, like Azure Automation, Azure Virtual Machines, or Azure Storage Accounts.
- Function App – This is an “instance” of Azure Functions. It’s a single application.
- Function – This a function defined purely in code. You can have multiple functions (lowercase) inside of a single Function App.
To make it even more confusing, some learning material uses these terms interchangeably so be careful!
Triggers
Azure Functions is “event-driven.” This attribute refers to how the code being executed by Azure Functions starts. A function will start via an event. That event can be many different things, each with a specific trigger.
The trigger is responsible for executing an Azure function, and there are dozens of triggers to choose from. Examples of trigger events include:
- HTTP trigger: Receiving an HTTP request, like interacting with an API to retrieve the application’s information.
- Timer trigger: Running on a schedule, such as sending reminders once a day about upcoming appointments.
- Azure Blob Storage trigger: Running on blob storage object creation, such as generating thumbnails of uploaded images.
- Azure Event Grid trigger: Running on a new event in an Event Grid subscription, such as sending a notification when a new virtual machine is created in a resource group.
Bindings
Azure Functions is a service that consists of various functions. When running, a function can connect to other Azure services. To do that, a function requires a binding. A binding is code that “links” one Azure service to another and has a direction (in or out). That binding direction refers to how the “linked” Azure service sends or receives information from the function.
Examples of bindings include:
- Storage Account: Access blobs, tables, and queues in a storage account, such as saving records to a table.
- Azure Cosmos DB: Interact with records in Cosmos DB, such as updating or creating new documents.
- Third-Party Apps: Connect to outside apps like Twilio for sending text messages
Hosting Plans
Even though you don’t have to manage the server running the code in a function, you must still tell Azure a little bit about how you intend to use it. Azure Functions’ infrastructure is defined via hosting plans. Hosting plans dictates what operating system the code runs on, its scaling ability, and availability.
The three main hosting plans include:
- Consumption: Provides automatic scaling up and down to meet changes in demand. You only pay for compute resources when the function is running.
Consumption is the default hosting plan and is useful for development or testing environments.
- Premium: Useful for running Function Apps continuously, access to more CPU and memory options, and virtual network connectivity than provided in the Consumption plan. Choose Premium plans for longer runtimes and faster start times.
- Dedicated: Run functions in App Service plans for predictive scaling where you can scale up or down manually without waiting for auto-scaling to take effect. Choose Dedicated plans when you need the function to run continuously.
Runtime Hosts
Every function runs some code. That code must be written in a language defined in the function to ensure it can execute the code as expected. To run that code, every function must have a defined runtime host.
Runtime hosts determine what languages and versions are available for coding your function. Azure Functions currently support three versions of the runtime host: 1.x, 2.x, and 3.x.
Microsoft recommends running your functions in the latest supported version of the Function runtime. The latest runtime provides more features and compatibility while older runtimes are receiving new enhancements.
By default, Azure sets the runtime version to 3.x when creating Functions in the Azure Portal and Azure CLI.
All functions in a Function App use the same language. Azure Functions supports several programming languages in version 3.x:
- C# using .NET Core 3.1
- JavaScript Node 10, 12, and 14
- F# using .NET Core 3.1
- Java version 8 & 11
- PowerShell Core 6 and PowerShell 7
- Python version 3.6, 3.7, and 3.8
Monitoring and Logging
Finally, to monitor your Function Apps, Azure Functions uses Application Insights. Application Insights gathers data generated by the function app, including application traces and events you write within the app.
Application Insights is not required to deploy Function Apps. Without it, you can still view the live logs when the Function App executes, but you can’t view historical data about the performance and troubleshooting of your functions.
Tutorial: Creating an Event Logger Azure Function
Now that you’ve got the gist of Azure Functions, let’s jump into a tutorial to get your hands dirty!
This Azure Functions tutorial will create a PowerShell Function App that logs events in a storage account table. Imagine you were rolling out new software to hundreds of computers using a custom PowerShell script. You invoke this logger function from the script to store the progress and errors during the rollout centrally.
To trigger the function from your fictional software deployment script, you will use an HTTP trigger. Once triggered, the Function App will then store a message to a storage account table using an output binding.
Storage account tables are a low-cost option for storing structured data like log messages.
Prerequisites
If you plan on following along step-by-step in this Azure Functions tutorial, you will need the following:
- An Azure resource group. This tutorial will use a resource group called rg-atafunctions-westus2.
- An Azure storage account. This tutorial will use a storage account called atafunctionsdemo.
- An account with Contributor or Owner permissions on the subscription
Create the Function App
Once you have all of the prerequisites in place, you’ll first need to create a Function App. The Function App is the component that encapsulates all code execution. The Function App executes functions and groups them together for easier management and resource sharing. This tutorial uses a Function App based on the PowerShell language.
1. Open up a web browser and log into the Azure Portal.
2. Once in the Azure Portal, search for “function app” and select the matching service.

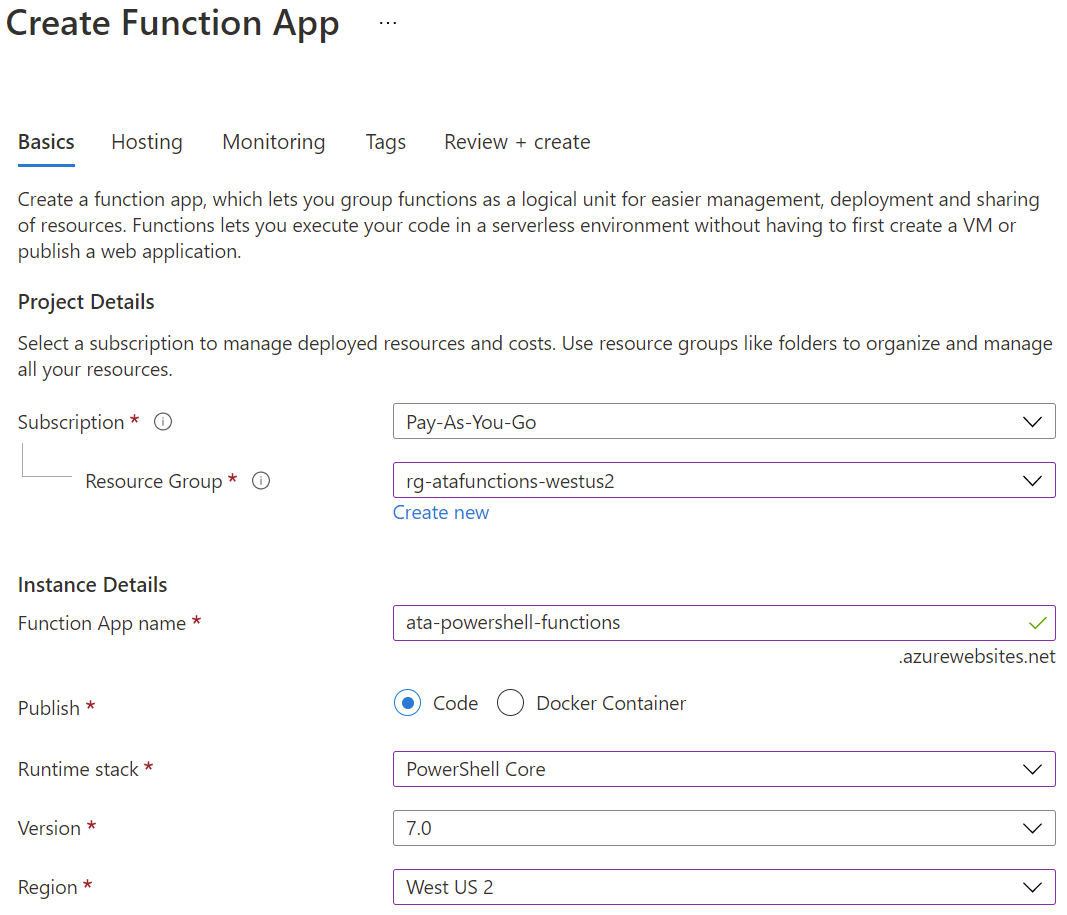
3. In the Function App service, click + Create to create a new Function App. In the Create Function App window, enter the following information on the Basics tab:
- Subscription: select your Azure subscription.
- Resource Group: Select the resource group. This tutorial will use rg-atafunctions-westus2.
- Function App name: Enter a globally unique name for the Function App. Note that Function App URL uses the domain azurewebsites.net.
- Publish: Select Code to use the built-in Azure image for executing the function code. If your app requires a specific language version or another dependency not in the built-in image, select Docker Container.
- Runtime stack: Select the programming language that all functions in the app will use. For this demo, select PowerShell Core.
- Version: Select the runtime version of the programming language to execute the code. This tutorial uses PowerShell 7.0 as it is the only version available.
- Region: Select an Azure region to store the Function App. Choose a region that is closest to users using the application or other services the function accesses. This tutorial will use the West US 2 region.
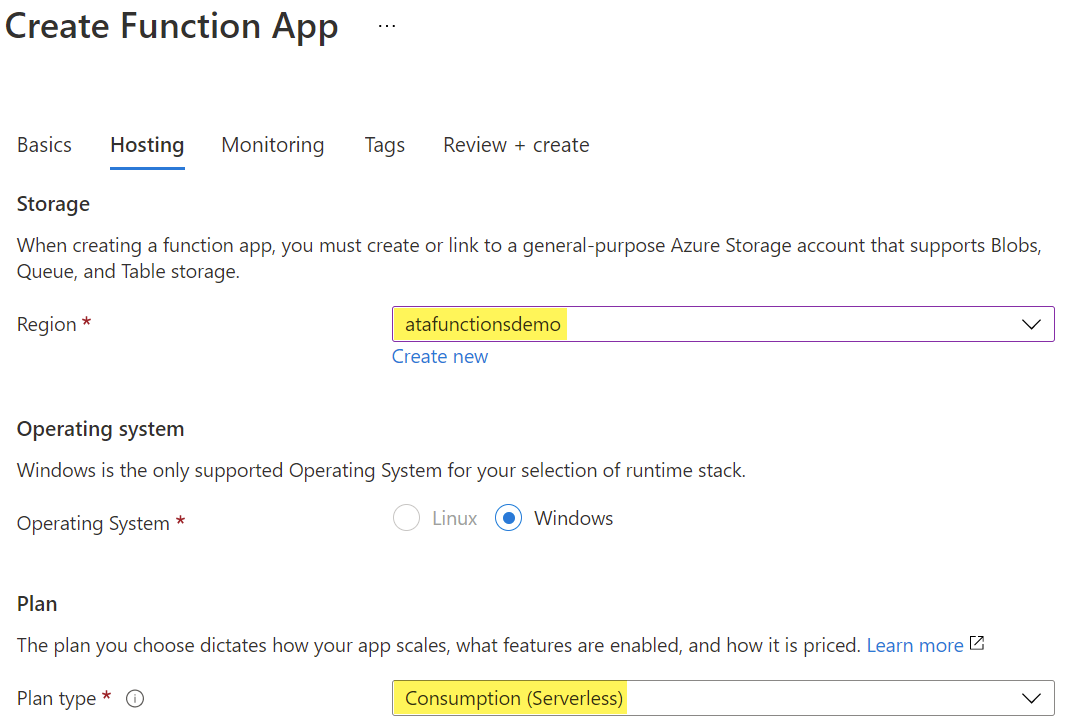
4. Click on the Hosting tab and change the storage option to the storage account that the function will store messages in. This tutorial will use a storage account called atafunctionsdemo.
Leave the Plan type at Consumption (Serverless). Using the Consumption plan means you will only pay when the Function App executes. If your Function App requires more powerful instances or long-running scenarios, consider choosing the Premium or Dedicated plans.
5. Click on the Monitoring tab.
6. Set the option for enabling Application Insights to Yes. Application Insights gathers more historical data for analyzing performance and troubleshooting issues. If you have an existing Application Insights deployment, select it from the dropdown. Otherwise, Azure will create a new Application Insights resource for hosting the Function App performance logs.
7. Once you configure all the settings, select Review + create.
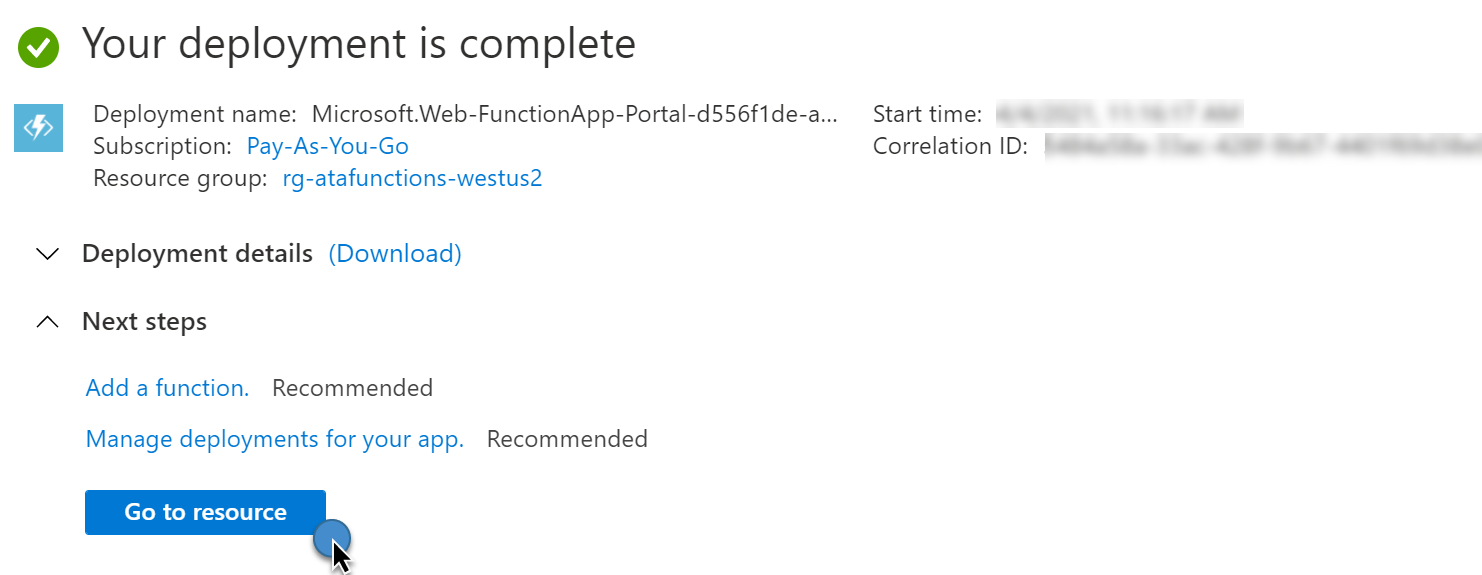
8. Now, click Create. Azure will create the Function App and associate it with the configured components.
9. Once the deployment completes successfully, your Function App is built! Now, select Go to resource.
Create the Function
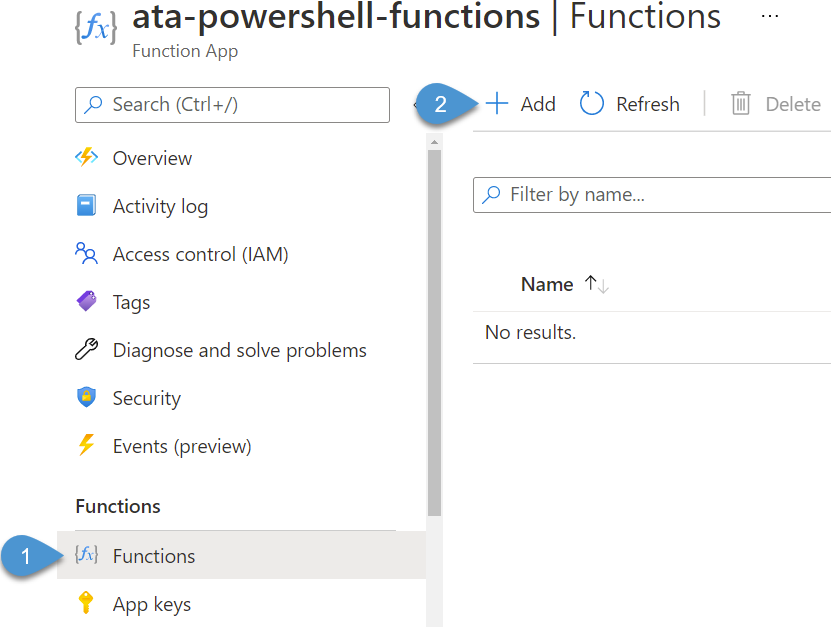
Now that your Function App is built, it’s time to build a container to define the type of trigger, binding and finally your actual code. All of this work is done via a function (lowercase).
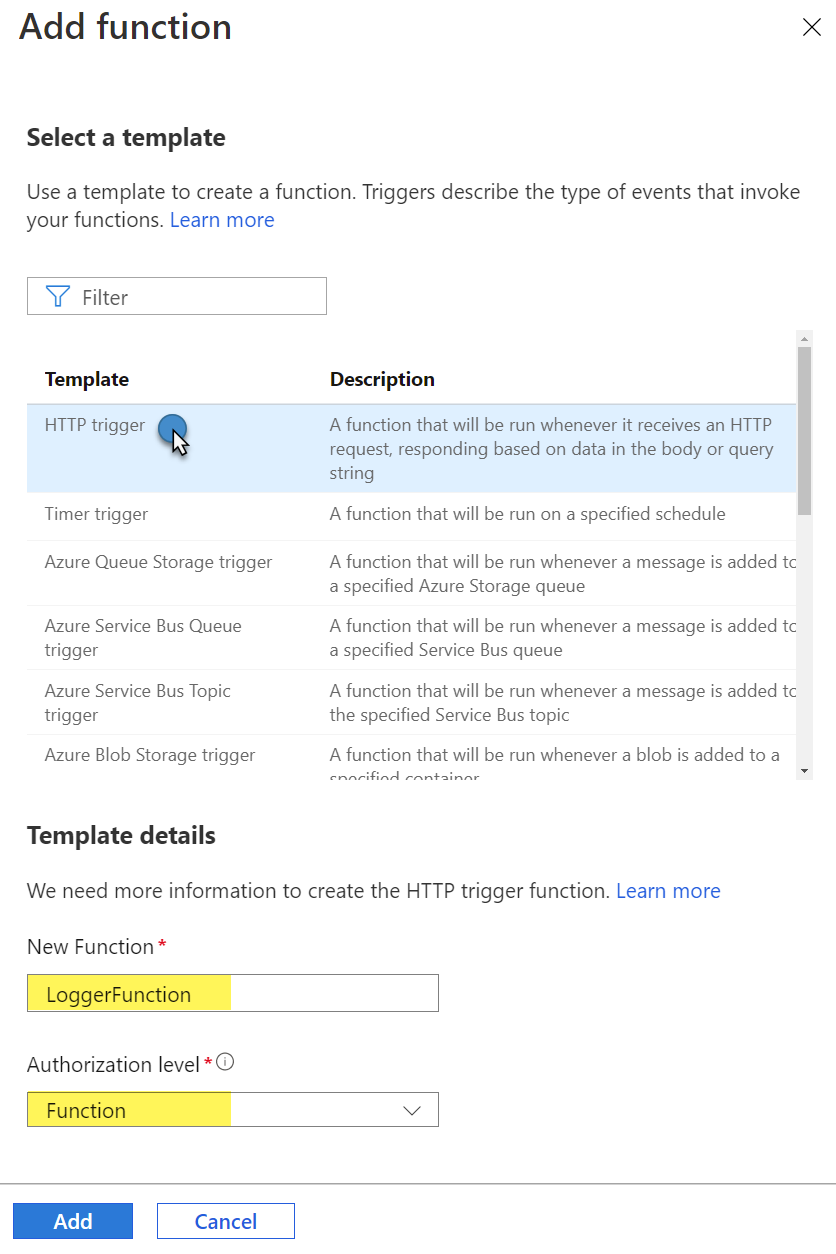
1. In the Function App, navigate to Functions —> Functions and select the + Add button to create your first function.
2. In the Add function window, select the HTTP trigger template, which will show additional details. An HTTP Trigger allows you to run the function by invoking an HTTP request so you can call the function from another application.
3. In the New Function input box, give the function a new name. This function is named LoggerFunction.
4. Select Function as the authorization level. The Function authorization level creates an access key specifically for executing this function. You’ll see the function key later when you view the HTTP URL to trigger the function.
5. Finally, click Add to create the function.
Add Table Output Binding
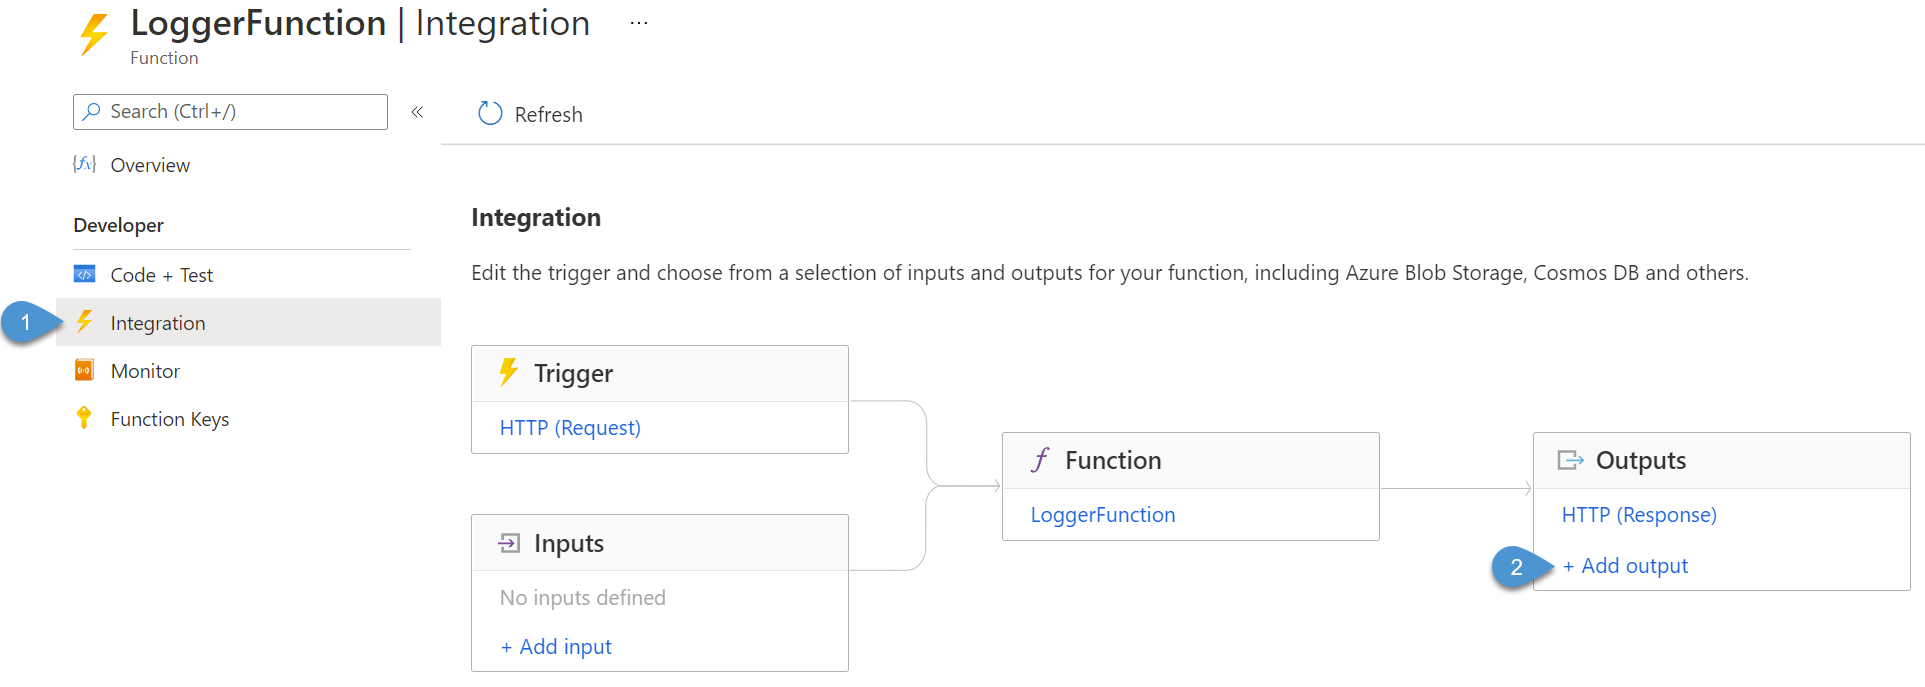
Once you’ve built the function, it’s time to define where to send this function’s output. For this tutorial, you’re going to use a storage table. To do that, create an output binding to the storage account table for logging messages.
The output binding allows the function to access the table storage without worrying about authentication or connection strings. You reference the output binding in the code, and the function takes care of connecting to the service for you.
- In the function window, select Integration on the left. Azure displays a chart of the integrations for the function.
Azure refers to the trigger, inputs outputs, and the functions themselves generically as “integrations”.
Notice the HTTP trigger input created in the previous step below. Since this function already has an HTTP trigger defined, the function includes an HTTP response for an output.
You will see the output message when you invoke the web request later on.
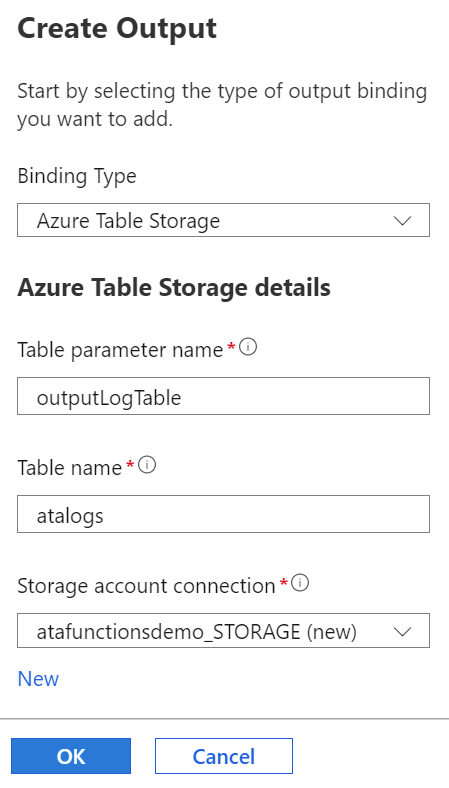
2. In the Outputs box, select + Add output to create an output integration for the function to connect to a storage account table.
3. In the Create Output window, change the Binding Type to Azure Table Storage. Enter a new name for the table parameter name. The parameter name for this tutorial is outputLogTable.
Make note of output binding name. You’ll need it later.
4. Next, enter the table name where the function is storing the data. If the table doesn’t exist, the function will create it. The table name for this Azure Functions tutorial is atalogs.
5. For storage account connection, click New, then select the storage account. This tutorial is using the storage account named atafunctionsdemo.
6. Click OK.
Code the Function
You now have the Function App, the function which includes the trigger and the output binding built. It’s time to finally get down to coding!
1. In the function window, select Code + test. When creating the Function App, you chose PowerShell as the language; the function will already have a PowerShell code example for an HTTP trigger.
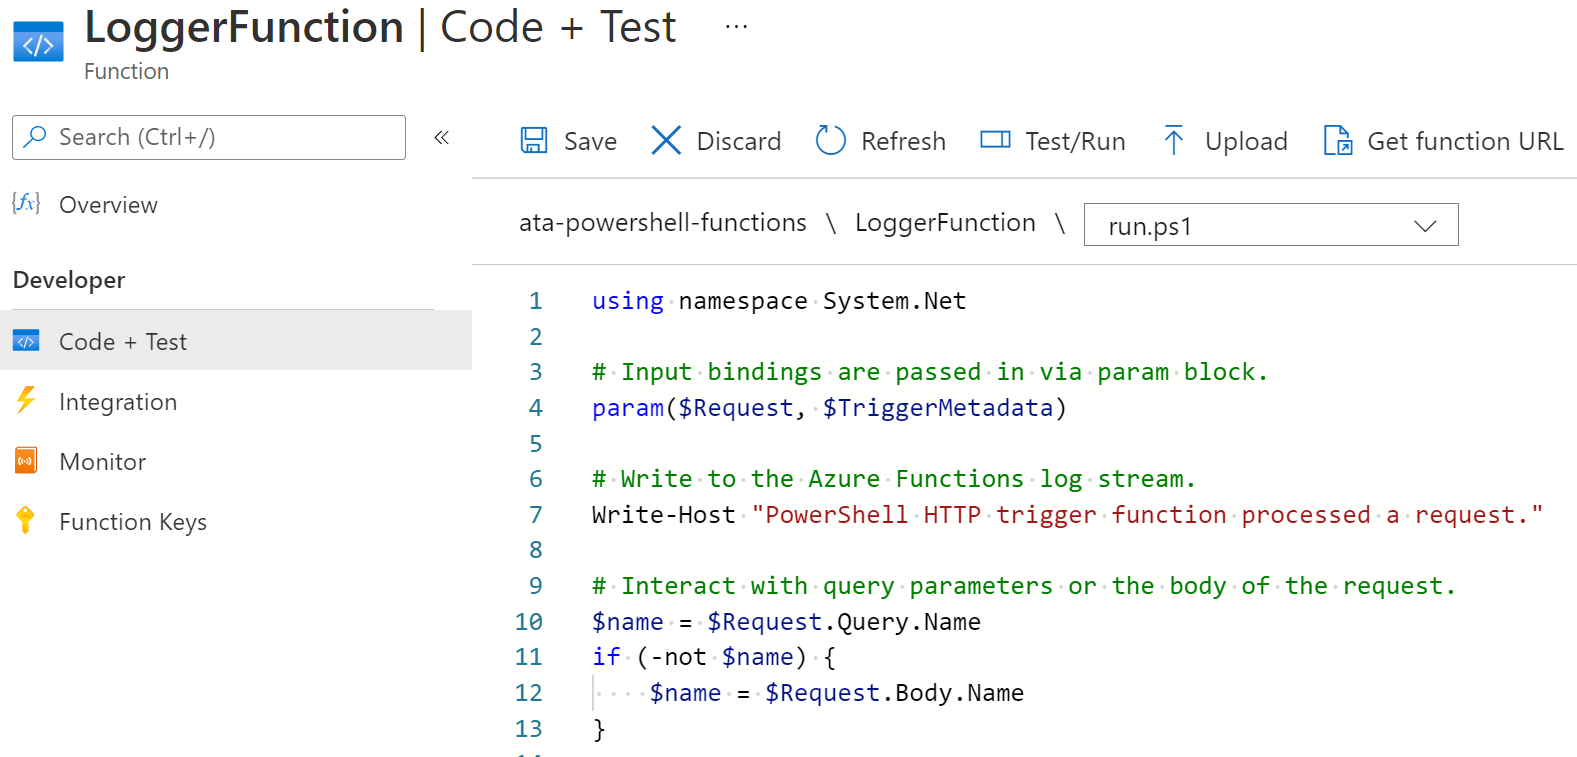
2. Replace the default function code with the following. To ensure the instruction goes with you when you paste this code into the function, comments about the code are inline.
3. Once you enter all the code, click Save.
Triggering the Function
With the function code complete, it’s time to execute the code. To do that, with all functions, you’ll need to trigger it. In this case, you’ll do so via an HTTP request.
Before you can trigger the HTTP request via your calling script, you will first need the function’s URL to target the request. To find that:
1. In the function window, click the Get function URL button.
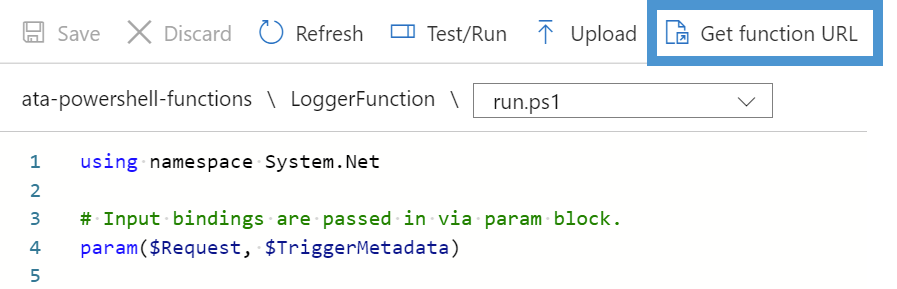
2. In the function URL window, verify that the default key is selected. This default key is the function key created earlier. Click the copy icon to place the URL in your clipboard.

3. Once you’ve copied the trigger URL to your clipboard, open your favorite PowerShell editor. It’s now time to work on the PowerShell code that will invoke the HTTP trigger.
4. Copy and paste the below code into a new script. All comments are inline.
You can use any command or language capable of making HTTP requests; but, this tutorial uses PowerShell 7.1.2 to demonstrate this capability.
For more information on PowerShell and JSON, be sure to check out the Wrangling REST APIs with PowerShell and JSON (Four Demos!) article.
5. Now, save and run the PowerShell script as ata-functions-demo.ps1.
.\ata-functions-demo.ps1If successful, the script will invoke the HTTP trigger attached to the function and return a message stating The entry was successfully logged to the table.
Validating Function Logs
Now that you’ve invoked the function (hopefully), let’s confirm it actually ran successfully. To do that:
1. Open your web browser (if you closed it) and navigate back to your function.
2. Select the Logs icon below the code editor. The log console displays the function’s output during execution.
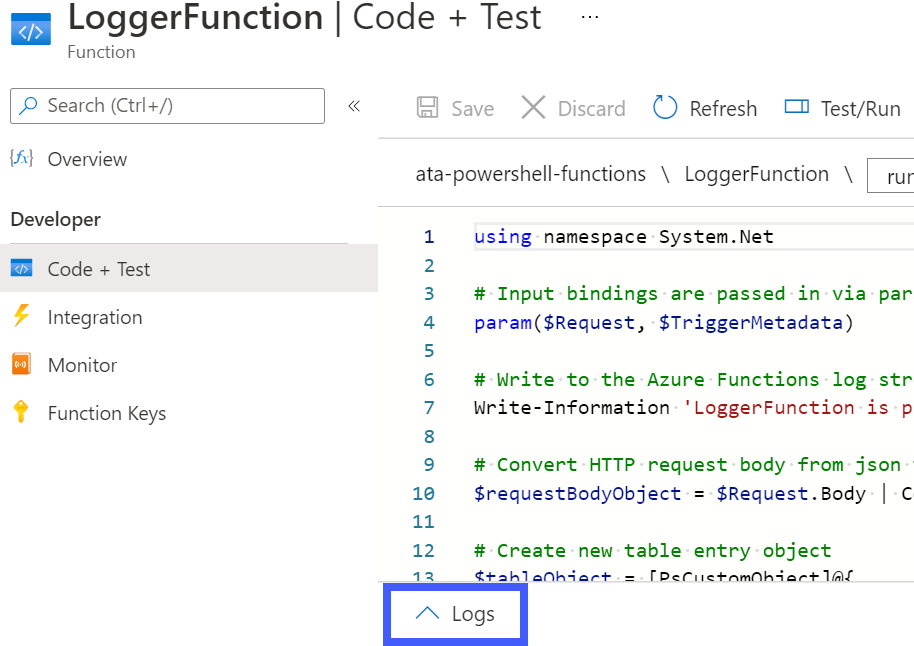
You should see the INFORMATION banner displayed from the Write-Information command in the function code on the Logs page.
If you do not see entries showing the function code’s execution, click the Stop button and Start button again at the top of the console to refresh the console log window.

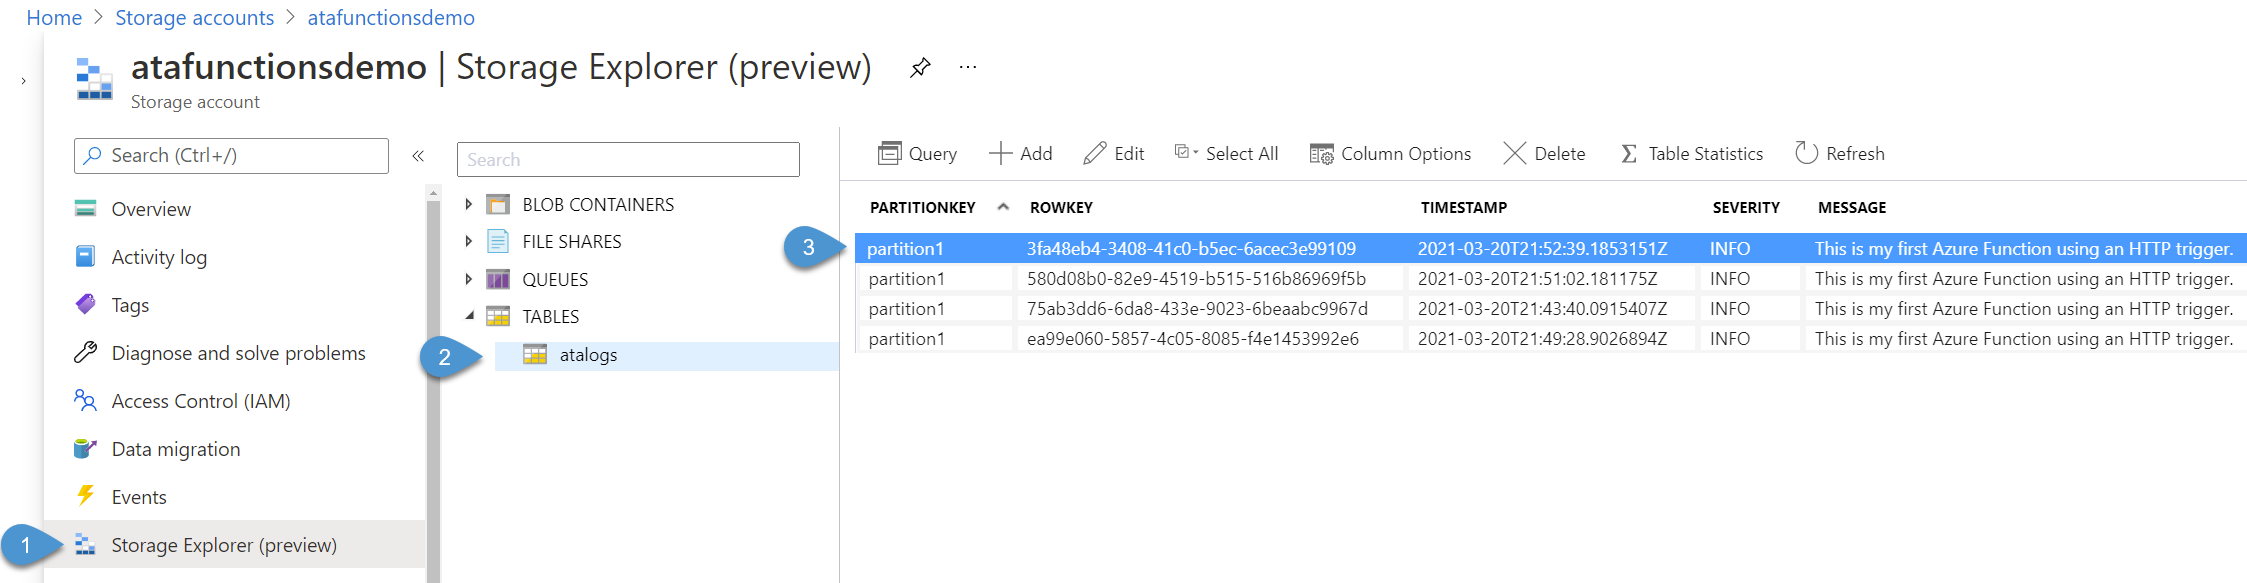
3. Now, confirm the message has been stored in your table storage by navigating to your storage account.
You can quickly switch to the storage account by entering the name in the search bar at the top of the portal.
4. Select Storage Explorer (preview) on the left, and expand TABLES.
Below you can see the table name defined when creating the output binding earlier (atalogs). In the table, you should see the entries made when invoking the function using a web request.
Each entry has the partition key, a unique row key, the log severity, and the log message.
Note that the table automatically includes the timestamp column.
For an example of an Azure Function using a timer trigger, check out the article How to Export Teams PSTN Usage Records with Azure Functions.
Conclusion
In this Azure Functions tutorial, you learned about Azure Functions and built your first function using PowerShell. Azure Functions is a fantastic serverless solution with many different options.
You can create an entire web application and other automation with different triggers and output bindings. Multiple language options make functions accessible to any developer to create their serverless solution.
Next, try a different project by checking out the Azure Serverless Community Library. The library contains solutions created by the community using different Azure serverless options and languages.


