

When you need to control traffic to your Azure virtual machines, you have two choices; Azure Firewall or Network Security Groups (NSGs). They both serve a similar purpose, but which one do you pick, or can they be used together? This tutorial will answer those questions and show you how to get up Azure Firewall from scratch.
In this article, you will learn the differences between Azure Firewall and NSGs and understand where each fits in your environment. You will also walk through a deployment of Azure Firewall and learn how to configure the firewall and route traffic through it.
Let’s get started!
Azure Firewall vs. an NSG
If you are new to Azure, there may be some confusion around the difference between Azure Firewall and Network Security Groups (NSG) and deciding when to use NSG’s or Azure Firewall. While they both filter traffic based on a set of rules that you provide, they each have a specific role to play.
Azure Firewall is a Microsoft-managed Network Virtual Appliance (NVA). This appliance allows you to centrally create, enforce and monitor network security policies across Azure subscriptions and virtual networks (vNets). An NSG is a layer 3-4 Azure service to control network traffic to and from a vNet.
Unlike Azure Firewall, an NSG can only be associated with subnets or network interfaces within the same subscription of Azure VMs. Azure Firewall can control a much broader range of network traffic.
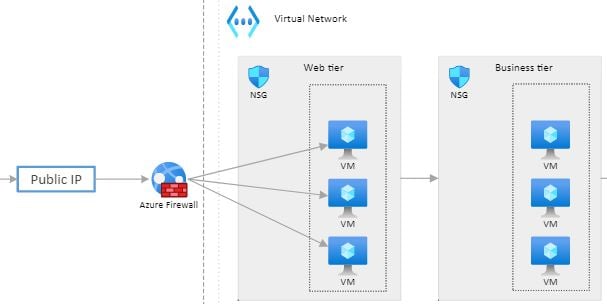
Azure Firewall and NSGs don’t have to work independently. They can also work together, as shown by the below diagram.
Notice that Azure Firewall sits at the subscription level and manages traffic going in and out of the vNet. The NSG is then deployed at the subnet level and network interface (not shown). The NSG then manages traffic between subnets and virtual machines.
In this scenario, you could create an NSG on the business tier to allow only database connections from the web tier while configuring the web tier to allow only HTTP/HTTPS traffic. Both the NSG and Azure Firewall provide better “defense-in-depth” network security.
Creating an Azure Firewall
Enough talk; let’s get your hands dirty with a demo on setting up Azure Firewall to see how it works! To do that, before you start, be sure you’ve satisfied a few prerequisites.
- An Azure subscription
- The environment is created via Azure Resource Manager (ARM) template in this Microsoft Quickstart document.
- Access to an account with Contributor Permissions in the subscription
Azure Firewall is a managed service and is not free. For pricing information, check out the Azure Firewall Pricing page.
Assuming that you have an environment built and ready to create Azure Firewall on top of, to create an Azure Firewall:
1. Open your favorite web browser and navigate to the Azure Portal.
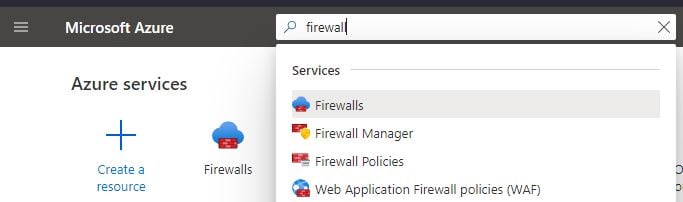
2. Search for “firewall” in the Search box and click on Firewalls to open the Firewalls blade.
3. In the Firewalls blade, click Create.
4. Provide values for all necessary fields like the Azure subscription you’ll be deploying Azure Firewall into, the resource group (Create a new one if you need to ), and the region.
The region you deploy to here is important. The region must be in the same region as the vNet you want to protect!
Also, provide a Tier level. This tutorial will be using the Standard tier. Although, if you need more advanced features like TLS, URL Filtering, and Intrusion Detection and Prevention System (IDPS), choose the Premium tier.

5. Next, select how you’d like to manage the firewall, either using a firewall policy or classic rules. This tutorial will use classic firewall rules to manage the firewall.
A firewall policy, unlike classic rules, can be attached to multiple firewalls. Since the tutorial will only be creating a single firewall, classic rules will suffice.

6. Next, provide the Virtual network name where Azure Firewall will be deployed. Note that Azure requires the name of the virtual network to be exactly “AzureFirewallSubnet,” as seen below. If you do not name the virtual network correctly, you can not deploy the firewall correctly!
You are somewhat limited to the address space. Azure firewall requires at least 64 addresses available. The example below shows a CIDR range of 10.0.0.0/26, with 64 available IP addresses.

If you look at the captions under the address space box, Azure will show how many addresses will be available for a given CIDR range. This will help in determining the correct range for your network.
If you set the CIDR prefix to something higher than 26, you will get an error that the CIDR prefix must be set smaller than 26.

Setting up the Route Table
Now that you’ve created the firewall, it’s time to send some traffic to it. To do that, your first task is to create a route table. The route table will contain the network routes that will direct traffic from devices on the vNet to the firewall.
To create the route table:
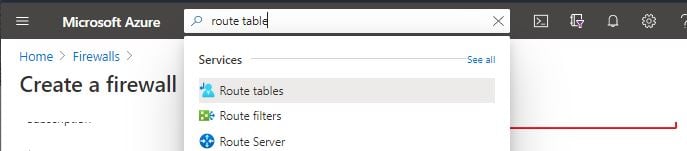
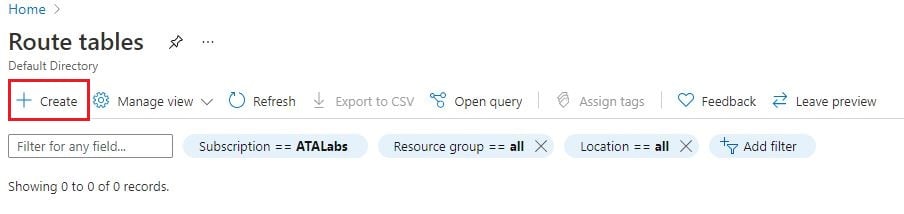
1. Search for “Route tables” at the top search bar and open the Route tables blade in the Azure Portal.
2. At the top right of the Route Table blade, click on Create.
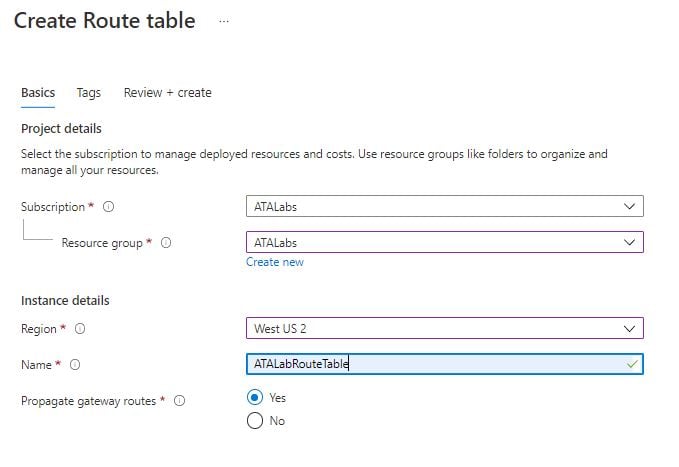
3. In the Create Route Table blade, provide:
- Resource group – The resource group to add the route table resource to.
- Region – The region to add the route table resource to.
- Name – The name of the route table. Any name will work.
- Propagate gateway routes – Set this option to Yes. In larger enterprise networks, this setting will advertise routes to other routers and gateways using routing protocols.
4. When complete, click on Review & Create → Create.
Finding the Azure Firewall Private IP Address
Once you have the route table set up, you’ll need to create a default route. But, to create a default route, you must find the Azure Firewall’s private IP address. When fully configured, each device on the subnet you’re routing from will use the firewall’s private IP address as their default route or “default gateway.”
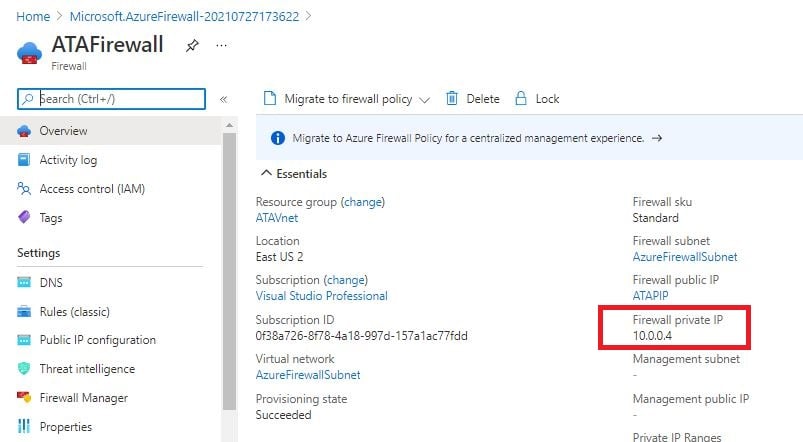
To find the private IP of the Azure Firewall, in the Azure Portal, navigate to the Azure Firewall you created in the previous section. Click on the Overview link. You’ll see the Firewall private IP along the right side of the page. Copy this IP address somewhere. You’ll need it in a little bit.
Creating a Default Route
Now it’s time to create the default route that all devices on the subnet the firewall will be protecting will use. The default route will tell the devices attached to the vNet to send all Internet traffic to the firewall.
To create the default route:
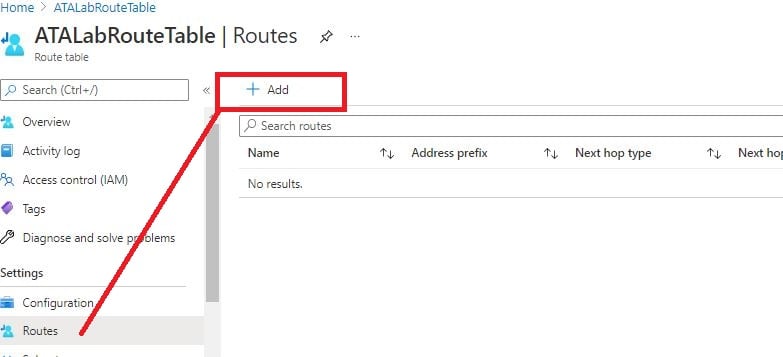
1. Navigate to the route table you created earlier in the Azure Portal.
2. Click on Routes from the left menu and then on Add.
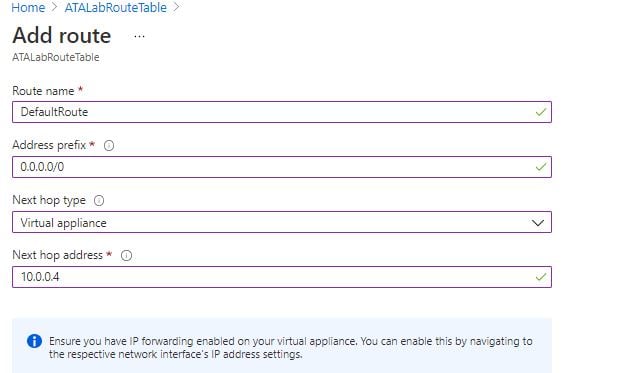
3. On the Add route screen, provide:
- Route name – The route name can be anything you choose. This tutorial will use the name DefaultRoute.
- Address prefix – Since a default route or “default gateway” is always 0.0.0.0/0, input all 0s in CIDR notation. This prefix matches all traffic from a device in your subnet destined for an IP address, not in your subnet. 0.0.0.0/0 is a “catch-all” address.
- Next hope type – Choose virtual appliance since the firewall is a virtual appliance.
- Next hop address – The Azure Firewall’s private IP address you captured in the last section.
When complete, click OK.
4. Next, on the default route you just created, click on Subnets —> Associate and input the vNet and subnet the devices you’d like the firewall to protect are attached to. This action will associate the default route to the subnet that your devices are using.
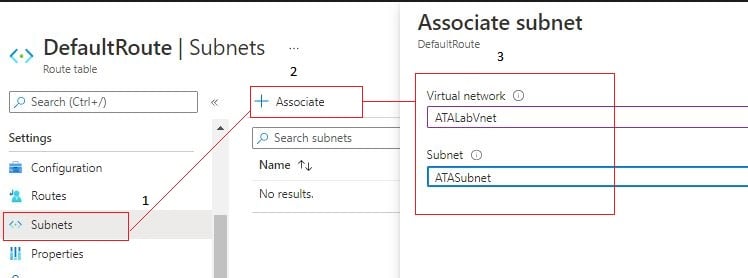
Once complete, all devices attached to the subnet will begin sending Internet traffic or 0.0.0.0/0 traffic to the firewall.
Creating Azure Firewall Rules
At this point, the firewall and networking have been set up, and your devices should be routing Internet traffic through the firewall using the default route. It’s now time to create a firewall rule.
Perhaps some devices on your vNet need to resolve DNS with Google’s DNS servers through the firewall out the Internet. Maybe you also need to allow the devices to connect to Windows servers in the 10.0.0.0/16 network with the Remote Desktop Protocol (RDP).
As an example of creating a couple of outbound Azure Firewall rules:
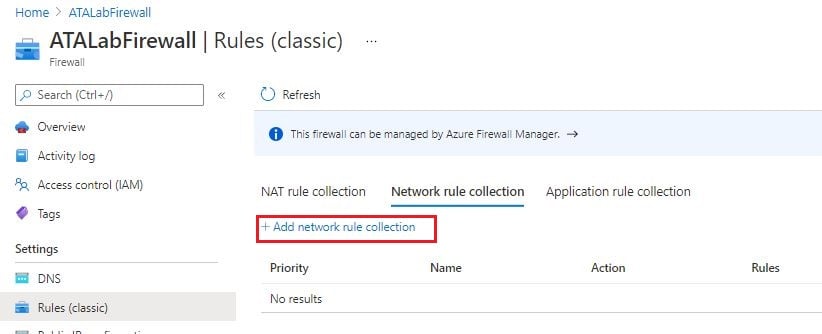
1. Navigate to the firewall in the Azure Portal.
2. Click on Rules (classic) on the left menu —> Network rule collection —> Add network rule collection. This action will bring up the new rule page.
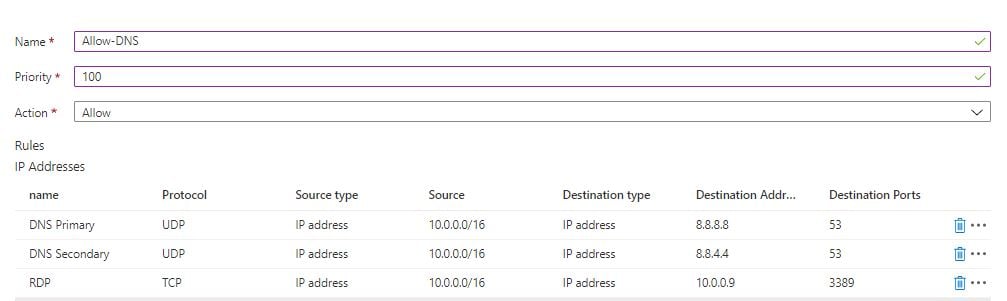
3. Provide the following to create the rule collection:
- Name – A descriptive name for the rule collection. The below example uses the name of AllowDNS.
- Priority – The order the rules will process. Lower numbers will process first until a match is found.
- Action – Allow for Deny the traffic based on the pattern matched from the rule.
Near the bottom of the screen, create three rules for the traffic you need to allow through, as shown below.
| Protocol | Destination IP Address | Destination Port |
| UDP | 8.8.8.8 | 53 |
| UDP | 8.8.4.4 | 53 |
| TCP | 10.0.0.0/16 | 3389 |
For each rule, you must specify a few properties:
- Name – A human-friendly label.
- Protocol – The protocol the firewall will match. This option can be TCP, UDP, ICMP (traceroute or ping).
- Source type – Either the IP address(es) the traffic is coming from (IP Address) or IP group if using Firewall Policy.
- Source – The IP network where the traffic is coming from. The Source can be a wildcard (*), a specific IP address, or a CIDR block.
- Destination type – The Source type only for the destination traffic.
- Destination Addresses – The destination of the traffic. The Destination Addresses can be a wildcard (*), a specific IP address, or a CIDR block.
- Destination Ports – The port that the incoming traffic is trying to connect to. For example, the DNS protocol listens on port 53.You should not specify an asterisk () for the source or destination address, if possible. The asterisk allows all source or destination traffic.
You should not specify an asterisk (*) for the source or destination address, if possible. The asterisk allows all source or destination traffic. You should always narrow down your firewall rules to specific networks or individual IP addresses, if possible. down your firewall rules to specific networks or individual IP addresses, if possible.
When complete, the rule page should look like below.
Conclusion
You’ve now set up an Azure Firewall, set up all the networking necessary to route devices to it, and also created a few rules! You can now add other devices on your subnet and know that the Azure firewall will be protecting them.
Now that you’ve set up the Azure Firewall and learned a little about NSGs, which approach will you use next when protecting your Azure devices?


