

Did you know you can natively run scripts like PowerShell in Azure DevOps (AzDo) pipelines creating a PowerShell pipeline? By using the tips and techniques you’ll learn in this article, you’ll be well on your way to scripting your way to automation greatness.
Not a reader? Watch this related video tutorial!If you’re building pipelines with Azure Pipelines, you’re familiar with tasks. Tasks are the building blocks of Azure DevOps (AzDo) pipelines. AzDo has many built-in tasks and also allows you to download other tasks via an extension in the extension marketplace. But, there will inevitably come a time when you need to perform some action that doesn’t have a task available.
It’s time to break out a script.
AzDo can natively run three types of scripts – PowerShell, Bash, and batch files. Using one or more of these scripting languages/techniques, you can get just about anything done.
In this in-depth tutorial, you’re going to learn how PowerShell scripts work in AzDo pipelines creating a PowerShell pipeline. You’ll learn all about how to invoke code, saved scripts in your source control repositories, and also how to work with pipeline variables in scripts.
How Scripts Work in AzDo Pipelines
Inside of each AzDo pipeline is a series of tasks. A task is defined as a step. These tasks represent a particular action like running a .NET build, deploying a web application, running a test, etc. Tasks are the building blocks for a pipeline.
AzDo uses the concept of a task to run existing scripts or code in the YAML pipeline itself. More specifically, a task can run a PowerShell, Bash, or batch file script on pipeline agents like Windows, Linux, and macOS. When a task is invoked, you can specify what agent (OS) to run the script on and any parameters the code/script has.
You can find PowerShell or Bash script tasks in the task picker in the web interface, just like any other task.
You can run a PowerShell task on Windows with Windows PowerShell, Linux, and macOS with PowerShell (Core).
Each scripting task is defined as a step in the pipeline, and you have a few different ways to assign tasks to execute a script like passing in parameters, failing on error, getting the last exit code, and so on. You’ll learn, in detail, how to build these tasks in the following sections.
Another essential concept to learn is how pipeline variables integrate with scripts. You can still define and manage “script variables” like $var = 123 in PowerShell and maintain environment variables without AzDo being involved. However, AzDo allows you to set and reference pipeline variables in scripts too.
Inline Code vs. Scripts
Throughout this article, you’ll see references to running “scripts.” Although accurate, it reads like you have to create your own text file, insert the code you’d like to execute, and only then the pipeline will run that script. That’s not true.
You can also run inline code. Inline code runs directly in the YAML pipeline. You don’t have to create a script ahead of time to run PowerShell or Bash code. Instead, you can insert the code directly in YAML. There’s no reference to a PS1 file. AzDo creates a temporary script when the pipeline runs.
One-Line
You can run inline code one of two ways in a pipeline either via a single line or multi-line. If you have a short code snippet as a single line, you can specify the task type followed by the code in quotes, as shown below.
- powershell: "I'm running PowerShell on a pipeline agent. Woohoo!!"Multi-Line Code
If you have a code snippet that spans a few lines or perhaps you don’t want to use quotes, you can define a multi-line code snippet by using a pipe (|) symbol followed by one or more lines right below it as shown below.
- powershell: |
      This is script line 1
        This is script line 2
It’s typically best to only use inline code for small tasks with less than five lines or so. Any other task that requires more than that should probably go in a script in your source control repository.
The upside of using inline code is keeping all functionality in a single place, making it easier to see everything that’s going on. But, this approach can soon get confusing if you have a large pipeline.
Where to Store your Scripts
If you’re not using an inline code task to run a script, you’ll have to save a script somewhere. You’ve got a few options where to store scripts executed via the pipeline.
A Source Control Repository
If you’re using a pipeline trigger from a GitHub or AzDo source control repository running a CI pipeline, try to store your scripts in the same repo. It’s easier to manage all files related to a project this way. By default, AzDo will check out all code in the source repo. Checking out the code will download all files from the repo onto the pipeline agent, making them immediately available for execution.
If you have scripts located in another GitHub repo, you can also check out multiple repos to download and run scripts stored in other repos too.
Once the scripts are downloaded to the pipeline agent, you can then reference them in a task via the [System.DefaultWorkingDirectory predefined variable.
For example, if you have a PowerShell script called script.ps1 stored in the root of your source repo, AzDo will check out the file placing it in the System.DefaultWorkingDirectory folder path. It can then be referenced using the PowerShell task, as shown below.
- task: PowerShell@2
    inputs:
        filePath: "$(System.DefaultWorkingDirectory)\script.ps1"
Somewhere Else
If a script isn’t located in a source control repo, you can still run it in a pipeline. How you do this, though, highly depends on the situation. For example, you could use a PowerShell task to download another script and run it.
steps:
- powershell: |
    Invoke-WebRequest -Uri <https://somesite.com/script.ps1> -OutFile script.ps1
    .\script.ps1
It doesn’t matter where the script is stored. As long as you can use a task or run a script to authenticate (if necessary) and download the script, the PowerShell task will run it for you.
Pipeline Variables in PowerShell CI/CD pipelines
Just like you have variables in a script, you also have variables in a pipeline. Variables are defined a few different ways and their value can be accessed differently depending on the context.
Not only can you define and read variable values in the YAML pipeline, you can also do so within scripts.
Reading Pipeline Variables
When a script is run via a pipeline, the pipeline exposes all currently-defined variables as environment variables on each pipeline agent. This means that you can read pipeline variables in a script just like any other environment variable.
For example, perhaps you have defined a variable called foo under the variables section of the pipeline.
variables:
    - name: foo
      value: 'bar'
Since the pipeline exposes this variable as an environment variable, you can then reference the value of that variable in your scripts like usual e.g. $env:foo.
For pipeline variables defined with a dot (
.), AzDo will automatically convert these dots to underscores as environment variables. If a pipeline variable is defined asfoo.barfor example, the environment variable will befoo_bar.
Setting Pipeline Variables
Setting pipeline variables isn’t quite as straightforward as reading them. To set a pipeline variable via script, you must use a logging command. A logging command is how a script communicates with the pipeline agent.
To set pipeline variables via a script, you must output a specifically-crafted string to standard out in the script. The string must have the format of "##vso[task.setvariable variable=[variable_name];][variable_value]".
For example, to set a pipeline variable foo to the value of bar, a PowerShell or Bash script would have to output a string like below.
echo "##vso[task.setvariable variable=foo;]bar"Custom Script Extensions
AzDo provides the PowerShell and Bash script tasks by default. But you can also download or even build your own script-based tasks in the form of an extension making your PowerShell CI/CD pipeline customizable.
Using the standard script tasks, you’re writing all of the code yourself and invoking it in one shot. There’s no real “interface” to the code. AzDo gives you a box saying, “Insert code here,” you put in the code, and then the pipeline executes it. There’s no real structure around it.
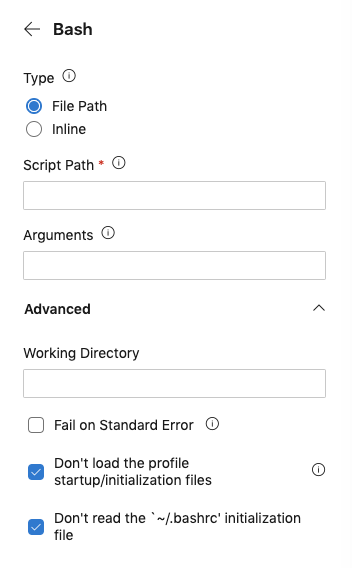
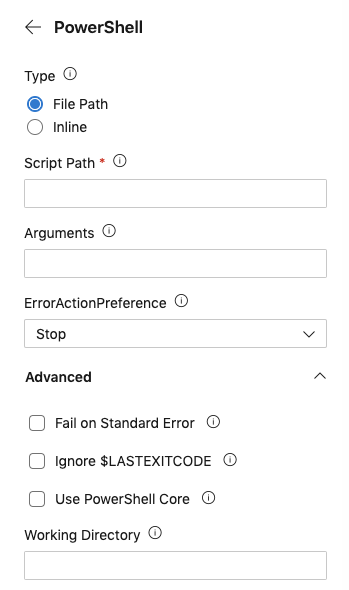
Notice when you create a PowerShell task below, you don’t have many options. The parameters for this task are minimal. There’s an Arguments field to pass parameters to the script, but wouldn’t it be easier to understand if Arguments wasn’t some generic name?
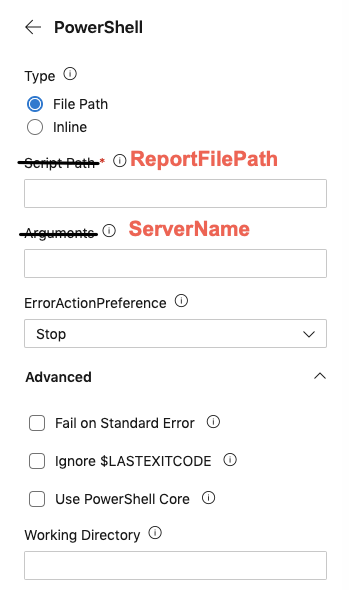
Maybe you have a script you regularly use for querying a set of machines and returning some report. The script is called Get-AcmeServerReport. It has parameters like ServerName to specify the servers to run against and ReportFilePath for where to save the report.
Wouldn’t having fields in the web UI matching the script parameters be a lot more intuitive like you can see below?
This article isn’t going to cover building custom AzDo extensions, but you should know this is possible. You can move the “interface” up to the pipeline level instead of down at the script level, allowing you to reuse existing scripts easily.
Building a PowerShell Pipeline
Enough talk. Let’s now actually build an example AzDo PowerShell pipeline!
Before You Start
This article will be a combination of teaching and hands-on tutorial. If you intend to try out any of the examples for yourself, be sure to have a few prerequisites set up ahead of time.
- An existing AzDo pipeline created linked to a repo – Learn how to create a pipeline via the web interface or using the Az CLI in this Azure Pipelines article.
What You’re Going to Learn
In this hands-on tutorial, you’re going to learn everything there is to know about running PowerShell and Bash scripts in AzDo Pipelines. Using the PowerShell and Bash tasks, you’ll see how to invoke scripts, pass parameters to them, control errors and how to fail a task in the pipeline should a problem arise in the script.
You’re also going to learn how to use AzDo pipeline variables in scripts and also how to set them using AzDo logging commands.
The PowerShell Task is Your Friend
To run a PowerShell script in a pipeline requires using the PowerShell task. The PowerShell task takes a script or PowerShell code from the pipeline and runs it on a pipeline agent. Depending on the options chosen, the pipeline agent will either be on Windows or Linux.
You can also use more specific use case tasks like the Azure PowerShell task too but those won’t be covered here.
PowerShell Task Schema
The PowerShell task is called PowerShell@2 and has a schema that looks like below. You can see you’ve got a few options at your disposal for running scripts under the inputs section.
- task: PowerShell@2
  inputs:
    targetType:
    filePath:
    arguments:
    script:
    errorActionPreference:
    failOnStderr: true
    ignoreLASTEXITCODE: true
    pwsh: true
    workingDirectory:
Each attribute you decide to use in inputs affects the behavior of how the PowerShell code/script runs.
| Name | Mandatory | Options | Used with | Default Value | Description |
| targetType | No | filePath, inline | All | The PowerShell task allows you to add PowerShell code directly within the YAML pipeline or execute an existing script in the source repo. Here you can specify either filePath providing the path to the script to run or use inline which indicates that you’ll be adding the PowerShell code directly int the YAML pipeline. | |
| filePath | Yes | targetType: filePath | This attribute is where you specify the path of the script to execute. This path typically points to a script in your source repo that the pipeline checks out when it runs. For example, to tell the PowerShell task to execute a script called script.ps1 in the root of the source repo, you’d use a predefined variable like $(System.DefaultWorkingDirectory)\\script.ps1. | ||
| arguments | No | targetType: filePath | If you’ve provided a script via the filePath attribute and that script is built with parameters, this is where you would pass in values to those parameters. Note that when using inline code, this option is not used. You should specify named parameters like `-Name someName -Path -Value “some value”` | ||
| script | Yes | inline | Enclosed in quotes, this is where you provide the PowerShell code to execute. | ||
| errorActionPreference | No | SilentlyContinue, Continue, Inquire, Stop | All | Stop | Use this to set $ErrorActionPreference in the script if you haven’t done so already. |
| failOnStderr | No | true | All | false | Setting this value to true will fail the PowerShell task in the pipeline is an error is thrown via PowerShell. Otherwise, the task will only fail if the scripts exits with a non-zero exit code. |
| ignoreLASTEXITCODE | No | true | All | false | If set to false, the line `if ((Test-Path -LiteralPath variable:\\\\LASTEXITCODE)) { exit $LASTEXITCODE }` is appended to the end of the script. This will cause the last exit code from an external command to be propagated as the exit code of PowerShell. |
| pwsh | No | true | All | false | If the pipeline agent is running on Windows, this will force the code/script to be executed using pwsh.exe (PowerShell Core). If not set to true, the task will default to Windows PowerShell on Windows pipeline agents. |
| workingDirectory | No | All | $(Build.SourcesDirectory) | The working directory to execute the script in. This affects paths in the script like _.\\command.ps1_. | |
| env | No | All | A list of additional items to map into the process’s environment. By default, pipeline variables are mapped but secret variables are not. Here is where you would specify them like `MySecret: $(Foo)`. |
Now that you have an idea of what’s possible, let’s dive into each attribute and see what’s possible.
Running Simple One-Liners
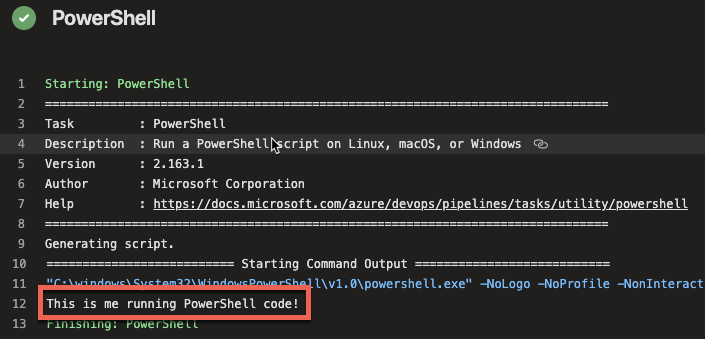
In the PowerShell task’s most simplest form, you can run a single line of PowerShell using a targetType of inline and by specifying the code to run via the script attribute as shown below.
- task: PowerShell@2
    inputs:
      targetType: 'inline'
      script: 'Write-Host "This is me running PowerShell code!"'
When the pipeline is run, you’ll then see the output shown in the log.
If you’d like to take a shortcut to this approach, you can save yourself a few lines but using the optional powershell shortcut task too.
To perform the exact same function as above, you can also simply use the powershell term followed by the code to run as shown below.
- powershell: 'Write-Host "This is me running PowerShell code!"'If you’d like to learn more about running PowerShell code inline, check out this the Code vs. Scripts section of the first article in this series.
Sidenote: Windows PowerShell vs. PowerShell (Core)
Before you get too much farther, it’s important to point out some behavioral differences in Windows PowerShell vs. PowerShell (Core) and how to control what version of PowerShell your scripts run on.
In the example above, the version of PowerShell that the code executed on completely depended on the pipeline agent the code was running on. The pipeline is smart enough to handle this for you but you will get caught by this at some point.
For example, what if you have a Windows PowerShell-specific code and use the powershell task assuming that it will run on Windows? It might but what if you’ve got a big pipeline defined and you forgot you added a pool: ubunbu-latest line for that job? The task will still run on Linux but it has no choice but to run PowerShell (Core).
Using the task above as an example, let’s now say you’ve specifically defined the pipeline agent to run on Linux like below. The tasks are exactly the same but the pipeline agent is not.
pool:
  vmImage: "ubuntu-latest"

steps:
  - task: PowerShell@2
    inputs:
      targetType: 'inline'
      script: 'Write-Host "This is me running PowerShell code!'
	- powershell: 'Write-Host "This is me running PowerShell code!"'
You’ll then see in the job log, the pipeline automatically chose pwsh. You’ll see the same in Windows where the pipeline executes powershell.exe.

Be Explicit about PowerShell Versions
If there might ever be a possibility that you’re running code that depends on a specific version of PowerShell, always be explicit about the version you’d like to run on.
To run PowerShell (Core), always use the pwsh: true attribute on the PowerShell@2 task or the pwsh shortcut task. Don’t assume that the pipeline will pick the right version for you. You’ll probably never remember you made that “quick change to troubleshoot a thing” by changing the pipeline agent before it’s too late.
- task: PowerShell@2
    inputs:
      targetType: 'inline'
      script: 'Write-Host "This is me running PowerShell code!'
      pwsh: true

- pwsh: 'Write-Host "This is me running PowerShell code!"'
Running Scripts
If you need to run some PowerShell code longer than a few lines or need to pass parameters to your code, you’ll need to step up to executing scripts. Using the PowerShell task, you can do this by setting the targetType to filePath and then specifying the path of the script to run via the filePath attribute.
For example, perhaps you have a PowerShell script called script_no_params.ps1 in the root of your source repo. Below you can see an example of calling the script.ps1 script located in the System.DefaultWorkingDirectory pipeline variable path. This is the directory where the source repo files are downloaded to when the pipeline runs.
- task: PowerShell@2
    inputs:
      targetType: 'filePath'
      filePath: '$(System.DefaultWorkingDirectory)\script_no_params.ps1'
Watch out for forward and backslash inconsistencies! If you’re running a script on Linux, use forward slashes. On Windows, use backslashes when specifying the
filePath.
The script contains a single line.
[CmdletBinding()]
param()

Write-Host "I'm running in a PowerShell script!!"
When the pipeline is run, you’ll see that the pipeline reads the code inside of the script, creates its own PowerShell script and then executes the code.

If you intend to run an existing PowerShell script, be sure you don’t have the
- checkout: noneline in your pipeline. Otherwise, the script will never be downloaded to the agent.
Passing Parameters
If you have a script that has one or more parameters, you can pass parameters to those scripts using the arguments attribute.
Note that you cannot pass parameters to inline code using the
argumentsattribute.
The arguments attribute accepts parameters the exact same way you’d specify a named parameter within PowerShell itself using -[parameter_name] [parameter_value].
For example, perhaps you have a script called script.ps1 in the root of your source repo. That script contains two parameters called $foo and $bar as shown below.
[CmdletBinding()]
param(
  $foo,
  $bar
)

Write-Host "Value of foo is $foo and value of bar is $bar"
You can provide values to the $foo and $bar parameters via the arguments attribute in the YAML pipeline like below.
- task: PowerShell@2
    inputs:
      targetType: 'filePath'
      filePath: '$(System.DefaultWorkingDirectory)/script.ps1'
      arguments: "-foo 'foovalue' -bar 'barvalue'"
You can then see the values were passed to the script in the job output log.

Handing Errors and Warnings
When a PowerShell is invoked via a pipeline and returns an error or warning, the pipeline behavior greatly depends on how you configure it. A PowerShell script can “error out” in a few different ways such as soft-terminating, hard-terminating errors and exiting with a non-zero exit code. Also, don’t forget about that warning stream!
Errors
When the PowerShell task encounters an error, it may or may not fail the task in the pipeline. If you have a script that may return an error but it’s not serious enough to fail the entire pipeline task, you can manage this behavior with the errorActionPreference attribute.
By default, the pipeline sets all PowerShell scripts to an $ErrorActionPreference value to Stop. This means that all soft and hard-terminating errors will force PowerShell to return a non-zero exit code thus failing the pipeline task.
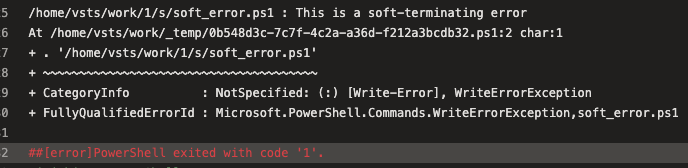
To demonstrate, perhaps you have a script that returns a soft-terminating error like Write-Error does or a hard-terminating error like throw does.
## Soft
Write-Error -Message 'This is a soft-terminating error'

## Hard
throw 'This is a hard-terminating error'
When the pipeline encounters this script, the task will fail because PowerShell didn’t return a zero exit code as you can see below.
Although not recommended, if you’d like the script to fail but not fail the pipeline task, you can do so by setting the errorActionPreference attribute to SilentyContinue.
- task: PowerShell@2
    inputs:
			targetType: 'filePath'
      filePath: '$(System.DefaultWorkingDirectory)/script.ps1'
			errorActionPreference: SilentlyContinue
Modifying Exit Code Behavior
By default, the PowerShell task fails if PowerShell returns a non-zero exit code. You saw an example of this above. However, if you need to manipulate that behavior, you can do so using the ignoreLASTEXITCODE attribute.
Whenever a PowerShell script turns, it always populates a variable called $LASTEXITCODE. This exit code, coincidentally, returns the last exit code the PowerShell script returned. This is what the pipeline task reads to indicate success or failure.
Perhaps you have a situation where a command you’re running inside of a script returns a non-zero exit code but you know it was successful anyway. Don’t get me started on software installers! If you’d like the pipeline task to succeed, you can force your own exit code.
Let’s say you have a script called script.ps1 like below that modifies the exit code the PowerShell scripts quits with. In the example below, maybe the command returns a zero exit code which typically indicates success but you know that’s actually a failure.
$output = ./some-command.exe
if ($LASTEXITCODE -eq 0) {
	exit 1
}
If you’d run this task without using the ignoreLastExitCode attribute, you’d find the task still shows success. Why? Because the task doesn’t care what exit code PowerShell actually returns. It uses the value of $LASTEXITCODE to determine that.
To remove the dependency on the $LASTEXITCODE variable, use the ignoreLastExitCode attribute as shown below.
- task: PowerShell@2
    inputs:
      targetType: 'filePath'
      filePath: '$(System.DefaultWorkingDirectory)/script.ps1'
      ignoreLastExitCode: true
Showing Custom Errors and Warnings in Job Logs
Although less frequently used, you can also use logging commands to write warnings and errors into the job log using PowerShell. Below is an example.
- task: PowerShell@2
    inputs:
      targetType: 'inline'
      script: |
        Write-Host "##vso[task.LogIssue type=warning;]This is the warning"
        Write-Host "##vso[task.LogIssue type=error;]This is the error"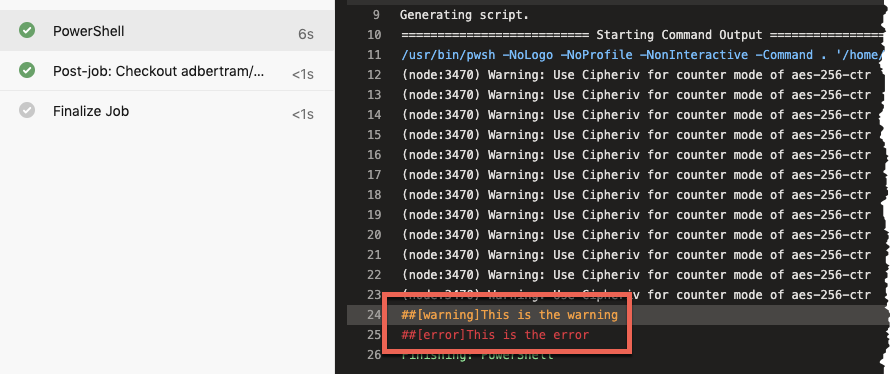
Adding warnings and errors directly into the job log doesn’t effect the success/failure status of the task itself. This feature is useful for logging information to the job log.
Managing Pipeline Variables
The final topic you’re going to learn is managing pipeline variables. AzDo makes it easy to set and reference pipeline variables in PowerShell scripts.
We’re not going to go deep with variables in this section. If you’d like to learn more about pipeline variables, be sure to check out Understanding Azure DevOps Variables [Complete Guide].
Reading Pipeline Variables
When you’ve defined variables in the pipeline, you can read the values of those variables in PowerShell scripts using environment variables.
Perhaps you’ve declared a variable in a pipeline like below. The project_name variable is now available throughout the YAML pipeline.
variables:
   - name: project_name
     value: "foo"
To reference this variable’s value in a script, simply reference the same name but as an environment variable as shown below. That’s all there is to it. All pipeline variables will always be mapped to environment variables in the pipeline agents.
Write-Host "The value of project_name is $env:project_name"Setting Pipeline Variables
Perhaps you need to set a pipeline variable in a PowerShell script. Although not quite as intuitive, you can do so using logging commands. Logging commands are how the pipeline talks to the agent. By writing a specifically-crafted string to the “console”, you can define variables as shown below.
## Creates a standard pipeline variable called foo and sets the value to bar
Write-Host "##vso[task.setvariable variable=foo;]bar"

## Creates an output variable called foo and sets the value to bar
Write-Host "##vso[task.setvariable variable=foo;isOutput=true]bar"
Troubleshooting
Things don’t always go the way you’d like so it’s important to know a few tips to troubleshoot your way out of a jam.
Watch Your Quotes!
If you’re running inline code, quotes will apply two places – in the YAML pipeline and in PowerShell. It’s easy to place a quote in the wrong spot making the pipeline think the quote is for it and the other way around.
One of the easiest ways to prevent this is by using multi-line inline code. Instead of invoking PowerShell code in a single line with quotes and having to keep something like this straight:
powershell: '"This is some code."'Instead, you can remove the required quotes from the pipeline all together by using a pipe (|) symbol and adding the code below it. This way removes some complexity.
powershell: |
	"This is some code"
Debugging
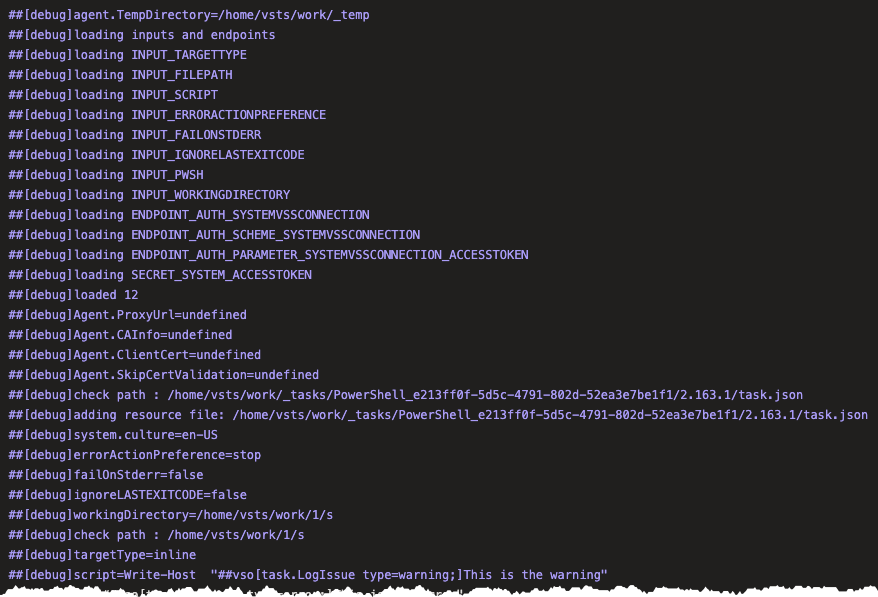
If you’d like to dig deeper into what the pipeline agent is doing in the background, you can debug pipelines using the system.debug variable. If you set the system.debug variable to true in a pipeline, you’ll see a much more verbose output in the job log as shown below.
Enumerating Environment Variables
When working with complex YAML pipelines, you’ll probably come across a situation where you need to see what PowerShell is seeing as values for one or more pipeline variables.
Since the pipeline maps all pipeline variables to environment variables, you can list all of the current environment variables including their values using Get-ChildItem.
PowerShell stores all environment variables in a PS Drive called Env. You can then read all environment variables by listing out the contents of this PS drive as shown below.
Get-ChildItem -Path Env:\

