


Keeping your secrets from falling into the wrong hands is a top priority. But how exactly do you secure your secrets? Save it on a local text file? Without encryption, that option is too risky. Why not use Ansible Vault to encrypt your variables and files?
In this tutorial, you’ll learn how to secure sensitive content, such as your passwords or keys, with Ansible Vault.
Read on and keep prying eyes off your secrets!
Prerequisites
This tutorial will be a hands-on demonstration. If you’d like to follow along, be sure you have the following.
- A Linux machine – This tutorial uses Ubuntu 20.04, but any Linux distribution will work.
- Ansible installed on your machine.
Configuring the Default Ansible Vault Editor
As a system administrator, you might be working on various Ansible playbooks containing different servers’ usernames and passwords. You can’t commit these files to the version control system in plain text format because it’s unsecured. And for that reason, Ansible Vault comes in handy.
Ansible Vault is designed to be integrated into your existing workflow to store your data in an encrypted file. But before creating your first Ansible Vault, you’ll have to set your default Ansible Vault editor.
1. Open your terminal and SSH to your machine.
2. Next, open the ~/.bashrc file using a text editor. The ~/.bashrc file is a shell script that runs whenever a new terminal session starts. This shell script initializes an interactive shell session and defines environment variables.
3. Add the following line at the end of the ~/.bashrc file, save the changes and exit the editor.
This line sets the EDITOR variable for the currently logged-in user. The EDITOR variable ensures your preferred text editor is used every time you open a new terminal session.
You can set any other text editor you prefer, but this tutorial uses the nano text editor.
export EDITOR=nano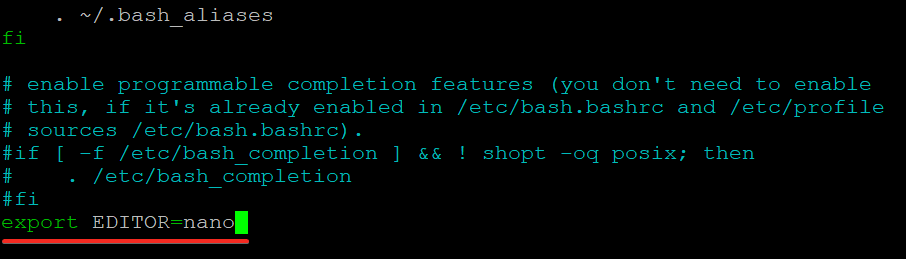
4. Finally, run the following commands to apply the changes (source) without logging out and back in again, and print (echo) your system’s current default text editor.
# Loads the environment variable into your current shell session.
source ~/.bashrc
# Prints your system’s current default text editor.
echo $EDITOR
Verify that the EDITOR variable is set to your preferred editor, as shown below.

Creating and Encrypting Your First Ansible Vault
You’ve set your default vault editor, so it’s time to create your first vault. You’ll create and encrypt a file that contains sensitive information, such as usernames, passwords, secret access keys, etc.
You’ll be running the ansible-vault command, the main interface for interacting with Ansible Vaults.
1. Run the following command to create the secret.yml file. Ansible uses YAML, a more human-readable format compared to other data formats like JSON.
ansible-vault create secret.ymlYou’ll be prompted to enter and confirm a password for the file. You’ll use this password to encrypt and decrypt the file secret.yml file later, so be sure to choose a strong password you can remember.

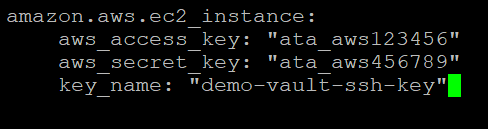
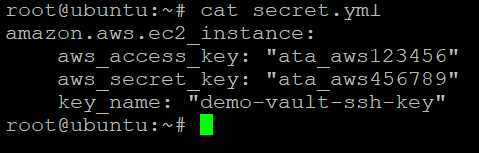
2. After setting the vault’s password, your default text editor opens an empty file. Enter sensitive information you like to store in the file, save it and close the editor.
This tutorial stores the aws_access_key and aws_secret_key variables in the secret.yml file. At this point, Ansible encrypts the secret.yml file, and no one else can read the vault’s content unless they know the vault’s password.
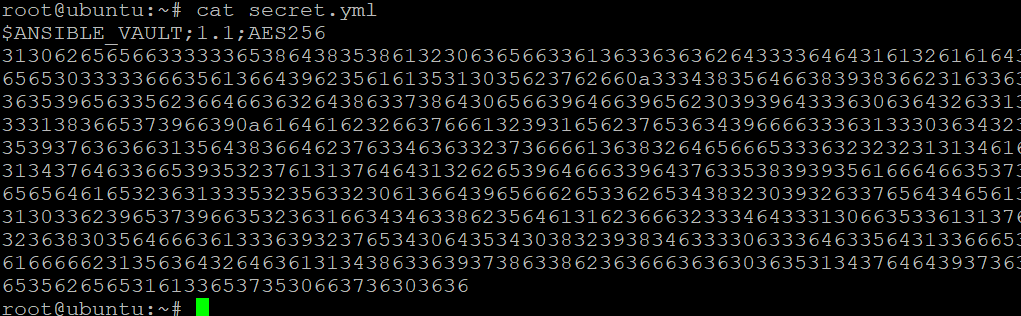
3. Run the cat command to try to view the contents of the secret.yml file without the password.
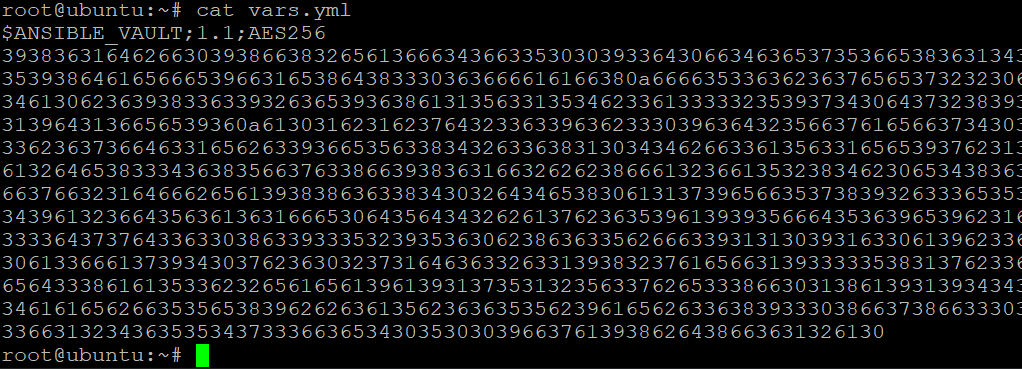
cat secret.ymlYou can verify the file’s content is encrypted if you see random numbers, as shown below. The $ANSIBLE_VAULT;1.1;AES256 header at the top of the file indicates that the file is encrypted with Ansible Vault using the AES256 cipher.
The Advanced Encryption Standard(AES) is a symmetric-key algorithm that uses the same key to encrypt and decrypt data.
Encrypting Existing Files
You’ve created a file from scratch which is automatically encrypted. But how about encrypting existing files? Ansible also offers the encrypt sub-command to encrypt a specified file. To see how to encrypt an existing file, you’ll encrypt a specific file that contains Ansible variables.
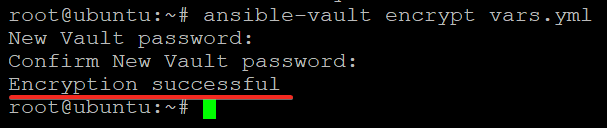
Run the following command to encrypt a file (vars.yml).
ansible-vault encrypt vars.yml
Like when you created the secret.yml file the first time, you’ll be prompted to provide a password for the vars.yml file.
The default editor will not open this time because the vars.yml file already exists. Instead, you’ll get the Encryption successful message indicating Ansible encrypted the file, as shown below.
Now, run the cat command below to verify Ansible encrypted the vars.yml file.
cat vars.yml
Decrypting Data from Ansible Vault
You’ve seen how to encrypt files, making them secure. But when you need to view your files’ content, how do you decrypt your files? Decrypting a file is useful when you want to edit an encrypted file or read its contents without providing the password every time. And Ansible’s decrypt sub-command will come in handy.
1. Run the following command to decrypt the secret.yml file.
The decrypt sub-command takes the path of an encrypted file as its only argument.
ansible-vault decrypt secret.ymlProvide the password for the file, and the file’s contents will be decrypted and written to the disk in plain text.

2. Next, run the cat command to view the decrypted content of the secret.yml file.
cat secret.ymlYou can see below the content of the secret.yml file printed to the terminal without any encryption. At this point, you can add, edit, or delete any lines in the file to your heart’s content.
3. Lastly, run the below command to encrypt the secret.yml file and provide a password to keep the file’s content secure.
ansible-vault encrypt secret.yml
Updating the Ansible Vault’s Password
You’ve seen that you need to enter a password each time you encrypt and decrypt files. But perhaps, you only want to update the file’s password without decrypting the file. If so, you’ll need to use the rekey sub-command. This sub-command lets you change your file’s password at will.
Run the following command to update the password for the secret.yml file.
The rekey sub-command takes the path of an encrypted file as its only argument.
ansible-vault rekey secret.yml
Provide the current password for the file followed by the new password, as shown below.
At this point, the old password will no longer work to decrypt the file.

Now, run the command below to try and decrypt the secret.yml.
ansible-vault decrypt secret.yml
Provide the old password when prompted, and you’ll see an error message saying the Decryption failed, as shown below. This output confirms the password for the file has been successfully updated.

Using Secured Data in Playbooks and Modules
You’ve seen that running commands to encrypt and decrypt files work. But if you plan to automate the process securely for your application, you’ll need to use playbooks and modules.
1. Open the Ansible configuration file (~/.ansible.cfg) in your editor, which contains the settings for Ansible.
Copy and paste the following code at the end of the ~/.ansible.cfg file, save the changes, and close the editor. This code tells Ansible to look for the inventory file (~/.ansible-hosts).
[defaults]
hostfile = ~/.ansible-hosts
2. Next, open the ~/.ansible-hosts file, which contains the inventory of hosts that your Ansible manage node can manage.
Populate the ~/.ansible-hosts file with the following line of code, save the changes and close the file. This code tells Ansible that it can manage the localhost via the local connection type.
localhost ansible_connection=local3. Run the below command to create a new encrypted file. You can name the file anything, but the file is named helloworld.yml in this tutorial.
ansible-vault create helloworld.yml
Populate the code below to the helloworld.yml file, save the changes and close the editor.
This code is a basic Ansible playbook that prints the hello world message on all the hosts in your inventory. The — symbol at the top of the code block denotes the start of a YAML document.
---

- hosts: all # Sets to perform the task to all hosts in the inventory
  tasks: # Sets the tasks to perform
    - shell: echo 'hello world' # Prints a 'hello world' message
4. Finally, run the ansible-playbook command below followed by the –ask-vault-pass options to execute the helloworld.yml playbook on all the hosts in your inventory.
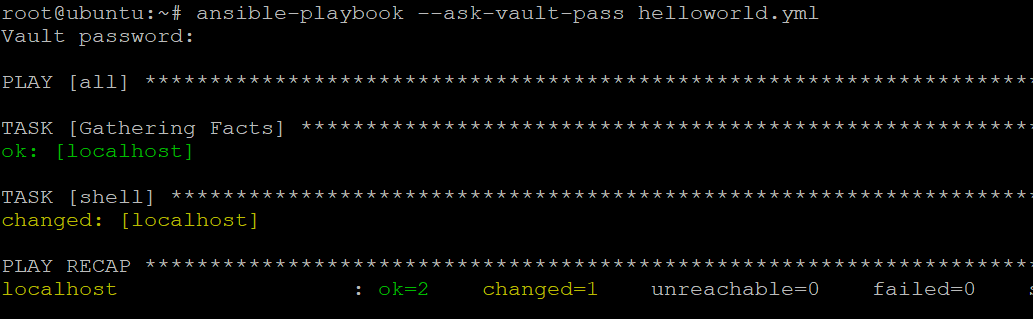
ansible-playbook --ask-vault-pass helloworld.ymlProvide the password for the helloworld.yml file when prompted. As you can see below, your playbook run has been successful.
- ok=2 – indicates that both of your tasks have been run successfully.
- changed=1 – indicates that your task has made one change to the state of your system. In this case, it wrote a hello world message to the shell.
- unreachable and failed are both 0 – indicates no hosts were unreachable or failed during the run.
Using Ansible Vault with a Password File
While manually entering a password when running one-off tasks works, it’s not practical for real-world usage.
A better way to provide the password for encrypting and decrypting files is to use a password file. This way, you can store the password in a secure location, and Ansible will read the password from the file needed.
1. Run the below command to store the Ansible Vault password in a file called .vault_pass. Replace my_vault_password with your actual vault password.
echo 'my_vault_password' > .vault_pass2. Next, run each command below to change ownership (chown) of the file to root and change permissions of the .vault_pass file. These commands ensure that only you (the root user) can read and write on the file.
# Change ownership of the file to root user
chown root:root .vault_pass
# Change file permissions to root only (read and write permissions)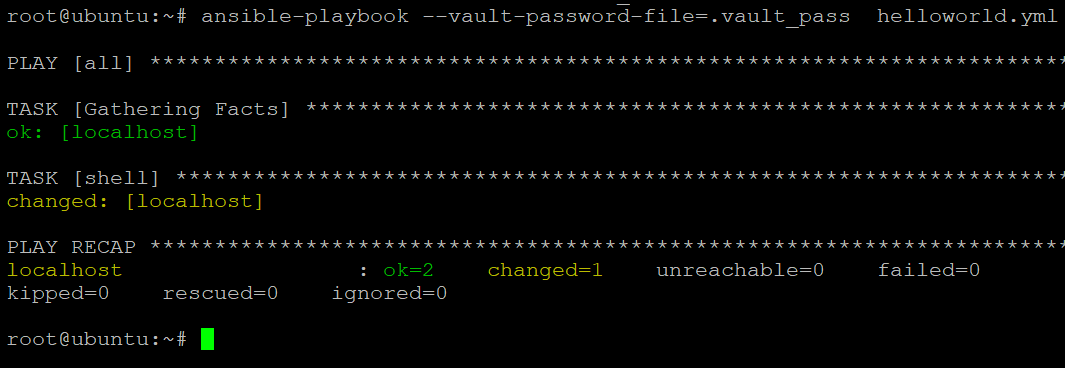
chmod 700 .vault_pass3. Lastly, run the ansible-playbook command below, followed by the –vault-password-file option to execute a playbook (helloworld.yml) using a password file (.vault_pass).
ansible-playbook --vault-password-file=.vault_pass helloworld.ymlNotice below that Ansible executed the playbook without asking for the encrypted file’s password.
Conclusion
In this tutorial, you have learned how to use Ansible Vault to encrypt and decrypt sensitive data for Ansible playbooks and tasks. You’ve stored the Ansible Vault password in a secure location using a password file. This behavior comes in handy for less user intervention when executing a playbook.
With this newfound knowledge, you can now confidently encrypt sensitive data and share your playbooks with others without worrying about the security of your data.
If you use LastPass for password management, why not store your Ansible Vault password in LastPass and have Ansible automatically retrieve it when needed?


