


If you’re looking for a way to deploy a standard set of configurations to multiple nodes using Ansible, Ansible roles are a great choice. Ansible roles allow you to re-use standard configurations and make the deployment pretty quick and easier.
In this tutorial, you’re going to learn everything about Ansible Roles and how to set them up!
Prerequisites
This post will be a step-by-step tutorial on Ansible roles. If you’d like to follow along, be sure you have the following in place:
- An Ansible controller host – This tutorial will be using Ansible v2.9.24 on an Ubuntu 18.04.5 LTS machine. You can confirm your Ansible version by running
Ansible --version.
- A user account on the Ansible controller host will allow you to create playbooks and run them on a managed node.
- A remote computer to run commands on.
Ansible Roles: High Level
When organizations find themselves with dozens of applications or sets of configurations to manage, they soon start to see the need to make the process easier. Ansible roles can help.
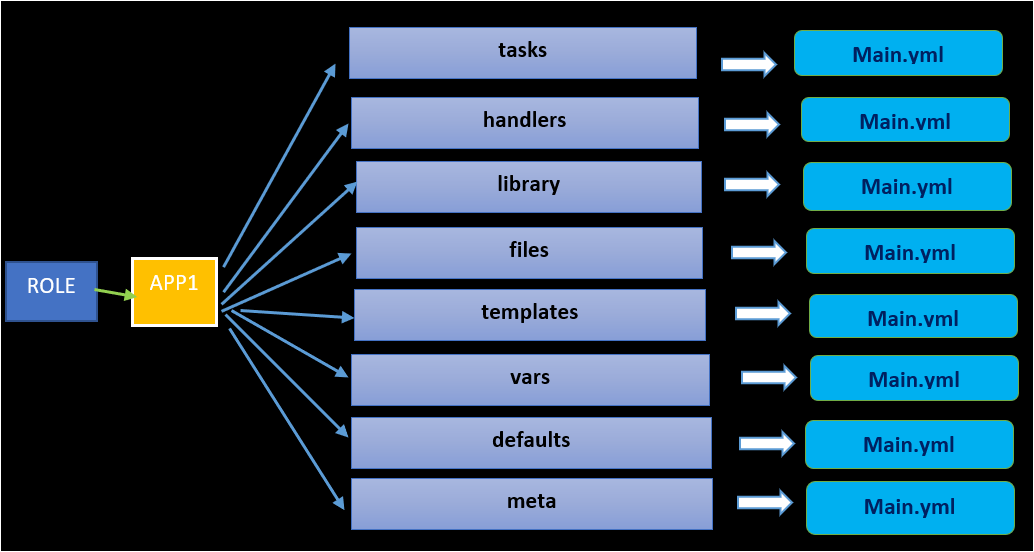
Roles allow you to load related vars, files, tasks, handlers automatically, and other packages according to a common application or group. Ansible stores roles in different directories, and each role contains standard directories depending on the application’s requirements.
Below, you can see a diagram of the APP1 Ansible role file structure containing the standard directories such as tasks, handlers, etc.
Setting up the Tomcat Ansible Role File Structure
Enough theory! Let’s now dive into the demo to set up an Ansible role. For this example, you’ll deploy the Apache Tomcat on a remote server using the ansible-playbook command.
1. SSH into your Ansible controller host.
2. Create a directory named ~/ansible_role_demo in your home directory and change to that folder as the working directory. The ~/ansible_role_demo directory will hold this tutorials’ demo files.
mkdir ~/ansible_role_demo
cd ~/ansible_role_demo
3. Next, run the command below to create another directory named roles inside the ~/ansible_role_demo directory. The ~/ansible_role_demo/roles directory will contain the Tomat role that you need to deploy.
By default, Ansible looks for roles in two locations in a directory called roles/ within the directory where playbook resides or in the /etc/ansible/roles. If you wish to store roles at different paths, declare the paths using the
- role:parameter in the playbook.
mkdir -p roles4. Run the commands below to change the directory to the ~/ansible_role_demo/roles directory (cd roles), and create the folders required by the role.
The p flag tells the mkdir command to create the parent directory (tomcat) and the folders such as tasks, handlers, defaults, vars, and templates. Each of these folders is common for every Ansible role. These folders will eventually contain a main.yml to deploy the Tomcat role.
You can create the role with any name within the role directory.
	cd roles
  mkdir -p tomcat/{tasks,handlers,defaults,vars,templates}
Each folder has a specific purpose:
- tasks: The task directory contains the list of tasks that a role needs to execute. All the tasks should be defined within the main.yml file inside the task directory.
- handlers: Handlers are like normal tasks in an Ansible playbook, but they run only if the task contains a “notify” directive. Handlers are used within a particular role or even anywhere outside this role and are defined in the main.yml file.
- library: If you need to declare any plugins or modules such as Python code, you must store them in the main.yml file of the library directory.
- files: If you need to copy any files from the Ansible controller host to other nodes, you must place all your files inside the files folder.
- templates: Templates that the role deploys. A template is a file that contains all your configuration parameters, but the dynamic values are given as variables in the Ansible.
- vars: The vars directory contains all the variables you need to use in the main.yml file in the tasks directory. Variables are also declared in the main.yml file within the vars directory.
- defaults: The defaults directory stores the variables that are required by the role to execute.
- meta: If there are any role dependencies, then they are declared within the meta directory.
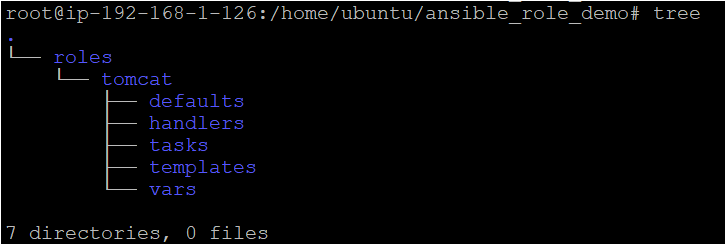
5. Finally, run the tree command to verify all of the required folders in the roles directory.
Configuring the Tomcat Ansible Role
Next, let’s add all the files and code that you will need for the Tomcat Ansible role that will be used to deploy Tomcat on the destination node.
1. Create the ~/ansible_role_demo/roles/tomcat/tasks/main.yml file and copy/paste the below code.
The playbook below installs the Tomcat Java dependency, downloads, installs, and configures Tomcat to start up automatically on the node it’s run on.
---
# Installing the Java (Open Jdk)
- name: Install Java 1.8
  apt: name=openjdk-8-jdk

# Adding the group tomcat
- name: add group "tomcat"
  group: name=tomcat

# Adding the user tomcat
- name: add user "tomcat"
  user: name=tomcat group=tomcat home=/usr/share/tomcat createhome=no
  become: True
  become_method: sudo

# Downloading the tomcat package
- name: Download Tomcat
  get_url:
     url:  "{{ tomcat_download_url }}"
     dest: "{{ tomcat_download_location }}"

# Creating the tomcat directory
- name: Create a tomcat directory
  file:
    path: /usr/share/tomcat
    state: directory
    owner: tomcat
    group: tomcat

# Extracting the tomcat archive
- name: Extract tomcat archive
  unarchive:
    src: "{{ tomcat_download_location }}"
    dest: /usr/share/tomcat
    owner: tomcat
    group: tomcat
    remote_src: yes
    extra_opts: "--strip-components=1"
    creates: /usr/share/tomcat/bin

# Copying the tomcat template file to the destination node
- name: Copy tomcat service file
  template:
    src: templates/tomcat.service.j2
    dest: /etc/systemd/system/tomcat.service
  when: ansible_service_mgr == "systems"

# Starting and Enabling the tomcat service on the destination node.
- name: Start and enable tomcat
  service:
    daemon_reload: yes
    name: tomcat
    state: started
    enabled: yes
  when: ansible_service_mgr == "systemd"
2. Similarly, create another file named ~/ansible_role_demo/roles/tomcat/vars/main.yml and copy/paste the below code.
The code below contains the variables tomcat_download_url and tomcat_download_location with assigned values that Ansible role picks from ~/ansible_role_demo/roles/tomcat/tasks/main.yml while running the playbook.
tomcat_download_url: http://archive.apache.org/dist/tomcat/tomcat-7/v7.0.61/bin/apache-tomcat-7.0.61.tar.gz
tomcat_download_location: /usr/share/tomcat/apache-tomcat-7.0.61.tar.gz
3. Lastly, create a template file ~/ansible_role_demo/roles/tomcat/templates/tomcat.service.j2 and copy/paste the below code.
The below template contains multiple sections:
Unit– Unit defines the name of the service you need to deploy, which is Tomcat.Service– In the service section, you need to define the type of service which is forking. Forking allows you to start the tomcat service as a system start-up and keeps the service running in the background.Environment– Environment contains the list of environment variables, such asJAVA_HOME, etc., that Tomcat requires to run.Install– The Install section defines if the specified Unit is enabled or disabled.WantedBYenables the defined unit, which automatically starts the Tomcat at boot up.
Below, the tomcat. service.j2 template is rendered when you execute the playbook. The data from the template is then copied to the destination node in the /etc/systemd/system/tomcat.service directory.
[Unit]
Description=Tomcat
After=network.target

[Service]
Type=forking

User=tomcat
Group=tomcat

Environment=JAVA_HOME=/usr/lib/jvm/java-8-openjdk-amd64
Environment=CATALINA_HOME=/usr/share/tomcat
Environment=CATALINA_BASE=/usr/share/tomcat
Environment=CATALINA_PID=/usr/share/tomcat/temp/tomcat.pid

ExecStart=/usr/share/tomcat/bin/startup.sh
ExecStop=/usr/share/tomcat/bin/shutdown.sh

[Install]
	WantedBy=multi-user.target
Running the Ansible Playbook with the Tomcat Ansible Role
You’ve managed to set up and configure the Ansible role file structure, and files/folder within the Tomcat Ansible role. But unless you run the playbook, the role that you created previously is not doing anything.
Let’s quickly deploy the Ansible role!
1. Create a YML file with a name you prefer, and copy/paste the below code. For this example, the file is named ~/ansible_role_demo/tomcat-setup.yml.
The code below deploys the Ansible role (tomcat) that you configured earlier to the destination server address (192.168.1.5) with the remote user (ubuntu) that has admin access.
You can use roles in three ways: At the play level with the
rolesoption. At the tasks level with the include_role and with import_role options.
- name: Tomcat deployment playbook
hosts: 192.168.1.5
remote_user: ubuntu
roles:
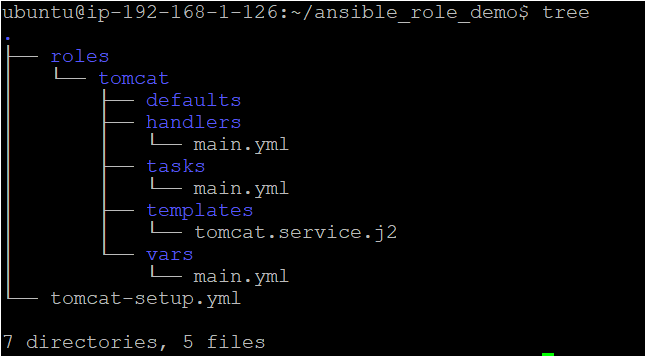
- tomcat2. Run the tree command as you did earlier to verify all required files are in the ~/ansible_role_demo/ directory.
In the below image, you should see all the main.yml files are in the handlers, tasks, and vars folders.
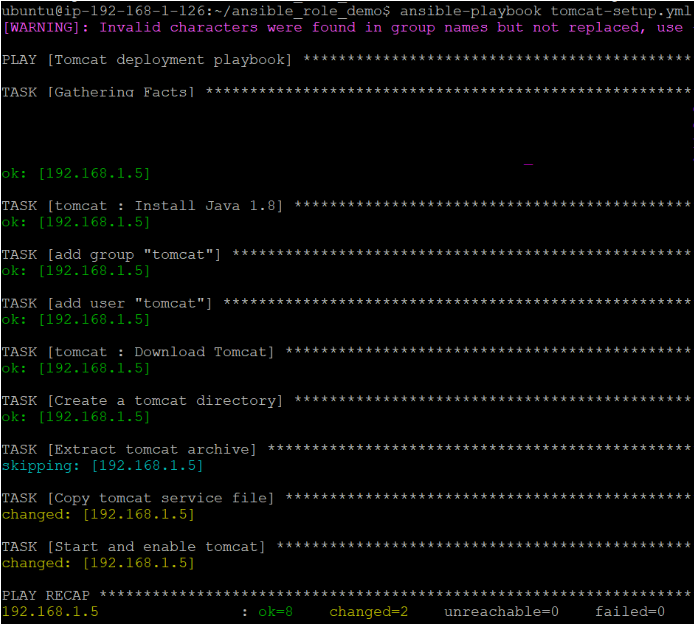
3. Finally, execute the ansible-playbook command below to deploy the Tomcat Ansible role to the destination server address defined in the hosts section of the playbook (192.168.1.5).
ansible-playbook tomcat-setup.ymlNotice below that the Tomcat Ansible role has successfully been deployed on the remote host.
Verifying Apache Tomcat Web Page
How do you know that Apache Tomcat is actually running? A default web page is available to verify that the Tomcat is correctly running with the service started.
To access the Apache Tomcat default web interface, open a web browser and navigate to <Remote-server:8080>. You’ll see a similar page to the one shown below.

Conclusion
In this tutorial, you learned how to set up an example Ansible roles and deploy them with Ansible. Ansible roles can prevent code duplication and allow you to deploy sets of configurations rather than reinventing the wheel each time.
With this newfound knowledge, which application do you plan to deploy next using an Ansible Role?


