


While running Ansible playbooks, have you ever wondered how to retrieve data from outside sources, such as files, databases, key/value stores, APIs, and other services? If yes, then exploring Ansible lookup will be worth your while.
In this tutorial, you’re going to learn everything about Ansible lookups and how to work with them to fetch external data.
Read on and start integrating data!
Prerequisites
This tutorial comprises step-by-step instructions. If you’d like to follow along, be sure you have the following in place:
- An Ansible controller host – This tutorial uses Ansible v2.11.7 on an Ubuntu 20.04.3 LTS machine.
- A remote Linux computer to test the tomcat installation – This tutorial uses Ubuntu 20.04.3 LTS as the remote node.
- An inventory file and one or more hosts configured to run Ansible commands and playbooks. The remote Linux computer is called myserver, and this tutorial uses an inventory group called web.
- NGINX installed on Ansible controller host.
- Python v3.6 or later installed both on your Ansible controller host and the remote node machine – This tutorial uses Python v3.9 on an Ubuntu machine.
Searching for a File using Ansible lookup
You typically don’t look up a file and expect that all goes well. What if Ansible can’t find the file, or it doesn’t exist? Use Ansible lookup in Ansible debug module to manage how errors should treat Ansible tasks.
The Ansible debug module prints the statements when you execute an Ansible playbook. In a nutshell, the module allows you to debug variables or expressions without necessarily stopping the playbook.
1. SSH into your Ansible controller host with a user you typically use to manage Ansible.
2. Next, create a directory called ansible_lookup_playbook_demo in your home directory. This directory will contain the playbook you’ll invoke later in the section.
mkdir ~/ansible_lookup_playbook_demo
cd ~/ansible_lookup_playbook_demo
3. Create a file called main.yml in the ~/ansible_become_playbook_demo directory and copy/paste the following YAML playbook contents.
---
- name: Ansible Lookup functionality with Ansible debug module demo
  hosts: web
# Executing the tasks with remote_user as ubuntu
  remote_user: ubuntu
  tasks:
    - name: Task ignores the error if shanky.txt does not exist
      ansible.builtin.debug:
         msg: "{{ lookup('file', '/shanky.txt', errors='ignore') }}"

    - name: Task gives warning but continues even if shanky.txt does not exist.
      ansible.builtin.debug:
        msg: "{{ lookup('file', '/shanky.txt', errors='warn') }}"

    - name: Task fails if file doesnt exists
      ansible.builtin.debug:
msg: "{{ lookup('file', '/shanky.txt', errors='strict') }}"- Finally, run the below command to invoke the playbook (
main.yml). Ansible then executes the tasks in the playbook.
Validating the Ansible playbook using the
--checkflag with theansible-playbookcommand is a good practice before actually executing the playbook. The--checkflag tells Ansible to perform a simulation without running the playbook.
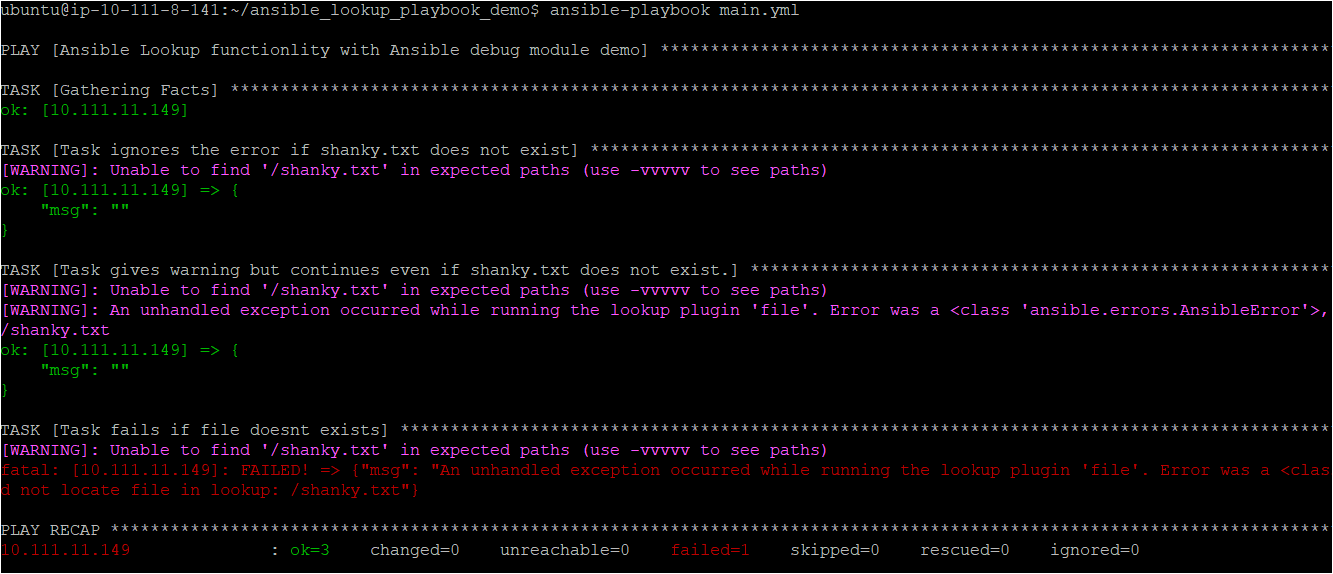
ansible-playbook main.yml Below, you can see that all the TASK has an OK status, which indicates the task was not required to execute. Each task did not execute as Ansible couldn’t find the shanky.txt file, and no change was required.
Fetching Environment Variables
Earlier in the previous section, you learned how to work with files using Ansible lookup. But at times, you need to read the value of environment variables which are further used in querying URLs or posting as the header or the data in the URL.
Create a file called main2.yml in the *~/*ansible_become_playbook_demo directory and paste in the following YAML playbook contents.
The below Ansible playbook executes two tasks:
- The first task checks for the
HOMEenvironment variable on your ubuntu machine and prints the path of that variable. - Similarly, the second task looks for the
USRenvironment variable but displays theno-user-founddefault value as the variable doesn’t exist.
---
- name: Ansible Lookup with Ansible env module demo
  hosts: web
# Executing the tasks with remote_user as ubuntu
  remote_user: ubuntu
  tasks:
    - name: Checking for enviornment variable HOME
      ansible.builtin.debug:
        msg:  "'{{ lookup('env', 'HOME') }}' is the HOME environment variable."

    - name: Checking for enviornment variable USR
      ansible.builtin.debug:
# Ansible task checks for USR variable, if not found takes the default value no-user-found
        msg: "'{{ lookup('env', 'USR') | default('no-user-found', True) }}' is the user."
Once the playbook execution completes, you’ll see that the first task displays the environment path. But in the second task, Ansible can’t find the USR user, so Ansible displays the no-user-found message.

Reading Website Contents
You previously learned to retrieve data from environment variables stored on your Ubuntu machine using Ansible lookup with Ansible’s built-in debug module.
But did you know Ansible lookup works well with multiple other Ansible modules? Some of these Ansible modules are ansible.builtin.config, ansible.builtin.template, ansible.builtin.uri, and so on.
To find out all the modules that work with Ansible lookup, run the
ansible-doc -l -t lookupcommand.
For this demo, you’ll work on one of the most widely used Ansible modules, the Ansible URL module (ansible.builtin.uri), and learn how it integrates with Ansible lookup. Ansible URL module returns the content of a requested URL to be used as data in an Ansible playbook.
Create a file called main3.yml in the *~/*ansible_become_playbook_demo directory and paste in the following YAML playbook contents.
The ansible-playbook below contains tasks that send requests to a local HTML page and a website to retrieve data.
---
- name: Ansible Lookup functionality with Ansible URL module demo
# Executing the tasks on the inventory group (web)
  hosts: web
# Executing the tasks with remote_user as ubuntu
  remote_user: ubuntu
  tasks:
    - name: Task sends the request to index.html page on nginx installed locally to retrive the data
      ansible.builtin.debug:
        msg: "{{ lookup('url', '<http://localhost:80/index.html>')}}"
    - name: Task sends the request to adamtheautomator website and retrive the data
      ansible.builtin.debug:
        msg: "{{ lookup('url', '<https://adamtheautomator.com/resources/>', username='U', password='p') }}"
Now, run the below command to execute the Ansible playbook (main3.yml), retrieving data from a local page and a live website.
ansible-playbook main3.yml
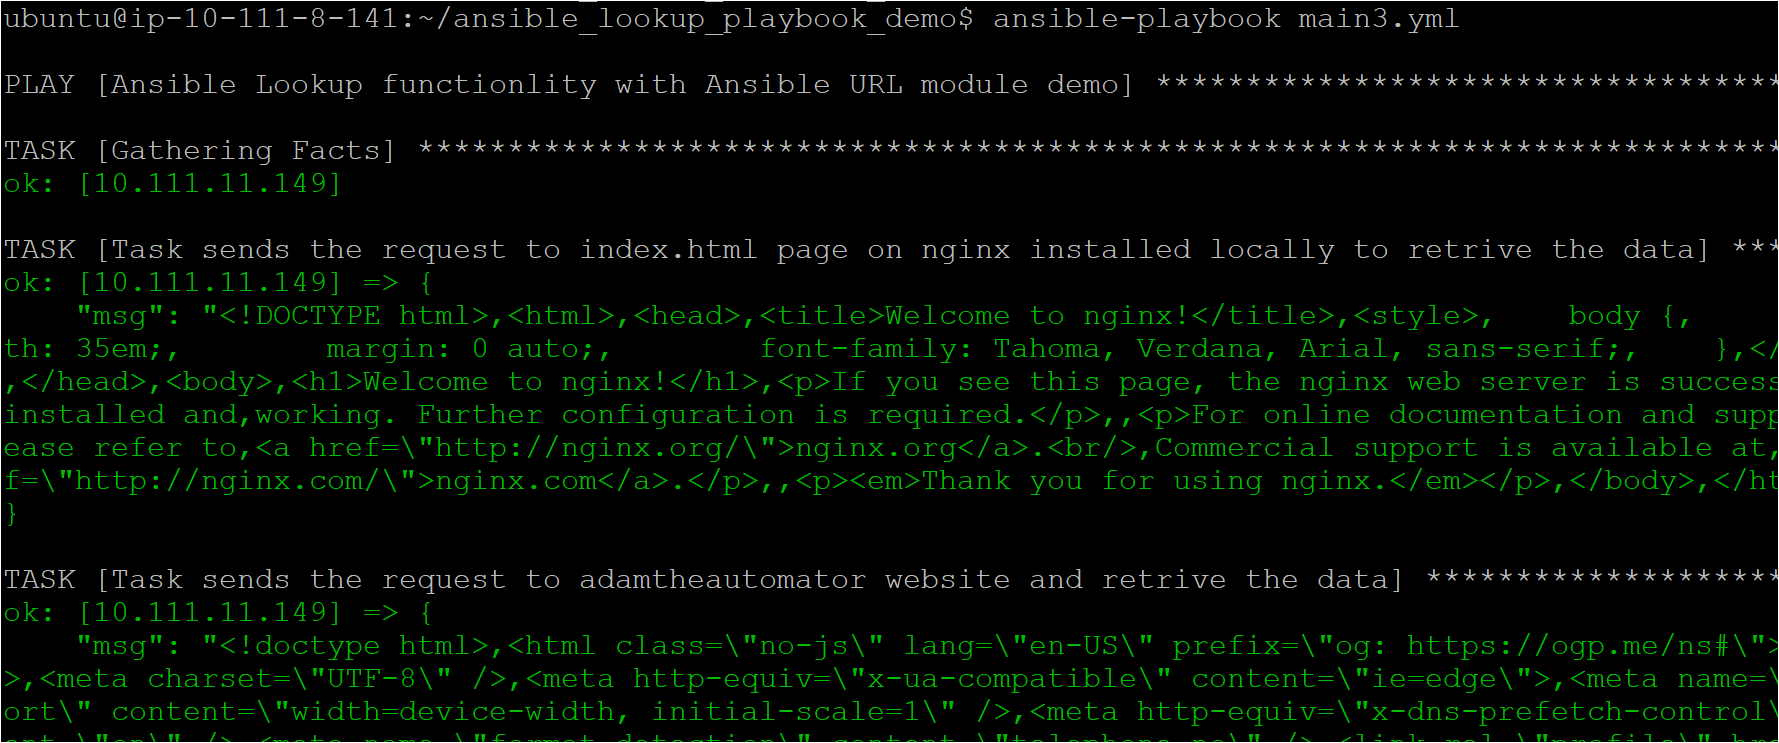
After successful playbook execution, you’ll see both tasks retrieved and printed data (source code) of both the local page and the adamtheautomator.com website.
Returning Key/Value Pairs with Ansible Dictionary and lookup
At times you need to have some environment variables declared in dictionaries format that is key: value format. Reading those values could be tricky, but the combination of Ansible lookup and Ansible dictionary works the magic. Let’s see it in action.
Replace the content of the main.yaml playbook you created in the “Searching for a File using the Ansible lookup” section with the content below.
In the below Ansible Playbook, Ansible lookup fetches the dictionary in one go; then Ansible dictionary returns a list with each item Ansible lookup requested.
# Declaring the variable users that further contains two users (alistek and abertram)
vars:
  users:
    alistek:
# users contain two keys: name and telephone
# Values of the key name are: Adamlistek and AdamBertram
# Values of the key telephone are 1234567890 and 1122334455.
      name: Adamlistek
      telephone: 1234567890
    abertram:
      name: AdamBertram
      telephone: 1122334455
# Ansible task that uses a lookup to display the user's information from the dictionary
tasks:
  - name: Print phone number of employees
    debug:
      msg: "User {{ item.key }} is {{ item.value.name }} ({{ item.value.telephone }})"
    loop: "{{ lookup('dict', users) }}"
Now, run the ansible-playbook command below to execute the main.yml playbook.
ansible-playbook main.yml
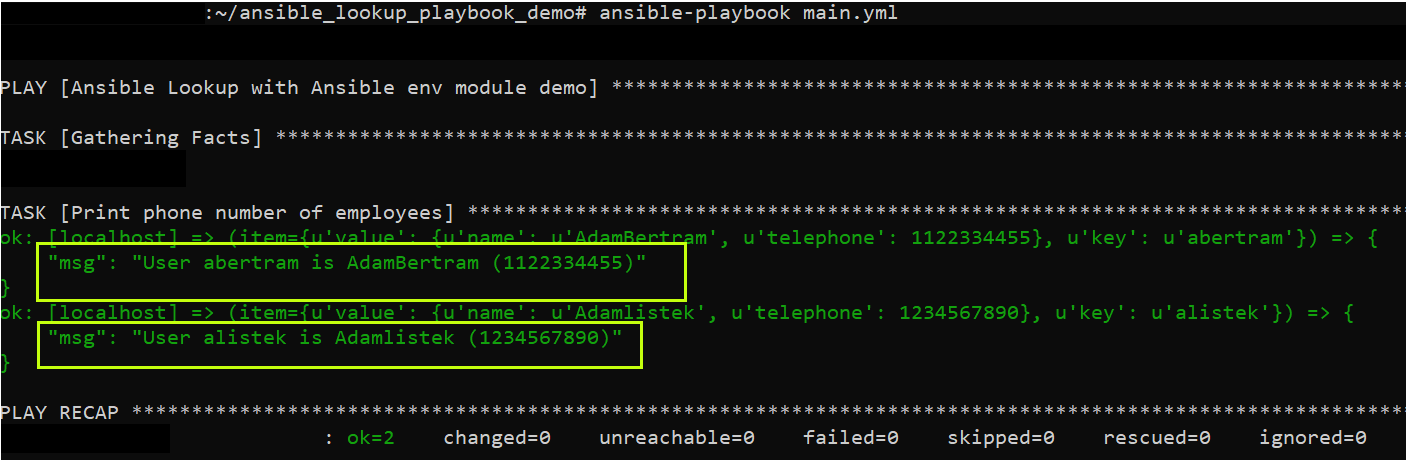
As you see below, the Ansible task prints the dictionary items with their values retrieved from the users variable.
Retrieving DNS records with Ansible dig
Previously you learned how the Ansible lookup plugin interlinks with various Ansible modules such as Ansible Dictionary, Ansible debugs, Ansible templates, etc. But there are dozens of other Ansible modules that work well with the Ansible Lookup such as dig plugin. Let’s quickly check out how to work with Ansible dig.
To find the list of all the Ansible lookup Plugins that are locally installed on your Ansible controller run the
ansible-doc -t lookup -lcommand.
Again, replace the content of the main.yaml playbook you created in the previous section with the content below. In the below Ansible Playbook, Ansible dig retrieves the DNS records for google.com that Ansible lookup requested.
---
- name: Ansible dig functionality with Ansible Lookup
  hosts: localhost
# Executing the tasks on the local machine
  tasks:
    - name: Retriving DNS records for google.com
      debug:
        msg: "{{ lookup ('dig', 'google.com')}}"
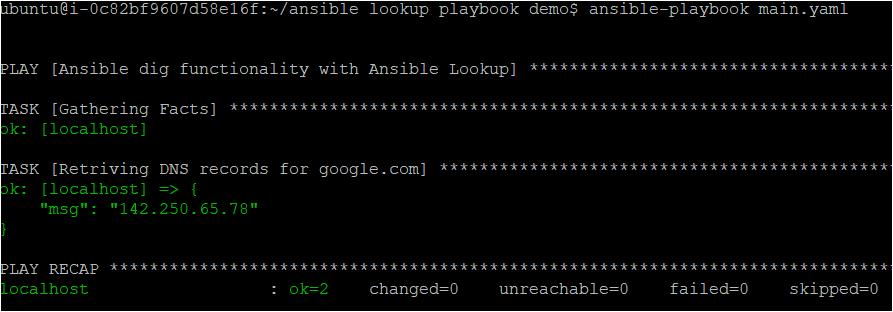
After you execute ansible playbook as you can the DNS record of google.com is displayed on the output.
Conclusion
In this tutorial, you’ve taken advantage of the Ansible lookup parameter to read external data from various external sources, such as websites environment variables with a single command.
Now that you have sound knowledge of the Ansible lookup, which data do you plan to retrieve next on your machine with the Ansible playbook?


