


If you’ve got dozens of containers to manage, automating the management of every containerized application is a must. How? By using Kubernetes (K8s) with the Ansible Kubernetes module! Ansible Kubernetes module allows you to access the full range of K8s APIs and create objects such as Kubernetes deployment, Kubernetes service, and so on.
Not a reader? Watch this related video tutorial!In this tutorial, you’ll learn what the Ansible Kubernetes module is and how it works to your advantage in creating Kubernetes objects on the Kubernetes cluster.
Read on and start automating application management!
Prerequisites
This tutorial comprises step-by-step instructions. If you’d like to follow along, be sure you have the following in place:
- An Ansible controller host – This tutorial uses Ansible v2.11.7 on an Ubuntu 20.04.3 LTS machine.
- A remote Linux computer with Kubernetes cluster setup to test out the Kubernetes module. This tutorial uses Ubuntu 20.04.3 LTS as the remote node.
- An inventory file set up and one or more hosts already configured to run Ansible command and playbooks on. The remote Linux computer is called myserver, and this tutorial uses an inventory group called web.
- Python v3.6 or later installed on your Ansible controller host and the remote node machine. This tutorial will be using Python v3.8.10 on a ubuntu machine.
- Python modules openshift greater than 0.6, and PyYAML greater than 3.11 installed both on the Ansible controller host and the remote node machine.
Creating Kubernetes Objects using Ad Hoc Commands
Perhaps you only plan to create a single K8s object, such as namespace, quickly. If so, running ad hoc commands will suffice. Ad hoc commands are a quick and efficient way to run a single command on a remote host and deploy the specified changes.
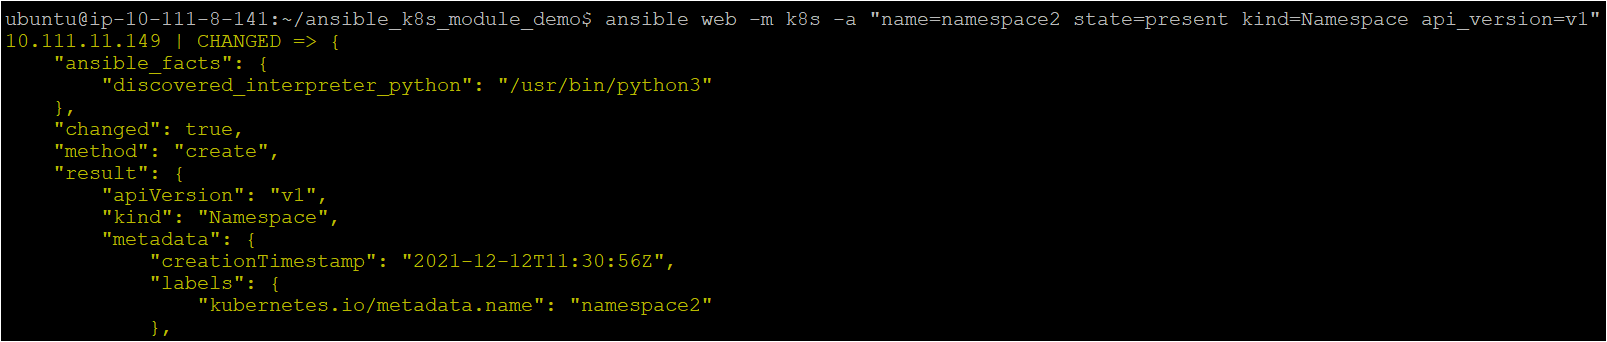
Log onto your Ansible controller, and open your terminal, then run the ansible command below to connect to the host called web using the Kubernetes module (-m k8s). The command passes an argument (-a) that creates a namespace (namespace2) on the Kubernetes cluster.
Ansible creates the new namespace with the state you specify as the present, and kind is set to the type of K8s object (Namespace) you need to manage.
ansible web -m k8s -a "name=namespace2 state=present kind=Namespace api_version=v1"Once the command completes, you’ll see a CHANGED message, as shown below, that confirms Ansible successfully created the namespace on the Kubernetes cluster on the remote host.
Creating Kubernetes Objects with Ansible playbook
Creating a single Kubernetes object may be okay with an ad-hoc command, but it’s going to be tough if you have to install multiple objects to be created in the Kubernetes cluster. Instead of using ad-hoc commands, integrate the Ansible Kubernetes module with a playbook using the ansible-playbook command.
Assuming you’re already logged into the Ansible controller host:
1. Run the following commands to create a directory called ~/ansible_k8s_module_demo. This directory will contain the playbook and all the required configuration files that you’ll use to invoke the Ansible Kubernetes module.
mkdir ~/ansible_k8s_module_demo
cd ~/ansible_k8s_module_demo
2. Next, open your favorite text editor, create a file called pod.yml in the ~/ansible_k8s_module_demo directory, and copy/paste the following YAML playbook contents.
The playbook below creates the pod named nginx within ata-namespace using nginx image with labels app as nginx and tier as frontend.
# pod.yaml template file that creates pod

apiVersion: v1        # It is of type String
kind: Pod             # It is of type String
Namespace: ata-namespace
metadata:             # It is of type Dictionary
  name: nginx
  labels:
    app: nginx
    tier: frontend
spec:                  # It is of type List and Array
  containers:
  - name: nginx
    image: nginx
3. Create another file called deployment.yml in the ~/ansible_k8s_module_demo directory and insert the following YAML playbook contents.
- The below file contains the manifest file to create the deployment (
nginx-deployment) within theata-namespacewith three replicas. The image used to launch the pods isnginx:1.14.2.
- You define the pods’ specification under the
specargument and pods’ labels inside theselector*—>matchLabelsoption. The deployment only takes place if pods’ labels match the deployment labels defined in the deployment metadata
apiVersion: apps/v1
kind: Deployment
Namespace: ata-namespace
metadata:     # Deployment metadata
  name: nginx-deployment  # Name of the deployment
  labels:
     app: nginx  # Declaring the deployments labels.
spec:
  replicas: 3  # Declaring the number of Pods required
  selector:
    matchLabels:
      app: nginx # Pods will be launched if matches deployment Label.
  template:
    metadata:
      labels:
        app: nginx # Labels of the Pods.
    spec:
      containers:
      - name: nginx
        image: nginx:1.14.2
        ports:
        - containerPort: 80
4. Finally, create one more file named main.yml in the ~/ansible_k8s_module_demo directory and copy/paste the following YAML playbook contents.
The playbook below contains multiple tasks to create and manage the Kubernetes objects on the remote machine hosting the Kubernetes cluster.
The playbook tasks perform the following:
- Create a namespace (
ata-namespace). - Copy the
pod.yamlanddeployment.yamlfiles you previously created (steps two and three) to the remote node.
- Creates a pod and deployments in the Kubernetes cluster using the
pod.yamlanddeployment.yamlfiles. - Check the Kubernetes pods exist in the specified namespace (
ata-namespace).
---
- name: Ansible k8s module example
# Creating the namespace in the kubernete cluster
  hosts: web
# Defining the remote server where the k8 module will manage the objects
  remote_user: ubuntu   # Using Remote user as ubuntu
  tasks:
    - name: Create a k8s namespace
      k8s:
        name: ata-namespace # defining the namespace
        api_version: v1
        kind: Namespace
        state: present    # State=present when you need to create new object

# Copying the Pod.yaml and deployment.yaml in the remote node which will be further used to create the pods and deployment in the kubernetes cluster

    - name: copying file with playbook
      become: true
      copy:
        src: /home/ubuntu/ansible_k8s_module_demo/pod.yaml
        dest: /tmp/pod.yaml

    - name: copying file with playbook
      become: true
      copy:
        src: /home/ubuntu/ansible_k8s_module_demo/deployment.yaml
        dest: /tmp/deployment.yaml

# Creating a Kubernetes pod in ata-namespace using file stored locally

    - name: Create a pod
      k8s:
        state: present      # State=present when you need to create new object
        namespace: ata-namespace  # defining the namespace
        src: /tmp/pod.yaml

# Checking the a Kubernetes pods in the ata-namespace

    - name: Get an existing Pods in the kubernetes cluster
      k8s:
        api_version: v1
        kind: pod
        name: nginx
        namespace: ata-namespace  # defining the namespace
      register: web_service

# Creating a Kubernetes deployment in ata-namespace using file stored locally

    - name: Create a deployment
      k8s:
        state: present            # State=present when you need to create new object
        namespace: ata-namespace  # defining the namespace
        src: /tmp/deployment.yaml  # Source file location
Deploying Kubernetes Objects with the Ansible Kubernetes Module
You now have all the files ready to deploy and manage Kubernetes objects. But unless you run the ansible-playbook command, these files are not doing anything. So, you’ll invoke the ansible-playbook command to deploy Kubernetes objects on the remote node.
Run the command below to invoke the playbook (main.yml) that executes the tasks to create the Kubernetes objects on the remote host.
ansible-playbook main.yml # Running the ansible-playbook command with main.yml playbookBelow, you can see that some tasks show a changed status, which indicates the remote host wasn’t in the proper state and was modified to run the command. While the tasks that show an ok status don’t require any changes.
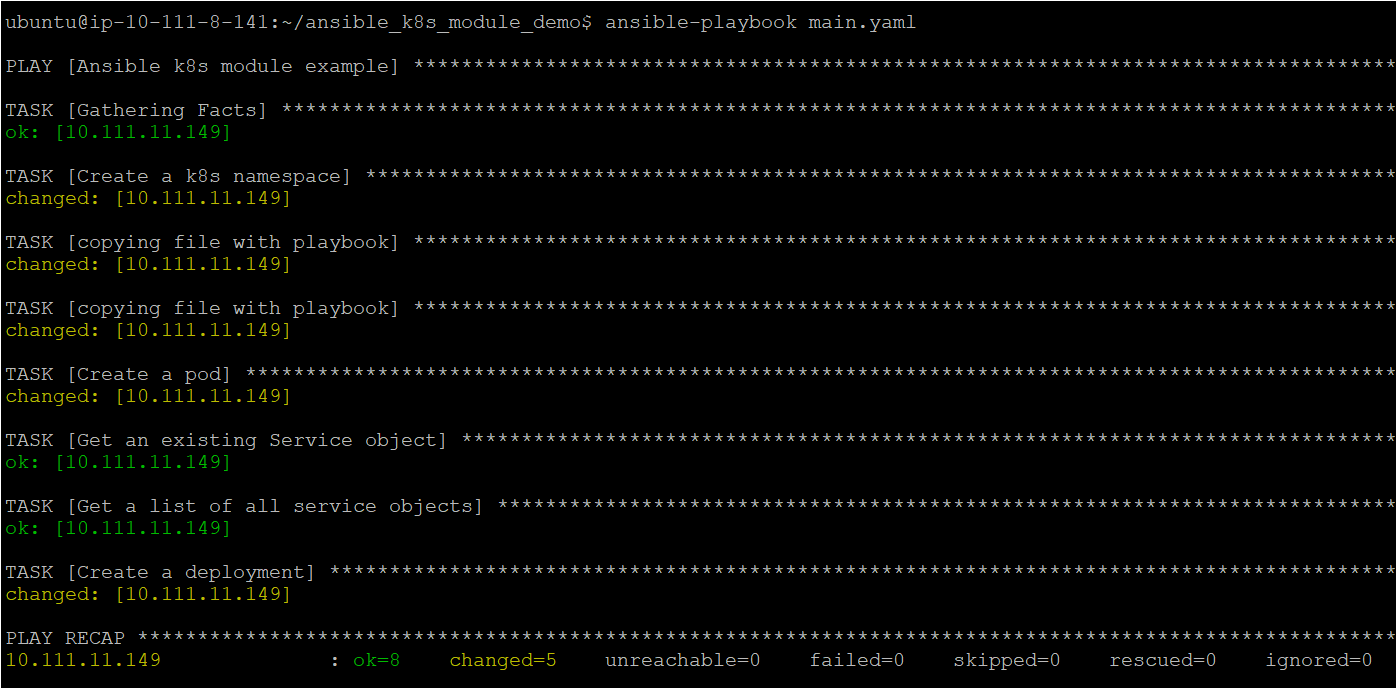
Running the ansible-playbook to manage the Kubernetes objects in the Kubernetes cluster
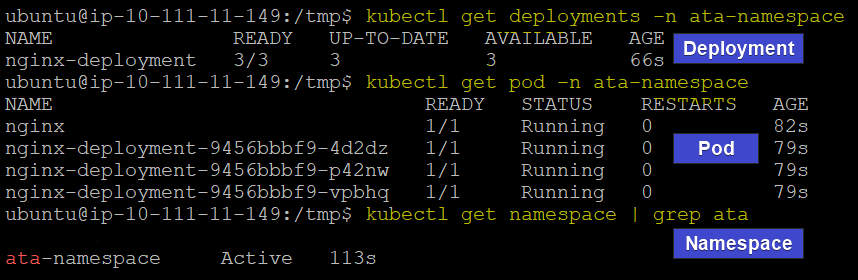
Now, run each command below to verify if Ansible successfully created all the Kubernetes objects defined in the main.yml playbook.
# Checking the deployments in the kubernetes cluster in "ata-namespace" namespace
kubectl get deployments -n ata-namespace
# Checking the pods in the kubernetes cluster in "ata-namespace" namespace
kubectl get pod -n ata-namespace
# Checking the namespace "ata-namespace" in the kubernetes cluster using grep command
kubectl get namespace | grep ata
After running the commands, you’ll see an output similar to the one below.
The output confirms the successful creation of Kubernetes objects (namespace, pod, and deployment) within the Kubernetes cluster using the K8s module.
Conclusion
Throughout this tutorial, you’ve learned how to use the Ansible Kubernetes module in a playbook to create and deploy Kubernetes objects. With the Ansible Kubernetes module, you get a quick way to effectively work with Kubernetes objects within the cluster on remote hosts.
Now, you can automate containerized application management with the Ansible Kubernetes module. But perhaps you prefer to create the same configuration for other servers too? If so, learn how to create Ansible templates to further build on this newfound knowledge.


