

This is part II of a two-part series on Active Directory health checks. Although not required reading, if you’d like to learn how the PowerShell script you’ll be learning about in this article was built, you’re encouraged to check out Building an Active Directory Health Check Tool [In-Depth]: Part I.
In Part I, you learned how many different multiple tests and why they’re important. Let’s now pull them all together and build a tool. In this part, you’ll convert all of the Active Directory health checks explained in Part I into a test framework. You’ll also learn how to output results of various AD health checks to tools like Pester and a monitoring tool called PRTG.
To follow along or to see a finished version of the tool you’re going to learn about in this article, download the ADHealthCheck-NoResult.ps1 script from GitHub.
Defining Output
Having a common object type and an easy way of generating it will make it much easier to convert test results to the tool of your choice.
To create a uniform output for all potential tools, I’ve chosen to use a PowerShell class. Although not required, it’s the approach I’ve opted to take here. The main point is to ensure all AD health checks return the same type of output.
A PowerShell class is a schema that defines how a PowerShell object should look and what it should do. Each line you see below represents a property the objects return will have. You can see below I’m planning on each AD health check to return ten properties.
Class AdhcResult {
    [string]$Source
    [string]$TestName
    [bool]$Pass
    $Was
    $ShouldBe
    [string]$Category
    [string]$SubCategory
    [string]$Message
    $Data
    [string[]]$Tags
}
To expedite this class-creation, I’ll be using a helper function called New-AdhcResult. This function creates the class and everything you’ll need to follow along. This function will output a custom
[AdhcResult]type object.
Running the AD Health Check Tool
First, download and copy the AD health check script to a domain controller. Open it up with the PowerShell ISE and run it. This portion of the tool will not return any information.
Ths script will run and store the result of each check in the $TestResults variable as multiple [AdhcResult] objects. You will use these objects later on for generating reports or outputting it into various tools. Holding health check results in a variable like this allows you to add more results should you choose to create another one and use the New-AdHcResult command.
Once the script finishes running, you should now have a complete set of AD health check objects stored in the $TestResults variable. You can now run $TestResults from the console and see the raw results.
Displaying AD Health Check Results in Tools
Since all of the checks are in a common object type, you can better inspect them through a couple tools like Pester and PRTG.
In this section, you’re going to learn how to create an HTML report with a tool called extent and to display the report in PRTG.
Creating an nUnit XML File with Pester
You first need to convert the PowerShell objects in a format your tools can understand. Most tools understand XML or, more specifically, nUnit XML. This is a format that you can import into various tools to display results.
Since you’re working with PowerShell, you’ll use the Pester testing framework to read the output from the AD health check script and to generate an nUnit XML file
Start by downloading the latest version of Pester. You can download Pester by running Install-Module in an elevated PowerShell console. The below command will force an install of the latest Pester version. Since the publisher certificate that Pester is signed with comes with Windows 10, we’ll need to use the SkipPublisherCheck parameter to install it.
PS51> Install-Module Pester -Force -Verbose -SkipPublisherCheck
Once Pester is available, you can then run the script and dynamically create a set of Pester tests.
Note: You can also create Pester tests yourself without even using the PowerShell script I’ve provided.
The below PowerShell script will use Pester to generate an nUnit XML file from the output of the $TestResults variable defined in the ADHealthCheck-NoResult.ps1 script.
Save this file as Pester.ps1 in the same folder as the AD health check script.
# dot source in the ADHealthCheck file
. $PSScriptRoot\ADHealthCheck-NoResult.ps1
$Grouped = $TestResults | Group-Object Category

Foreach($Category in $Grouped) {
    Describe -Name $Category.Name -Tags ($Category.Group.Tags | Select -Unique) {
        Foreach($Result in $Category.Group){
            Context "$($Result.Source) - $($Result.TestName)" {
                It -Name "Should've passed" {
                    $Result.Pass | Should -Be -ExpectedValue $True -Because $Result.data
                }
            }
        }
    }
}
Finally, run Invoke-Pester below to invoke the Pester.ps1 file and save the results in NUnitXml format.
PS51 > Invoke-Pester -Script @{Path = '.\Pester.ps1'} -OutputFile .\NunitReport.xml -OutputFormat NUnitXmlBuilding an HTML Report with the Extent Tool
Once you have the NUnit XML file, you can now use this file to pass to a tool that can convert that to HTML. One of those tools is called extent. Extent is a handy tool for creating HTML reports from Nunit XML files.
First, download extent to the same directory as the NunitReport.xml file created earlier. Then execute the following commands in a PowerShell session. These commands will create the directory to store the HTML files and then execute extent.exe to do the conversion.
# Create report directory
PS51> mkdir .\HTMLReports
# Create the report
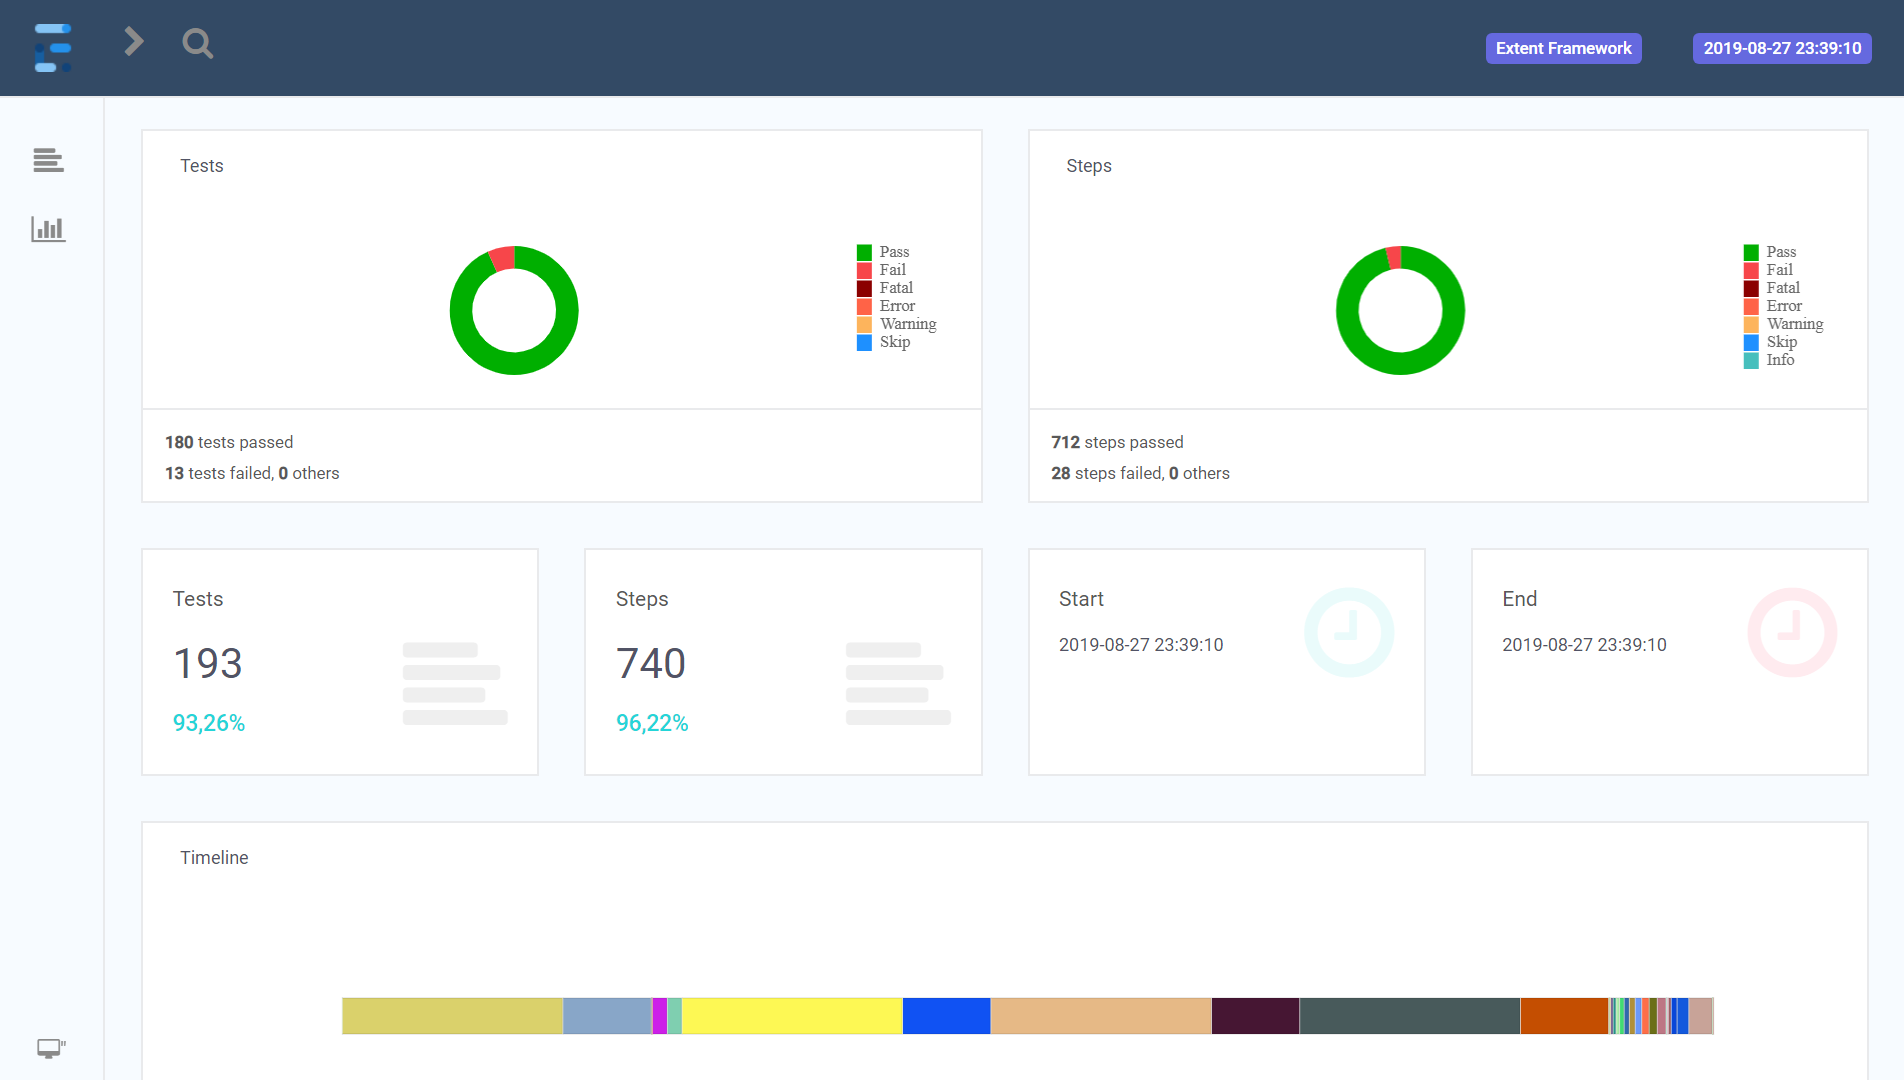
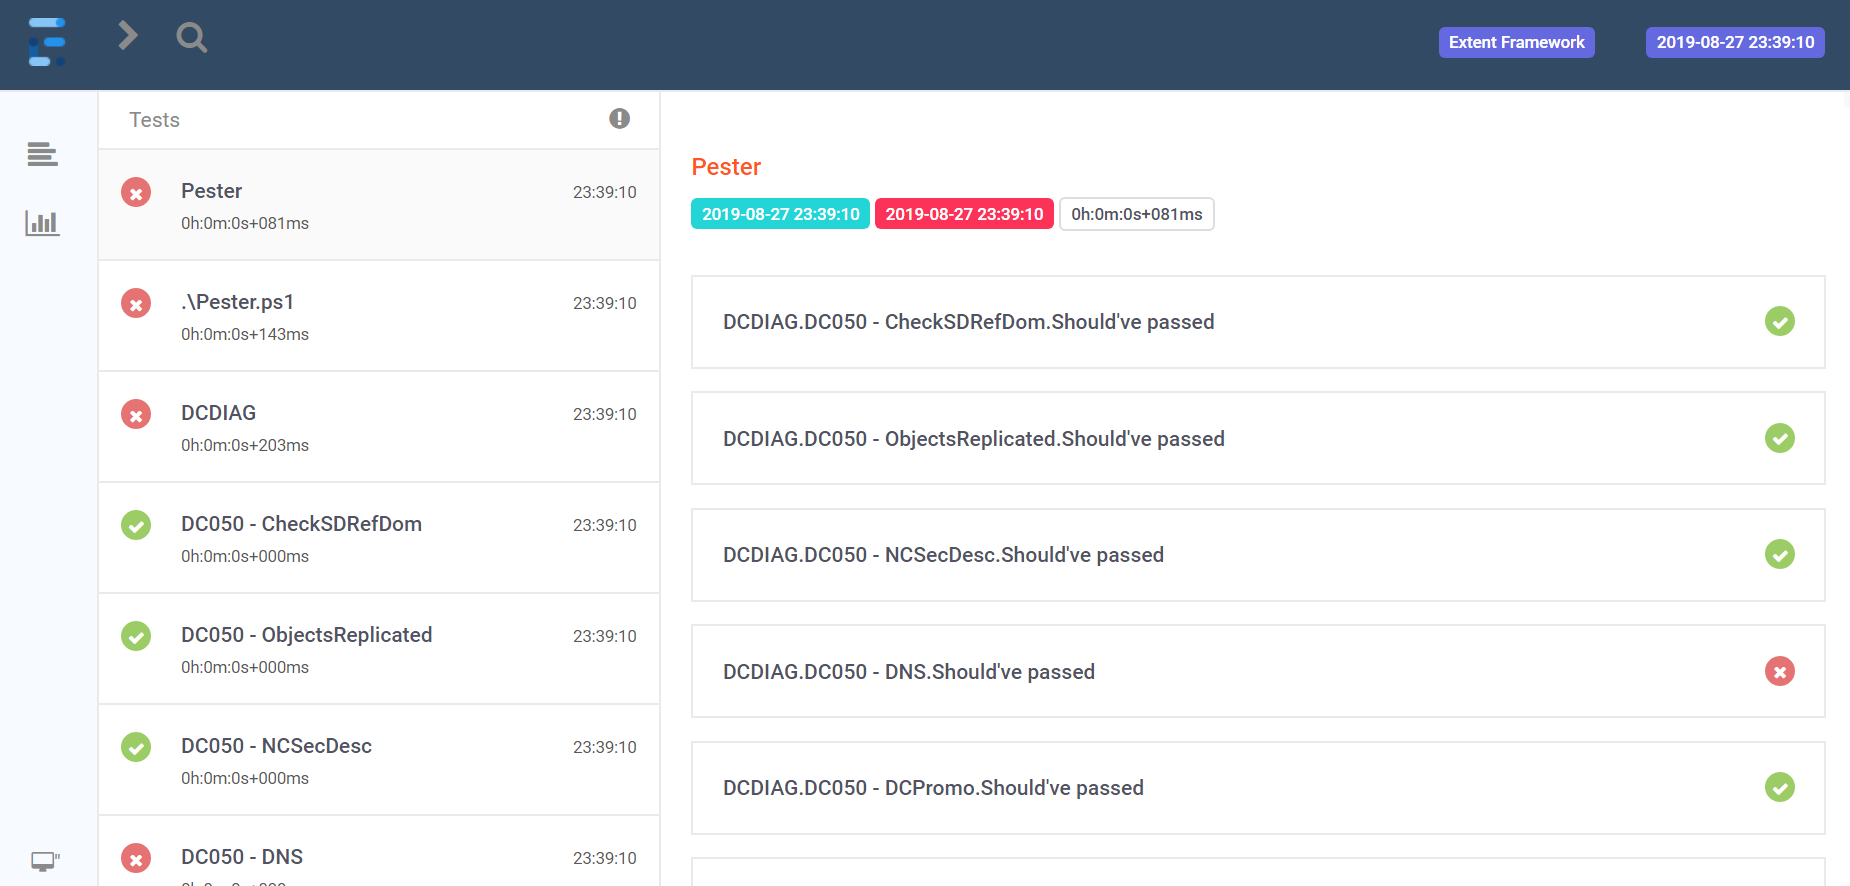
PS51> .\extent.exe -i .\NunitReport.xml -o .\HTMLReports\When complete, you’ll find two HTML files in the HTMLReports directory. These files will looks like the below screenshots you open them with a web browser.
Ingesting AD Health Check Results into PRTG
PRTG is a popular monitoring tool developed by Paessler that you can use to monitor your infrastructure and services. In this section, you’ll learn how to push the health check results to PRTG once the health check script has run.
Pushing results to PRTG does take more work rather than having the tool pull information but you’ll eventually see the setup is well worth the time spent.
Prerequisites
To successfully set up PRTG as a monitoring tool for the AD health check script built in this article, be sure you have:
- PRTG installed and configured
- All domain controllers set up in PRTG
- The Send-AdhcResultToPrtg.ps1 PowerShell script downloaded from GitHub
- the URL and port of y0ur PRTG sensor
If you have each of the prereqs done, you can then follow the below step-by-step instructions on how I recommend to push these AD health check results to PRTG.
- Create a device in PRTG called Domain or whatever name you prefer.
- Create an Advanced HTTP push sensor with an IdentityToken of directory-adhealthcheck. Note that this is case sensitive!
- For each domain controller device in PRTG, create one Advanced HTTP push sensor. For each IdentityToken, append each sensor with -adhealthcheck such as dc01-adhealthcheck.
- Add the contents of the Send-AdhcResultToPrtg.ps1 PowerShell script to the end of the ADHealthCheck-NoResult.ps1 PowerShell script we’ve covered.
- Change the variable
$PRTGUrlto the URL and port of your PRTG sensor. - Execute the script.
Once complete, once the AD health check script completes, it should now push status to your PRTG sensors as shown below.

Scheduling the Active Directory Health Check Script
Monitoring AD health is an ongoing process. You should be running tests all the time rather than ad-hoc instances. Let’s schedule the Active Directory health check script to run at frequent intervals.
The easiest route of automating these checks is by adding the script to the task scheduler and letting it run under an AD user account or a Group-Managed Service Account.
Using a Group Managed Service Account (gMSA) is the more secure way of executing scheduled tasks autonomously since only specified computer accounts that can fetch the password from AD. But some organizations may not have this luxury.
Creating an AD User Account
Let’s first break down what it takes to get an AD user account set up to run the scheduled task.
If you’re going to be running a scheduled task as a user account, by all means, do not run it as your own account! Always create a separate user account for this purpose.
To save time time, you will see a PowerShell script below. This is an example script you can use to create an AD user account that is part of the Domain Admins group. You can then use this account to run scheduled task with.
# Change this to the OU of your service accounts
$OU = "OU=Service Accounts,DC=contoso,DC=com"
# Change this to the password that you want to use for the account
$Password = "JägareTvå"
$SecureString = $Password | ConvertTo-SecureString -AsPlainText -Force
New-ADUser -Enabled $True -Path $OU -Name svcADHealthCheck -AccountPassword $SecureString
# Restrict account to only Domain Controllers
$DomainControllers = (Get-ADDomainController -Filter *).Name

Set-ADAccount -Identity svcADHealthCheck -LogonWorkstations ($DomainControllers -Join ",")

# Making it Domain Admin (Sorry)
Add-ADGroupMember -Identity "Domain Admins" -Members svcADHealthCheck
Creating a Group-Managed Service Account
Using a gMSA to run the health check is a bit more tricky if you aren’t using gMSA in your environment already, but it’s way more secure.
Creating a KDS Root Key
To create a gMSA account to run the AD health check script, first add a KDS root key if you don’t have one already. You can check if you have a KDS root key by running the PowerShell command Get-KDSRootKey on a domain controller.
If you don’t have a KDS root key, you create one by running Add-KDSRootKey -EffectiveImmediately under a user account part of the Domain Admins AD group on a 2012R2 or later domain controller.
The key needs to replicate out to the other domain controllers to take full effect. More information on this process can be found in the Microsoft documentation.
Creating the gMSA
Once the KDS root key is created, you’re ready to create the gMSA account with PowerShell. Below you can see an example script to use to create the gMSA account only allowed to authenticate from a domain controller in the Domain Admins group.
# Change to your domain
$Domain = "contoso.com"

$AccountName = "svcadhealthcheck"

# Create a GMSA called svcadhealthcheck (or in reality svcadhealthcheck$) and allow only Domain Controllers to fetch the password
New-ADServiceAccount $AccountName -DNSHostName "$AccountName.$Domain" –PrincipalsAllowedToRetrieveManagedPassword "Domain Controllers"

# Add the GMSA to Domain Admins
# Note that we're adding the the account by it's true SamAccountName 'svcadhealthcheck$'
Add-ADGroupMember -Identity "Domain Admins" -Members "$AccountName`$"
Installing and Testing the gMSA
Now the gMSA is created, the last step is to install and test it on all domain controllers. One way to do this is by using the Invoke-Command PowerShell command. Below you can see a PowerShell script that will install the gMSA on all DCs and ensure it’s working properly.
# This will run on all Domain Controllers
Invoke-Command -ComputerName (Get-ADDomainController -Filter *).Name -ScriptBlock {
    $Account = Get-ADServiceAccount -Filter { Name -eq 'svcadhealthcheck'}
    Install-ADServiceAccount $Account

    # Tests that the GMSA works on the computer
    # Returns $True if tests are OK
    $Test = Test-ADServiceAccount -Identity $Account.Name
    if($Test){
        Write-Output "GMSA test OK on $env:computername"
    }
    else {
        Write-Output "GMSA test FAILED on $env:computername"
    }

}
Giving the gMSA Permission to Run as a Batch Job
Once the gMSA is installed, you’ll now need to give it permission to run as a batch job on the DCs. The account needs this right since it will be running autonomously in the background in a scheduled task.
You can set this permission via an existing GPO or by creating a new GPO and linking it to the Domain Controllers OU. If you don’t already have a GPO to use, below are some steps you can take to create one.
- Launch the Group Policy Editor on a DC.
- Right-click on the Domain Controllers OU and select Create GPO in this domain and link it here.
- Name it DC – Logon as batch or another name you prefer
- Right-click the GPO and click Edit.
- Go to Computer Configuration –> Windows Settings –> Security Settings –> User Rights Assignment.
- Left-click Log on as batch job and click Properties.
- Click Add user or Group.
- Click on Object Types, select only Service Accounts and click OK.
- Search for the svcADHealthCheck service account created earlier, select it and click OK.
You should now see the gMSA under the list of AD objects like shown below.

Creating the Scheduled Task
Now that you have an account created to run the scheduled tasks, you can now create the scheduled task itself on a domain-joined server of your choice.
You can create the scheduled task via the GUI but that’s too much clicking! Instead, I recommend creating it with PowerShell. Why? Because you can simply copy the code you see below and be done with it.
Below you will find two scripts; both scripts are similar but one assumes an AD user account and the other assumes a gMSA. Be sure to use the appropriate script based on which account you’re using.
# Replace with the path to your script
$ScriptPath = "C:\Scripts\ADHealthCheck.ps1"
# Replace with the username of the account that you created to run the task
$UserName = "svdADHealthCheck"

# Replace with the password that you set for above account
$Password = "JägareTvå!"
# Create the action that launches the script
$Action = New-ScheduledTaskAction -Execute "powershell.exe" -Argument "-ExecutionPolicy bypass -File '$ScriptPath'"
# Create the trigger that starts the task
$Trigger = New-ScheduledTaskTrigger -Once -At "12:00" -RepetitionInterval (New-TimeSpan -Hours 12)
# Create settings for the scheduled task
$Settings = New-ScheduledTaskSettingsSet -AllowStartIfOnBatteries -DontStopIfGoingOnBatteries -StartWhenAvailable -RunOnlyIfNetworkAvailable -DontStopOnIdleEnd
# Create the scheduled task using a splat for readability
$Splat = @{
    User = "$env:USERDOMAIN\$UserName"
    Password = $Password
    TaskName = "ADHealthCheck"
    Action = $Action
    Trigger = $Trigger
    RunLevel = "Highest"
    Settings = $Settings
}
Register-ScheduledTask @Splat
# Replace with the path to your script
$ScriptPath = "C:\Scripts\ADHealthCheck.ps1"
# Replace with the username of the account that you created to run the task
$UserName = "svdADHealthCheck$"
# Create the action that launches the script
$Action = New-ScheduledTaskAction -Execute "powershell.exe" -Argument "-ExecutionPolicy bypass -File '$ScriptPath'"
# Create the trigger that starts the task
$Trigger = New-ScheduledTaskTrigger -Once -At "12:00" -RepetitionInterval (New-TimeSpan -Hours 12)
# Create settings for the scheduled task
$Settings = New-ScheduledTaskSettingsSet -AllowStartIfOnBatteries -DontStopIfGoingOnBatteries -StartWhenAvailable -RunOnlyIfNetworkAvailable -DontStopOnIdleEnd
# Create principal that defines the GMSA
$Principal = New-ScheduledTaskPrincipal -UserID "$env:USERDOMAIN\$UserName" -LogonType Password -RunLevel Highest
# Create the scheduled task using a splat for readability
$Splat = @{
Principal = $Principal
TaskName = "ADHealthCheck"
Action = $Action
Trigger = $Trigger
RunLevel = "Highest"
Settings = $Settings
}
Register-ScheduledTask @SplatYou’re done! At this time, the scheduled task will execute at the interval provided in one of the scripts above.
Summary
Whew! If you have followed along all the way from Part I, you should know by now that AD health is a deep subject. There’s so much to this one topic that not even two lengthy blog posts could cover.
But, by now, you should have enough knowledge and a pre-built PowerShell framework that you can plug in other Active Directory health checks as they arise.


