

Linux and Windows used to be mortal enemies but nowadays, they tend to get along much better. In fact, now you can even use SSH natively in Windows: both as a client and a server. What do you do when you’re a Windows admin but need to also manage Linux machines? You get used to (Secure Shell) SSH command in Linux!
This is Part IV in the blog post series A Windows Guy in a Linux World. If you’d like to learn more about popular Linux concepts, be sure check out Part I, Part II, and Part III.
In this post, you’re going to learn all about how to enable SSH in Linux, and how to set up your Windows SSH client to connect to remote Linux servers.
Note: All examples will be using OpenSUSE Linux.
Moving Away From the Desktop Environment
Back in the first post of this series, the tutorial recommended using the KDE desktop environment. As you were going through the OpenSUSE setup, you probably saw another enticing option; the server edition of OpenSUSE.
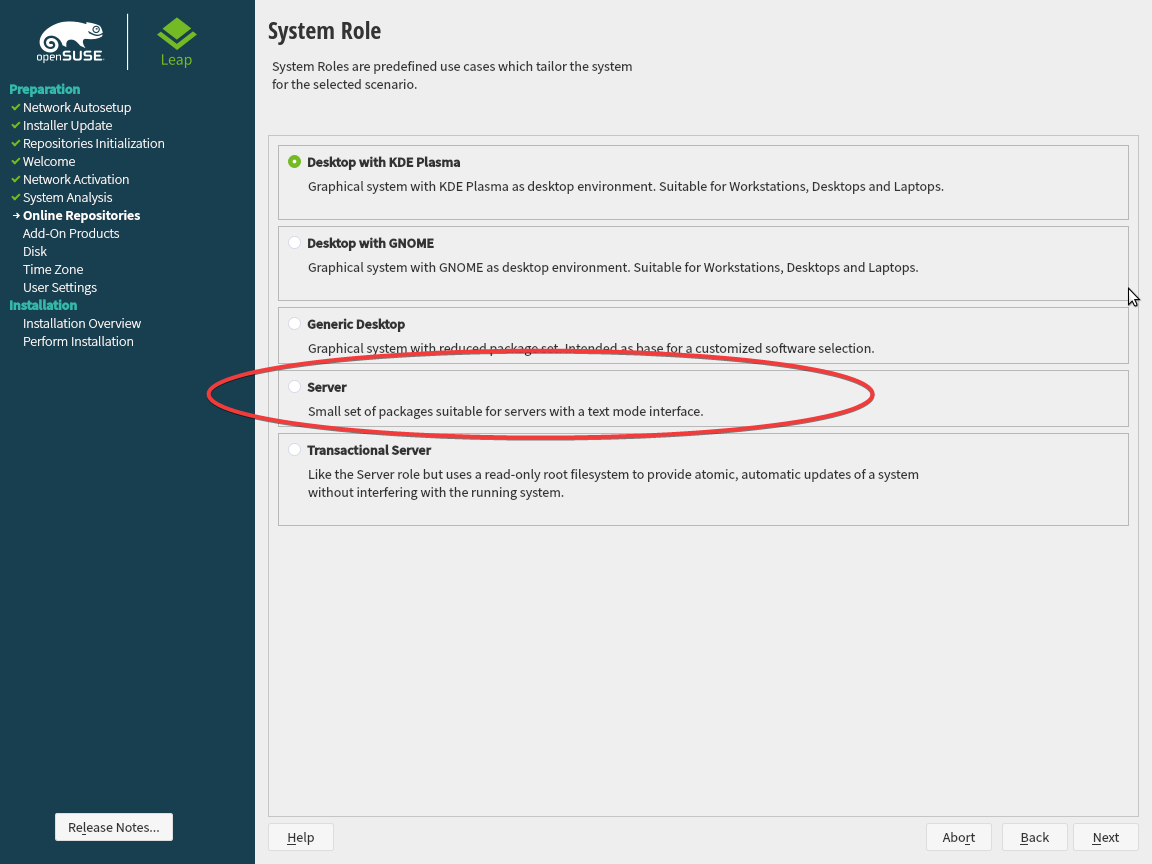
If you have installed the server edition of most Linux distributions (including OpenSUSE), you may have noticed the complete lack of a desktop. The Server edition of most popular distributions (like OpenSUSE, as well as Ubuntu Server and CentOS) is like Windows Server Core: no desktop to speak of.
To understand why the desktop is typically shunned in the Linux culture, you need to understand the CLI and SSH.
SSH: The Gold Standard of Remote Management
SSH, like many other remote management protocols, is a client-server based system. A client remotely connects over the network to a server and allows you to run commands (or even transfer files). SSH is the de facto standard when it comes to managing Linux remotely.
Since SSH has been around for a long time and is deeply embedded in the Linux ecosystem, command-line administration utilities dominate the Linux server environment. Most Linux server distributions do not have a graphical interface.
Using SSH Commands in Linux
Enough talk. Let’s see what SSH can do by first enabling it in OpenSUSE Linux. To do, use the YaST package manager. To enable SSH with YaST in OpenSUSE:
- Click on the start menu, type terminal and choose Konsole assuming you’ve installed the KDE Desktop Manager when installing OpenSUSE.
- In the terminal, open YaST by running
sudo yast. - Once in YaST, arrow down to system, then arrow over to services manager and press Enter to proceed.
- Arrow down to sshd, and press
alt+sto start the SSH service. - Press
alt+rto change the start mode from manual to on boot. This will ensure the SSH server service is started even after a reboot. - Press
alt+otookthe changes and apply them.
You can see these steps in action below.
Allowing SSH Through the Firewall
Nearly every Linux distribution comes with some kind of firewall to protect it as Windows does. You can read about OpenSUSE’s firewall here. To ensure you can access the SSH service remotely from Window, you must allow it through the firewall. To do that:
- Still in the terminal, start YaST again with
sudo yast. - Arrow down to Security and Users and then arrow over to Firewall and press Enter to proceed.
- Navigate to Zones –> Public and arrow over to the Services—Ports pane on the right.
- Arrow down to find
sshin the services. - Select
sshwith the spacebar and pressalt+dto add the selection. - Press
alt+ato accept the changes.
You can see all of these steps above represented visually below.
Just like Windows, Linux has different trust levels to apply firewall rules. These levels are referred to as zones. Windows has public, work, and private zones by default. Linux has many more, but defaults to the public zone.
Connecting to Linux from Windows
Luckily, these days, Windows 10 has a built-in SSH client. To connect to a Linux host, open up a command prompt (cmd) or PowerShell console and specify the username to connect with and the IP or hostname.
> ssh <username>@<ip address>If all goes well, the SSH client should ask you to accept a fingerprint. A fingerprint is an identifier to make sure someone hasn’t hijacked the target IP address.
If you’re running Windows 7, you can still SSH to your Linux host. You’ll just need to download the Microsoft SSH client from here. This SSH client is the same one Windows 10 uses.
Once you type yes and put in your password you’re connected to your server! You can now use the command line just as if we were opening a terminal on the computer itself.
Do not expose SSH (default port 22) to the Internet through your router. Bots crawl the Internet constantly looking for open SSH ports. As soon as a bot finds an open port, they’ll start spamming passwords trying to brute force their way in.
Enabling Mouse Support in SSH with Windows
One of the big drawbacks of using the native Windows 10 SSH client (at least at the time of this writing) is the lack of mouse support. This means you can’t use a mouse in midnight commander as you learned in a previous blog post.
Luckily, as of version eight of the OpenSSH Windows client, you can get mouse support! Let’s get this client installed.
- Download the latest release of OpenSSH-Win64 from here and extract the resulting zip file. The tutorial will assume you extract it to ~\Downloads\OpenSSH-Win64.
- Open a PowerShell console and navigate ~\Downloads\OpenSSH-Win64 with
cd ~\Downloads\OpenSSH-Win64. - Check the SSH client version by running
.\\ssh -V. As of writing this guide, the version should be 8.1.0.0-p1. - SSH into your Linux server by using
.\ssh <user>@<ip>. - Once logged in, test mouse support by running
mcto run midnight commander to ensure you can use a mouse.
You can see all of these steps above represented visually below.
Overriding the Default SSH Client
If you want to use the new version on a more permanent basis, you can; but you must override the default Windows 10 SSH client. This ensures whenever you run ssh on the command line, the newer version (with mouse support) is used.
Assuming you’ve got the client extracted to the ~\Downloads\OpenSSH-Win64 folder
- Move the extracted OpenSSH-Win64 folder to a permanent folder of your choice. This tutorial will use C:\users\public\OpenSSH-Win64.
- Go to Start and then Run and type sysdm.cpl or, open up System from the control panel.
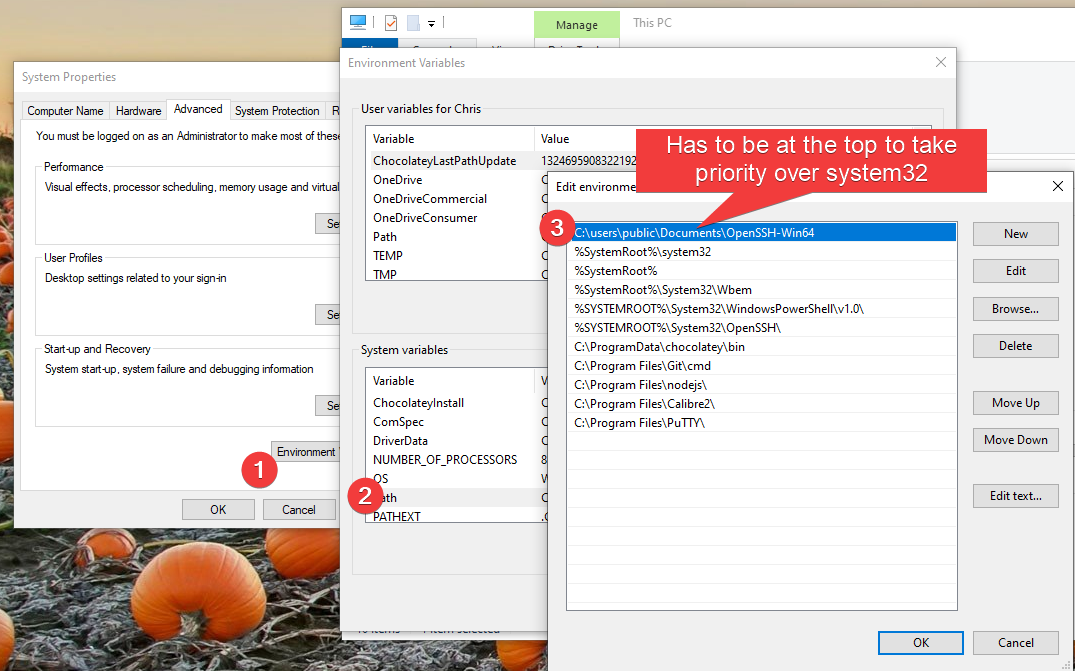
- Under the Advanced tab, click Environment Variables.
- Under System Variables, click on Path.
- Click on New to add a new path and provide the folder path to the SSH client (C:\users\public\OpenSSH-Win64 in this case).
- Click Move Up until it’s above the %SystemRoot%\system32 folder. This will ensure whenver you type
sshon the command line, Windows will look here first. - Open up a PowerShell console and run
ssh -V. You should see the version to be at 8.1.0.0-p.
These steps are summarized below.
Prioritizing a folder over %SystemRoot%\system32 can be a security risk. If someone has access to your computer, they can decide to insert a virus in the OpenSSH-Win64 folder and name it as a windows utility like cd.exe.
You should restrict the OpenSSH-Win64 folder to be read only for anyone except administrators.
- Right click on OpenSSH-Win64 folder and click Properties.
- Under the Security tab, click the Advanced button.
- Click Disable inheritance to allow custom folder permissions and to prevent parent folders from overriding permissions in the OpenSSH-Win64 folder.
- Choose Add, find the Administrators group and give them full rights.
- Click Add, find the Everyone group and give them read only permissions.
- Select the Replace all child object permission checkbox to propagate these settings to all files in the OpenSSH-Win64 folder; click Apply.
- Now test these permissions by creating a new file in the OpenSSH-Win64 folder. Windows should require an Administrator prompt.
You can see all of these steps above represented visually below.

Managing Disconnected Sessions with Tmux
Ah, what a pain! You’re halfway through running a long-executing command over SSH and your Internet drops out. Now you don’t have a clue what state the Linux server is in! Is it done with that command? How do you get it back?
Disconnected sessions are a legitimate issue with SSH and one that luckily has a straightforward solution. You need a terminal multiplexer (tmux).
Tmux stands for both the abbreviation of terminal multiplexer, and the name of the program itself
Tmux is a session manager for SSH. It “holds on” to a session if you get disconnected and keeps it running in the background. You can reconnect to that session later or even create multiple sessions and hop between them.
To manage disconnected sessions with tmux:
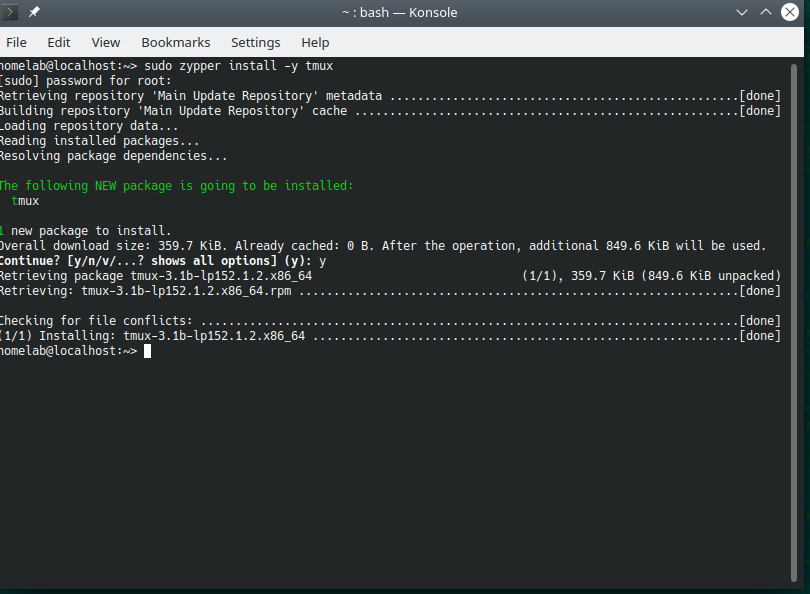
- In the Linux terminal, download and install the tmux utility by running
sudo zypper install -y tmuxas seen below:
You can use the YaST to download the tmux utility also.
Most Linux distributions have a different command-line package manager. OpenSUSE uses zypper. Arch uses pacman. Ubuntu uses apt. Red Hat uses dnf and yum. Thankfully, the syntax for these package managers is fairly similar across the board.
2. On your Windows computer, open up a PowerShell console and SSH into your Linux server. The tutorial will be using a username of homelab and a Linux server IP of 192.168.134.169.
ssh <username>@<ip address>3. Open tmux by running tmux once connected. You should get a green bar at the bottom
4. Run a command that outputs some text. It doesn’t matter what it is. This tutorial is using neofetch. You can run ls also.
5. Disconnect the session by closing PowerShell. This action simulates a dropout.
6. Reconnect to your Linux server again using SSH.
7. Now reattach to the old session by running tmux a You should still see the output of that previous ls command. Hooray, no data loss from the disconnect!
You can see all of these steps above represented visually below.
If you try running the Midnight Commander utility inside of
tmux, you might notice you don’t have mouse support. You can fix that by runningmc -xinstead.
Enabling tmux on Login
By default, tmux will not be available in all SSH sessions. You can change that by forcing tmux to attach to your SSH session every time you login.
Assuming you’re SSHed to your Linux server:
- Open up themidnight commander utility using mc.
2. Highlight the .bashrc file and hit edit.
The
.bashrcfile is a shell (batch) script that runs every time you log in via command line
3. Add the below shell script code to the bottom of the text file.
if [ -z "$TMUX" ]; then tmux attach -t default || tmux new -s default fi4. Click quit and save when prompted.
5. Test the tmux auto-attach by disconnecting from your SSH session and rejoining. You should get a green bar at the bottom automatically, indicating you are connected to a tmux session!
That’s really just scratching the surface of what tmux can do, it’s quite a powerful multitasking program. If you ask any Linux admin what their most used command is, it’s probably tmux.
Wrap Up
That concludes the latest post in the A Windows Guy in a Linux World blog post series. Stay tuned to the ATA blog for the next installing coming up!


