

Have you created an Azure VM via the Azure portal before? If so, how many clicks did it take to do that? Can you do it, again and again, providing the exact same input values to ensure you meet a specific standard? Probably not. You need to automate the process. Create Azure VMs with Terraform!
Not a reader? Watch this related video tutorial!Terraform by Hashicorp is a utility that creates simple to complex infrastructure on-prem or in the cloud. Terraform is a single binary file that reads configuration files, creates a state and then ensures your infrastructure is creating and remains in that state.
In this article, you’re going to learn how to get started with Terraform by creating an Azure VM. This tutorial will be a great Terraform Azure example.
Prerequisites
If you’d like to following along with this tutorial, be sure you have the following in place:
Throughout the steps, this tutorial will be using macOS running PowerShell Core although the same process can be followed on Windows 10 using PowerShell Core, Windows PowerShell or even the Windows command prompt.
Installing Terraform
To get started, you’ll first need to download Terraform. There are many ways to do that depending on your preference. This tutorial is using macOS so you can use HomeBrew by running brew install terraform. You can also go directly to the Terraform download page or, if you’re on Windows, you can use Chocolatey too.
Did you know that Azure Cloud Shell has Terraform pre-installed?
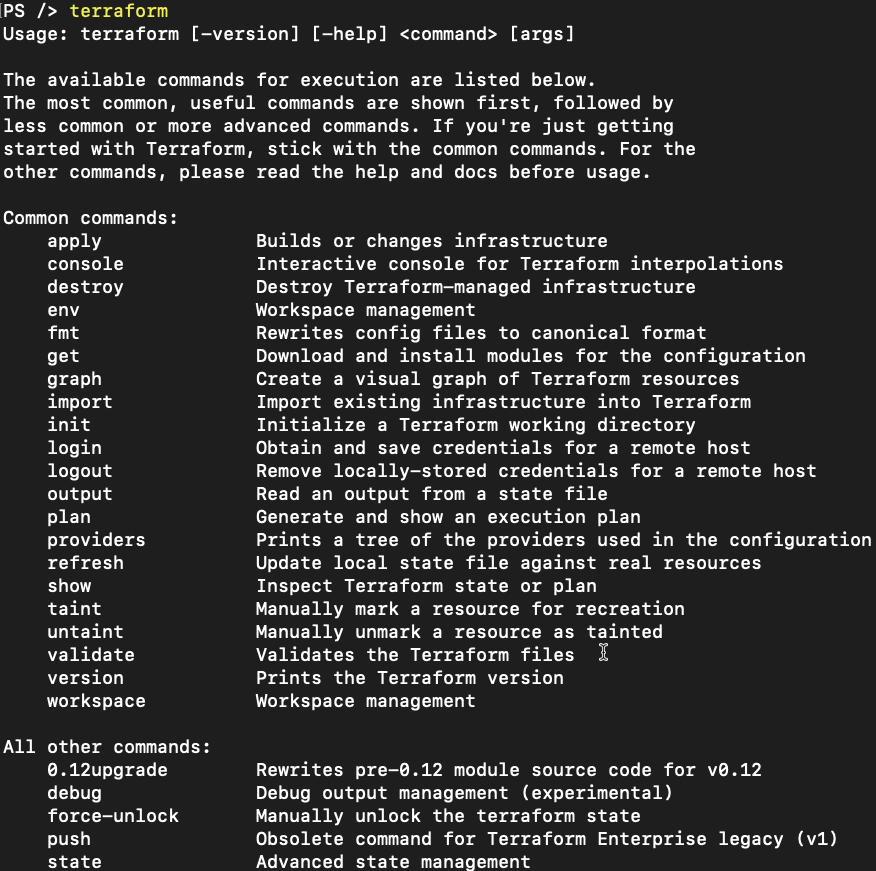
Once you have Terraform downloaded, copy it to a folder in your path and run terraform. You should see some usage instructions as shown below. If you see this, you’re ready to proceed.
Authenticating to Azure
Terraform uses providers to talk to various on-prem and cloud vendors. In this case, you need to configure the Terraform Azure provider. Assuming that you’ve got the Azure CLI installed and already authenticated to Azure, you ned to first create a service principal. Terraform will use the service principal to authenticate and get access to your Azure subscription.
Create a Service Principal
In your console, create a service principal using the Azure CLI. To do that:
First, find your subscription ID using the az account list command below.
> az account list --query [*].[name,id]Once you have the subscription ID, then create a service principal using the Contributor role scoped to your subscription.
$subscriptionId = 'xxxx-xxxxx-xxxxx'
$sp = az ad sp create-for-rbac --role="Contributor" --scopes="/subscriptions/$subscriptionId" -n TerraformTesting | ConvertFrom-Json
The Azure CLI will reach out to Azure and create an Azure AD application with a password as shown below. Since you’re assigning the output shown below to the $sp variable above, you will have the appId and password stored in the variable for later use.

Set Environment Variables
Terraform needs to know four different configuration items to successfully connect to Azure.
- The Azure subscription ID
- The service principal’s Azure AD application ID
- The service principal password
- The Azure AD tenant
One way to provide this information to Terraform is by using environment variables. Since this tutorial is working within a PowerShell console, you can set these environment variables using $env:. Below you will see each of the environment variables Terraform will look for when it tries to connect to Azure.
Since the output of az ad sp create-for-rbac was saved to the $sp variable earlier, you can simply reference the properties instead of copying and pasting them.
$env:ARM_SUBSCRIPTION_ID = $subscriptionId
$env:ARM_CLIENT_ID = $sp.appId
$env:ARM_CLIENT_SECRET = $sp.password
$env:ARM_TENANT_ID = $sp.tenant
Once you’ve defined the environment variables, Terraform is ready to connect to Azure!
Create a Configuration File
All Terraform configurations are created in a single folder typically by a module name. In this tutorial, you’re not creating a module but you’ll follow the same practice.
In your PowerShell console, create a folder called TerraformTesting wherever you’d like then change to that directory.
mkdir TerraformTesting
cd TerraformTesting
Next, create the main.tf configuration file. This is where the configuration to build the Azure VM with Terraform will be stored. This is the configuration file most call the “main” configuration file. It contains provider and resource declarations for all of the infrastructure the configuration will manage.
If you’d like to learn more about the syntax (HCL), Michael Levan and I have a great chapter on Terraform in our No BS Azure and DevOps eBook.
Create a new main.tf file inside of the Terraformtesting directory that looks like below.
## <https://www.terraform.io/docs/providers/azurerm/index.html>
provider "azurerm" {
  version = "=2.5.0"
  features {}
}

## <https://www.terraform.io/docs/providers/azurerm/r/resource_group.html>
resource "azurerm_resource_group" "rg" {
  name     = "TerraformTesting"
  location = "eastus"
}

## <https://www.terraform.io/docs/providers/azurerm/r/availability_set.html>
resource "azurerm_availability_set" "DemoAset" {
  name                = "example-aset"
  location            = azurerm_resource_group.rg.location
  resource_group_name = azurerm_resource_group.rg.name
}

## <https://www.terraform.io/docs/providers/azurerm/r/virtual_network.html>
resource "azurerm_virtual_network" "vnet" {
  name                = "vNet"
  address_space       = ["10.0.0.0/16"]
  location            = azurerm_resource_group.rg.location
  resource_group_name = azurerm_resource_group.rg.name
}

## <https://www.terraform.io/docs/providers/azurerm/r/subnet.html>
resource "azurerm_subnet" "subnet" {
  name                 = "internal"
  resource_group_name  = azurerm_resource_group.rg.name
  virtual_network_name = azurerm_virtual_network.vnet.name
  address_prefix       = "10.0.2.0/24"
}

## <https://www.terraform.io/docs/providers/azurerm/r/network_interface.html>
resource "azurerm_network_interface" "example" {
  name                = "example-nic"
  location            = azurerm_resource_group.rg.location
  resource_group_name = azurerm_resource_group.rg.name

  ip_configuration {
    name                          = "internal"
    subnet_id                     = azurerm_subnet.subnet.id
    private_ip_address_allocation = "Dynamic"
  }
}

## <https://www.terraform.io/docs/providers/azurerm/r/windows_virtual_machine.html>
resource "azurerm_windows_virtual_machine" "example" {
  name                = "example-machine"
  resource_group_name = azurerm_resource_group.rg.name
  location            = azurerm_resource_group.rg.location
  size                = "Standard_F2"
  admin_username      = "adminuser"
  admin_password      = "P@$$w0rd1234!"
  availability_set_id = azurerm_availability_set.DemoAset.id
  network_interface_ids = [
    azurerm_network_interface.example.id,
  ]

  os_disk {
    caching              = "ReadWrite"
    storage_account_type = "Standard_LRS"
  }

  source_image_reference {
    publisher = "MicrosoftWindowsServer"
    offer     = "WindowsServer"
    sku       = "2016-Datacenter"
    version   = "latest"
  }
}
Initialize Terraform
Terraform needs to know what kind of providers you’ll be using once it attempts to create resources. It must know this ahead of time because it downloads these providers in the same folder you’re working in.
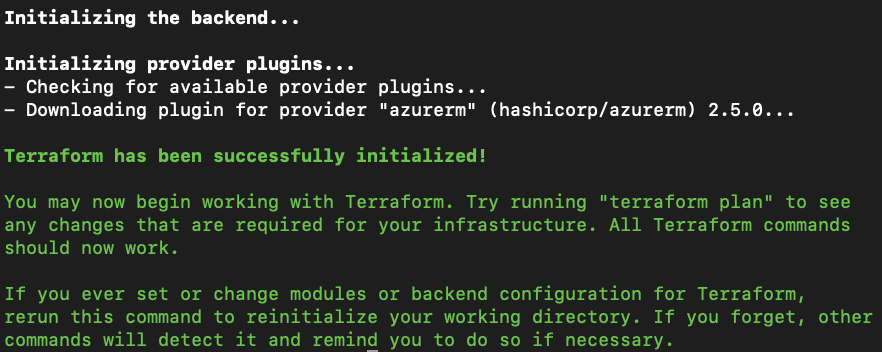
Download the azurerm resource provider as defined in the main configuration file by running terraform init. Once you do, you should then see output similar to below.
Validate the Configuration
The configuration you created may not be perfect. I know, hard to believe, right? Terraform needs to validate the configuration for any syntax errors in the configuration. To do that, run the terraform plan command. This command reads the configuration files in the directory and reports any errors.
Be sure to fix any errors the
terraform plansurfaces before attempting to actually provision infrastructure!
Build the Azure VM with Terraform
Finally, it’s time to actually build the Azure VM by running terraform apply. When you run terraform apply, Terraform reads any configuration files you have in the directory and prompts you for confirmation. Once you type “yes”, it will then reach out to Azure and begin building the VM and all associated resources.
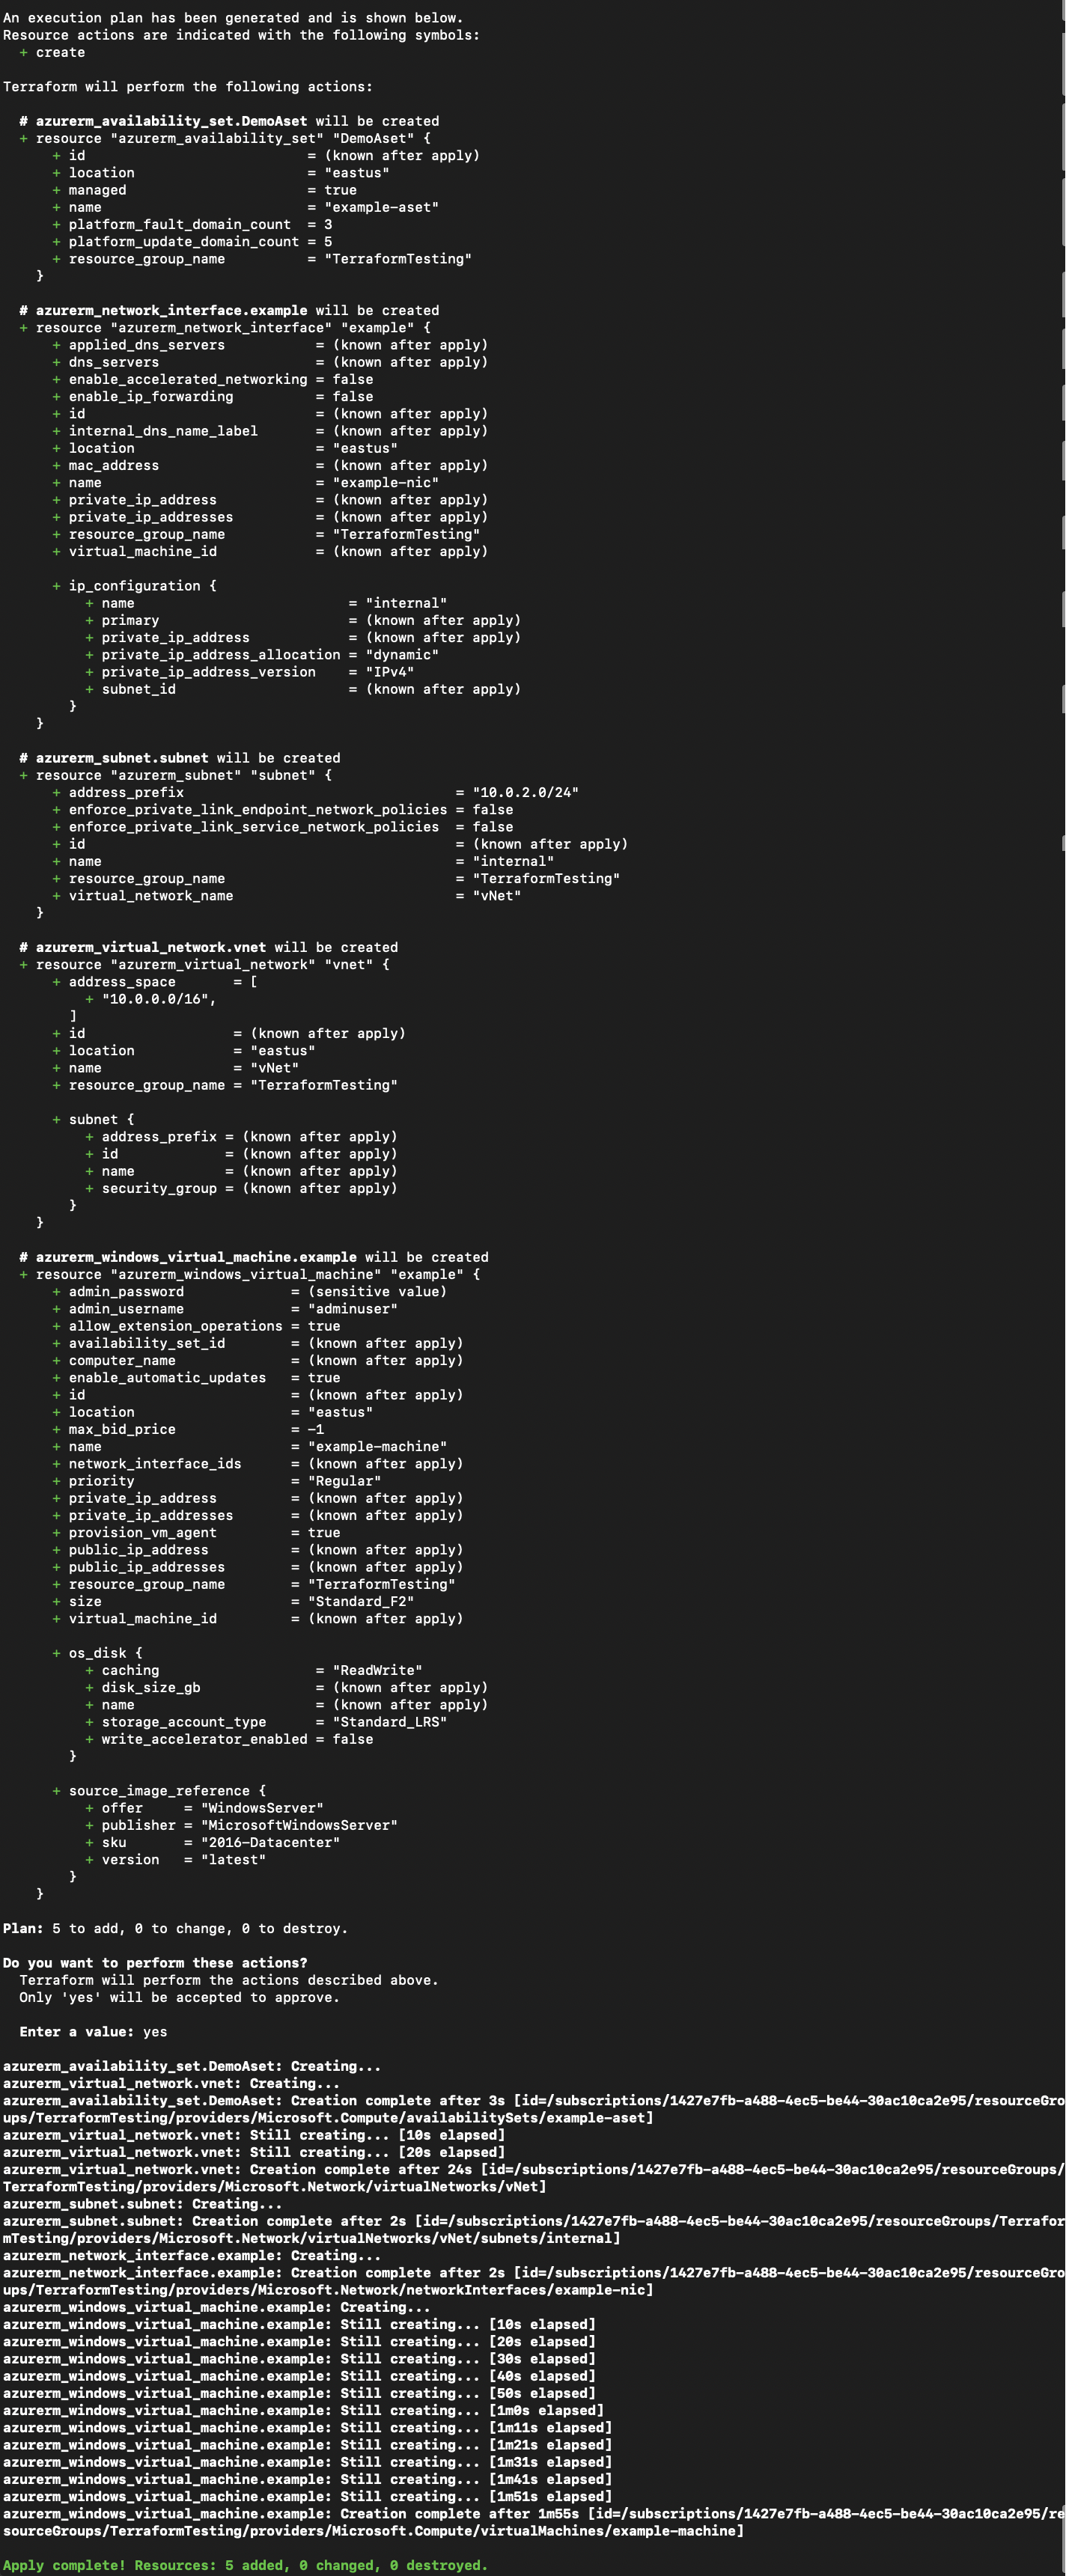
If you see the bright and shiny, green Apply complete! text at the bottom, Terraform has built the resources successfully!
Clean Up
Since this was just a demonstration and you’re probably not planning on keeping this VM around, be sure to do yourself a favor and remove everything you’ve done.
You created a service principal for Terraform to authenticate to Azure. You can remove that with an az ad sp delete command below.
$spId = ((az ad sp list --all | ConvertFrom-Json) | Where-Object { '<http://TerraformTesting>' -in $_.serviceprincipalnames }).objectId
az ad sp delete --id $spId
Next, remove the Azure VM you just created and all other resources in the configuration file using terraform destroy. If you’d like to validate the configuration and test what would happen if you were to run terraform destroy, you can also run terraform plan -destroy.
Conclusion
Terraform is a great and free tool to build infrastructure in many different areas. Learning the syntax of HCL is the hardest part of Terraform but honestly, HCL is an intuitive language. If you’re thinking about using a tool like Terraform or ARM temples, for example, learn Terraform!
Terraform is a popular industry tool now with great community support and plenty of people to help!


