


When you’re struggling to dig information about your PC, you’d naturally turn to third-party software. But does it give you the ideal output you’re expecting? Well, Speccy does more than just display information. Speccy also lets you save time while providing in-depth system information, and it’s ultimately free—how cool is that?
Speccy has more features that you’d want to explore, and in this tutorial, you’d experience them first hand. So eyes on the prize, let’s get it!
Getting to Know Speccy
It’s one of the best tools made by the same team who brought you CCleaner. This tool collects information about your computer and all of its hardware, then lets you comfortably parse and read them in a neatly organized interface.
With Speccy, you’d get both an overview and in-depth information about your PC which can be helpful in many scenarios. For example, with Speccy, you could confirm if the CPU and Storage device temperatures are at fault. Speccy also digs up information to help you decide on which piece of hardware component you’d need to upgrade.
Getting to Know the Interface
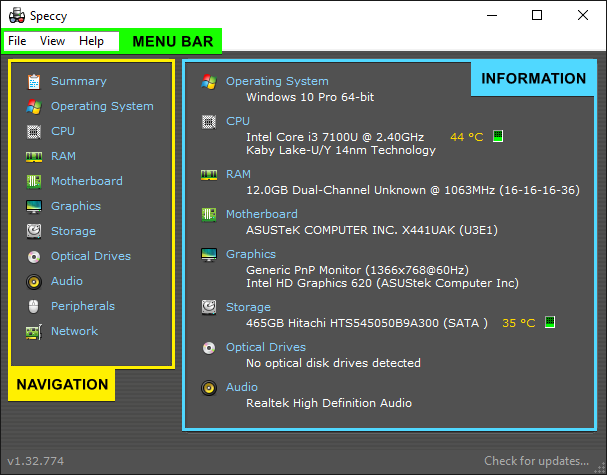
Now that you understand what it does, let’s go over the looks of Speccy. One thing that makes it a great tool is that it has a pretty neat interface.
Speccy’s interface is divided into three parts: the Menu Bar, Navigation Menu, and Information Panel, as shown in the following screenshot.
See below what each part of Speccy contains.
- Menu Bar – Contains additional actions to perform, like creating reports and taking snapshots.
- Navigation Menu – Houses all the categories you’d get detailed information about, such as CPU, Storage, and more.
- Information Panel – A viewing panel to read all the information about the category you selected in the Navigation Menu.
Viewing Detailed System Information
System information is available if you dig into different places in your system, but why would you rely on that tedious process? Instead, Speccy has a neatly organized interface, laying out detailed system information for you all in one place.
Below is an example of accessing system information using Speccy. Also, the example below demonstrates a comparison between manually digging information and letting it get all the information for you.
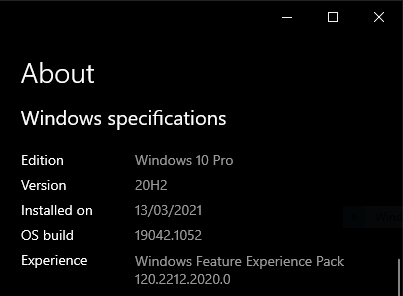
When manually digging information about your Windows OS, for example, you’d find them by navigating to Windows Settings —> System —> About, as shown below. But notice how brief the information you’re getting from the Windows Settings.
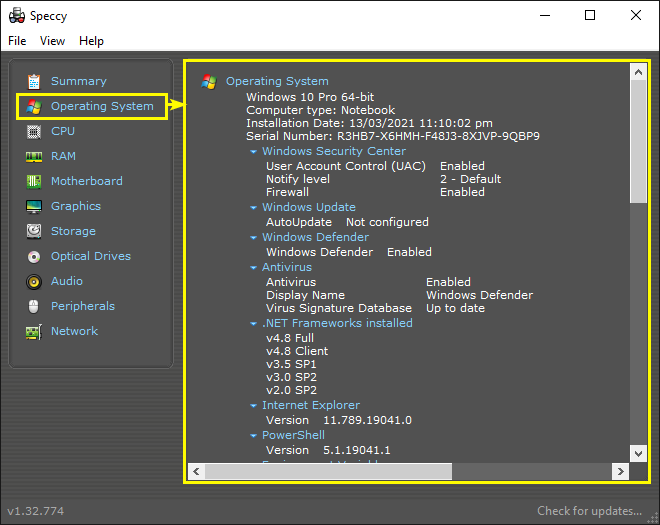
With Speccy, on the other hand, you’d get tons of information related to your Windows OS by clicking the Operating System category in the Navigation Menu.
Finding Specific System Information
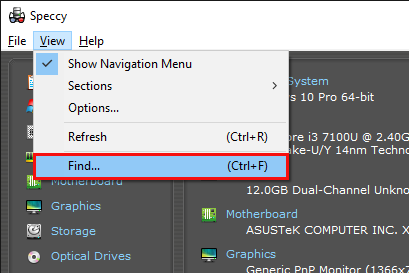
Though Speccy lays out your system information in one place, having an option to target particular information would definitely save time. If you already know what you’re looking for, take advantage of Speccy’s Find feature.
Access Speccy’s Find feature by clicking on the View menu —> Find, or press the Ctrl+F shortcut keys, as shown below.
Find any particular system information by typing in the textbox and press Enter. Then the Information Panel will jump to that particular information, as shown below.
If you haven’t found what you’re looking for, keep hitting Enter to cycle through all the results.

Taking System Information Snapshots
Now, what would you do with all the system information in front of you? If you’re having issues with your system, that’s where taking system information snapshots in Speccy comes in handy. When troubleshooting, for example, you can take a snapshot of your system information instead of writing down the details one by one.
Snapshots include your PC’s current system information, like your CPU, Storage, or RAM. When you take a snapshot, Speccy saves that information into a file that lets you view the saved information in a Speccy window rather than plain text.
A snapshot is also helpful if you plan to make changes on your PC, as it lets you have a complete record of your current system information. Taking a system snapshot could be done in two different methods, Saving Snapshot and Publishing Snapshot. Let’s go over these two methods.
Saving Snapshots
If you prefer carrying a copy of your system information snapshot with you, then the Save Snapshot feature would be your choice. This feature lets you save your system snapshot on your PC or a flash drive.
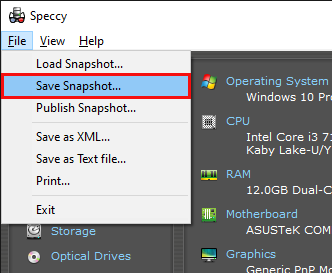
Save a system snapshot by clicking on the File menu —> Save Snapshot, as shown in the screenshot below.
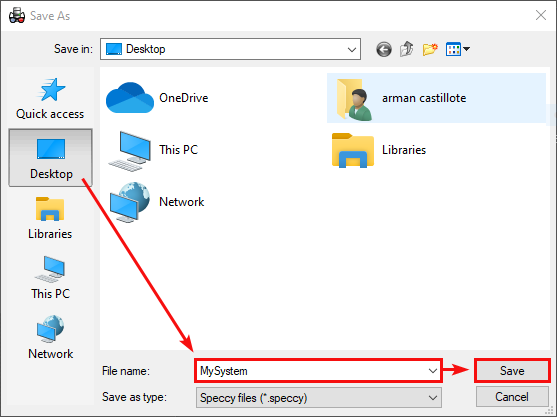
Now choose where to save the snapshot. Give the snapshot a file name, like MySystem, and click Save.
Publishing Snapshots
Publishing a system snapshot is basically uploading your system information on the internet. Unlike saving a snapshot on a storage device, publishing a snapshot is a viable option to access your system information anytime.
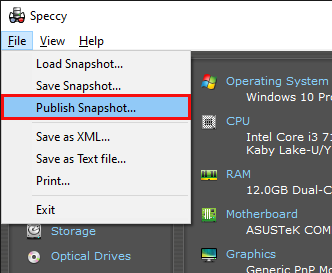
1. Start publishing snapshot by clicking on the File menu —> Publish Snapshot, as shown below.
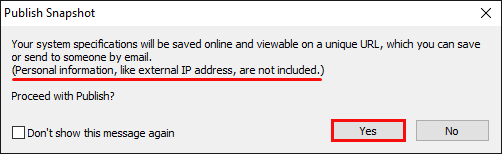
2. Proceed with publishing the snapshot by clicking Yes on the confirmation prompt below.
Note that Speccy doesn’t include personal information like the external IP address in the snapshot when publishing your system information.
3. Now either open the link to a browser by clicking on Open in Browser. Or, copy the link and save it to a notepad by clicking on Copy to Clipboard.
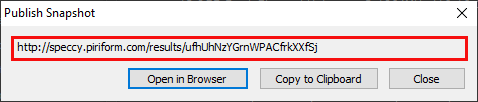
Along with the link to your published snapshot, you can access your published snapshot so long as you have an internet connection and a web browser.
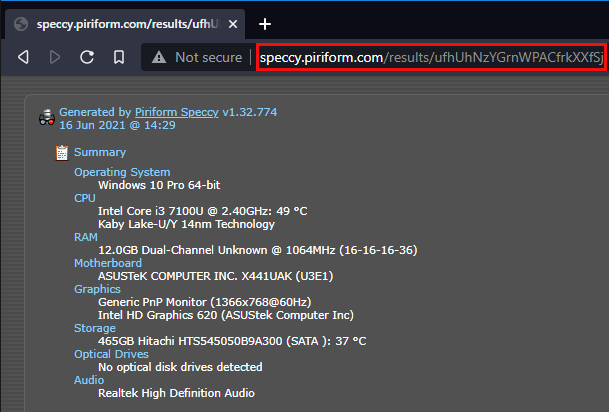
See below how the published snapshot looks when you open it on a web browser—as if you’re still inside Speccy.
Loading System Snapshots
After saving a snapshot, you now have a copy of your full system information. But let’s say you want to load a saved snapshot and compare it with the new one after upgrading your PC. How would you load that saved snapshot to Speccy?
Loading Snapshot in Speccy
When you load a snapshot, Speccy opens a new window that displays all the information extracted from the loaded snapshot.
Load a snapshot by clicking on the File menu —> Load Snapshot, as shown below.
Another way to load a snapshot to Speccy is by locating the snapshot file in the File Explorer, then double-click on it.

Now, look for the snapshot file, select it and click Open.

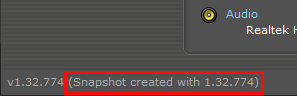
When you open a snapshot with Speccy, you’ll notice in the lower-left corner of the window a message stating (Snapshot created with <speccy version>), as shown below.
Saving System Information Reports
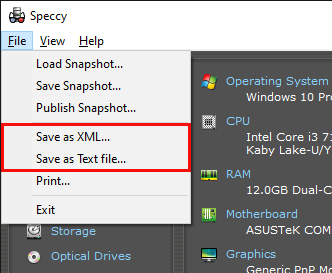
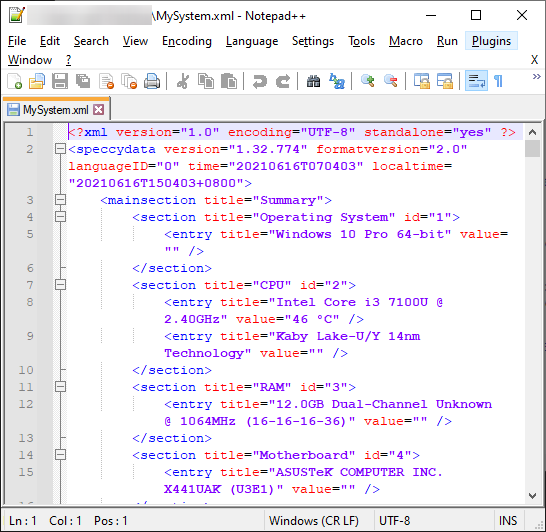
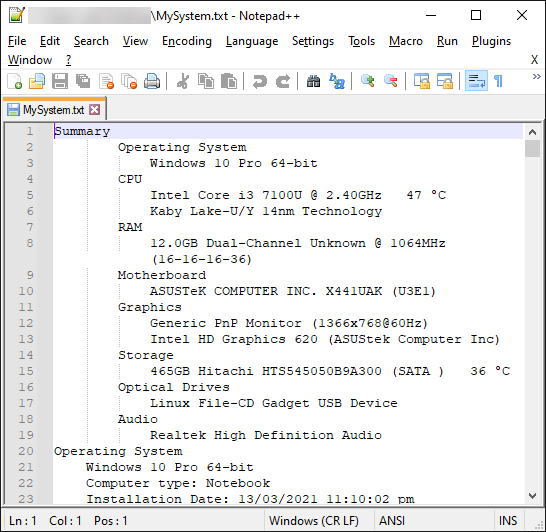
Similar to system snapshots, a system information report contains information, such as your CPU, Storage, RAM, and more. You could save your system information report in a text file or an XML file. A text file contains plain text, while an XML is integrated with applications for storing and transporting data.
Saving reports as a Text file and XML file follow the same process, as shown below. Click on File menu —> Save as XML or Save as Text file.
Speccy also lets you have a printed report of your system information. Print out a copy of your system information by clicking on the File menu —> Print.
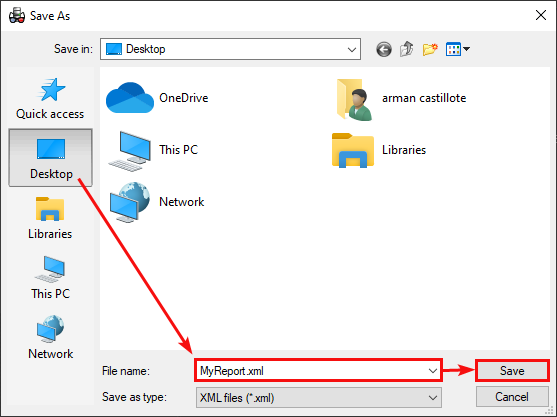
Now choose a location to save the report file, give it a file name and click Save.
Below, you’ll see how a system report looks when opened on a notepad editor.
Changing Interface Language
Imagine being able to view and save information in your mother tongue—that’s awesome! And yes, changing the language applies both to its interface and creating snapshots or reports.
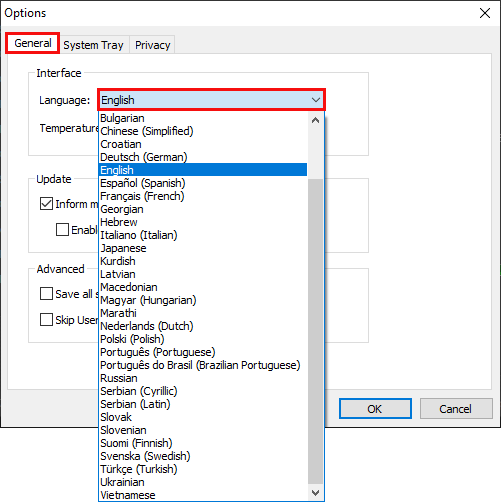
To access the translation features, click on the View menu and click on Options. You’ll see, under the General tab, an interface section, as shown below. Click on the Language dropdown to see the available languages.
Getting Updates
Speccy also supports getting the most recent updates. To update Speccy, you can either do so manually or have Speccy take care of it for you with automatic updates.
Automatic updates are only available in Speccy Pro (more on this product later).
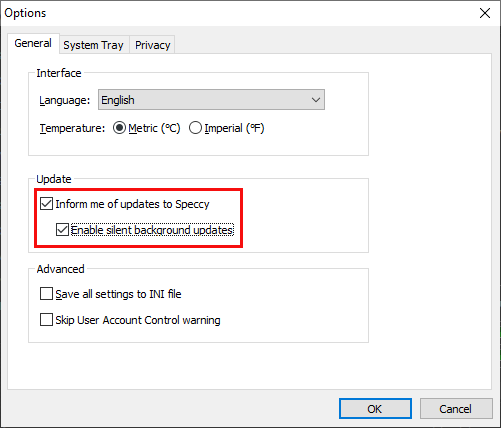
In Speccy Free, open View —> Options. On the General tab, you’ll see an Update section, as shown below. Here you can tell Speccy to inform you of new updates and even run updates silently in the background by checking the Enable silent background updates option.
Speccy Options
In the View —> Options menu, you’ll also find other various settings you can tweak!
Changing Temperature Scales
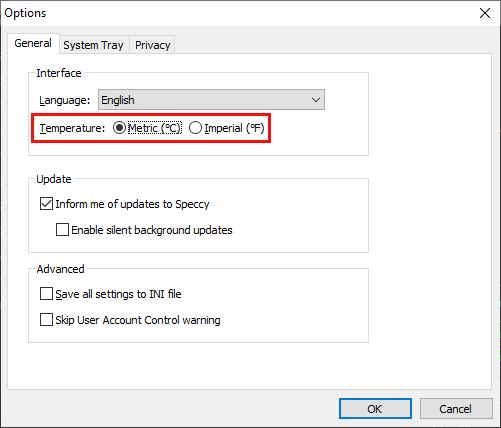
Real-time monitoring of your CPU and storage device’s temperature gives you an insight on when you must pay attention to your hardware’s health. You can view the temperature on two different scales, celsius, and fahrenheit.
Change the temperature scale while you’re in the Options window by selecting either Metric (°C) or Imperial (°F), as shown below.
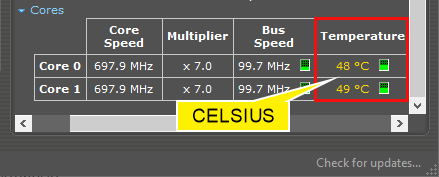
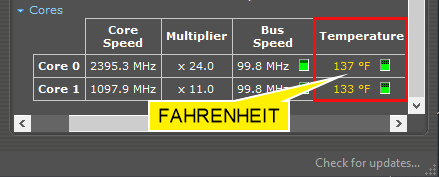
Below you’ll see how the temperature scales indicators are changed.
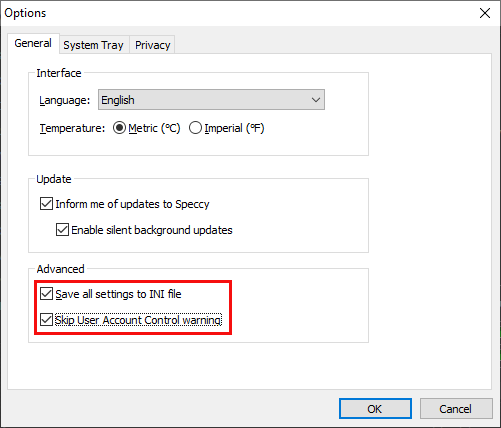
Advanced Settings
Its advanced settings are more of an additional feature, so you can have the same settings if you’d re-install it Or, if you don’t like seeing the User Account Control (UAC) prompt each time you open Speccy.
Save a copy of all your Speecy’s settings to an INI file by enabling the Save all settings to INI file option. Then enable the Skip User Account Control warning option to skip the UAC prompt.
System Tray Settings
Now head over to the System Tray tab inside the Options window for more cool features, as shown below. Speccy’s icon in the system tray is not just for looks; it serves a purpose! For example, the icon constantly shows your CPU and Storage metrics without even opening Speccy’s window.
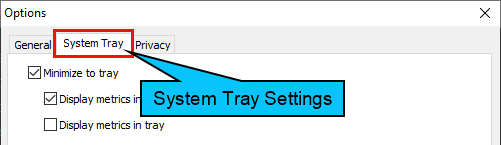
Below is a demonstration of what each of the features in the System Tray settings does:
- Minimize to tray – This feature leaves Speccy active in the System Tray when you minimize it.
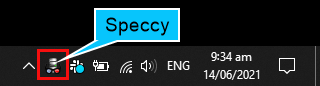
- Display metrics in tray tooltip – Shows the temperature of both your CPU and Storage Device in a tooltip. The tooltip appears when you hover your mouse on Speccy’s icon in the system tray, as shown below.

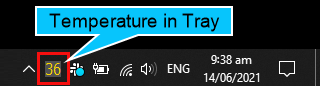
- Display metrics in tray – This feature gives you an option to select an Output, either your CPU’s or the Storage. Then displays the select Output’s temperature in the system tray.
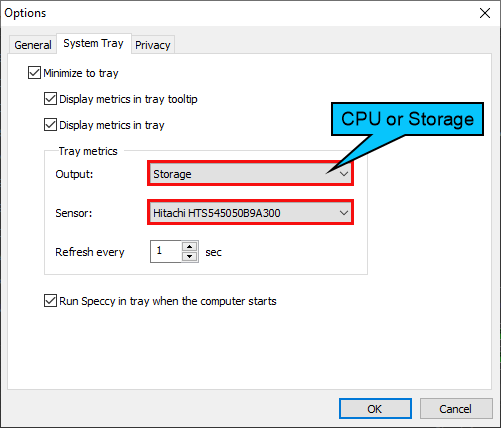
Regardless of the Output you chose, either CPU or Storage, the display would look like the one you see below.
- Run Speccy in tray when the computer starts – This feature adds Speccy to the list of startup apps in your Windows OS so that Speccy would run in the system tray automatically as soon as your computer starts.
Understanding Speccy Free vs Speccy Professional
By now, you already know your way around Speccy Free. But it’s also important to know what else you’d get with Speccy Professional. The usual caveat with free software is that it has restricted features, which are only available for premium users, but that’s not the case with Speccy.
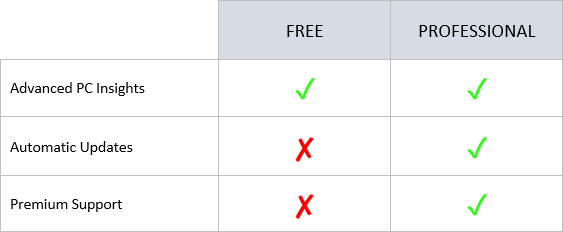
Between free and professional copy, the only difference is that you’d get automatic updates and premium tech support with Speccy Professional.
See the comparison of its Free and Professional versions. At the time of writing, Speccy Professional’s subscription costs $19.95 per year.
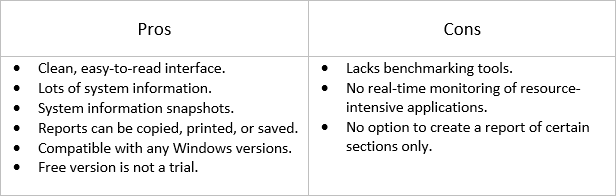
Pros and Cons
To help you decide whether you’d turn to Speccy when digging up system information, see the Pros and Cons below.
Conclusion
This tutorial has walked you through each of Speccy’s features, such as digging system information all in one place, taking snapshots, and creating reports. Speccy can also help with tracking changes on a PC, especially if you’re administering multiple PCs by taking snapshots every certain period.
Now, will you include Speccy the next time you perform a PC maintenance routine?


