


If your organization needs to send transactional emails or promotional messages, don’t use your own mail servers. Instead, look into Amazon Web Services AWS email service called SES.
Not a reader? Watch this related video tutorial!In this article, you will learn how to use Amazon SES to send emails using the Amazon SES console and the SMTP interface. You will also learn the needed preparations before you can start sending emails using Amazon SES.
Prerequisites
There are some requirements that you must have to follow along with the examples and steps in this article.
- You must have an AWS account. If you don’t have this, you can sign up for a new AWS account. All the steps that will be performed in this article will work with the AWS Free Tier subscription.
- If you plan to verify the identity of the whole domain, you need to have access to your DNS host. Verifying a domain requires adding new DNS records to confirm domain ownership.
- If you plan to verify the identity of an email address, you need to have a valid mailbox using that email address. Email address ownership confirmation requires access to the confirmation email from Amazon SES.
Note: A new Amazon SES account starts as “sandboxed.” This means that you can only send and receive emails using the verified domain or email address as sender and recipient. For example, for verified email domains (e.g., contoso.com), you can only use email addresses with @contoso.com as both sender and recipient.
Eventually, you can request to move your Amazon SES out of the sandbox.
- (Optional) An existing mail server or application to integrate with Amazon SES.
Accessing the Amazon SES Console
Assuming that you have just created your AWS account and have logged in for the first time, your brain goes, “Where’s that SES console?”. Given a multitude of services available in AWS, it is easy to get overwhelmed and not find what you’re looking for right away.
Think of the SES console as your email client and email management tool all built in one.
While logged in to the AWS Management Console, the easiest way to find AWS SES to send email is by using the search box. Just type the words “simple email” into the search box and click on the result, as shown in the demonstration below.
Verifying Sender Identity
Before using this AWS email service to send emails, you must verify that you have the authority to use the sender identity that you will use. This process also helps avoid fraud by making sure that only legitimate domains or addresses are allowed to use the service.
There are two ways to verify sender identities. One is by verifying an email domain, another is by verifying an email address. Which one to use depends on your business requirements.
Verifying Domains
If you intend to use any email address under your domain, then verifying a domain is a must. When a domain is verified in SES, you can use any address as a sender as long as the domain part is your verified domain.
For example, if your verified domain is contoso.com, the addresses [email protected] and [email protected] are eligible to use as sender addresses.
To verify an email domain, under the Identity Management section, click on Domains. Next, click on Verify a New Domain.
In the Verify a New Domain pop-up box, enter the name of the domain you wish to verify. Then, click on Verify This Domain.
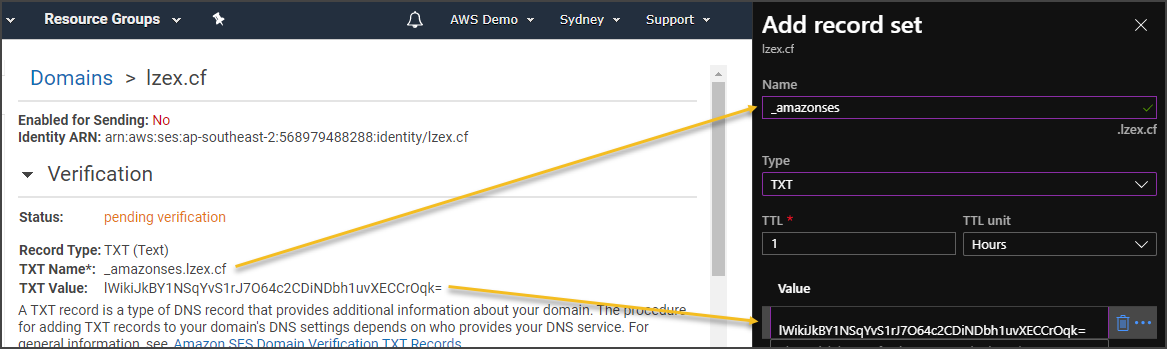
As you can see from the demonstration above, after adding a new domain to verify, a TXT record is created. You need to copy the TXT record and create it in your DNS host.
In the example below, a new TXT record is added for the domain lzex.cf using the values provided by Amazon SES. Note that your DNS management interface may be different from the example you see below.
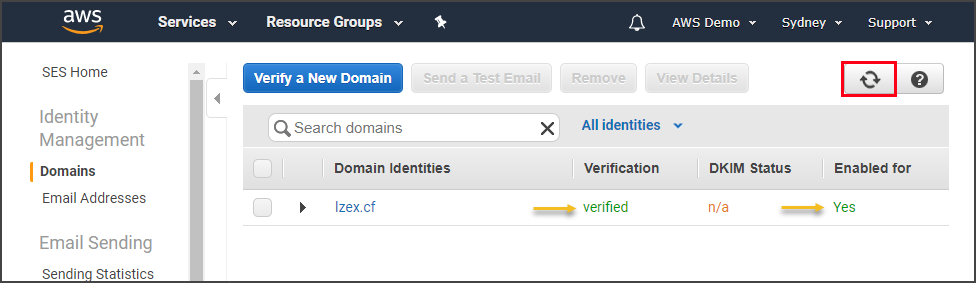
Once you’ve created the TXT record in your DNS host, go back to the Verify a New Domain page in Amazon SES. Check if the domain has been verified. If not yet verified, click on the refresh button.
If the correct TXT record is found, the domain status will change to verified. Refer to the screenshot below showing the that domain has been verified and enabled.
You’re one step closer to using AWS SES to send email!
Verifying Email Addresses
To confirm the identity of individual email addresses and enable them as senders, follow these steps.
Under the Identity Management section and click on Email Addresses. Next, click on Verify a New Email Address. Type in the email address you wish to verify into the Email Address box and click on Verify This Email Address.
As you can see at the end of the demonstration above, the new email address verification status is set to pending verification. The next step is to access the mailbox and confirm the email address using the link in the confirmation email sent by SES.
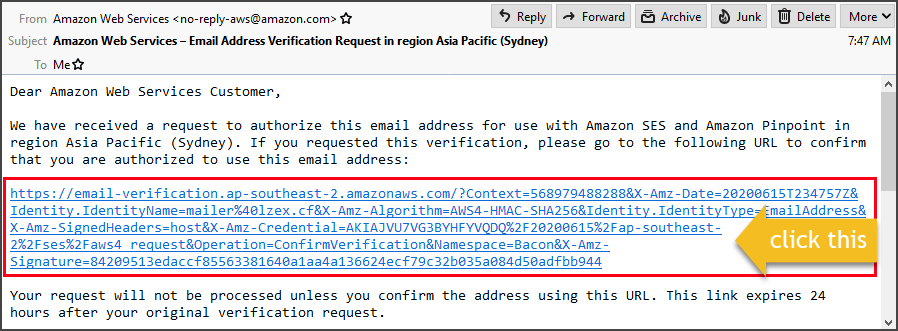
The screenshot below shows the verification email that was sent by AWS. To continue the verification, click the link in the message.
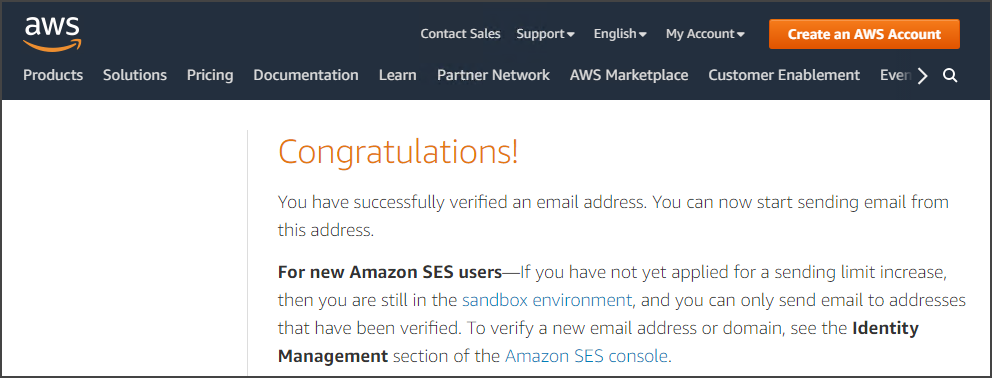
The link should automatically open in your web browser. If the verification is successful, you should get a message that is similar to the one shown below.
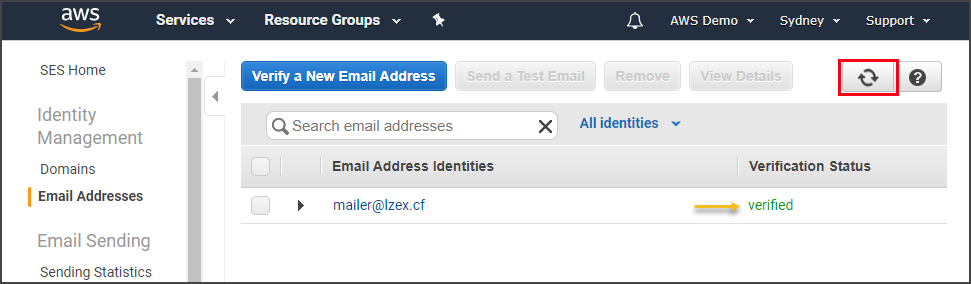
Go back to the Amazon SES console. Click on the refresh button in the Email Addresses page to retrieve the status of the email address verification. The verification status is now changed to verified.
Using AWS SES to Send an Email using the Console
Perhaps the easiest way to send an email using this AWS email service is doing it from the console. However, using the console requires you to manually input information to send one email at a time. This method of usage makes the Amazon SES console suitable only for sending test emails.
There are two email format options available when using this method. These two email options are formatted and raw.
To access the send email interface in the Amazon SES console, you can:
- If you will send an email using any address from your verified domain, go to Domains.
- If you will send an email using an individually verified email address, go to Email Addresses.
Sending a Formatted Email
Sending a formatted email is the simplest option when using the console to send an email. With this option selected, you only need to input your message body, and Amazon SES automatically converts your content into a generic email format.
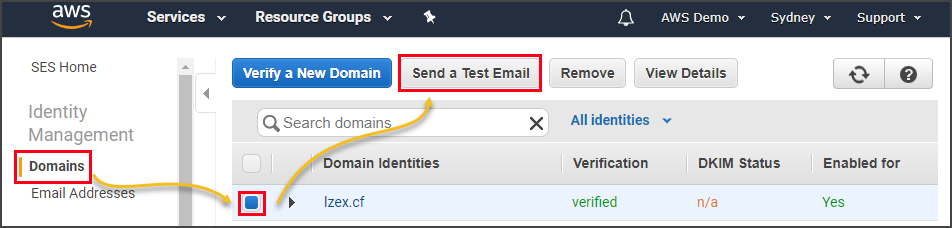
To send a formatted email, go to Domains or Email Addresses depending on your preferred sender address. Then, select the domain or email address from the list and click on the Send a Test Email button.
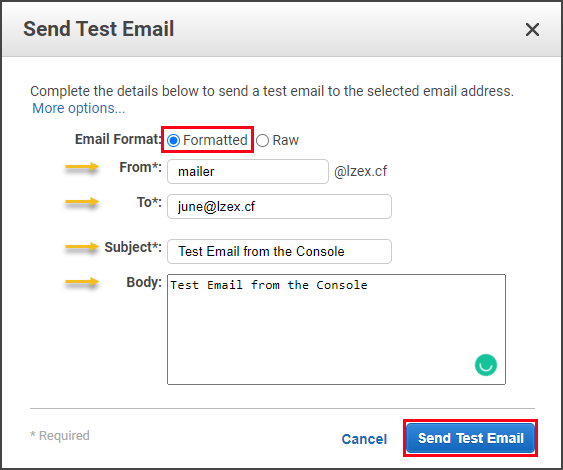
In the Send Test Email pop-up, make sure to select Formatted as the Email Format. Then, enter the required details such as the From, To, and Subject. Lastly, enter your message in the Body and click on the Send Test Email button when you’re done.
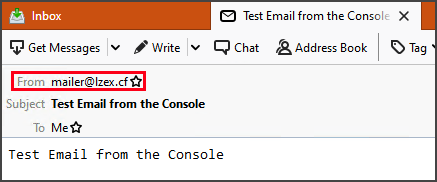
And if all goes well, the test email should be delivered to the destination mailbox. The screenshot below shows that the message was received.
Sending a Raw Email
The option to send a raw email allows you to craft a more complex message formatting. This means that you can use HTML formatting so you can design your message using HTML code.
For example, the HTML code below can be used as the message body.
Subject: Amazon SES Raw Email Test
MIME-Version: 1.0
Content-Type: text/HTML
<!DOCTYPE html>
<html>
<head>
<style>
body {background-color: powderblue;}
h1 {color: blue;}
p {color: red;}
</style>
</head>
<body>
<h1>This is a heading</h1>
<p>This is a paragraph.</p>
</body>
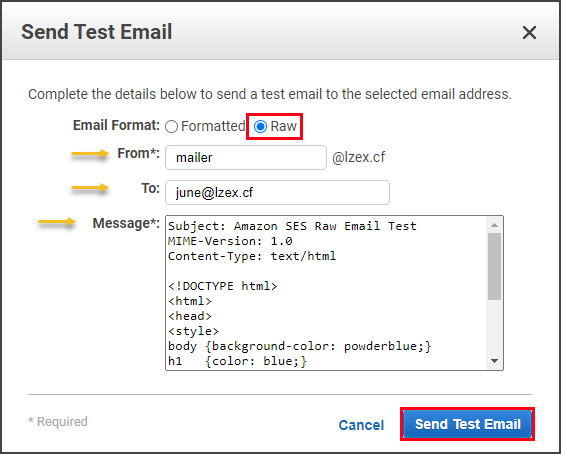
</html>To send the raw email, go back to the Send Test Email interface again in the Amazon SES console. This time, select Raw as the Email Format. Enter the From and To addresses. Then, copy the code above and paste it into the Message box and click on the Send Test Email button.
When the message is received, the email would be displayed with HTML formatting.
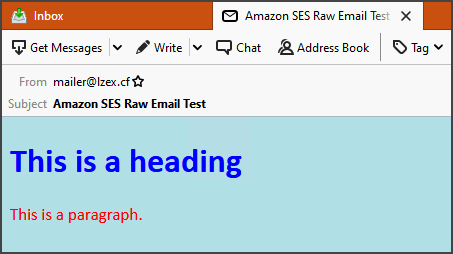
As you can see from the email screenshot above, the email is rendered as an HTML formatted message.
Sending an Email using the SMTP Interface
This AWS email service (SES) has SMTP endpoints listen to the ports 25, 587, and 2587 for STARTTLS. As well as to ports 465 and 2465 for TLS Wrapper (SMTPS)
AWS SES can send emails manually or programmatically – which means you can integrate your automation and background email sending processes with Amazon SES.
Before you can use the Amazon SES SMTP endpoint, you must obtain two things. The SMTP credential and SMTP endpoint address.
Getting the SMTP Endpoint Interface Details
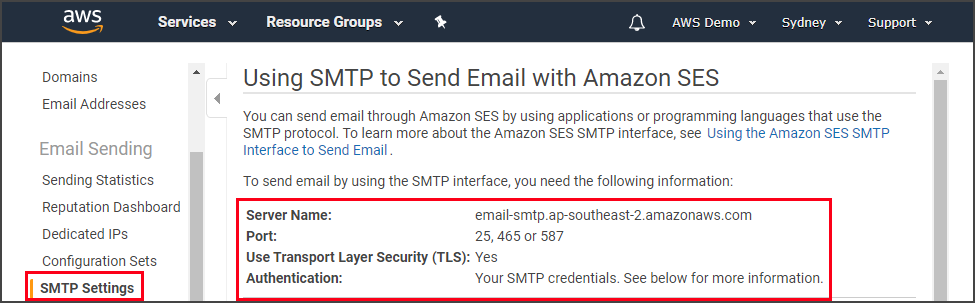
To find the appropriate SMTP endpoint information for your account, go to SMTP Settings in the Amazon SES console. You should be able to find the relevant SMTP interface information, such as the Server Name and Port.
Creating an SMTP Credential
The SMTP credential is not the same as your AWS credential. To obtain the SMTP credentials, click on the Create My SMTP Credentials button. Next, you can either enter the name you want to assign to the credential or accept the default name and click Create.
In the demonstration below, a new SMTP credential with the name SMTP1 is created.
Once the SMTP credential is created, make sure to copy and save the SMTP username and password.
Sending an Email Through Amazon SES SMTP using PowerShell
Now that you’ve created the SMTP credential and have the SMTP details, you can use them to send an email through this AWS email service.
In this example, the email will be sent using the Send-MailMessage PowerShell cmdlet. Use the code below.
Make sure to use your SMTP credentials in the $smtpUserName and $smtpPassword variables. Also, update the email parameters like the smtpServer, Port, From, and To.
# Define username and password
$smtpUserName = '****SMTP USER NAME HERE****'
$smtpPassword = ConvertTo-SecureString '****SMTP PASSWORD HERE****' -AsPlainText -Force

# Convert to SecureString
[pscredential]$credential = New-Object System.Management.Automation.PSCredential ($smtpUserName, $smtpPassword)

# Send Email - change the values if needed.
Send-MailMessage -Credential $credential `
-useSSL `
-smtpServer 'email-smtp.ap-southeast-2.amazonaws.com' `
-port 587 `
-from '[email protected]' `
-to '[email protected]' `
-subject `
'Email via Amazon SES SMTP Endpoint' `
-body 'Email via Amazon SES SMTP Endpoint'
Once you’ve modified the code above, copy the entire code and paste it in PowerShell to run it. Refer to the demonstration below that shows the message being sent using PowerShell and received by the destination address.
Integrating with Your Existing Email Server or Application
Aside from using email service in AWS Amazon SES SMTP endpoint for sending emails programmatically, you can also integrate it with your mail server or email sending application.
In the example below, a mail server (hMailServer) is configured to send outbound messages using the Amazon SES SMTP endpoint as its smart host.
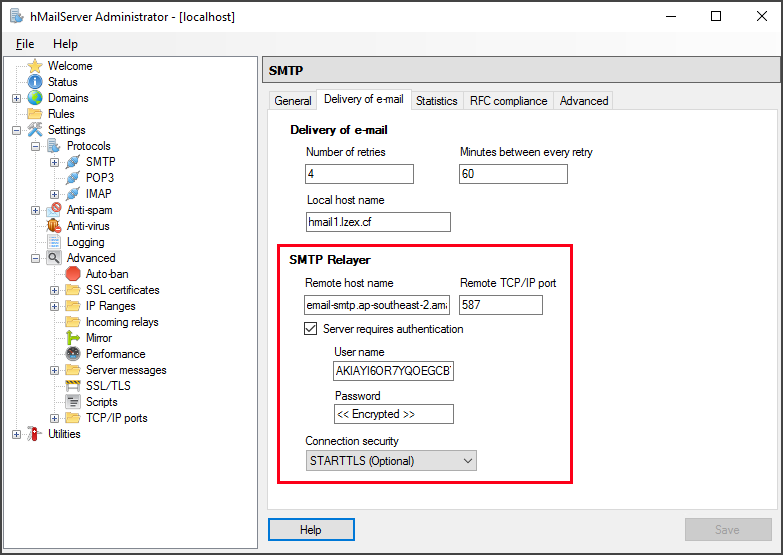
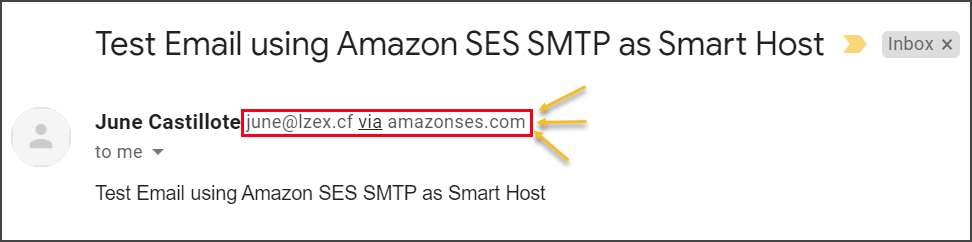
After setting the SMTP relayer settings, as shown in the above screenshot, the mail server now routes all outbound messages through Amazon SES. In the example below, a test message was sent to an external recipient (gmail.com) and was received.
Conclusion
Amazon Simple Email Service is indeed a ‘simple’ email service to configure, use, and get used to. Using Amazon SES instead of building your own email infrastructure can really save you from hardware, maintenance, and management cost.
In this article, you’ve learned how to prepare your domain or email address for use with Amazon SES. You’ve learned how to send formatted and raw emails using the Amazon SES console.
You’ve also learned how to use the Amazon SES SMTP interface to send messages programmatically and as an SMTP outbound smart host for your existing email servers and applications.
There are other ways of sending emails through Amazon SES that you can learn, like, using the API and SDK. However, those are for advanced usage scenarios and would be best suited for development purposes.


