

Having to type and click stuff over and over to get a job done is not fun. Take website monitoring and testing, for example. You do many repetitive actions like clicking on buttons and links, login, run a search, and click some more. Good thing there’s Selenium and PowerShell.
Selenium is a free and open-source framework for automating web browser testing. And since Selenium is portable and it supports multiple languages that make it available to use with PowerShell.
In this article, you will learn how to get started using the incredible combination of these two excellent tools, Selenium and PowerShell, to automate web-related tasks on web browsers. You’ll learn how to programmatically perform actions such as navigating, logging, searching, clicking, and sending input.
By the end of this article, you will have created a PowerShell script that does the following:
- Launch an instance of Google Chrome.
- Navigate to PowerShell.org.
- Enter the username + password. (Login)
- Perform an article search.
- Click the second article in the result.
If you’re still interested, then get ready to learn and keep on reading.
Prerequisites
Before going any further, you need to meet some requirements to follow along with the examples.
- You need a computer that is running on at least Windows 10.
- Your computer must have Windows PowerShell 5.1 or PowerShell 7.0.3 installed.
- You must have a code editor installed on your computer. In this article, you will see Visual Studio Code is used. Feel free to use the code editor you’re comfortable with.
- Your computer must have the Google Chrome browser installed.
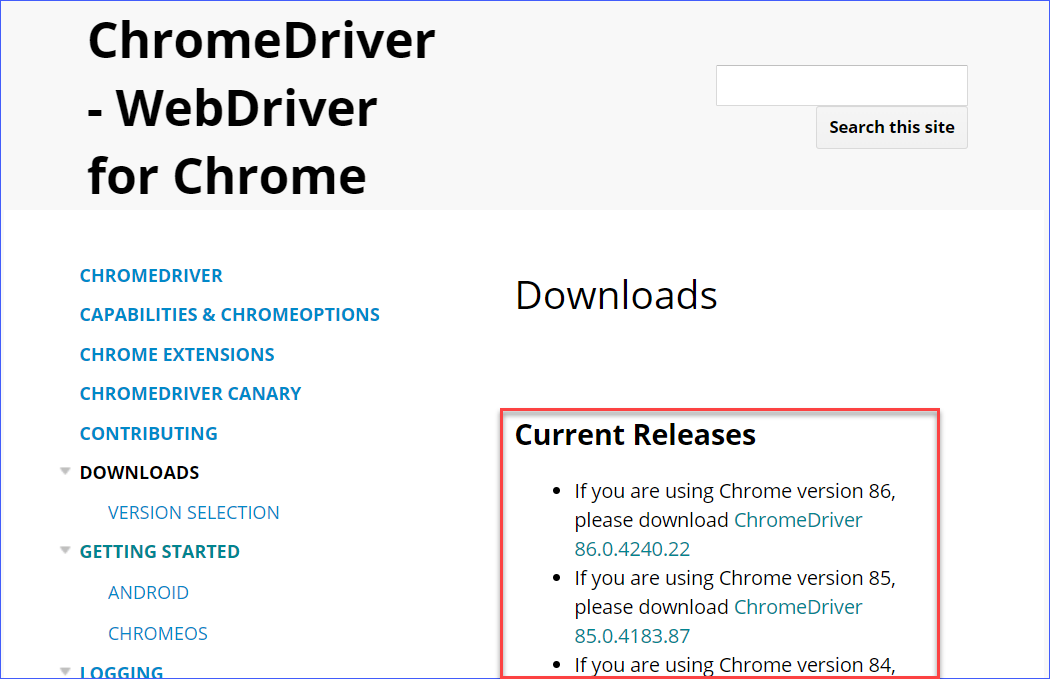
- The version of ChromeDriver appropriate to your Google Chrome version.
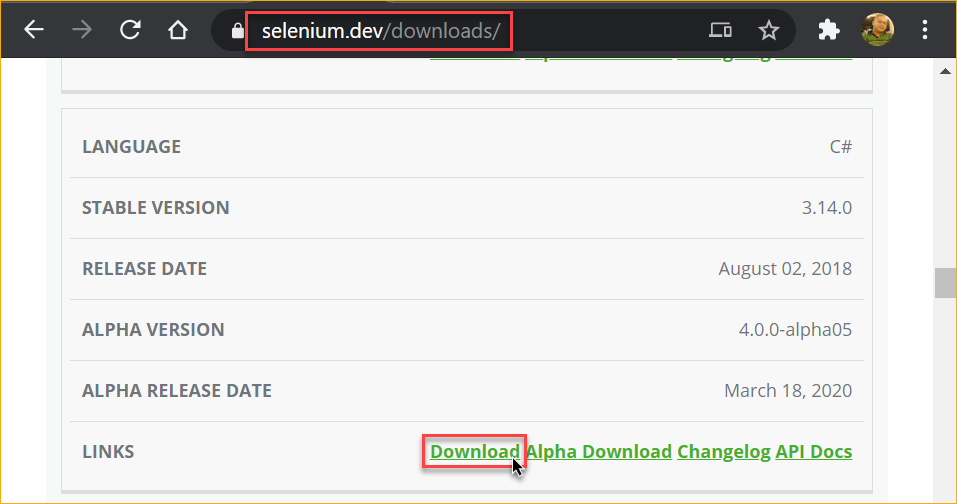
- The latest stable version of Selenium Web Driver. At the time of this writing, the latest version is 3.14.0. Go to the downloads page and download the web driver for C#.
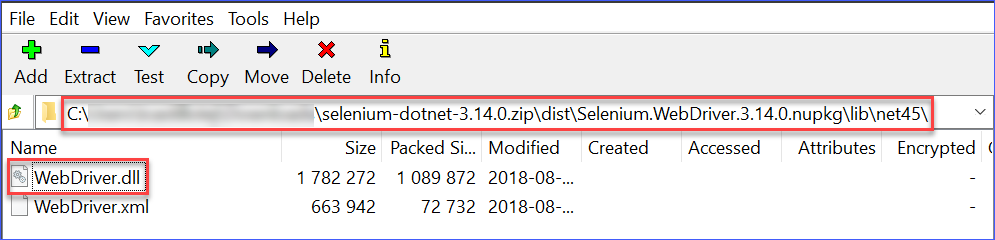
Note that once you’ve downloaded the Selenium WebDriver zip file, you will look specifically for the WebDriver.dll file.
- Create a working directory for your script, such as c:\selenium.
- Make sure to extract the file chromedriver.exe and WebDriver.dll to your working directory.
- Create a new PowerShell script file with the name run.ps1 in your working directory. The image below shows the files you should have in your working directory.

Making Selenium and PowerShell Work
Two things are needed for Selenium and PowerShell to work;
- The WebDriver.dll must be imported to the PowerShell session.
- ChromeDriver.exe can be called from a system path or user path.
In this section, you’ll learn how to make sure that those conditions are met.
Adding the ChromeDriver Location in the User Path
According to the ChromeDriver official documentation, the ChromeDriver.exe location must be in the Path environment variable for it to work. You can use either the system or user Path environment variables for the Selenium WebDriver to recognize the location.
The command below will add the folder location c:\selenium to the current PowerShell session’s user path.
# Your working directory
$workingPath = 'C:\selenium'

# Add the working directory to the environment path.
# This is required for the ChromeDriver to work.
if (($env:Path -split ';') -notcontains $workingPath) {
    $env:Path += ";$workingPath"
}
After running the above command in your PowerShell session, confirm that the c:\selenium location was added to the environment path by running this command below.
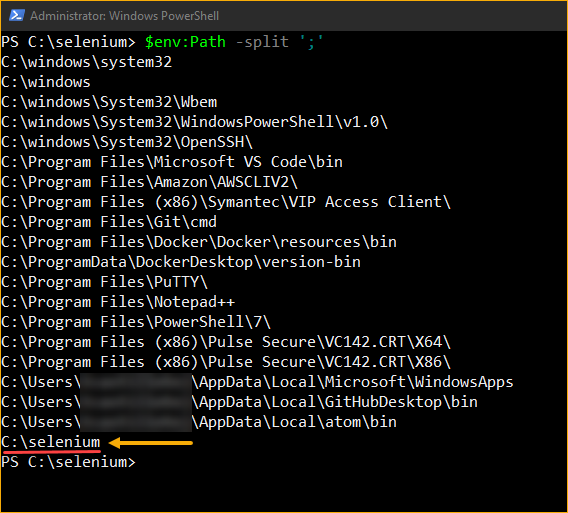
# Check the Path environment variable
$env:Path -split ';'
The image below shows that the c:\selenium location is now present in the environment path.
Importing the Selenium to PowerShell
Next, to import the WebDriver.dll (class) into the current PowerShell session, you can use any of the commands below. Note that you only need to choose one. The first command should be all you need, but use whichever one you like best. The result will be the same.
# OPTION 1: Import Selenium to PowerShell using the Add-Type cmdlet.
Add-Type -Path "$($workingPath)\WebDriver.dll"

# OPTION 2: Import Selenium to PowerShell using the Import-Module cmdlet.
Import-Module "$($workingPath)\WebDriver.dll"

# OPTION 3: Import Selenium to PowerShell using the .NET assembly class.
[System.Reflection.Assembly]::LoadFrom("$($workingPath)\WebDriver.dll")
Creating a New Browser Instance
Now that you’ve imported the Selenium WebDriver in your PowerShell session, you can now create a new instance of the ChromeDriver. Then, use that instance to launch the browser and navigate to a URL.
The command below creates the new ChromeDriver instance if the form of the $ChromeDriver variable.
# Create a new ChromeDriver Object instance.
$ChromeDriver = New-Object OpenQA.Selenium.Chrome.ChromeDriver
Next, the command below will launch a browser window and navigate to the specified URL.
# Launch a browser and go to URL
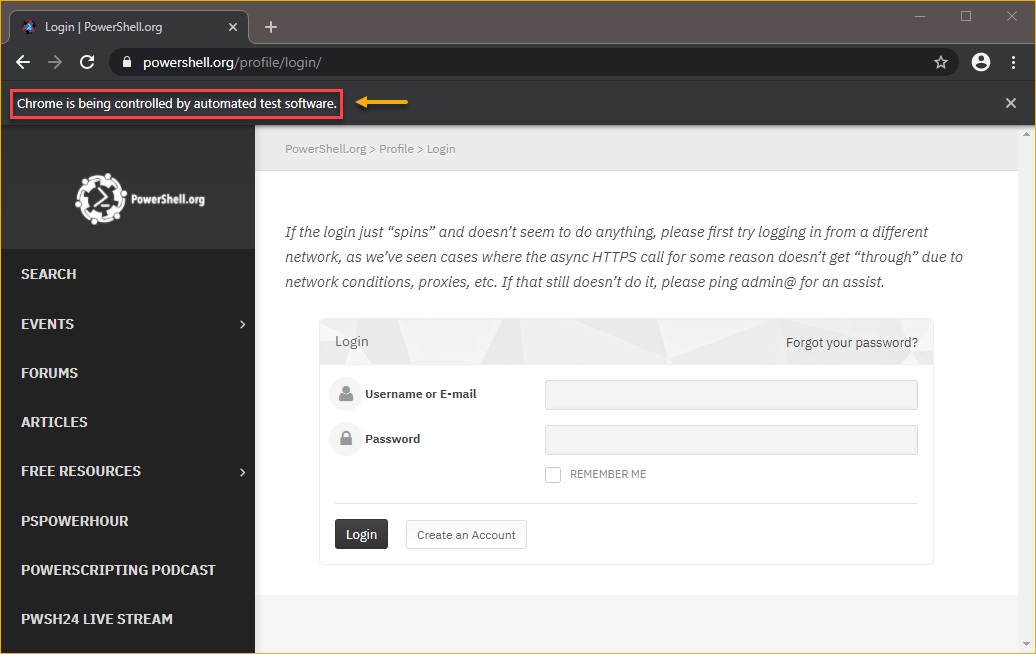
$ChromeDriver.Navigate().GoToURL('<https://powershell.org/profile/login/>')After running the code above in your PowerShell session, a new browser window launches and automatically loads the URL.
As you can see from the screenshot below, a notification text below the address bar says, “Chrome is being controlled by automated test software,” which means that this browser instance was created by the web driver.
Inspecting Elements on a Page
An element refers to, well, basically everything on the loaded web page. These elements can be buttons, input boxes, and links. Before you can interact programmatically with any element, you first need to locate that element.
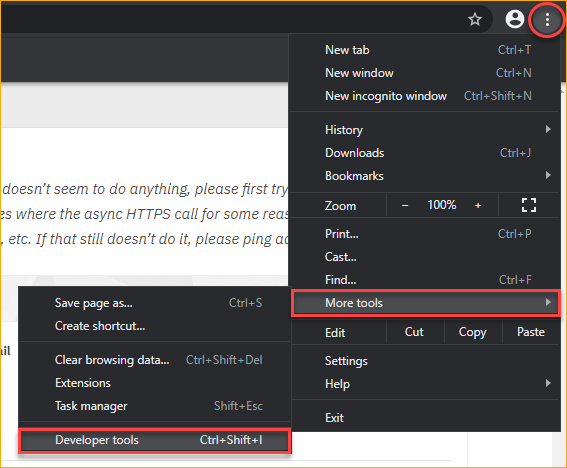
Modern browsers, such as Chrome, includes a built-in developer tool. This developer tool can be used to inspect the elements on the page and get the properties you need for the element.
For example, the web page shows a login form with a username, password, and login button. To inspect these elements, press CTRL+SHIFT+I on your keyboard to display the dev tool pane on the right. Alternatively, click on the menu button on the top right, click More tools —> Developer Tools.
Once the developer tool pane is shown, right-click on the element you wish to inspect. In this example, right-click on the input box for the username and click on Inspect.
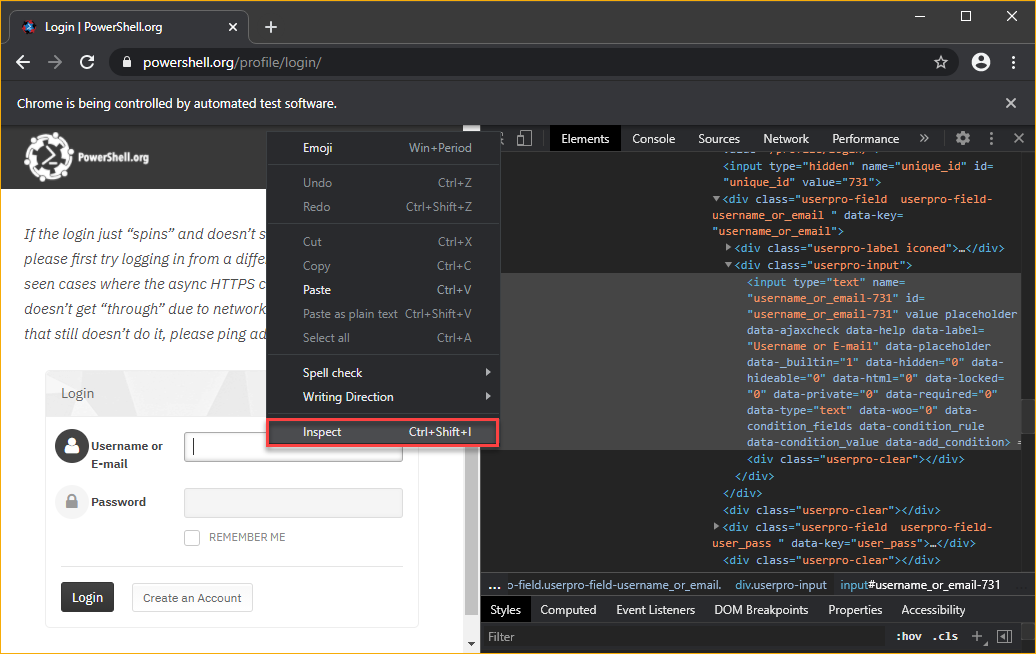
Then, right-click on the highlighted element code and click on Copy —> Copy XPath.
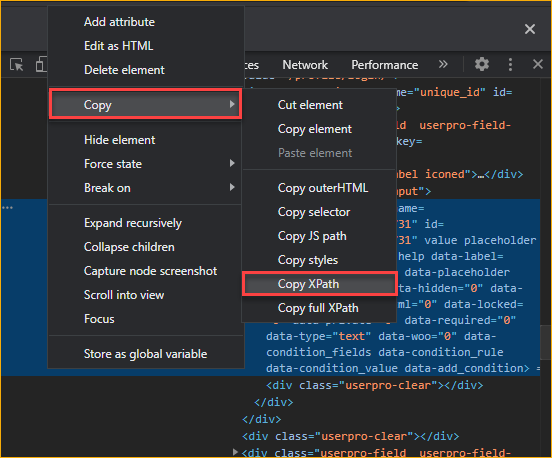
Now that you’ve copied the XPath value make sure to keep it in a record. Then, repeat the same process and copy the XPath of the Password box and Login button. You should have a record of the XPath of the three elements, similar to the one below.
# Username Box XPath: //*[@id="username_or_email-731"]
# Password Box XPath: //*[@id="user_pass-731"]
# Login Button XPath: //*[@id="post-115080"]/div/div/div/div[2]/form/div[7]/input
Locating the Target Elements by XPath, Sending Keys, and Clicks
Now that you have the XPath of the Username box, Password box, and Login button, use the code below to issue each element’s commands. Make sure to change the XPath values inside the FindElementByXPath(). Also, change the SendKeys() value of the first two code lines with your username and password, respectively.
# Enter the username in the Username box
$ChromeDriver.FindElementByXPath('//*[@id="username_or_email-731"]').SendKeys('YOUR USERNAME HERE')

# Enter the password in the Password box
$ChromeDriver.FindElementByXPath('//*[@id="user_pass-731"]').SendKeys('YOUR PASSWORD HERE')

# Click on the Login button
$ChromeDriver.FindElementByXPath('//*[@id="post-115080"]/div/div/div/div[2]/form/div[7]/input').Click()
After you’ve substituted your XPath, username, and password values to the code, run them in PowerShell one line at a time. As you can see from the demo below, the code programmatically entered the username and password and clicked on the Login button.

Next, get the XPath of the SEARCH menu on the left side.
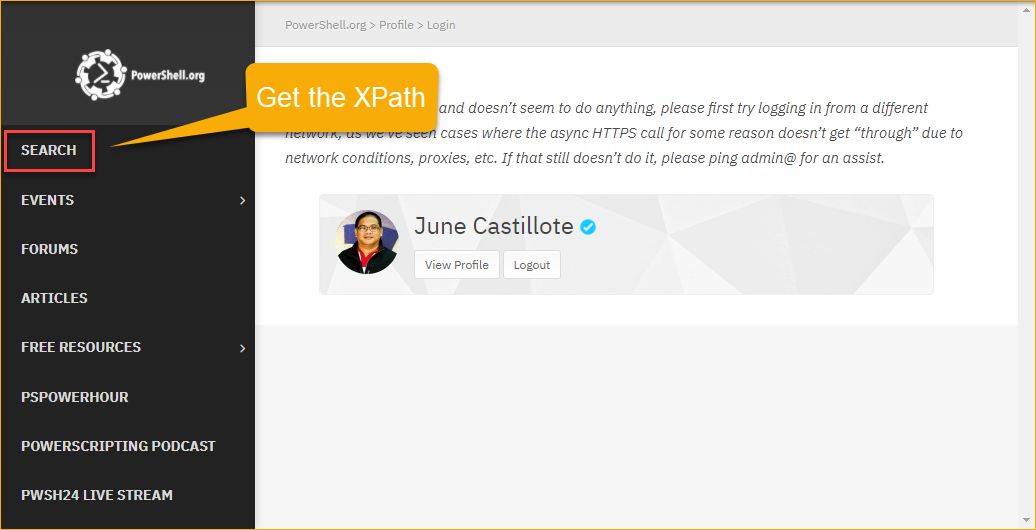
After getting the XPath, substitute the FindElementByXPath() value in the code below. Then, run the code in PowerShell.
# Click on the SEARCH menu item
$ChromeDriver.FindElementByXPath('//*[@id="menu-item-194315"]/a/span').Click()
The demo below shows that the SEARCH menu link is clicked using the Selenium PowerShell command.

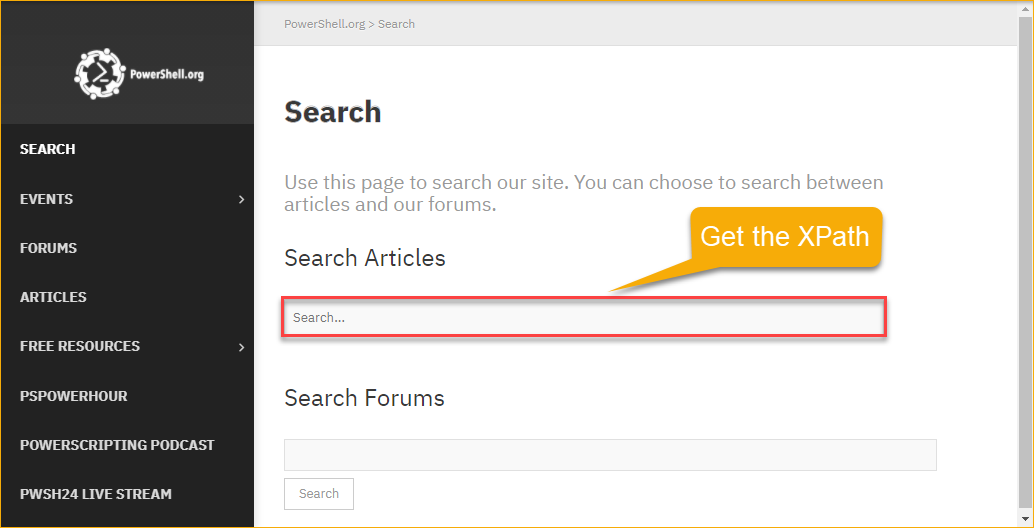
Submitting Input Data
Now that you are on the Search page, the next step is to perform an article search by submitting a keyword search. But first, you need to get the XPath of the Search… box.
When you have the XPath of the search box, using the code below to enter the keyword “SharePoint” in the box and submit the search. Make sure to substitute the FindElementByXPath()value.
# Enter the keyword to search
$ChromeDriver.FindElementByXPath('//*[@id="s"]').SendKeys('Sharepoint')

# Submit the search
$ChromeDriver.FindElementByXPath('//*[@id="s"]').Submit()
Run the commands above in PowerShell, and the search should be performed, similar to the demonstration below.

Locating the Target Elements by Tag and Sending Clicks
In the previous section, the search was submitted, and the results were returned. The next step is to run a code to click the second search result. Since you are now dynamically selecting an element based on the order by which the search results are displayed, using the XPath is not applicable.
One of the applicable techniques is to locate an element is by using its TagName. In the example below, you can see that the tag name is article. Since there’s more than one search result, there will be more than one element with the article tag name.
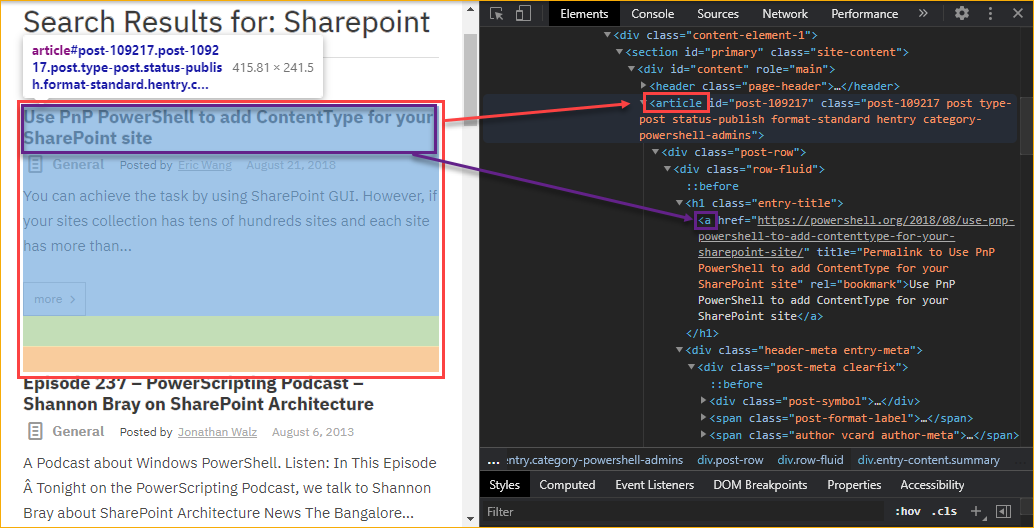
Inside the article, what you should be looking for is the hyperlink. Hyperlinks are using the tagname a. There’s possibly more that one hyperlink or a tagname under an article. In the example above, the hyperlink for the article is the first a tagname.
If you want to open the second search result by click on the first hyperlink in that search result, you’ll need to use an index to identify which links to click.
The code below performs the following:
- Locate the second element using the tag name ‘article’. Index = [1]
- Locate the first element using the tag name ‘a‘ under the ‘article’. Index = [0]
- Click on the link to load the article.
Note: The index is zero-based. This means that the index [0] is the first and the index [1] is the second, etc.
# Find the second search result and click the link
$ChromeDriver.FindElementsByTagName('article')[1].FindElementsByTagName('a')[0].Click()
When you run the code in PowerShell, below is the demonstration of the expected result.

Cleaning Up
After your automation has done its job, it is vital to perform a cleanup Selenium, which includes deleting temporary files and killing the browser processes. You do not need to perform the clean up manually. All you need to do is to run these lines below. Note that this step is not required but recommended.
$ChromeDriver.Close()
$ChromeDriver.Quit()
Putting Together Your Code
Based on all the steps and tests you’ve done, below is the resulting code that you can save in your run.ps1 script.
# Your working directory
$workingPath = 'C:\selenium'

# Add the working directory to the environment path.
# This is required for the ChromeDriver to work.
if (($env:Path -split ';') -notcontains $workingPath) {
    $env:Path += ";$workingPath"
}

# OPTION 1: Import Selenium to PowerShell using the Add-Type cmdlet.
Add-Type -Path "$($workingPath)\WebDriver.dll"

# Create a new ChromeDriver Object instance.
$ChromeDriver = New-Object OpenQA.Selenium.Chrome.ChromeDriver

# Launch a browser and go to URL
$ChromeDriver.Navigate().GoToURL('<https://powershell.org/profile/login/>')

# Enter the username in the Username box
$ChromeDriver.FindElementByXPath('//*[@id="username_or_email-731"]').SendKeys('YOUR USERNAME HERE')

# Enter the password in the Password box
$ChromeDriver.FindElementByXPath('//*[@id="user_pass-731"]').SendKeys('YOUR PASSWORD HERE')

# Click on the Login button
$ChromeDriver.FindElementByXPath('//*[@id="post-115080"]/div/div/div/div[2]/form/div[7]/input').Click()

# Click on the SEARCH menu item
$ChromeDriver.FindElementByXPath('//*[@id="menu-item-194315"]/a/span').Click()

# Enter the keyword to search
$ChromeDriver.FindElementByXPath('//*[@id="s"]').SendKeys('Sharepoint')

# Submit the search
$ChromeDriver.FindElementByXPath('//*[@id="s"]').Submit()

# Find the second search result and click the link
$ChromeDriver.FindElementsByTagName('article')[1].FindElementsByTagName('a')[0].Click()

# Cleanup
$ChromeDriver.Close()
$ChromeDriver.Quit()
Summary
Selenium and PowerShell is a powerful combination to use for browser-based automation. With Selenium and PowerShell, you can automate tasks that can be repeated and write scripts that can be re-used.
In this article, you’ve learned how to get started using Selenium and PowerShell for browser-based web automation. You’ve learned how to inspect elements on a page, located elements, and send actions to the web browser programmatically to perform targeted tasks.
I hope that this article has helped you gain an understanding of Selenium and what it can do when used with PowerShell to create automation scripts. Perhaps a good follow up learning is for you to try making a script that would download or upload files to a website.


