

So an admin just accidentally removed one of your executives’ Office 365 mailboxes or maybe an automation script has gone awry that decided to “clean up” your Office 365 tenant unintentionally. In that case, you’ve got to restore Office 365 mailbox and that’s such a task to do! Why pay big money for expensive software when you can do it for free using some knowledge and a little PowerShell?
In this article, you will learn the different ways to restore or recover a deleted mailbox in Office 365 with real, step-by-step examples.
Requirements
This article will follow a How-To approach. If you plan to follow along with the examples, these are the requirements that must be in place.
- A computer with Windows 10.
- Windows PowerShell 5.1.
- An Office 365 Tenant. If you don’t have this yet or if you want to set up a test tenant, you can request for an Office 365 Trial.
- A global admin or user management admin account in Office 365. This is required to restore a mailbox.
- The Exchange Online PowerShell V2 module must be installed.
- The Azure ActiveDirectory (MSOnline) module must be installed.
“Deleted” Does Not Mean “Gone Forever”
When an Office 365 mailbox is deleted, it is not immediately removed. The deleted mailbox is only hidden and moved to the Soft Deleted Objects container in Office 365. At this point, the mailbox is considered as a Soft-Deleted mailbox.
A soft-deleted mailbox is available for recovery within 30 days. After 30 days, the soft-deleted mailbox will be Hard-Deleted or purged. Once the mailbox has been purged, recovery is no longer possible.
However, if a mailbox was put in litigation hold before it was deleted, the mailbox will become an inactive mailbox and will not be purged, indefinitely.
When you attempt to restore or recover a mailbox in Office 365, note that only Soft-Deleted (including inactive) mailboxes can be restored or recovered. Hard-Deleted mailboxes are permanently deleted and are not recoverable.
These statements aren’t meant to confuse you but to let you know you can get mailboxes back under just about any circumstance!
Using Office 365 Admin Center to Restore Office 365 Mailbox that is Deleted
Before going any further, please make sure that your Office 365 account is assigned with a global admin or user management admin privileges in Office 365. Otherwise, the following steps will not work for you.
Note: The Office 365 Admin Center is now known as the Microsoft 365 Admin Center. But, for the sake of familiarity, we will still refer to it as the Office 365 Admin Center.
Restoring deleted mailboxes can be done from the Office 365 Admin Center. To do so, follow these steps.
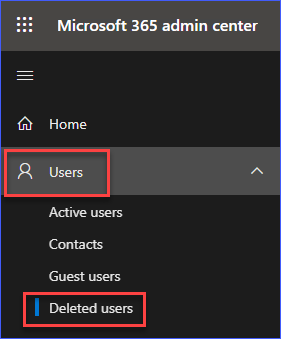
First, using your browser, navigate to the Office 365 Admin Center, and log in using your admin account. Then, on the navigation menu on the left of the page, go to Users —> Deleted Users.
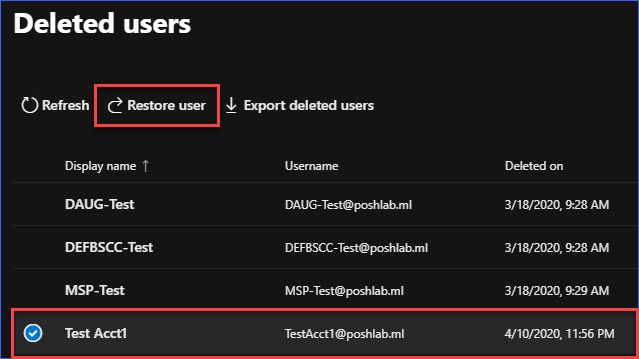
Then, on the Deleted user page, you should see a list of the deleted users that are still available to be recovered. From the list, you can select one or more deleted users and click on the Restore user button.
In the example below, the deleted user with username [email protected] Is selected to be restored.
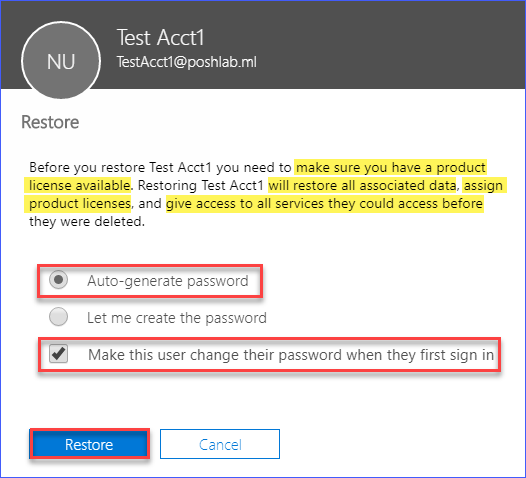
The Restore flyout will show up to present you with options before restoring the mailbox. As you can see from the below, the restoration advises you to make sure that there’s an available product license that will be assigned for the restored user.confirmation page, as
Restoring the mailbox will perform the following actions:
- Restore all associated data.
- Assign product licenses.
- Give access to all services that the user can access before.
Select the options that you deem appropriate or that are compliant with your organization’s policies. After making your selections, click the Restore button.
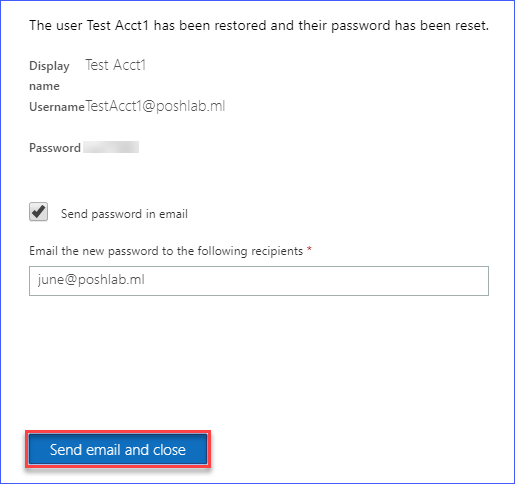
Once the restore operation is complete, you will get a confirmation page as shown below. You can choose to send the new password by email, then click on Send email and close.
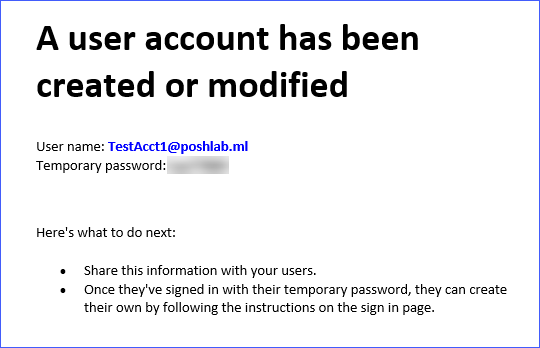
Once done, an email with the user login details that you can then share with the user, similar to the image below.
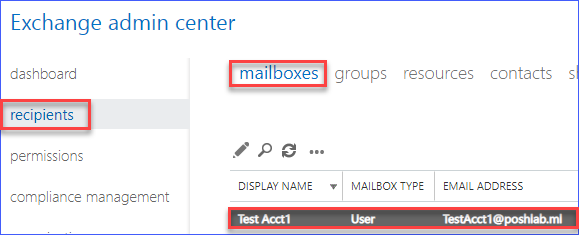
Optionally, you can confirm that the mailbox is restored by checking in the Exchange Admin Center.
As you can see from the screenshot below, the mailbox [email protected] is listed under the available mailboxes list.
Using Azure ActiveDirectory (MSOnline) PowerShell to Restore a Deleted Mailbox
You must have already installed the MSOnline module as a requirement before you can run any of the commands in this section.
First, you must connect to Azure AD using PowerShell. Then, to know details of the user that will be restored, run the command:
Get-MsolUser -ReturnDeletedUsers | Select-Object ObjectID,UserPrincipalName,isLicensedWhen you run the code above, you should get the list of the deleted users that are available for restoration. Take note of the ObjectID value of the user that you need to restore. See the screenshot below as an example.

Then, once you’ve selected the deleted user, you can restore it by using the command below. Make sure to change the <objectid> with the actual ObjectIDof the user object.
Restore-MsolUser -ObjectId <objectid> -AutoReconcileProxyConflictsOnce you run the command above in PowerShell, you should see a similar output, as shown below. In this example, the deleted user to be restored is [email protected].

Then, you can run this next command to confirm that the user was restored as an active user.
Get-MsolUser -ObjectId <objectid>-OR-
Get-MsolUser -UserPrincipalName <UserPrincipalName>As you can see from the screenshot below, the restored user is found.

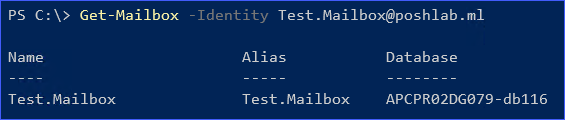
Lastly, to confirm that the mailbox has been restored as well, you can either go to the Exchange Admin Center or Connect to Exchange Online PowerShell. If you prefer to check the mailbox via PowerShell, run this command:
Get-Mailbox -Identity <UserPrincipalName>The screenshot below shows that the mailbox of the restored user has been restored as well.
Using Exchange Online PowerShell to Recover a Deleted Mailbox
Using the Exchange Online PowerShell module, you can also recover a mailbox using just a few commands. In this example, it is assumed that the user account has been deleted, which caused the mailbox to become a soft-deleted mailbox.
First, get the mailbox identity of the soft-deleted mailbox you intend to restore using the command below.
Get-Mailbox -SoftDeletedMailbox | Select-Object UserPrincipalNameAfter running the above command, you should get a list showing the list of the soft-deleted mailboxes with the UserPrincipalName property values.
In this example, the mailbox to be restored is the one with the name [email protected].
Next, run this command below to recover the mailbox. Make sure to replace the <UserPrincipalName> with the actual value of the mailbox UserPrincipalName.
Undo-SoftDeletedMailbox <UserPrincipalName> `
 -WindowsLiveID <UserPrincipalName> `
 -Password `
 (ConvertTo-SecureString -String 'NewP@$w0rd' -AsPlainText -Force)
Once you run the command above, a new user account will be created and the recovered mailbox is linked to the new account. See the example below.
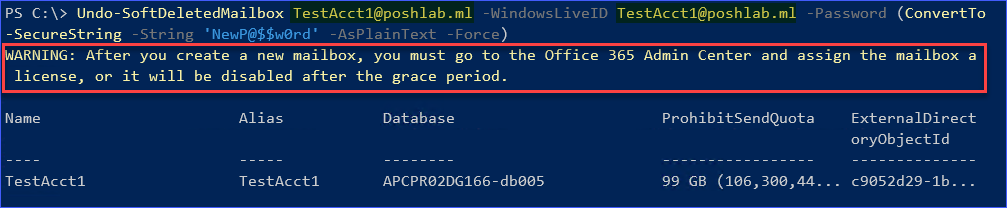
Note: After the mailbox is recovered, you need to assign a product license to the user. Otherwise, the mailbox will be disabled after the 30-day grace period has passed.
Using Exchange Online PowerShell to Restore a Deleted Mailbox
Restoring a soft-deleted mailbox means that you are essentially copying the contents of the soft-deleted mailbox to another mailbox.
Note that in this example, the source mailbox is called TestAcct, and the target mailbox is called reports.
To restore the contents of the soft-deleted mailbox, you first need to get two values.
- The Exchange of the soft-deleted mailbox (source)
Get-Mailbox -SoftDeletedMailbox <MailboxID> | Select-Object Name,ExchangeGUID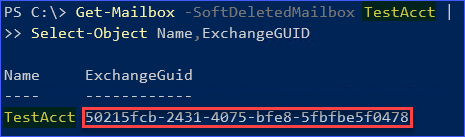
- The ExchangeGUID of the new mailbox (target)
Get-Mailbox <MailboxID> | Select-Object Name,ExchangeGUID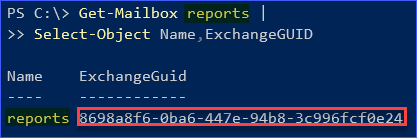
Once you have the required ExchangeGUID values, you can initiate the restore using the command below. Make sure to change the <SourceExchangeGUID> and <TagetExchangeGUID> with the actual ExchangeGUID values of the source and target mailboxes.
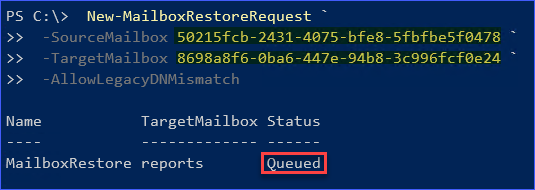
New-MailboxRestoreRequest `
 -SourceMailbox <SourceExchangeGUID> `
 -TargetMailbox <TargetExchangeGUID> `
 -AllowLegacyDNMismatch
After running the command, you should see a confirmation that the restore request has been Queued. See the screenshot for reference.
While waiting for the completion, you can monitor the progress by running this command below.
Get-MailboxRestoreRequest | Get-MailboxRestoreRequestStatisticsThe output of the command above is similar to the screenshot below.

Using Exchange Online PowerShell to Recover an Inactive Mailbox
An inactive mailbox is a type of soft-deleted mailbox that was put in litigation hold before it entered the soft-deleted state. When an inactive mailbox is recovered, a new user account is created, and the inactive mailbox is linked to it.
Before you can recover an inactive mailbox, first, you need to get the ExchangeGUID of the inactive mailbox. Use the command below to get the inactive mailbox details. Note that the InactiveMailboxOnly parameter ensures that only inactive mailboxes are returned.
Get-Mailbox -InactiveMailboxOnly |
 Format-List Name,DistinguishedName,ExchangeGuid,PrimarySmtpAddress
After running the command above, you should see the list of inactive mailboxes. Then, find the ExchangeGUID of the inactive mailbox you wish to recover. See the screenshot below as a reference.

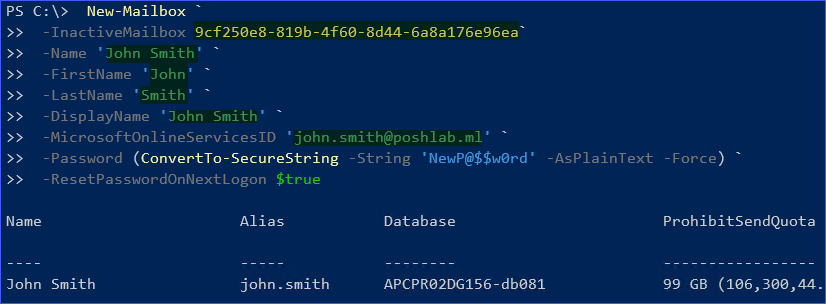
The syntax below shows the minimum required set of parameters to recover an inactive mailbox.
New-Mailbox `
 -InactiveMailbox <InactiveMailboxGUID>`
 -Name <Name> `
 -FirstName <FirstName> `
 -LastName <LastName> `
 -DisplayName <DisplayName> `
 -MicrosoftOnlineServicesID <UPN> `
 -Password (ConvertTo-SecureString -String 'NewP@$w0rd' -AsPlainText -Force) `
 -ResetPasswordOnNextLogon $true
Using the syntax above, replace the <Name>, <FirstName>, <LastName>, <DisplayName>, <UPN> values. After you’ve replaced the appropriate values, run the command in PowerShell as shown below.
Note: After an inactive mailbox is recovered, you need to assign a product license to the user. Otherwise, the mailbox will be disabled after the 30-day grace period has passed.
After completing the recovery, you can confirm that the new mailbox is available by checking in the Exchange admin center or PowerShell as was done in the previous examples. And, if your company policy permits, access the mailbox using Outlook or Outlook on the Web (OWA).
Conclusion
There are several ways to either recover or restore a deleted mailbox in Office 365. These recovery and restore capabilities are built-in to Office 365 and are free to use.
Each method of mailbox restore can be used in specific scenarios where they may apply. Some methods are available in the Office 365 portal, while most are available through the use of PowerShell modules and scripts.
It is up to you to determine which method you deem appropriate to use for the conditions you may encounter when restoring Office 365 mailboxes.


