


PSRemoting is a great way to run commands on remote computers but if you’re not in an Active Directory (AD) domain, authentication is not quite straightforward. PSRemoting in a workgroup requires a few pieces to set up if you don’t have Kerberos available.
In this tutorial, you’re going to learn all of the steps necessary to set up a PSRemoting connection using a username and password from a client and server in a workgroup.
Related: PowerShell Remoting: The Ultimate Guide
Prerequisites
If you’d like to follow along, please be sure you have the following items in place beforehand:
- A Windows 7+ machine to act as a client. This tutorial will be using Windows 10 build 20H2.
- A Windows 7+ machine to act as a server. This tutorial will be using Windows Server 2019.
- Access to an administrative user account on both the client and server.
PSRemoting Workgroup Issues
PSRemoting, in AD, works seamlessly. If the client and server are both domain-joined and you have appropriate rights, you can simply run Invoke-Command and it’ll just work.
Notice below that you only need to use a ComputerName and ScriptBlock parameter. Assuming that PSRemoting is enabled on the server already, it just works.
Invoke-Command -ComputerName SRV -ScriptBlock { Write-Host 'I am running on the remote server.' }Related: Invoke-Command: The Best Way to Run Remote Code
When both the client and the server are joined to the domain, they can use AD to verify that the other is who they say they are. This is baked into the Kerberos authentication method and is used all over the place in an AD environment.
The problems start when you pull the domain out of the mix. Now you only have a way of authenticating the client (with the password) and not a way of authenticating the server. That is a real security problem that we need to fix.
Potential Solutions
To set up PSRemoting in a workgroup requires a couple of different potential solutions; using the trusted hosts list (as covered below) or setting up an HTTPS/SSL connection.
Using trusted hosts, as you’ll see in this tutorial, is the easiest route to go. The client has a list of hostnames or IP addresses that it trusts to connect to. This list allows PowerShell to bypass the typical server validation of the connection.
Using the trusted hosts approach is not recommended in production as it is far less secure than configuring WinRM the “right” way with SSL.
You can also set up WinRM using HTTPS. HTTPS provides a way to authenticate that the server is who it says it say via the certificate used for the HTTPS connection. This is the preferred way, but it does require a public key infrastructure.
While it is possible to use a self-signed certificate for the HTTPS connection, this approach does not validate the server. That self-signed certificate could have come from someone you do not trust.
Setting up PSRemoting in a Workgroup
Although it’s a bit more involved, you still set up PSRemoting in a workgroup. You need to establish trust and configure the firewall before you can connect. Let’s get started using trusted hosts.
Opening up the Firewall
When both the client and server are part of a domain, both will be using the Domain network profile. By default, the Domain network profile allows connections from any subnet. When both client and server are in a workgroup, things change. The machines will either be on a Public or Private network profile which limits traffic.
If both the client and server are running Windows Server and are both on the same subnet, no firewall changes are necessary.
If you are using a client OS for the destination or your client and server are on different subnets, you need to check what network profile you have set. On the server run Get-NetConnectionProfile and you should get an output similar to this.
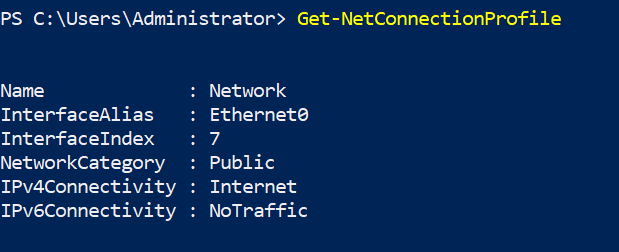
If the network category is set to Public and you are using a client OS, like Windows 10, you have to run Enable-PSRemoting -SkipNetworkCheck. If you are using a server OS, like Server 2019, you do not need to include -SkipNetworkCheck.
If you need to be able to connect from a different subnet with PSRemoting in a workgroup while on a public network, run the below command on the destination computer.
$FirewallParam = @{
    DisplayName = 'Windows Remote Management (HTTP-In)'
    Direction = 'Inbound'
    LocalPort = 5985
    Protocol = 'TCP'
    Action = 'Allow'
    Program = 'System'
		Profile = 'Public'
}
New-NetFirewallRule @FirewallParam
Setting up Trusted Hosts for an HTTP Connection
The trusted host list is a list of hostnames and/or IP addresses that is used by the WinRM client to determine if you trust the server you are attempting to connect to. You can view this list by running the below command.
Get-Item WSMan:\localhost\Client\TrustedHostsThe trusted host list should be a last resort. Adding hosts to this list tells PowerShell you trust these hosts completely. If the server has some way of doing a check for validity either through an HTTPS connection or Kerberos, you should not add it to this list.
Let’s say you try to connect to an untrusted server. If so, you will see the below error message.
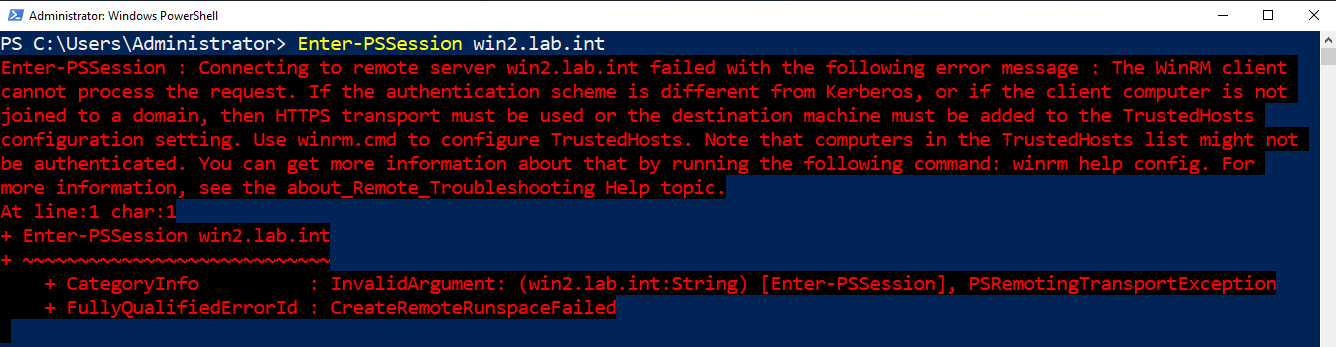
To prevent that error and allow you to connect, add the remote server to the TrustedHosts list by using the Set-Item cmdlet and referencing the WSMAN PowerShell drive as shown below.
The example below is concatenating a remote server called ServerB to the TrustedHosts list. Since the TrustedHosts list can contain many different hosts, using the Concantenate parameter appends the host name rather than overwriting the entire list.
Set-Item WSMan:\localhost\Client\TrustedHosts -Value 'ServerB' -ConcatenateAlways use the individual server name, if possible. You can also use a wildcard like 192.168.1. too. But using a wildcard and trusting all servers automatically isn’t the best security decision.
The only reason you’re adding a host to the
TrustedHostslist is that you’re setting up an HTTP connection. PowerShell has this mechanism in place because authentication methods could be used that exposes the password to the remote server. As a more secure alternative, you can instead set up an HTTPS listener.
You can also clear the list to set it back to nothing by running the below command.
Set-Item WSMan:\localhost\Client\TrustedHosts -Value ''
Enabling PS Remoting on the Server
Although PS Remoting is usually enabled by default, you may have to enable it manually. To enable PS Remoting, log into the server and run the below command in PowerShell:
Enable-PSRemoting -Force
Connecting to the WinRm Server
Once you’ve added the hostname to the trusted hosts list on the client, you should then be able to connect to the server in a workgroup.
To connect to the server, use the Credential parameter on a PSRemoting command like Invoke-Command or Enter-PSSession.
Related: Invoke-Command: The Best Way to Run Remote Code
Be sure to provide a server’s local username and password with rights to connect in the credential provided.
By default, all local users in the Remote Management Users and Administrators group on the server and authenticate to the server over PSRemoting.

Next Steps
Now that you’re all set up with PSRemoting in a workgroup and know the gist of things, why not look into setting up WinRM with HTTPS <link here to the How to Securely Run PSRemoting with WinRM and SSL article> or really dig into PSRemoting by taking a look at the PowerShell Remoting Ultimate Guide post?


