

If there was a command-line utility that could compete with robocopy in terms of usefulness, it’s PsExec. The Sysinternals PsExec utility is as ubiquitous as they come in an IT admin arsenal. This tool allows administrators to remotely run commands just as if they were on the local computer.
To cover the PsExec tool in depth, it was fitting to cover this coveted tool in an ATA Ultimate Guide. In this guide, you will learn what psexec is, what it’s capable of any many examples of how to use this useful tool.
What is PsExec.exe?
If you’re new to IT or perhaps haven’t had the need to run commands and tools on remote computers, you might not know what psexec is.
PsExec or psexec.exe is a command-line utility built for Windows. It allows administrators to run programs on local and more commonly remote computers. It is a free utility part of the Sysinternals pstools suite built by Mark Russinovich many years ago.
It was built to replace tools like telnet that forced you to open up ports and introduce security vulnerabilities. Nowadays, we have other options like PowerShell Remoting and the Invoke-Command PowerShell cmdlet but PsExec still has its place.
PsExec allows full interactivity for console application without having to install any software. As you’ll see through this Ultimate Guide, PsExec can launch interactive command prompts, run as local system on remote computers, run commands on multiple computers at once and more.
It supports all versions of Windows since Windows XP. That means, that yes, PsExec on Windows 10 is a thing too. It’s a simple tool to run that works on nearly everything but don’t confuse its simplicity with its capabilities!
Prerequisites
You simply need to be running a modern Windows operating system for PsExec to run on your local computer. However, you’re going to want to run psexec against remote computers. To do that, you’ll need to ensure a few items are in place.
If you don’t have these items in place now or unsure, don’t worry. In the next section, we’ll cover how to write some PowerShell to test your remote computers.
- A modern Windows computer (local)
- File and Printer Sharing open (remote computer, TCP port 445)
- The admin$ administrative share available (remote computer)
- You know a local account’s credential (remote computer)
As of this writing, PsExec is at v2.2 and will be the version you’ll be learning about in this article.
Installing PSexec (With Remote Computer Setup)
Technically, you don’t install PsExec since it’s just a command-line utility but close enough. Since no installation is necessary, you simply need to download and extract it from the PsTools zip file. PsExec isn’t available as a standalone utility and is part of the PsTools suite of tools.
Downloading PSExec
You can either extract the ZIP file manually or here’s a handy PowerShell snippet to download and extract PsExec from its pstools ZIP file. Note that this removes all of the other PsTools tools. Many are still handy but we’re not going to cover those in this article.
PS> Invoke-WebRequest -Uri 'https://download.sysinternals.com/files/PSTools.zip' -OutFile 'pstools.zip'
PS> Expand-Archive -Path 'pstools.zip' -DestinationPath "$env:TEMP\pstools"
PS> Move-Item -Path "$env:TEMP\pstools\psexec.exe" .
PS> Remove-Item -Path "$env:TEMP\pstools" -Recurse
Remote Computer Configuration
Once you have PsExec downloaded, you’ll then need to ensure any remote computer you’re going to run it on is open. PsExec has simple requirements; File and Printer Sharing enabled and the admin$ administrative share available.
You could go to all of the remote computers, open up the Windows Firewall applet, go to Allowed Apps and enable File and Printer Sharing on all computers as you see below.
Note that File and Printer Sharing is a known security risk so ensure only the Private firewall profile is enabled.

Or you could visit each computer and run the netsh utility to open it up via:
> netsh advfirewall firewall set rule group="File and Printer Sharing" new enable=YesOr you could use PowerShell’s Set-NetFirewallRule cmdlet to do it.
PS51> Set-NetFirewallRule -DisplayGroup "File And Printer Sharing" -Enabled True -Profile PrivateIf you’d rather not visit each computer, you have PowerShell Remoting available and you’re in an Active Directory domain, you could also open up the firewall on many computers at once using the Invoke-Command cmdlet.
PS51> Invoke-Command -ComputerName PC1, PC2, PC3 -ScriptBlock { Set-NetFirewallRule -DisplayGroup "File And Printer Sharing" -Enabled True -Profile Private }Using PsExec
Before you can run, you need to walk. If you’ve never used PsExec before, you’re in for a treat! Be sure to read this section first to get your feet wet to learn the basics before jumping in the deep end later in this article.
The first time you run PsExec on a new system, you will immediately see the PsExec license agreement come up. You’ll have to click on the Agree button to begin using it.

If you’d like to prevent the license agreement from being displayed, you can silently accept it using the /accepteula switch as shown below.
> psexec /accepteulaYou’ll learn a few tricks at silencing this EULA popup on local and remote computers later in the article.
Finding Help
When exploring PsExec, you shouldn’t use any switch at all. When you simply run psexec with no switches, it will return all options and a brief explanation of what each does. All of the options are in the below table for your convenience.
| Switch | Explanation |
|---|---|
| -a | Separate processors on which the application can run with commas where 1 is the lowest numbered CPU. For example, to run the application on CPU 2 and CPU 4, enter: “-a 2,4” |
| -c | Copy the specified program to the remote system for execution. If you omit this option the application must be in the system path on the remote system. |
| -d | Don’t wait for process to terminate (non-interactive). |
| -e | Does not load the specified account’s profile. |
| -f | Copy the specified program even if the file already exists on the remote system. |
| -i | Run the program so that it interacts with the desktop of the specified session on the remote system. If no session is specified the process runs in the console session. Some have reported best results always using the -s switch with -i due to windows being unintelligible. |
| -h | If the target system is Vista or higher, has the proc |
| -l | Run process as limited user (strips the Administrators group and allows only privileges assigned to the Users group). On Windows Vista the process runs with Low Integrity. |
| -n | Specifies timeout in seconds connecting to remote computers. |
| -p | Specifies optional password for user name. If you omit this you will be prompted to enter a hidden password. |
| -r | Specifies the name of the remote service to create or interact. with. |
| -s | Run the remote process in the System account. |
| -u | Specifies optional user name for login to computer. |
| -v | Copy the specified file only if it has a higher version number or is newer on than the one on the remote system. |
| -w | Set the working directory of the process (relative |
| -x | Display the UI on the Winlogon secure desktop (local system only). |
| -arm | Specifies the remote computer is of ARM architecture. |
| -priority | Specifies -low, -belownormal, -abovenormal, -high or |
| -realtime | run the process at a different priority. Use |
| -background | run at low memory and I/O priority on Vista. |
| computer | Direct PsExec to run the application on the computer or computers specified. If you omit the computer name PsExec runs the application on the local system, and if you specify a wildcard (\*), PsExec runs |
| @file | PsExec will execute the command on each of the computers listed in the file. |
| -accepteula | This flag suppresses the display of the license dialog. |
| -nobanner | Do not display the startup banner and copyright message. |
Running a Simple Remote Command
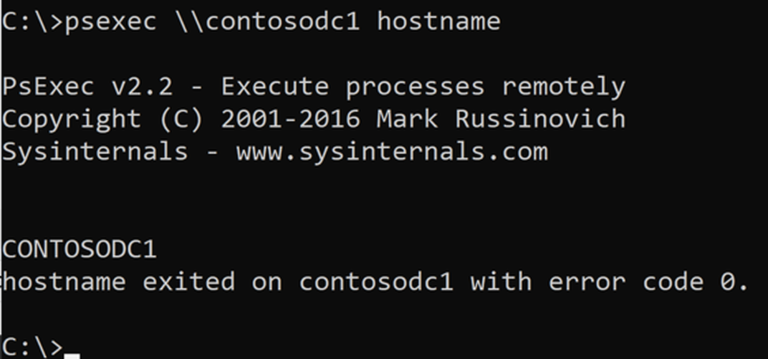
At its most basic, PsExec requires two parameters: a computer name and a command to run. If you have a command to run on the remote computer that doesn’t require any arguments like hostname, you can simply add it after the computer name.
Note that if you don’t specify a full file path, the command to run must be in the user or system path. Also, if you have a program with spaces in the name, you can always enclose the program in spaces such as “my application.exe”.
> psexec \\REMOTECOMPUTER hostnameYou can see below that to execute the hostname command on the CONTOSODC1 computer, you define it’s UNC path followed by the command. PSExec will then connect to the remote computer securely, execute the command and return the output. In this case, the hostname command returned the hostname of the computer which is CONTOSODC1.
If the command isn’t cmd or another console, PsExec will quickly exit the remote session and return the exit code the remote process returned.
Note: The error or exit code returned from psexec is not coming from PsExec itself. Instead, it’s coming from the command that psexec executed on the remote computer.

How PsExec Works on Remote Computers
PsExec goes through a few steps to execute programs on remote computers.
- Create a PSEXESVC.exe file in C:\Windows.
- Create and start a Windows service on the remote computer called PsExec.
- Execute the program under a parent process of psexesvc.exe.
- When complete, the PsExec Windows service will be stopped and removed.
When the process doesn’t work 100% correctly you may have to manually remove the service using the sc command.
Running a Simple Local Command
Even though PsExec is best known for running commands on remote computers, you can also run commands locally.
You can run commands locally by simply not providing a computer name like below.
> psexec <local command or EXE file>Why would you do this? One reason would be to execute commands as the local SYSTEM account. You can use the -s switch to run any command as SYSTEM locally or remotely as you’ll learn more about later.
Take a look at the short video below. Notice that you simply need to provide the -s switch along with the command interpreter executable for psexec to launch a new command session as NT AUTHORITY\SYSTEM.

PsExec Commands (Getting More Advanced)
Once you’ve got the basics down, you can then start learning more advanced techniques in psexec. PsExec can do a lot more than just run a single command on a single computer.
Running commands on multiple computers
PsExec isn’t just limited to running commands on one remote computer at a time. This tool also has support to copy programs and run commands on multiple computers at once.
You can run PsExec on multiple computers at once a few different ways.
Comma-separated Computer Names
Typically when running a command on a single remote computer, you will specify a single computer name like \\REMOTECOMPUTER. You can also specify multiple computers separated by commas like below.
> psexec \\REMOTECOMPUTER1,REMOTECOMPUTER2,REMOTECOMPUTER3All Computers in an Active Directory Domain
If you’re running PsExec on an Active Directory domain-joined computer and you’d like to blast out a command execution on all computers in that domain, use a wildcard.
PsExec will search your entire Active Directory domain and attempt to run a command on every computer. Below is example syntax on how PsExec will attempt to connect to every computer on the domain the executing computer is a part of and run the hostname command.
> psexec \\* hostname

PsExec v2.2 - Execute processes remotely
Copyright (C) 2001-2016 Mark Russinovich
Sysinternals - www.sysinternals.com

Enumerating domain...
Note that if you use an asterisk to find all computers in a domain while the local computer is part of a workgroup, you will receive the error
A system error has occurred: 6118.
Using a wildcard forces PsExec to essentially run the command net view /all to first find all computers in the domain. This is an outdated way to find computer information due to its dependency on NetBIOS.
Reading from a File
Another way you can run commands on multiple computers at once is to use a text file. Using the syntax @<filename.txt>, PsExec will read every line in the text file as if it were a computer name. It will then process each computer individually.
Below you can see an example of using PowerShell to create a text file of line-delimited computer names and using that as input for psexec.
PS51> (Get-AdComputer -Filter *).Name | Out-File computers.txt
PS51> psexec @computers.txt hostname
Copying local programs to the remote computer
Using the -c switch, psexec will copy any local program to the remote computer prior to execution.
Perhaps you have an EXE on your local computer in a C:\Tools folder and would like to run it on a remote computer. You can do so using the following syntax:
> psexec \\REMOTECOMPUTER -c C:\Tools\program.exeWhen you use the -c switch and don’t specify an executable file, PsExec will still copy the file but you’ll receive an error stating system cannot find the file specified. This happens because PsExec will always attempt to run the file you copy.
If you need to copy files to remote computers prior to using PsExec, use the Copy-Item PowerShell cmdlet instead.
Running Remote Processes under Alternate Credentials
Another popular use case of PsExec is to run commands under alternative accounts. By default, PsExec will attempt to connect to the remote computer under your currently-logged-in account. More specifically, it will impersonate your account on the remote computer.
Using the -u and optional -p switch allows you to connect to the remote computer with an alternative user account. PsExec will then encrypt both the username and password and send them to the remote computer for authentication.
For example, if you’re in a workgroup, you’ll always need to specify the username to authenticate to the remote computer as.
> psexec \\REMOTECOMPUTER hostname -u localadmin -p secret-p@$$wordIf both computers are a member of Active Directory, be sure to preface the user account with the domain name.
> psexec \\REMOTECOMPUTER hostname -u contoso.local\domainadmin -p secret-p@$$wordNote that when you do not use the -u switch, psexec impersonates your logged-in account on the remote computer. It will not have access to any network resources.
Running Processes as the LOCAL SYSTEM Account
One of the most useful features of running PsExec under an alternative account is using the -s switch. This switch allows PsExec (and your remotely-executed application) to run under the remote (or local) computer’s LOCAL SYSTEM account.
Notice below I didn’t include a remote computer name. PsExec will just as gladly run on the local computer as well. In this instance, I’m using the -s option to tell PsExec to launch a local command prompt as the LOCAL SYSTEM account.

To run a command prompt as LOCAL SYSTEM on a remote computer, add the computer name to the reference like below:
> psexec -s \\REMOTECOMPUTER cmdLaunching GUI Applications Remotely
Another useful PsExec switch is -i. By default, PsExec does not allow the remotely-executed command to bring up any windows on the remote computer. This is helpful because if you’re executing commands remotely, you’re not going to see the screen anyway.
But perhaps you need to bring up programs for your users. You personally won’t be using the application but an end-user will. In that case, use the -i switch.
Maybe you need to bring up a notepad window on a remote computer. Not a problem. Run notepad.exe with the -i switch and PsExec will open up Notepad.
> psexec -i \\REMOTECOMPUTER notepad
Be sure to also use the -d switch to disconnect when the interactive window is brought up though. By default, PsExec will wait for the process it executed to complete. If the remote process (Notepad in this case) is kept running, PsExec will never return control.
Using the -d switch with -i will tell PsExec to not wait for the remote process to finish. Instead, it will disconnect and return control to you as soon as the remote process is executed.
Redirecting Output
Psexec will rely any output sent from the remote process to your local session. Typically, this output will go directly to your local console. But if you’d like to redirect it, you can do so using typical redirection operators.
For example, if you’d like to run a command and silence all output, you could redirect output and errors to null using ^> nul ^2^&1.
Note the special characters are escaped with a hat. (
^).
PsExec Use Cases
Once you’ve learned how to use psexec, you’ll inevitably come across various specific use cases. In this section, you’ll learn some real-world use cases and examples using psexec.
Launching a Remote Command Prompt (psexec cmd)
One of the most common use cases is launching PsExec as an interactive command prompt. PsExec doesn’t just run commands remotely. It can also send command output back to your console. Because of this, it can make a great telnet (if anyone is still using that) or perhaps PowerShell Enter-PSSession replacement.
To launch a remote command, specify the remote computer name and run the cmd application. Cmd is the Windows command interpreter. Since PsExec supports interactive use, it will gladly return a flashing cursor and a prompt.
> psexec \\REMOTEPC cmd
At this point, the world is your oyster. You can run commands on your local computer via this “nested” command prompt and they will be executed on the remote computer.
To exit from the command prompt, type exit. PsExec will stop the cmd process on the remote computer and return focus to the local computer.
Do NOT use Ctrl-C to close out of an interactive cmd session. Always use
exit. If you use Ctrl-C, the psexec session will remain running on the remote computer.
Installing Software Remotely
You can use PsExec as a poor-man’s software deployment tool. Perhaps you have an MSI installer that you need to run on one or more remote computers called setup.msi. This installer needs to be copied to the remote computers and then executed with the msiexec.exe utility with a few switches.
Below is an example of how you could use PsExec to remotely deploy software. This example copies setup.msi to the remote computer then launches the MSI installer interactively on as the SYSTEM account.
> psexec.exe \\REMOTECOMPUTER –i –s "msiexec.exe /i setup.msi" -c setup.msiAccepting the EULA without the /accepteula switch
As mentioned earlier, the first time PsExec runs, you’ll have to accept a EULA. You could use the /accepteula switch but you could also “stage” it in the registry.
When launched for the first time, PsExec creates a registry key at HKCU\Software\Sysinternals\PsExec. Instead of that registry key, it creates a registry value called EulaAccepted with a DWORD value of 1.
Using your favorite method to modify the registry on remote computers, you simply need to create this key/value on computers you’d like to run PsExec on. Once created, no need to run /accepteula!
Marrying PowerShell and PsExec
Before PowerShell, all we had was PsExec. Now, we have options. PowerShell can replace PsExec in many situations but complement it in others.
Building Computer Names with PowerShell
Instead of using \\* to find all computers in the domain, you can use PowerShell instead. By using PowerShell, you can not only pick certain computers but you don’t have to use the firewall-prone net view /all behavior.
You can use PowerShell to create a string containing all computer names separated by a comma. You can then pass that string to PsExec which will merrily process each one like you typed each one manually.
You can see below an example of using the Get-AdComputer cmdlet part of the ActiveDirectory PowerShell module.
PS51> psexec "\\$((Get-AdComputer -Filter *).Name -join ',')" hostnameEnabling PowerShell Remoting Remotely
If you have remote computers you’d rather use PowerShell Remoting with instead of PsExec, you can use PsExec to enable them.
By running Enable-PSRemoting or the winrm.cmd batch file on remote computers, you can quickly turn on PowerShell Remoting across many computers at once.
Below you can see an example of calling the winrm.cmd batch file on a remote computer running as the SYSTEM account. Because the output from that command isn’t needed, it’s silenced with 2>&1> $null.
$computerName = 'REMOTECOMPUTER'
psexec "\\$Computername" -s c:\windows\system32\winrm.cmd quickconfig -quiet 2&>&1> $null
PsExec Error Messages
It’s worth mentioning again upfront that most error codes you see returned from PsExec are from the remote process; not from PsExec. But it’s helpful to have an understanding of these error codes and what they might mean.
If you’d like a reference on all Windows error codes, I recommend checking out this exhaustive list of Windows error codes.
Below is a list of common error codes you may see returned by PsExec.
| Error Code | Explanation |
|---|---|
| -2146232576 | Typically returned by Windows Update when an error occurs. |
| 0 | Command executed successfully |
| 1 | Incorrect function. A problem happened. That’s about it. |
| 1603 | Fatal error during installation. This typically is returned by msiexec. |
| 2 | The system cannot find the file specified |
| 4 | The system cannot open the file. |
| 5 | Access is denied. |
| 6 | The handle is invalid. |
| 6118 | The list of servers for this workgroup is not currently available |
Your Feedback
ATA Ultimate Guides are big. There’s a lot of information in these and I’m bound to miss a thing here or there or make a mistake. If you notice anything wrong or think something should be added to this guide, please let me know via the comments. I’d be happy to credit you in the post.
Credits
- Thanks to Mathias (comments) for numerous feedback.


